Since the previous tutorial was a bit vague, I decided to make this guide so you won’t have to research like I did.
As per usual, this is a tutorial on the internet. Do anything you see here at your own risk. I am not responsible if anything goes wrong.
This tutorial couldn’t have been possible without:
Fernando, for the Win-Raid Forum,
shixinyuan, for their original mod,
htpcfans, for their research,
plutomaniac, for their ME guide and archive,
ProIIIu3Hb, for their PIII Discord server,
dsanke, for being a BIOS modding god,
Droidbot and ylp1194045441, for helping me with the guide,
CodeRush for their original SPI tutorial, and
deftdawg, for their original SPI tutorial.
This guide is intended only for motherboards with a 100-series chipset. It may or may not work on your 200-series motherboard. For example, my Asus PRIME Z270-AR would not restart with my QL32 installed. It will not work on a 300-series motherboard. It will not work on any Gigabyte motherboards.
This guide makes several references to my SPI flashing guide, so I highly recommend reading it first here: [GUIDE] The Beginners Guide to Using a CH341A SPI Programmer/Flasher (With Pictures!)
Part Zero: Equipment Required
1. SPI Programmer (CH341A recommended) with SOIC8 Test Clip
2. Non-Xeon CPU (optional)
Note: I recommend using an SPI Programmer to flash your modded BIOS, to ensure that the ME region is correctly overwritten. Some motherboards (AsRock, MSI, etc) have no issue with Instant Flash within the BIOS, but your mileage may vary. Additionally, Asus motherboards must be flashed through an SPI programmer. An SPI is also useful if the mod fails and you cannot boot.
Note: If you are intending on running an Engineering Sample CPU (ES), take the necessary precautions to check the correct microcode is in the BIOS you flash. If you are running an ES, it is very important that you already know how to do basic things like this, and take whatever other precautions are necessary.
Part One: Obtaining the BIOS
Method One: For Asus motherboards or for those who wish to dump their own BIOS
Since Asus motherboards require board-specific information to be manually added to any BIOS from their website before it can be flashed externally, it is recommended to backup the existing BIOS to use as the base for your modded one. Other motherboards work with this technique as well.
To do this, connect your SPI Programmer and load Flashrom as detailed in my Programming guide above. Then, run the following command:
sudo flashrom --programmer ch341a_spi -r backup.bin
Once it is complete, you are ready for the next step.
Method Two: Manufacturer-provided BIOS
Go to your motherboard manufacturer's website and download a BIOS that supports your CPU. If you have multiple options, pick the one for Instant Flash within the BIOS. Once it's downloaded, you're ready for the next step.
Part Two: Modding the BIOS
Download the Intel CSME System Tools v11 r19 package from this post (scroll down a bit):
Intel Management Engine: Drivers, Firmware & System Tools
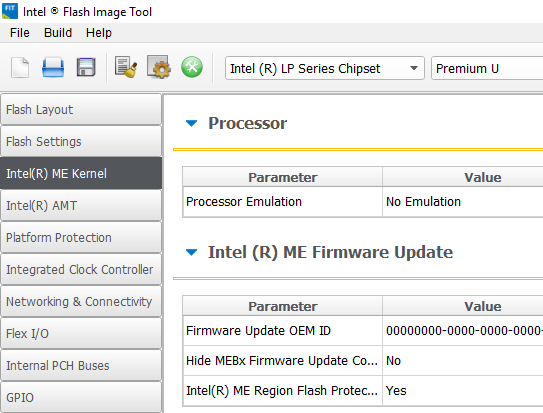
Navigate to the folder that contains the Intel Flash Image Tool program, and run it.
Then, select the 'ME Kernel' option from the left hand side. It should look like this:
Scroll down until you find the setting called ‘Reserved’. When you do, double click ‘No’, to change it to ‘Yes’. It should go from this:

To this:
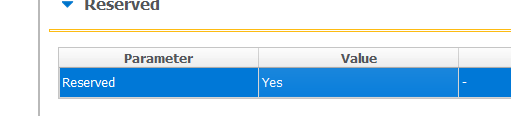
With no issue.
When you are done, go to the ‘Build’ menu on the top, and select ‘Build Image’. Congratulations! Your modded BIOS is now in the FIT folder. It’s the file called ‘outimage.bin’.
Part Three: The Flash
Method One: Instant Flash
Boot your motherboard with a non-Xeon CPU, and load your modded BIOS into the Instant Flash menu. If it works with your Xeon, great! You can skip to the next section of the guide. As mentioned before this will not work on Asus motherboards.
Method Two: SPI Programmer
Load Flashrom under Linux again, as shown in my SPI Programming guide above. Next, after your Programmer and chip are connected, run the following command to flash your BIOS, inserting your BIOS image’s name:
sudo flashrom --programmer ch341a_spi -w <new bios name>
Now your Xeon should work! If not, let me know by replying here and I'll see what I can do.
Part Four: Aftercare
Once your mod is confirmed to work, go to the Intel CSME Tools package you downloaded, and open a command prompt in the 'WINDOWS64' folder of the Flash Programming Tool. Then, execute this command to reset the ME co-processor:
fptw64 -greset
Since the mod has modified the BIOS heavily, take care not to update it in the future. If there is a major reason to do the upgrade, you will most likely have to perform the mod again. Also, some motherboards will hang briefly at boot, or display an error message about an abnormality in the ME Region. This is expected and normal, and a caveat of the mod.
EDIT by Fernando: Thread title shortened (was too long)