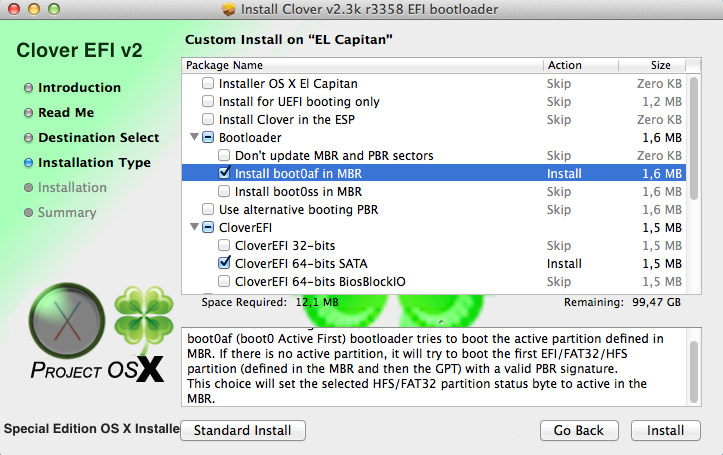
UEFI DUET Installer - REFIND boot manager
PREVIEW
ATTENTION!
By using these files YOU WILL BE SOLELY RESPONSIBLE FOR ANY TYPE OF DAMAGE !!!
• Current download link for DUET (EDK2015) with REFIND included
PROPRIETARY FILE SYSTEM
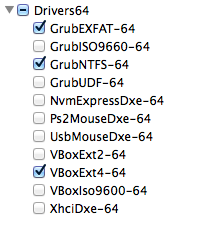
In case the OS uses some specific type of partition or the UEFI OS installer is not showing up in REFIND: You'll might find the right driver inside the binary release of REFIND
To add the DXE, unpack the .EFI driver within the drivers directory located in /EFI/Boot/drivers of the DUET USB: REFIND will auto load them for you.
What's new (20-06-2020) major fixes:
1
2
3
4
2
3
4
UTILITY: Adjusted the cluster count to FAT32 value.
DUET: Added VT-x/nested page table - booting\memory segmentation multi processor support.
• Current download link for DUET (EDK test Build 2020) with REFIND included
HOW to MAKE THE USB flash drive ( bootable ) for DUET.
Booting the NVME drive from non-UEFI legacy board - DUET with optional REFIND - with USBSetup:
• 1) Connect a USB flash drive and start the USBSetup application
• 2) Select the USB flash drive letter from the drop-down combo box
Warning.
The following step will completely remove all information and partitions on the selected USB flash drive
• 3) Remove all information and partitions from the drive by clicking on: CLEAN
• 4) Format the selected drive by clicking on: FORMAT
• 5) Make the selected drive bootable by clicking on: BOOT
• 6) Copy the required DUET files by clicking on: DUET
• 7) Copy the optional graphical boot manager REFIND by clicking on: REFIND
• 8) Connect the USB on the target system and set Boot from USB as the first option in your system BIOS Boot order
Booting the NVME drive from non-UEFI legacy board - DUET with optional REFIND - from command line:
• 1) Connect a USB flash drive and open the Windows Command Prompt with the Run as Administrator option
• 2) In the command prompt CD to the DUET_UDK2019_REFIND folder: cd C:\DUET_UDK2019_REFIND
Warning.
The following command will completely remove all information and partitions on the selected DISK volume
Replace the Drive_Letter: with the USB flash drive letter.
• 3) Remove all information and partitions from the selected DISK volume by typing: CreateUSB Drive_Letter: CLEAN
• 4) Optional format the selected DISK volume with: CreateUSB Drive_Letter: FORMAT
• 5) Make the selected DISK volume bootable by typing: CreateUSB Drive_Letter: BOOT
• 6) Disconnect and plug back the USB flash drive.
• 7) Copy the required DUET files with: CreateUSB Drive_Letter: DUET
• 8) Copy the optional graphical boot manager REFIND: CreateUSB Drive_Letter: REFIND
• 9) Connect the USB on the target system and set Boot from USB as the first option in your system BIOS Boot order
HOW to MAKE THE USB flash drive (non-bootable) for REFIND.
Booting the NVME drive from UEFI capable board - REFIND mass-storage without DUET - with USBSetup:
• 1) Connect a USB flash drive and start the USBSetup application
• 2) Select the USB flash drive letter from the drop-down combo box
Warning.
The following step will completely remove all information and partitions on the selected USB flash drive
• 3) Remove all information and partitions from the drive by clicking on: CLEAN
• 4) format the selected drive by clicking on: FORMAT
• 5) Copy the graphical boot manager REFIND by clicking on: REFIND
• 6) Connect the USB on the target system and set Boot from USB as the first option in your system BIOS Boot order
Booting the NVME drive from UEFI capable board - REFIND mass-storage without DUET - from command line:
• 1) Connect a USB flash drive and open the Windows Command Prompt with the Run as Administrator option
• 2) In the command prompt CD to the DUET_UDK2019_REFIND folder: cd C:\DUET_UDK2019_REFIND
Warning.
The following command will completely remove all information and partitions on the selected disk volume.
Replace the Drive_Letter: with the USB flash drive letter.
• 3) Remove all information and partitions from the selected DISK volume by typing: CreateUSB Drive_Letter: CLEAN
• 4) Optional format the selected DISK volume by typing: CreateUSB Drive_Letter: FORMAT
• 5) Copy the graphical boot manager REFIND: CreateUSB Drive_Letter: REFIND
• 6) Connect the USB on the target system and set Boot from USB as the first option in your system BIOS Boot order
※ NOTE
• Ensure no other DUET USB KEY are inserted while booting
※ Know to BOOT -- TESTED
VIRTUAL BOX inside VM WARE on INTEL VT-x
1
2
3
4
2
3
4
DUET EDK2015 -- BOOT
DUET EDK2020 -- BOOT
INTEL DX58SO2
1
2
3
4
2
3
4
DUET EDK2015 -- BOOT
DUET EDK2020 -- BOOT
※ CHANGELOG:
(06-06-2020)
1
2
2
DUET: Reverted the SMBIOS memory mapped table reporting for older hardware support.
(16-03-2020)
1
2
3
2
3
DUET: Added VM (Virtual Box) support, changed the platform boot timeout - Updated the EFI Shell.
REFIND: Removed string print for empty boot option.
(07-03-2020)
1
2
3
2
3
REFIND: Updated to build 1.0.5 - Changed the timeout behavior.
USBSetup: Updated the non-standalone graphical user interface USBSetup ver.1.0.3.2 - Fixed diacritics in file path. Added -GenBootLOG command switch.
(27-02-2020)
1
2
3
2
3
USBSetup: Updated the non-standalone graphical user interface USBSetup ver.1.0.3.0
REFIND: Added internal build versioning. Build note: 1.0.4: Fixed an issue on pointer removal. Updated LodePNG encoder/decoder. Removed unused OSX code.
(13-02-2020)
1
2
3
2
3
USBSETUP: Updated the non-standalone graphical user interface USBSetup ver.1.0.1.8
CREATEUSB: Changed the folder structure and updated the scripted process.
(28-10-2019)
1
2
2
DUET: Changed the NonPaged low limit to 1MB
(24-10-2019)
1
2
2
DUET: Added BIOS Block IO to support INT 13 devices (EDD)
(01-10-2019)
1
2
2
DUET: Extended the EFI_GRAPHIC_OUT_PROTOCOL for native resolution support
(30-4-2018)
1
2
2
USBSETUP: Updated the non-standalone graphical user interface USBSetup ver.1.0.1.4
(08-4-2018) :
1
2
2
USBSETUP: Added the non-standalone graphical user interface USBSetup ver.1.0.0.1
(14-12-2017)
1
2
3
2
3
DUET: Comprehensive stability update to the DXE handles and dependent CPU library, updated core module to EDK2
REFIND: Added handled mouse and keyboard driver. Should give less problem with USB switches / KVM
(11-12-2017)
1
2
2
DUET: Improved NVME boot performance / execution time
(10-12-2017)
1
2
3
4
2
3
4
DUET: Updated the USB bus
DUET: Added OHCI ( firewire IEEE 1394 ) DXE driver
REFIND: Changed the file format of the screenshot functionality in PNG
(08-12-2017)
1
2
3
2
3
REFIND: Optimized the on screen draw & clear function
REFIND: Fixed the screenshot functionality ( F10 -> DUET_USB\\EFI\Screenshot )
※ ADDITIONAL INFO
• The CreateUSB.bat came from KeshavA2016 "Tianocore Uefi Duet Installer" project, it has been adapted by me.
• The Bootsector files came from from UDK2017 DuetPkg, a copy of the BSD license can be found within the Licenses directory.
• The Binaries files are built with UDK2017 Basetools, a copy of the BSD license can be found within the Licenses directory.
• The "shellx64.efi" is built with UDK2017 Basetools, a copy of the BSD license can be found within the Licenses directory.
• Added REFIND as OPTIONAL BOOT MANAGER see changelog for changes, a copy of the GNU license can be found within the Licenses directory.
• Added the Google Material Design icons in REFIND Minimal theme, a copy of the APACHE 2.0 license can be found within the Licenses directory.
• Added the non-standalone graphical user interface ( USBSetup ) to manage the USB of DUET/REFIND.
• SPECIAL THANKS TO: @SkOrPn for all the testing and the HOW-TO VIDEO&BOOTING PROCESS!
• THANKS to @eierhals for the testing done on the AMD platform and suggestion leading to additional fixes!
USBSetup PREVIEW
CMD HELP
VIDEO HOW-TO (CMD) By @SkOrPn
(video is outdated follow the textual procedure)
DUET-REFIND BOOT PROCESS By @SkOrPn
※ How to CLEAN install WINDOWS 10
• Download the windows 10 media creation tool and make the WIN10 ESD-USB directly from the media creation tool.
• Boot the PC with the DUET USB connected and wait for it to reach the graphical boot manager.
• Connect the WINDOWS 10 ESD-USB and refresh the visual representation list by hitting the ESC keyboard KEY to make the "Boot Fallbcak boot loader from ESD-USB" option appear.
• Launch the EFI WINDOWS 10 installer from the WINDOWS 10 ESD-USB by selecting the "Boot Fallbcak boot loader from ESD-USB".
• Select CUSTOM: Install Windows only (advanced) on the next screen delete all the partition till the NVME drive show as "Drive 0 Unallocated Space" and select NEXT, YES, NEXT.
• Once the Windows Setup screen end copying and installing Windows disconnect the WINDOWS 10 ESD-USB before it self-reboot. On some legacy board this is required.
※ ERROR HANDLING
If the NVME become un-bootable it mean the PC is not booting from the DUET USB.
If the NVME doesn't appear as selectable disk there could either be an broken\hidden hybrid partition or hardware issue locking the EFI installer read access, on WINDOWS 7 a driver must be provided.
To delete an hidden partition and rebuild the disk layout use the DISKPART CLEAN parameter from a command prompt, recovery environment or by when in another WINDOWS OS connected as non-bootable storage.
• With only the NVME inserted.
• Boot the PC with the DUET USB connected and wait for it to reach the graphical boot manager.
• Connect the WINDOWS 10 ESD-USB and refresh the visual representation list by hitting the ESC keyboard KEY to make the "Boot Fallback boot loader from ESD-USB" option appear.
• Launch the EFI WINDOWS 10 installer from the WINDOWS 10 ESD-USB by selecting the "Boot Fallback boot loader from ESD-USB".
• Instead of "Install now" select "Repair your computer" > Troubleshoot > Command Prompt
• In the "Command Prompt" type;
1
2
3
4
5
6
7
8
9
10
11
12
13
2
3
4
5
6
7
8
9
10
11
12
13
DISKPART

LIST DISK

SELECT DISK <DISKNUMBER> (should be 0 without <> if no other DISK are connected )

CLEAN

EXIT

EXIT
• Select "Turn off your PC" and detach the WINDOWS 10 ESD-USB.
• See How to CLEAN install WINDOWS 10 again from the start.
RAID and TIPS OLD - TO BE DELETED
※ How to install WINDOWS 7
• Extract\copy the [DUET_ZIP_VERSION]\Refind\drivers\ntfs.efi to the [DUET|USB]\EFI\Boot\drivers folder and connect the USB on the target system.
• Download the Windows USB/DVD Download Tool & follow the on-screen instruction.
• Once the Windows USB/DVD Download Tool is done locate the [WIN7|USB]\efi\ directory and within create a new [WIN7|USB]\efi\boot folder.
• Extract\copy and RENAME from the [WIN7|ISO]\sources\install.wim\1\Windows\Boot\EFI\bootmgfw.efi to the [WIN7|USB]\efi\boot\bootx64.efi new folder.
• Boot the PC with the DUET USB connected and wait for it to reach the graphical boot manager.
• Connect the WINDOWS 7 USB and refresh the visual representation list by hitting the ESC keyboard KEY to make the "Boot Fallbcak boot loader from NTFS volume" option appear.
• Launch the EFI WINDOWS 7 installer from the WINDOWS 7 USB by selecting the "Boot Fallbcak boot loader from NTFS volume".
• Select "Custom: (advanced) and on the next screen provide the NVME driver for WINDOWS with the "Load Driver" option.
• Select "Drive options(advanced) and delete all the partition till the NVME drive show as "Drive 0 Unallocated Space" select "New" and APPLY and OK. NEXT.
• Once the Windows Setup screen end copying and installing Windows disconnect the WINDOWS 7 USB before it self-reboot. On some legacy board this is required.
• When the installation is complete and the new system is bootable delete the [DUET|USB]\EFI\Boot\drivers\ntfs.efi from the [DUET|USB]\EFI\Boot\drivers folder.
NOT healthy USB DRIVE
To FORMAT the USB back into its original state, use the Windows FORMAT utility FIRST.
If the USB became unreadable after using a third party utility:
see DISKPART or try to use the CLEAN function of USBSetup\CreateUSB to restore the USB MBR.
DISKPART ( Optional )
BE SURE TO SELECT THE RIGHT VOLUME. The Diskpart utility will completely erase the partition table on the drive you select.
How to restore the USB disk manually
• 1) Open the Windows Command Prompt with "Run as Administrator" option ( ie. Run "cmd" as Administrator ).
• 2) Type "diskpart" ( without quotes ). Enter.
• 3) Type "list vol" seek and triple check your USB disk: compare the size, the type and the letter before proceeding.
• 4) Type "sel vol "DRIVE_LETTER:" (without quotes) - ie: "K:" is the drive letter of MINE USB flash drive.
Be sure to select the USB Drive the next command will wipe the DISK. Enter.
• 5) Type "clean" (without quotes). Enter.
• 6) Type "convert mbr" (without quotes). Enter.
• 7) Type "create partition primary offset=1024" (without quotes). Enter.
• 8) Type "format fs=fat32 quick" (without quotes). Enter.
• 9) Type "exit" (without quotes). Enter.
Boot stuck on MBR Start!
Sometime the USBSetup application is not capable to write the required DBR on the predefined offset.
This is an issue with the per-existent MBR and the active partition on the USB.
If the error keep showing up during the boot process of DUET either:
try to make again the USB, do the process manually (see CreateUSB) or use another USB with lesser size.
Boot stuck on SE Error!
If you receive an SE error the error mean a device booted with a PCI ROM and was also expecting an unavailable EFI driver.
Use an USB 2.0 port and set the SATA controller to AHCI or disable the software RAID.
RAID to AHCI - AHCI to RAID
Windows 10: installing any newer RST software without reducing the "MessageNumberLimit" from the default 80 to 8 could trigger the never ending loading circle, if your ICH10 board never reach the desktop, go to the DELETE RAID driver section.
Self-signed 15.9.8.1050 RST driver with "MessageNumberLimit" set to 1 by default ( value can be changed from the registry ).
• 1) Open the Windows Command Prompt with the "Run as Administrator" option to run the Import_CERT.bat
• 2) Open the Windows Command Prompt and type: start devmgmt.msc
• 3) From the Device Manager "Storage Controller" locate the device and install the corresponding self-signed driver located in the "DRIVER_F4" directory
• 3) Reboot and open the Windows Command Prompt with the "Run as Administrator" option to run the Setup_RST.cmd
How to use the SATA RAID software option
For the SHELL: find the suitable RST EFI SATA\RAID driver version and place it inside the "EFI\Raid" directory, then modify the "startup.nsh" accordingly or rename the file in "RaidDriver.efi".
For the OPTIONAL BOOT MANAGER: find the suitable RST EFI SATA\RAID driver version and place it inside the "EFI\Boot\drivers" directory.
To boot DUET with the RAID BIOS option enabled on EFI system (non-legacy) the OROM and EFI version must match.
[style=font-size:10pt]
• 1) Uninstall the RAID or AHCI SATA driver ( intel matrix/rapid storage technology etc ).
• 2) Open the Windows Command Prompt with "Run as Administrator" option ( ie. Run "cmd" as Administrator ).
• 3) Type "start devmgmt.msc" ( without quotes ). Enter.
• 4) In "Storage controller" double check if the Intel(R) ICH10| Desktop/Workstation/Server Express Chipset AHCI or SATA RAID Controller is still there, in case uninstall and also check the "delete drivers" option.
• 5) Open msconfig > boot tab > check safe boot > restart.
• 6) Go into the BIOS and set the SATA mode either RAID or AHCI.
• 7) Boot Windows 10 in safe mode.
• 8) Open msconfig and under the main menu tab ( general ) click the normal startup circle and restart.
• 9) Install your AHCI or RAID driver ( intel matrix/rapid storage technology etc ).
DELETE the RAID driver
• 1) Go into the BIOS and set the SATA mode to AHCI.
• 2) Boot Windows 10 in safe mode after 3 failed attempt to boot.
• 3) Open the Windows Command Prompt with "Run as Administrator" option ( ie. Run "cmd" as Administrator ).
• 4) Type "set devmgr_show_nonpresent_devices=1" ( without quotes ). Enter.
• 5) Type "start devmgmt.msc" ( without quotes ). Enter.
• 6) CTRL+V and select "show hidden device"
• 7) On the "Storage controller" locate the semi transparent Intel(R) Desktop/Workstation/Server Express Chipset | Premium SATA RAID Controller and uninstall by also checking the "delete drivers" option.
• 8) Open msconfig and under the main menu tab ( general ) click the normal startup circle and restart.