@davidm71 Thanks for the suggestions! After some additional testing with my R4BE, changing the module versions (SATA, LAN) doesn’t seem to have fixed the issue.
I’m not entirely sure what you mean by ‘Update your ME’, bios modding is a fairly new topic for me.
My next thought was to try extracting the NVME dxe from an x99 board and inserting them instead of using the Clover team driver provided in the first post.
Apparently so. I tried a few times with different modules extracted from various x99 boards, but none can see my drive (Samsung 960 pro). The Clover team DXE remains the only one that is bootable.
Is there a specific place I should be inserting these modules? Any other things I can try? I really love the speed of the drive, but if it’s not stable with the rest of my system I’ll have to give up and shelve it until I upgrade.
I suspect some sort of a irq or resource conflict or timing conflict with the drive. You should run HWInfo and examine the device tree it prints out and look at each branch and what other devices are using the same bus and then disable that device. I would even recommend you try a different pci express slot such as the primary pci-e slot. Also make sure you update all the device drivers including the NVME drive’s firmware to the latest. Of course make sure you have a fresh install of Windows to test from and don’t install any oem software until you know the system is stable. In any case your sure it goes away when the drives removed?
@Praxis could you explain the steps on how you got the nvme drive recognized in your bios?
I just got a 960 evo, installed in a pcie m2 adapter on my Asus RIVE. I booted to windows to see if the drive would natively be recognized via Win10, but it wasn’t in the device manager. Then I flashed the bios with Asus (v4901) using usb flashback with latest NbmExpressDxE_2 module. Rebooted, but boot manager can’t find “Windows Boot Drive”. I booted into Windows and no nvme drive recognized either via PCI. Installing Samsung nvme drivers didn’t help.
@bioman : Welcome at Win-RAID Forum! Windows 10 should detect the M.2/PCIe connected Samsung 960 EVO without any problem (provided, that the related PCIe connection is enabled within the BIOS and not blocked by another PCIe or SATA connected device). An NVMe BIOS module is only required, if you want to boot off the NVMe SSD.
Into which section of the Device Manager did you look? What about the “Disk Management”? Is the Samsung 960 EVO listed there?
Do you mean the “Windows Boot Manager”? Did you install Win10 in UEFI mode using the GUIMode Partition Table?
If your Samsung Magician Performance Benchmark shows low Read ~1800MB/s and low Write ~1200MB/s speed, I have a solution for you!
1. Download and install free Defraggler: https://www.piriform.com/defraggler 2. Defrag your Samsung SSD 960 drive! 3. Done - Read 3000+MB/s and Write 1400+MB/s 4. Alternatively, you can format your drive and reinstall OS.
I know it’s stupid to defrag SSD drive, but it works for my Samsung SSD 960 EVO 500GB! Please note that built-in Windows 10 Optimize Drives tool (TRIM Performance Optimization) - doesn’t fix the low Read/Write speed.
Alright, so i have been trying to get this to work for around a day now with no success. I’m not the best with computers and this is the first time i’m trying to do anything to my BIOS so bear with me if there are some rookie mistakes. I am able to mod the BIOS just fine but when i try to flash it with the EZ flash it just gives me a message that “Security verification failed.” So i looked into it and found out that i need to either use the USB flashback method (which my ASUS Z87-K motherboard doesn’t have) or the Aptio flash tool thingy. So i went for the latter option and dowloaded the file. I tried using the AFUDOS first which didn’t work since apaprently it doesn’t work on my PC so i tried the AFUWIN and i got it to start and the command prompt opened. It had the different commands i could use and it said “Press any key to continue” so i did, then i got more commands that i could use and the same “Press any key to continue” so i did that and it just shuts down then leaving me confused. So i went looking for advice on what to do there and i just got that i need to run it as administrator which didn’t work either for me and that’s where i am now. Is there a way to make it work for me or am i in a need of another motherboard that can run the SSD without modding the BIOS? Any sort of help is appreciated.
Since your problem (flashing a modded BIOS into the BIOS chip of an ASUS UEFI mainboard without USB Flashback) has nothing to do with this thread, I recommend to read carefully the start post of >this< thread and to post your additional questions into it. Once the BIOS flashing problem has been solved, you can return to this thread in case of any further problems/questions.
Hi Everyone, I wanted to post my success in following the instructions at the start of this guide.
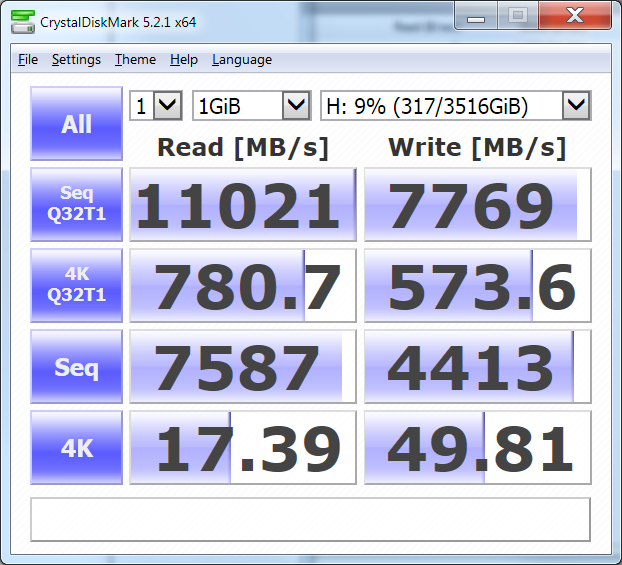
I have an x79 that I modified for the NVMe protocol capability, and then proceeded to install some NVMe storage. I am very pleased with the results. These results are with two video cards installed in crossfire (I later upgraded to two NVidia cards in SLI, but the results did not change) The results I have from Diskmark 5.2.1 have some variance depending on what I am doing. My attached files show the score of what I get on average. (Some people have said that going faster than normal has no benefit and it is a waste of money , but the same people complain that their games have long load times. I do not have long load times…)
@Hyperturtle : Welcome at Win-RAID Forum and thanks for your report. It is fine, that you succeeded and are happy with the result. Regards Dieter (alias Fernando)
@Fernando : I was attempting to copy the image on my SSD onto the new drive and boot from it. Couldn’t get that to work, but it worked installing a new copy of Windows 10.
Thanks.
EDIT by Fernando: Unneeded fully quoted post replaced by a direct addressing (to save space)
I wanted to add (I thought I had written this before) – this is with a raid 0 of four NVMe drives.
My PCIe lanes are somewhat saturated with the GPUs; I had to properly balance the placement of the NVMe connection (x79 of course requires a PCIe card for proper NVMe speeds) against the GPUs, and try not to oversubscribe the lanes too much.
If I only have one GPU/graphics card installed, the storage goes faster.
It is also much quicker when formatted to 64kb cluster sizes compared to 4kb (ntfs default), but that is to be expected. The diference is large, however – I gained over 1000MB/s by reformatting to 64kb cluster size (that result is in what I included).
Taking the F18 file located here. (I found it has better stability with the rev 1.1 board over F20e. I experienced instabilities in the BIOS environs with F20e that were unrelated to modification.) I had been using F18 prior to the desire to modify the BIOS, so I chose that as my base. Using the steps listed here. I took the steps necessary, using the latest uncompressed NVMe module release in the aforementioned post and added it to the F18 BIOS. There were no space errors. No deletion of any existing modules was necessary. Flashed with Q-flash over USB, restored default values. Restored my CPU OC as well as my XMP profiles without issue.
I do not currently own an NVMe drive to test, but things should be in order for the coming weeks when I pick one up. All in all a straightforward process that makes the nerves come alive. I was inspired by the poor benchmark of my Intel 3 series SSD (we’re pushing 7 years together, I believe… SATA2!), and the fact that SATA3 SSDs aren’t going to be the higher end standard anymore. It’s time for a replacement on my end and I simply couldn’t settle given that the price of NVMe has come to match or beat standard SSDs. To replace this nonsense with an NVMe will provide me with great joy. I’m a firm believer that the 3570k is an amazing processor and I’m not ready for a replacement, meaning without a huge leap in generations I didn’t yet feel necessary, I would’ve been left out. To be able to add NVMe support to older boards is truly a blessing and I thank everyone involved in the process.
To the future of NVMe! Cheers.
EDIT by Fernando: The post has been moved into an already existing matching thread. Furthermore I have removed unneeded blank lines (to save space).
Hi! i bought samsung m.2 960 evo. i cant make it shown for installing windows. Have latest bios 4901, have latest driver for it, speeds are good, picture below google it and find out it is not that easy to make it work! i want install windows on it. can sameone help me with that please?!
If you want to install Win10 onto the Samsung 960 EVO and to use the NVMe SSD as bootable system drive, you should insert the required NVMe module into your mainboard BIOS according to my guide, which you can find within the start post of this thread. Since this is the thread, which matches the best your request, I have moved your post into it.
i am little noob about that, can u please tell step by step how to install, or i have to update it same how!? i now smarter people dont like that when someone is asking questions how to install, i am not stupid but i need little guide. thank you for giving me driver for it.