@MKS-DXB - First, use UEFITool on the stock.CAP BIOS to extract the body >> Right click AMI Aptio Capsule and choose extract body, Then do NVME mod to that bin/rom
This is how you should do that >> open stock.CAP in Hex editor and go to offset 800. Open mod bios rom/bin in second tab of hex editor, select all and copy, then paste at offset 800 in stock.cap, then save this file as M5F.CAP
Extension name does not matter so much when saving, I mean you can easily rename, but how the BIOS is created and it’s contents are what matters.
Your mod BIOS is in a capsule, but named rom/bin, renaming should have been OK but it’s probably not accepted due to how you did the mod with capsule included while editing.
If you need me to do for you I can, just let me know 
Can you give me the detailed steps for this please. lost with the steps
i do the mod first with UEFITool
save the image file
than use the hex editor
----------------
yes please if its not too much
thanks a ton
I gave the steps in order above, it would be same if I broke that down into numbered step-by-step instructions. But, see below, I have now did just that, and added images etc
1. Use UEFITool on the stock.CAP BIOS to extract the body >> Right click AMI Aptio Capsule and choose extract body, save as bin/rom does not matter.
2. Then do NVME mod to that bin/rom (body file) per the guide at post #1 of this thread
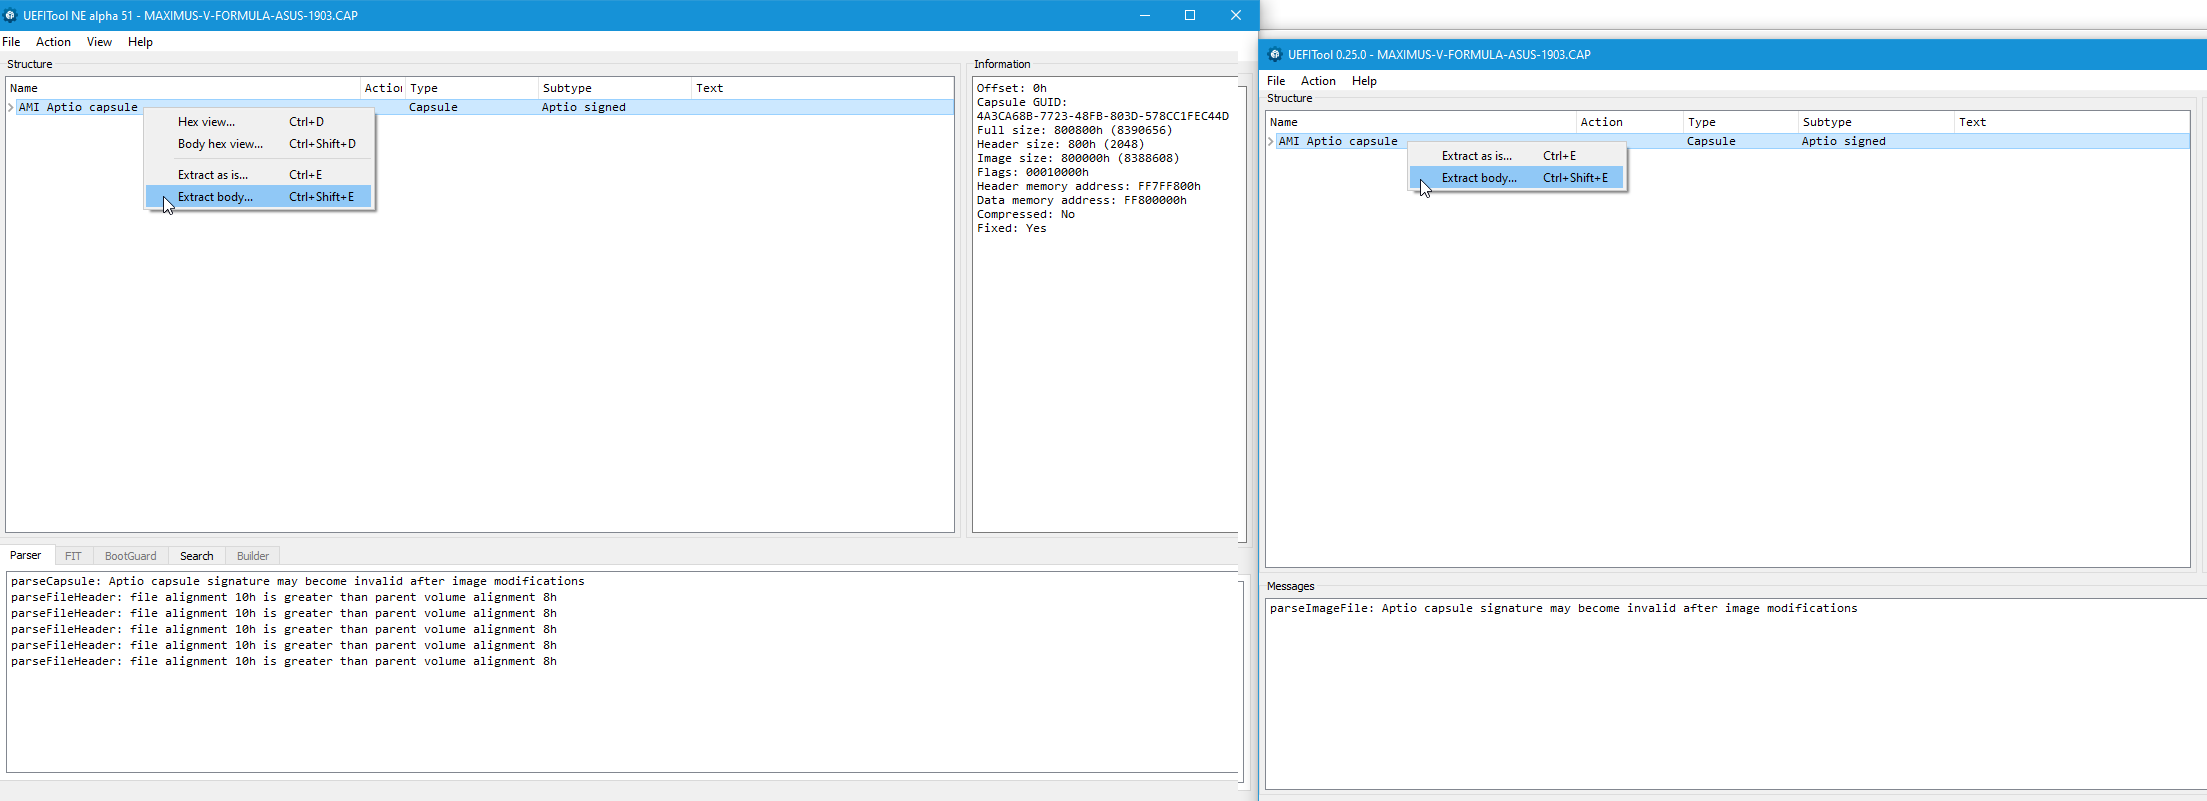
3. Then open your stock .CAP BIOS in UEFITool, expand “AMI Aptio Capsule” and check to see what is the starting offset of the “Body” of the Capsule is, this is the actual start of the “BIOS Image” itself (Rom/Bin)
The offset which body of BIOS starts depends on your particular Asus BIOS and how large it’s capsule is, example of how to tell and both sizes is shown below, the capsule size is usually 800h or 1000h (2KB/4KB)
This applies to AMD as well as Intel, so pay no attention that both of these happen to be Intel BIOS For Intel it will show “Intel Image” for AMD it will show “UEFI Image”
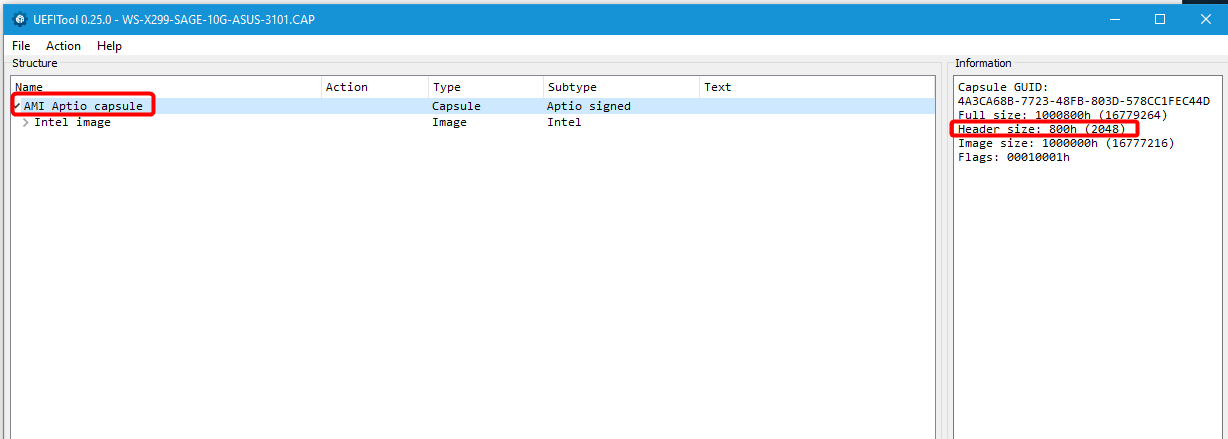
3a. If using regular UEFITool versions (ie 25-2x), not NE Alpha (ie 51-5x), then you need to select AMI Aptio Capsule, then look at "Header Size" as shown in the image below.
Header size is the size of the actual capsule, and this tells you the BIOS starts after this at 800 or 1000 (generally). That will be your starting point of the "BIOS Image" itself
4. Then open stock BIOS .CAP in Hex editor and go to offset 800h or 1000h offset depending on your original stock.CAP BIOS, this is the end of the capsule, and the start of the actual BIOS
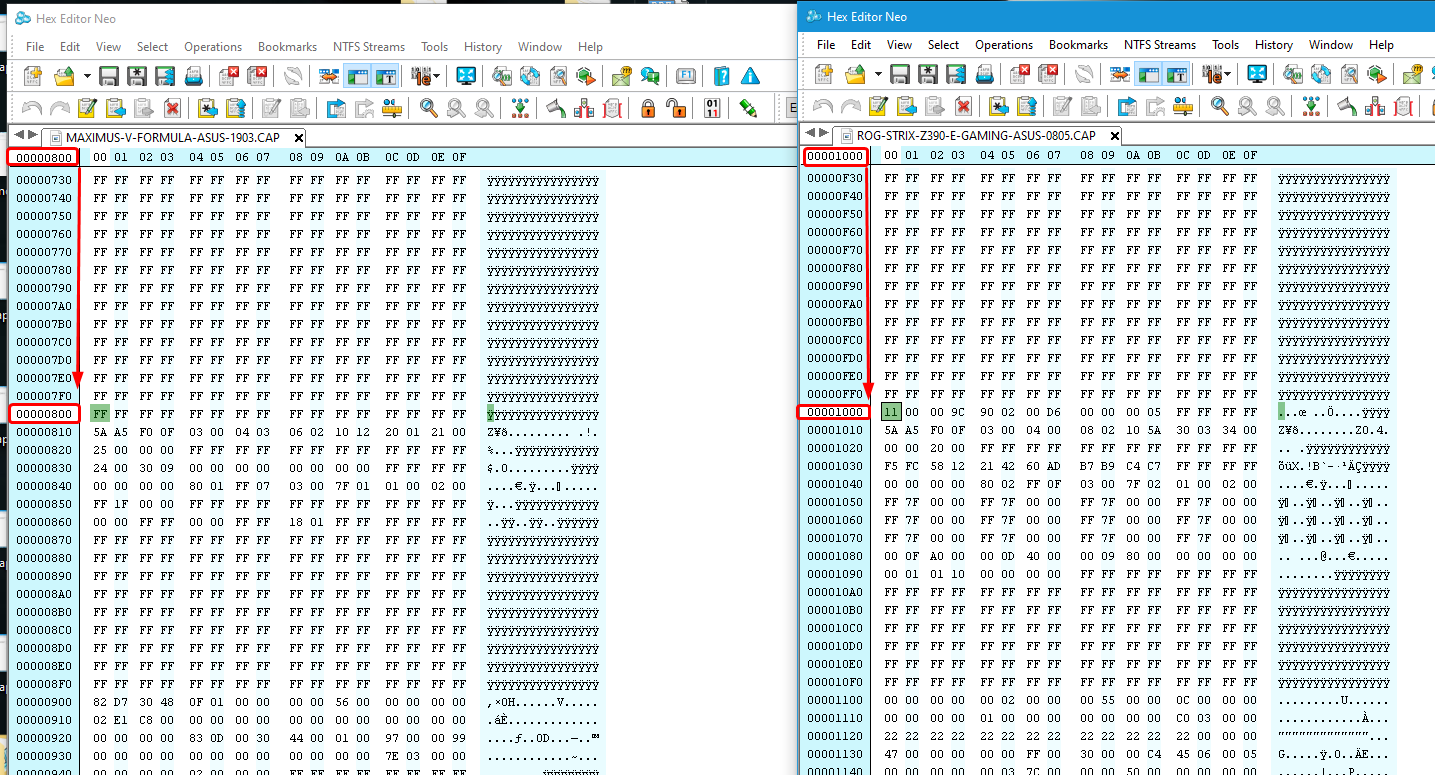
5. Open mod bios rom/bin (body) in second tab of hex editor, select all and copy
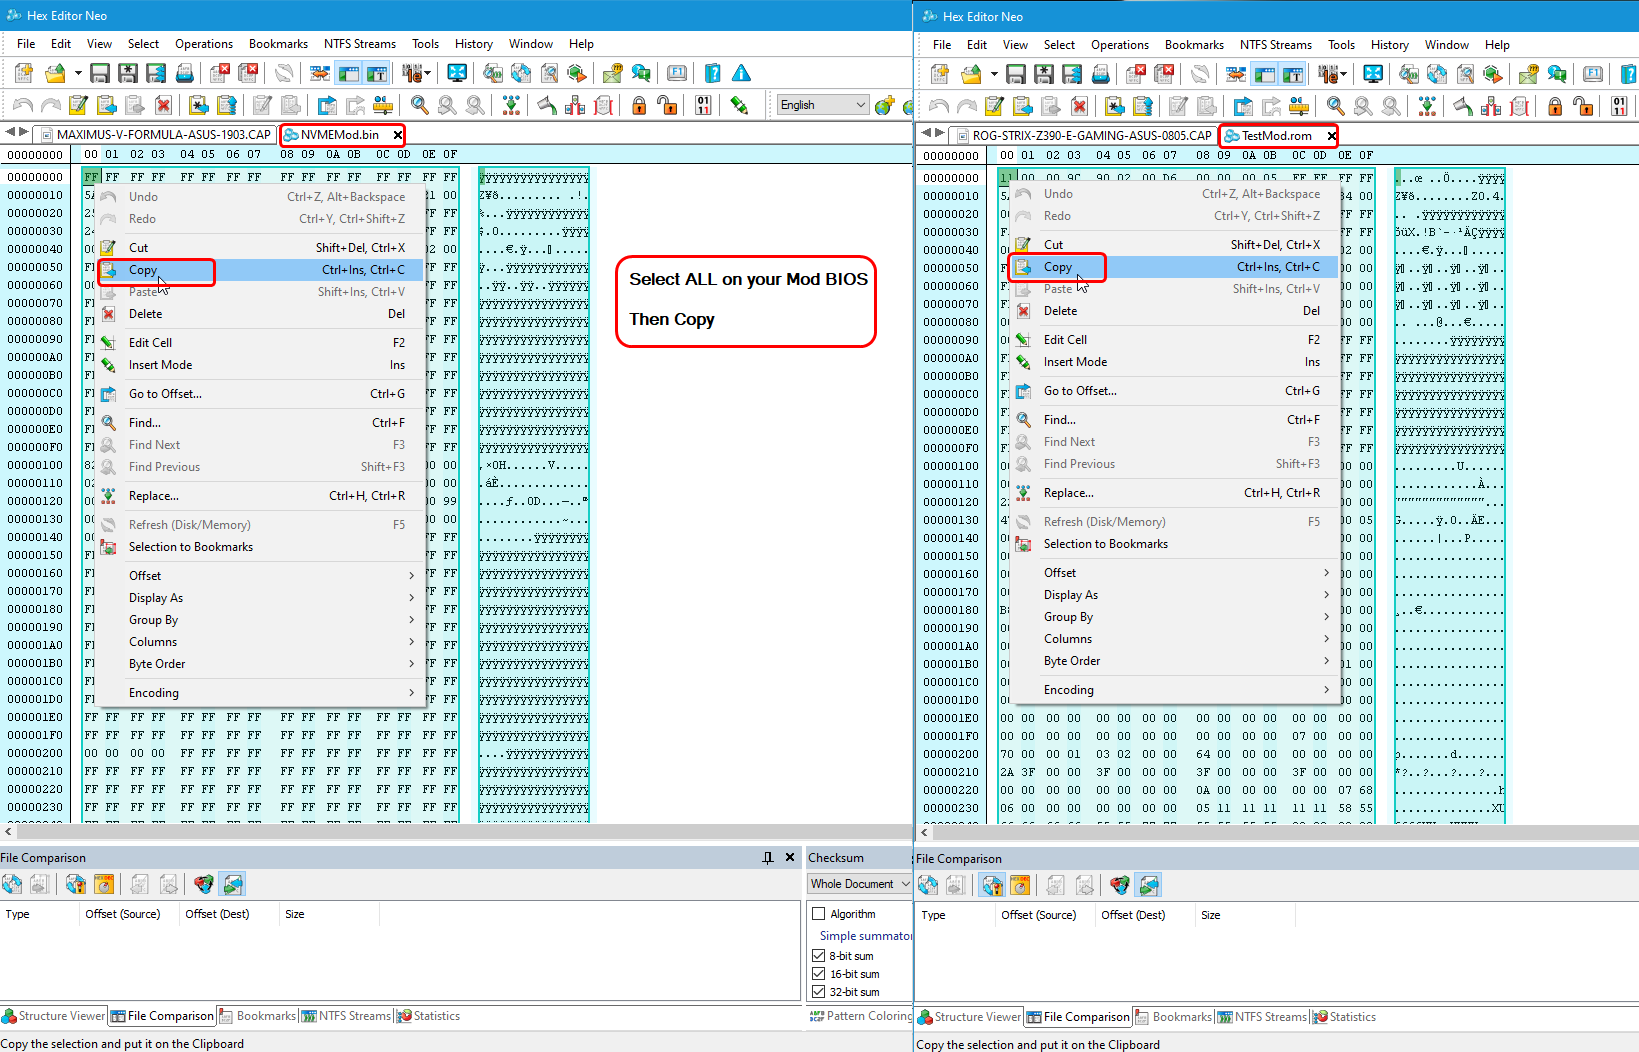
6. Then paste into stock BIOS .CAP at offset 800h or 1000h, depending on your BIOS starting offset after capsule ends as noted in step #3 above
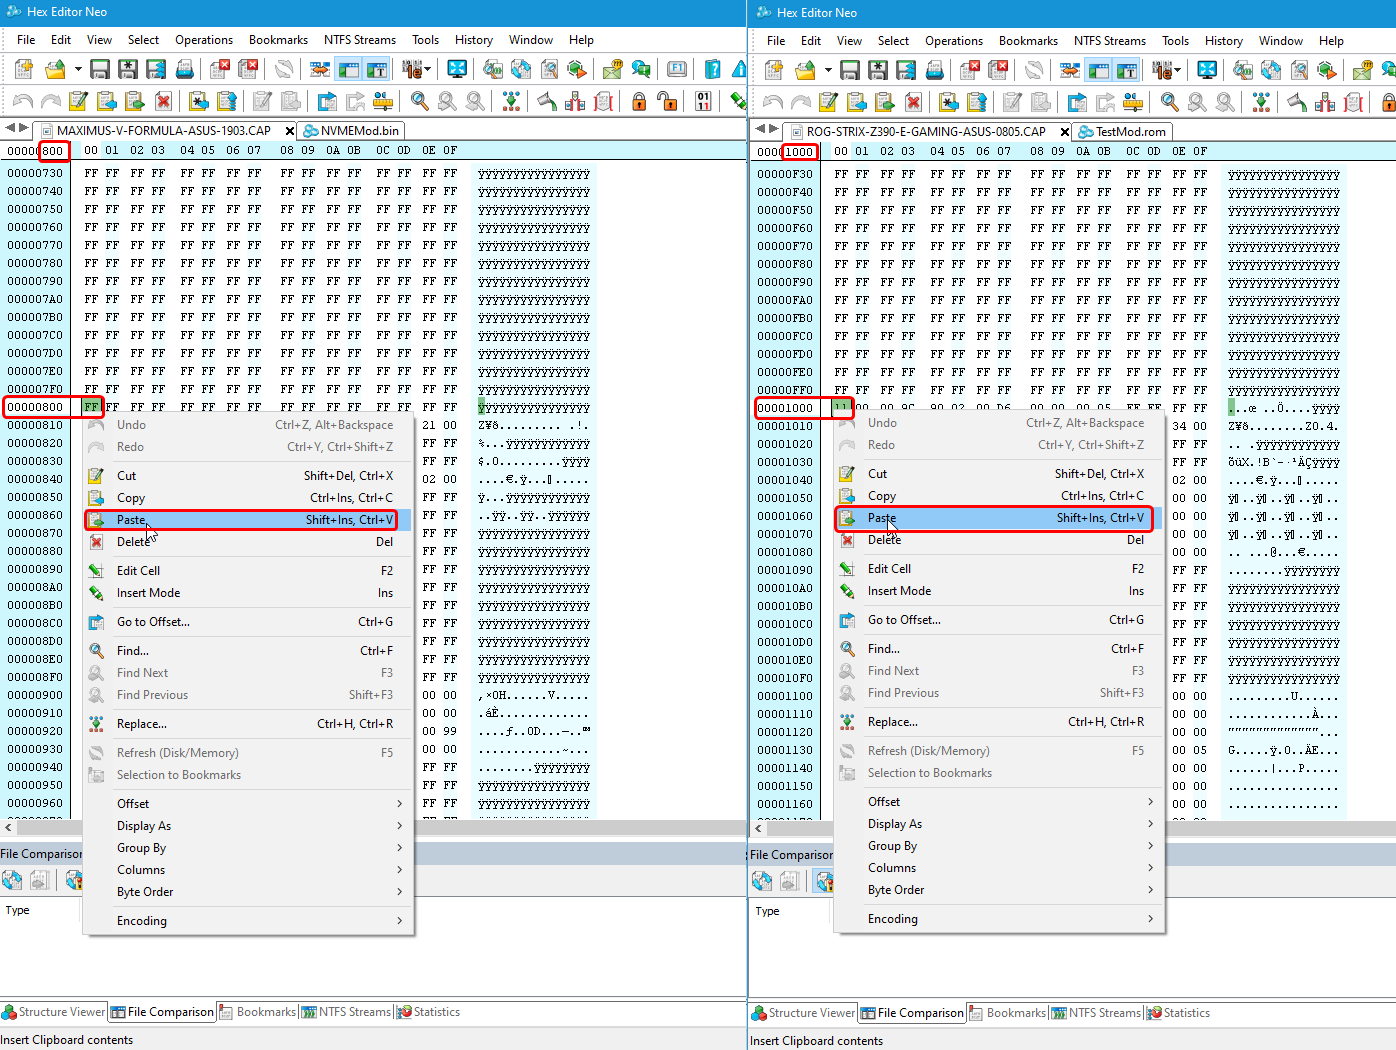
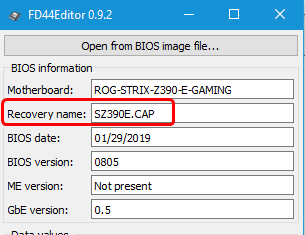
7. Then save this file as USB Flashback Name - You can get this by dropping BIOS onto FD44Editor if you are not already sure of the BIOS USB Flaskback name, it’s called “Recovery Name” in FD44Editor
https://ufile.io/vfim10gn
@MKS-DXB @Lost_N_BIOS
Please consider, that this thread is already very voluminous and not appropriate for off-topic discussions. >Here< is the matching thread about how to flash a modded AMI UEFI BIOS. Users with special problems while trying to get the NVMe module properly inserted should better start a new thread within >this< Sub-Forum.
Thanks for your understanding!
@Fernando I had started my own thread with this thread linked because i knew it was going to be more than this thread had room for (i agree). is it possible to put back what i had started in the thread i had?
@Fernando - Our discussion is 100% on topic, all about creating proper NVME Mod BIOS, see step #2 in my outline (do NVME mod). Additionally, this topic covers “Flashing of the mod BIOS” at post #1 step #3
Our discussion was not necessarily about “how to flash a mod BIOS” as I see it, but more about “how to make a NVME Mod BIOS for Asus” since it was not outlined clearly for that user in the guide, and discussions to sort it all out should not be split into 2-3 topics all to accomplish one task
I feel all that info, and or something like that should be added at post #1 for ALL Asus users knowledge, because all those steps, or similar needs to be done for anyone doing a NVME mod to an encapsulated Asus NVME BIOS and then using USB Flashback.
Without this, the guide is not complete for Asus users, and this question will continue to be asked over and over again. His NVME mod was done properly, but the BIOS was not proper overall due to the guide leaving out stuff he needed to do per his specific brand/BIOS.
I do know and understand how much you dislike general or expanded discussion in a thread, but stuff like this can’t be strictly limited while you are working things out on a mod BIOS, or split into multiple threads etc, that makes a confusing mess at the time and for anyone reading in the future.
@PsyberBill :
Although it would be not a big problem to move all your posts (and the direct replies given by someone else) from this thread into a separate one, such action would induce other problems (wrong links to specific posts etc.).
Another option would be to create a new thread about the same topic, to start it with an up-to-date guide (hopefully written by someone else), to close this thread and mark it as being outdated. This way no information will get lost for the Forum members and visitors.
@Lost_N_BIOS :
You are right - it is nearly impossible to keep a very popular thread like this one strictly on-topic, but I do not 100% agree with your statement, that the recent discussion with MKS-DXB has been completely topic-related.
This is what I have written into my guide (= start post of this thread):
Nevertheless our Forum Member MKS-DXB started the recent discussion with this post:
It turned out, that he didn’t know how to flash an ASUS *.CAP BIOS by using the ASUS USB Flashback feature.
Hi, first, thank you for creating this guide.
I used it to mod and flash my Asus G751JT BIOS. I used the MMTool to insert NvmExpressDxe_Small (as is, i.e. uncompressed) because the non-small version was too big both uncompressed and compressed.
However, I am not able to boot from my NVMe SSD. I disabled secure boot and enabled CSM option, but I don’t see PATA nor PATA SS as boot options in BIOS.
The current BIOS file I extracted using AFUWIN is in the attachment.
I suspect that the problem might be with my SSD itself, but if someone could look into the BIOS and tell me does it seem fine, that would be appreciated, thank you.
afuwin.zip (2.31 MB)
@DarkLunaPhantom :
Welcome to the Win-RAID Forum!
To be able to verify the usability of your modded BIOS, I need the original BIOS as well. Please attach it or give me the link to the related BIOS version.
Questions:
1. Which NVMe SSD are you using (manufacturer and model)?
2. How did you flash the modded BIOS and what makes you sure, that it has been flashed properly?
Regards
Dieter (alias Fernando)
The original BIOS is in the attachment.
1. I am using Kingston A2000 NVMe PCIe SSD 1TB.
2. I used AFUWIN to flash the modded BIOS. Using AFUWIN again to extract the current BIOS gave me the same file I flashed (I compared MMTool reports). Is there any other way I could use to check that it was flashed properly?
afuwin.zip (2.31 MB)
@DarkLunaPhantom :
Thanks for the original BIOS.
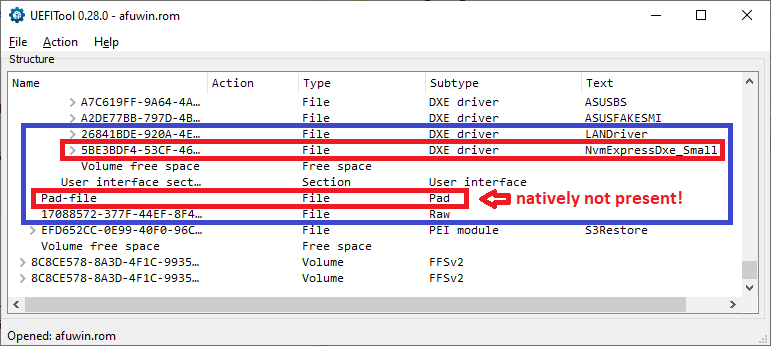
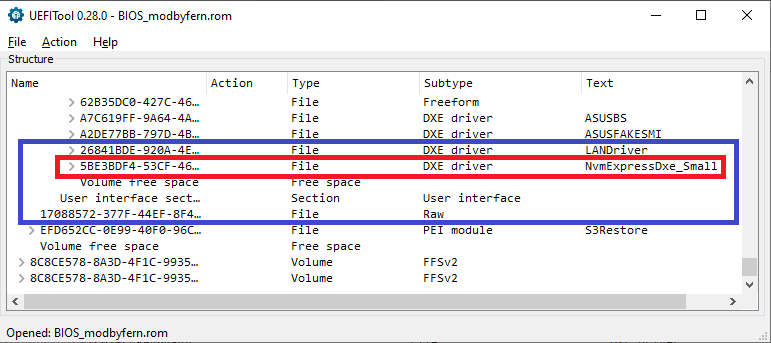
After having compared it with your modded BIOS I found out the following:
1. You have inserted the small NVMe module absolutely correctly.
2. Nevertheless your modded BIOS may have become unusable due to the fact, that the MMTool additionally has inserted a natively not present Pad-file.
3. By using the UEFITool v0.26.0 I was able to insert the small NVMe module without adding the unwanted Pad-file.
Here are the related pictures showing just the downmost end of the "DXE Driver Volume":
1. Original BIOS:
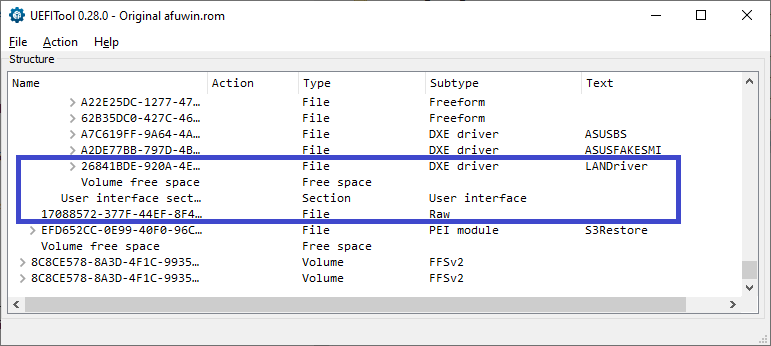
2. Your modded BIOS:
3. My modded BIOS:
Attached is the BIOS, which has been modded by me. Try it at own risk and report, whether it worked or not.
Good luck!
EDIT: The attached BIOS file has been removed by me on 10/27/2020
Nevertheless our Forum Member MKS-DXB started the recent discussion with this post:
It turned out, that he didn’t know how to flash an ASUS *.CAP BIOS by using the ASUS USB Flashback feature.
I do see what you mean, but the last part is what I was getting at. He knew how to flash it via USB Flashback, had used before with stock BIOS, but his NVME mod BIOS was not prepared properly due to following this guide the steps I mentioned were not addressed within the guide.
So, he ended up with an NVME mod encapsulated improperly because none of that is discussed as part of the NVME mod process. Sure this could be taken as a flashing problem, but it shouldn’t have to be (our discussion about on/off-topic posts aside), this should all be covered in this guide here
My main point was all that about capsule, editing BIOS outside of capsule and putting back into capsule, should really be part of the guide, something to cover that for all Asus users.
Otherwise all Asus users are instantly stuck with invalid mod BIOS as soon as they follow the guide, and then either have to ask for help to redo here, or another thread, or make a new thread etc
This shouldn’t happen by following a guide to mod a BIOS, unless addendum is added "Asus users - Please start a new thread of your own, or ask "here (at link)" for help how to fix your NVME BIOS once done with this guide - see what I mean?
And my apologies if anything I said in previous reply sounded rough, I was very sick, head pounding, and stomach swirling, and so I was trying to hurry my way through that reply so I could go toss-it-up

hi to all, thanks for the support, you can help me? i have an error when i reopen modded bios on UEFITool, error says "parseFile: invalid data checksum 5Ah, should be AAh"
i attach the bios file that i created, my motherboard is a z77a-g43
biosmod_2.zip (5.41 MB)
@Matiux14 - That is normal for your BIOS, stock BIOS says same, I checked version 2D
* Edit - I checked your BIOS, and I would not flash that, it may brick! NVME is inserted in wrong location (should be at end, after last DXE entry - MFlash) and padding file is missing at end of main DXE volume (volume you are editing in)
You need to redo the mod, using a different tool (ie use MMTool 4.50 instead). Once done, rename back to stock name.extension and M-Flash it
@Lost_N_BIOS :
Thank you for your statement and advice regarding the modification of capsuled ASUS mainboard BIOSes.
Before I am going to update the start post, I would like to know more about the additional risks to get a bricked mainboard/system, if the user modifies the entire *.CAP file instead of extracting and modifying the “body” of a capsuled BIOS. Is your knowledge based just on the feedback you got from users, who ran into problems after having flashed their modded ASUS BIOS, or is it a wellknown and often discussed problem? If it should be the latter, please give me links to the related publications.
As we both know, the AMI Aptio UEFI MMTools and all versions of the UEFITool are able to modify capsuled BIOSes and to save the modded BIOS without giving any warning.
Additional question:
Are only ASUS mainboards with a capsuled BIOS (offered by ASUS as *.CAP file) affected by these specific problems? If yes, why? If not, the BIOSes of which other mainboard manufacturers need the same precautionary measures?
By the way, as I already have mentioned >here<, it may be a good idea to start a new thread by writing a new/updated guide. Would you be willing to overtake this task? You know much more about BIOS modding and the related risks than me.
Hi, I followed your excellent instructions, used MMTool and was able to modify my BIOS and get my NVMe drive to boot on my MSI B85M-G43 motherboard. I sent you 5 euro.
One slight error I found is that you show a picture of how the screen should look when you verify that the NVMe drivers are present in the modded BIOS. That picture was captured immediately after the insert and the NVMe drivers are the last item in volume 1. If you save the BIOS after the insert, and then close MMTool, and then launch MMTool and load the modded BIOS, you will see that the NVMe drivers are now the next to the last item in volume 1. It looks like in the process of saving there is some formatting of the file. Padding? That worried me but I redid the process, and looked at the result before I saved the file and it matched your picture and after the save, it was different.
@Fernando - Thank you! Yes, this is well know thing for all Asus, common way, we all use this to make BIOS proper. This is same thing UBU does at end (ie replace capsule once done) and some other tools do as well, such as CoffeeTime.
The issue is not about bricking BIOS in this case, it’s about being able to USB Flashback the BIOS or not. In this case, if not done correctly, user simply cannot flash the mod BIOS, USB Flashback will not detect the file or will error and not start etc
Sorry, I cannot link you to anything about this, it’s something we users who modify BIOS have known, done, and worked around for many years since Asus started using CAP BIOS
It’s just common knowledge for editing Asus BIOS, there is no guide/info about this to link to in general
The stock capsule 2-4KB at start of each encapsulated stock BIOS is not touched or edited, only the actual BIOS/Body of the capsule is extracted, edited, then replaced back into the capsule once finished.
The BIOS itself (ie body) of capsule can be extracted w/ UEFITool or by direct hex, or you can simply/cut/delete off the capsule and leave yourself with the BIOS body, then put back as mentioned later, it does not matter but the latter is least ideal for non-tech users to deal with.
MMTool, AMIBCP, and UEFITool can edit BIOS while in capsule yes, but 99.9% of the time this = broken capsule or invalid/unsigned capsule and you cannot use this with USB Flashback. Rare case may pass (0.0001%), if some bug in BIOS/check by flashback not done etc.
Often MMTool or AMIBCP will tell you, “Saving BIOS as unsigned”, with or without capsule, but this does depend on the BIOS or tool version, if you see that message or not.
But in all cases, if you edit BIOS with capsule attached, and do not do as I mentioned instead, then you cannot USB Flashback the BIOS.
Yes, mainly, only Asus are encapsulated in this way, with signed capsule as first 2-4KB of the BIOS. Some Asrock as you know, have an internal capsule/signature check thing, but it’s not this same method/thing Asus does
Asus has done ALL BIOS this same way since beginning of switch from ROM to CAP several years back. I do now know why Asus does this, I guess they think it helps with “Security”, similar to why Asrock does their thing too.
No manufacturer needs this, and none should do it!!  But you know, they all try to act like they want to be "Secure"
As for new guide, Yes, I have considered making some type of general how to edit/save and check to be sure BIOS is OK before flashing type of guide.
But, I’ve just not had time to do yet. Same as I REALLY need to update my fix FIT guide too, much easier way to do that now, just no time to update it yet 
But, as for replacing this guide, no, I can’t do that and don’t think it needs done. This is a great guide, just needs updated with some info from time to time.
I know long threads concern you, so you could always make this one a new thread, just close this and start a new w/ copy/paste of first post, that way this thread would start over new/fresh and not be so long.
If you would like me to write you out some step by step short summary on how to do the Asus Caspule work-around, and maybe include a few image examples at each step, then you can edit/adjust however you want and make your own image examples etc, let me know?
@Lars - yes, due to padding and MMTool not showing the name of that padding file. NVME will go to below last “DXE” labelled entry when looking at the file in UEFITool, sometimes this may go before or after a padding at end, all BIOS are different
Look at your before/after side by side with UEFITool and you will better see the padding change, and or how/where the NVME module gets inserted.
@Lost_N_BIOS :
Thank you very much for your detailed answers, which enlighted me in different ways.
As a consequence I have updated today my guide regarding the following sections of the chapter "This is what you should do:":
- "Preparations"
- "BIOS Modification" > "a) Guide for the usage of AMI’s MMTool 4.50.0023:" > "Verification of the successful insertion:"
- "BIOS Modification" > "b) Guide for the usage of the UEFITool:" > "Verification of the successful insertion:"
Please have a look into related sub-chapters and let me know, if you should have any alternative or additional proposal.
By the way:
My limited knowledge about how to modify an ASUS *.CAP BIOS and to get it properly flashed was mainly based on my own experiences with my ASUS P8Z77-V, which I owned until April 2015. I modded the BIOS very often without removing its capsule and never had a problem to get it properly flashed by using the USB flashback method.
After having read your explanations, I have done some additional tests with the AMI Aptio IV MMTool 4.50 and with the UEFITool 0.28 to find out, whether any byte of the capsule header really will be altered by the insertion of the NvmExpressDxe_4.ffs module. My test candidates were the latest original (capsuled) BIOSes for the ASUS mainboards P8Z77-V (the one I formerly owned) and Z87-PRO. Both AMI Aptio IV BIOSes are supported by the ASUS Flash-Back method. The insertion of the NVMe module went flawlessly with both BIOSes and both used Modding Tools (neither a space nor a Pad-file problem). After having successfully modified the *.CAP files I compared the capsule header codes of the original and the modded *.CAP files by using the HxD tool.
Result of my 4 tests (2 different BIOSes, 2 different Tools): The BIOS capsule header hex codes before and after the insertion of the NVMe module were absolutely identical. Not a single byte had been altered.
My conclusion: It would not have made a difference, if I would have removed the original capsule before modifying the BIOS and re-added it to the modded BIOS "Body".
My question to you: How do my test results match your recent statement?
Have I been just lucky having by chance tested the 2 only ASUS *.CAP BIOSes, which belong to the 0,1%, whose capsule don’t become invalid/unsigned by the insertion of the NVMe module?
Since you have much more experience with the modification of ASUS *.CAP files, I have no doubt, that there is a risk to modify a capsuled ASUS BIOS directly (without removing and re-adding the original capsule), but I suspect, that the percentages you mentioned are too high (99,9%) respectively too low (0,0001%).
@Fernando - You’re welcome!
Yes, it very well may be your P8Z77-V is one of the rare ones this is OK on, similarly some Asus by accident or rare forgetfulness, can also flash mod BIOS via EZ Flash, which as you know Asus’s goal is to block that at every example.
This is similar to that, I’m sure you’ve seen cases where user can flash mod BIOS via EZ flash, it’s rare, and not supposed to be allowed/possible.
Additionally, it’s not always about what’s in the capsule, it’s about if the capsule is attached when modified that causes the issue. Something else in the BIOS is changed/checked elsewhere, which I’ve not ever looked into, this may be more the case with Aptio IV than V
Sometimes capsule changes to Aptio Unsigned, and sometimes capsule remains same 800-1000 bytes, but whatever it checks internally, if not the capsule itself, in some cases is changed. If CAP is attached when modified and I don’t think “unsigned” is the only time this will fail flashback.
This check and how it all works all may depend on board series or capsule version, or Aptio version I am not sure, especially on Aptio IV, for Aptio V it’s almost always changed to “Unsigned capsule” (but again, not always), and may depend on tool used as well in these cases
The older example BIOS which we started with recently that MKS-DXB was using (Maximus V Formula) did not say “Unsigned Capsule”, yet it was stopped from being flashed via flashback until properly made.
Newer BIOS, I grabbed random example to check for you, MAXIMUS-IX-CODE, if you edit this as-is, with MMTool 5.02 or AMIBCP, then check with UEFITool you will see Aptio Unsigned for the capsule, and it tells you when saving MMTool or AMIBCP that it’s saving as unsigned too.
Doing same edit with UEFITool 25/28 etc, will not change the capsule, but this resulting BIOS would still be unable to flash via USB Flashback too, due to internal checks done outside the capsule
Files created with any of the three tools as-is would not be possible to USB Flashback. Some older examples such as some Aptio IV or your exact board, capsule may remain signed but BIOS still unable to flashback (except in rare cases)
You can see by @SoniX 's UBU this is commonly known and used practice if you still are not sure I am correct. First thing UBU does is to remove capsule from BIOS, thus you see the 2-4KB smaller “BIOS.bin” in the work folder.
Then it does it’s scans, and lets you update etc. Then at end you are given option “Rename to Asus Flashback” (ie put mod BIOS back into stock capsule) or leave as-is BIOS.bin. Choosing the Flashback option, the original capsule is then restored, otherwise BIOS is left as-is without the capsule
Or, just google search here at the site, all the times I had to help users fix capsule via hex (search >> hex capsule flashback site:win-raid.com)
And then double or triple those findings for for all the times I just checked users mod BIOS and fix without mentioning the issue
As to the percentages I mentioned, Asus goal is 100% protected, so those that fail and allow in a mod BIOS are rare and would only be by their mistake, thus my 99% / 1% comments, but yes, those may be a bit off from how many actual mistakes they’ve made in all the BIOS they put out
Changes to the main post look good to me, thank you!
I will take some time tonight and update that post you linked to, to add how-to image examples for user so it’s easier to see what is being done for those unfamiliar with using UEFITool or hex editors
^^ Done, please check and let me know if you think everything is clear enough, or if I need to add or change anything - thanks!
Just an update for any Supermicro owners. I’ve got an X10SRL-F board:
BIOS 2.0b - Requires DXE driver baking in
BIOS 3.0b - Supports nvme boot out of the box
BIOS 3.1 - Supports nvme boot
BIOS 3.2 - Supports nvme boot
FYI my old X9SRL-F on 2.x BIOSs required DXE modding, but since then they’ve moved to 3.x BIOSs. I wouldn’t be surprised if nvme boot was also included in the OEM firmware, but can’t guarantee it.
Thought I might put this here as release notes had no details, Supermicro support were useless, but Fernando said 3.1 should work, and it did, so I thought I’d experiment with older and newer.