@ all:
Please read this before posting into this thread:
- This thread has been designed by me for users, who want to do the required BIOS modification themselves by following this guide.
Users, who want to get an already modded BIOS, may search for it within >this< Sub-Forum or post their request into >this< one. - The main topic of this thread is the procedure of the NVMe specific BIOS modification and the support in case of appearing problems.
Users, who don’t know how to flash a modded BIOS or how to avoid a clean OS installation, should search for a guide/solution by using the Forum’s “Search” box and post their request into the related specific thread.
What is NVMe?
Wikipedia Info: (open/hide by a click)
- NVMe is a specification for accessing Solid-State Drives (SSDs), which are attached through the PCI Express (PCIe) bus. “NVM” stands as an acronym for “Non-Volatile Memory”, which is used in SSDs.
While Advanced Host Controller Interface (AHCI) interface has the benefit of legacy software compatibility, it does not deliver optimal performance when an SSD is connected via PCI Express bus. This is because AHCI was developed back at the time when the purpose of a host bus adapter (HBA) in a system was to connect the CPU/memory subsystem with a much slower storage subsystem based on rotating magnetic media. Such an interface has some inherent inefficiencies when applied to SSD devices, which behave much more like DRAM than like spinning media.
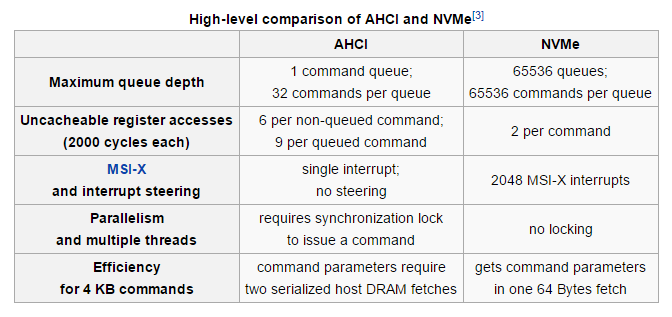
NVMe has been designed from the ground up, capitalizing on the low latency and parallelism of PCI Express SSDs, and fulfilling the parallelism of contemporary CPUs, platforms and applications. At a high level, the basic advantages of NVMe over AHCI relate to its ability to exploit parallelism in host hardware and software, manifested by differences in depth of command queues, interrupts processing, the number of uncacheable register accesses etc., resulting in various performance improvements.
The table below summarizes high-level differences between the basic NVMe and AHCI device interfaces:
Who can benefit from an NVMe SSD?
- The latest Windows Operating Systems from Win8.1 up natively do support NVMe. For Win7 and Server 2008 R2 users I recommend to read the start post of >this< thread.
- Nearly all mainboard manufacturers are meanwhile offering new BIOS versions with full NVMe support for their mainboards with an Intel 9-Series or X99 Chipset.
- Many consumer SSDs with NVMe support are already available or will be available soon.
Answer: (open/hide by a click)
- Everything seems to be prepared for a drastical SSD performance boost by the new data transfer standard named NVMe:
There is no doubt, that users with an up-to-date mainboard, whose BIOS contains the required NVMe module(s), will benefit from the performance boost initiated by an NVMe supporting SSD.
What about MBs with an UEFI BIOS, but w/o NVMe Support?
- Is it possible to give natively not supported systems the option to boot off an NVMe SSD by modding the BIOS?
- If yes, which modules have to be inserted and how has it to be done?
Answer: (open/hide by a click)
- When I started this thread in April 2015, these were the most interesting questions regarding NVMe support:
After having done the related test with my old Intel Z68 system I found in June 2015 the first time answers to the questions. My success report can be found here: https://winraid.level1techs.com/t/howto-get-full-nvme-support-for-all-systems-with-an-ami-uefi-bios/30901/117.
After this first success the method has been optimized and successfully tested with nearly all existing mainboard models.
Since February 2017 we know for sure, that the insertion of the natively missing NVMe module into the UEFI BIOS enables the ability to boot off an NVMe SSD for all natively not supported Intel and AMD Chipset systems.
You can find the well approved latest version of my Guide within the next chapter.
Guide about how to get full NVMe support
(valid for all Intel/AMD chipset systems with an AMI UEFI BIOS)
(last updated: 12/04/2022)
Changelog:
Guide structure optimized (as good as possible)
This is what you should know:
- The desired OS should be Win10 or Win11 (due to their native NVMe support).
- The mainboard BIOS should offer the required UEFI boot settings.
- It should be possible to get a modded BIOS successfully flashed into the system’s BIOS chip.
- The on-board SATA Controller should not been set to “RAID” mode within the BIOS.
Tip: Before you start with the preparations, I recommend to read >this< report written by our Forum member Paulos7.
Details: (open/hide by a click)
- It is no problem to get a PCIe or M.2 connected NVMe SSD working with an old system without modifying the mainboard BIOS, if
- a) the NVMe SSD will be used just for the storage of data (as drive D:, E: etc.)
and
b) an appropriate NVMe driver is present within the Operating System (either natively or loaded/integrated),
Note: Some NVMe SSDs like Samsung’s 950 Pro SSD are natively bootable in LEGACY mode (CSM and loading of Option ROMs has to be enabled within the BIOS), because their Controller chip contains its own NVMe supporting Option ROM module.
These are the best pre-conditions for a successful implementation and configuration of an NVMe SSD as bootable system drive:
Alternative methods to use an NVMe SSD as bootable drive with older systems (no BIOS modding required):
This is what you will need:
- The “Small” variant should be taken, if the BIOS tool gives you the message “File size exceeds the BIOS volume size” while trying to insert one of the above mentioned uncompressed modules.
- After having successfully inserted any of the above offered NVMe modules the related name “NvmExpressDxe_5” resp. “NvmExpressDxe_Small” will be shown by the related BIOS tool.
- Credits go to
- a) the EDK2 Team resp. the Clover Team at InsanelyMac
(>LINK<) for the source file UDK2018, - b) our Forum member davidm71 for his efforts to make the source file usable as additionally insertable EFI NVMe BIOS module, which is loaded while booting off an NVMe SSD in UEFI mode and
- c) to our Forum member Ethaniel for having completely re-structured, optimized, shrinked and re-compiled the NVMe modules.
- a) the EDK2 Team resp. the Clover Team at InsanelyMac
Details: (open/hide by a click)
- 1. A modern unzip tool like WinRAR v6.xx or 7-Zip v2xxx
(has to support the RAR5 compression)
2. A mainboard with an AMI Aptio UEFI BIOS
3. The desired BIOS version for the related mainboard model
as extracted “pure” BIOS file (not an *.exe one), original or already pre-modified
4. An appropriate UEFI BIOS modding tool
- These are the alternatives:
a) An Aptio IV compatible AMI UEFI MMTool
- (easy to use and usually best choice for AMI Aptio IV BIOSes: v4.50.0.23, in case of any trouble v5.0.0.7 is a very good alternative)
Important: These tools are not free available.
Tip: Do a Google search for “MMTool Aptio 4.50.0023” or “MMTool Aptio 5.00.0007”, join the listed TweakTown site, scroll down to the “AMI (UEFI) BIOS Tools” section and download the desired tool.
b) CodeRush’s UEFITool
- (very good tool for users with advanced BIOS modding knowledge)
The currently latest version can be downloaded from here (as RAR archive):
>UEFITool v0.28.0< (>MIRROR<)
Advantage: This tool is free available, works very reliable and can be used with all AMI UEFI BIOSes without any restrictions.
Attention: The usage of the UEFITool is not recommended, if the opened BIOS contains one or more listed “Pad-Files” within or just beneath the “DXE Driver Volume”. A possible BIOS modding issue (removal of a natively present or addition of a natively not present “Pad File”) is caused by a wrong BIOS configuration and not by the UEFITool.
5. An appropriate EFI NVME BIOS module
(has to be inserted into the “DXE Driver Volume” of the mainboard’s UEFI BIOS)
- You have the choice between 2 different NVMe files:
a) NvmExpressDxe_5.ffs dated 09/20/2021
(uncompressed size: 18 KB, best choice for systems without native NVMe support)
>Download link (MEGA)< or >Mirror link (OneDrive)< and
b) NvmExpressDxe_Small.ffs dated 04/01/2018
(uncompressed size: only 6 KB, recommended for BIOSes with limited DXE Driver Volume space)
>Download Link (MEGA)< or >Mirror Link (OneDrive)<
Both sorts of NVMe modules have been compiled and optimized by our Forum member Ethaniel on the basis of the currently latest source code UDK2018, which had been built by the EDK2/Clover Team for rather different purposes regarding the NVMe usage.
The file named “NvmExpress_Small.ffs” contains just the required code to support booting off an NVMe SSD and should be taken, if there is not enough space available within the BIOS (resp. its DXE Driver Volume) for the insertion of the bigger sized “NvmExpressDxe_5” module.
Both NVMe modules have been successfully tested. For details look >here< and >here<.
Notes:
This is what you should do:
- Create a separate folder within the root of any PC partition, name it anyhow (here: D:\Source BIOS) and copy the "pure" (completely extracted) source BIOS file into that folder.
- Additionally you should create another, but currently empty folder for the later created modded BIOS (example: D:\Mod BIOS).
- Only for ASUS BIOSes with the suffix *.CAP:
To avoid problems while trying to flash later on the modded *.CAP file, it is recommended to extract the "Body" of the original *.CAP BIOS. This can easily be done with the UEFITool by opening the *.CAP file, doing a right-click onto the "AMI Aptio Capsule", choosing the "Extract body..." option and saving it as *.ROM file.>Here< you can find the complete instructions layed down by Lost_N_BIOS.
- Unzip the downloaded AMI Aptio MMTool resp. the UEFITool and the chosen NvmExpressDxE module into the "Source BIOS" folder.
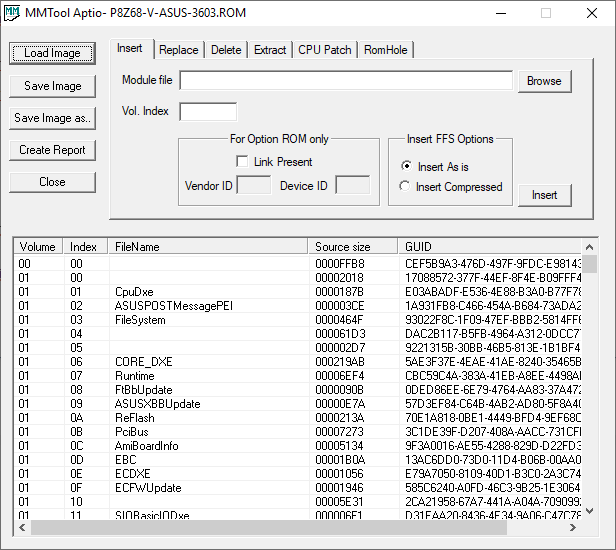
- Double-click onto the file named MMTool.exe.
- Click onto the "Load Image" button and navigate to the folder, where the source BIOS is located. If it should not yet been shown within the pop-up window, choose the file type option "All files (*)", which is located at the bottom of the "MM Open" window.
- After having double-clicked onto the BIOS file, which you want to get modified, you will see a picture similar to this one:
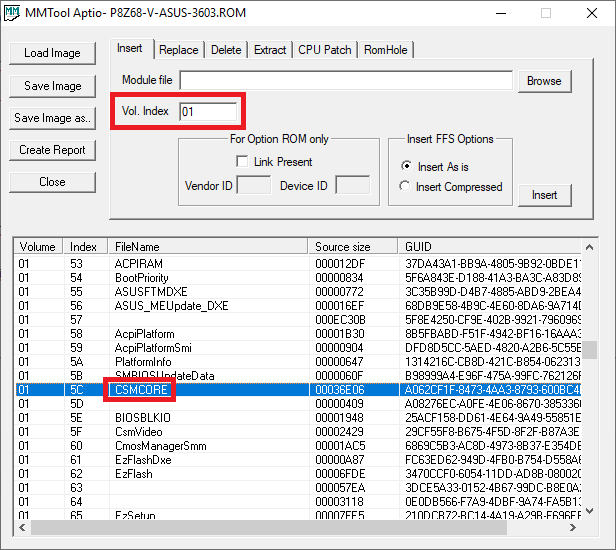
- Scroll down within the great MMTool window until you find the module with the FileName “CSMCORE”.
- Click onto the line with the FileName “CSMCORE”. After having done that, the number of the Volume will be shown within the box named “Vol. Index” in the upper part of the MMTool GUI.
Here is the related picture of my test BIOS:In my test BIOS it was the Volume “01”, but this is just an example. In other BIOSes the CSMCORE module may be within a Volume with another number (e.g. “04” or “02:01.00”).
- Since the CSMCORE module is present within nearly all AMI UEFI BIOSes and always located within the DXE Volume, where the NVMe module has to be inserted, you are now within the target Volume.
Note: In the very rare case, that the MMTool doesn’t show any module named “CSMCORE”, you should scroll down the MMTool window with the listed modules until you find the first ones with the letters “DXE” within its name. This way you can be sure, that you are within the correct “DXe Driver Volume”, where the NVMe module has to be inserted. - Make sure, that the correct DXE Driver Volume number (usually with the CSMCORE module within it) has been written into the Vol. Index box.
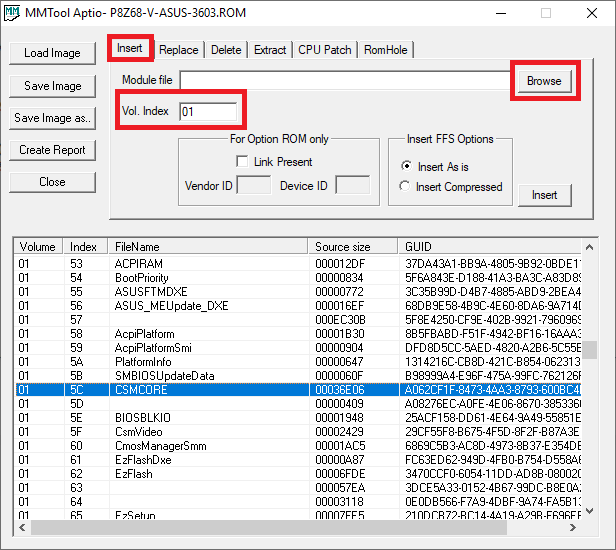
- Click onto the "Insert" tab on the on-top MMTool menu bar.
Here is the related picture: - Click onto the “Browse” button and navigate the folder, where your desired NVMe module as “pure” *.ffs file is located.
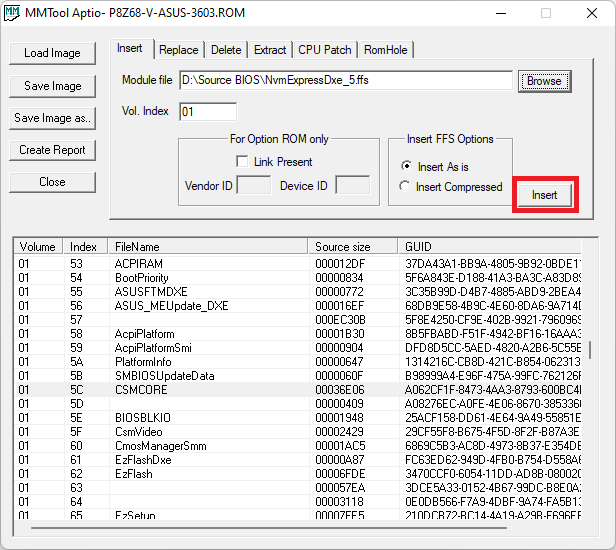
- Double-click onto the *.ffs file you want to get inserted.
Now you will see a picture like this: - You can choose within the “Insert FFS Options” area of the MMTool GUI, whether you want to get the previously chosen module inserted “as it is” (normal option) or in “compressed” form (option in case of limited space within the DXE Volume).
Note: Don’t touch the “For Option ROM only” area of the MMTool GUI! - Now you can click onto the “Insert” button, which is on the upper right hand side below the “Browse” button (see above picture).
- After having done that, the insertion of the desired NVMe module should be done automaticly and correctly by the MMTool.
Note: If the MMTool should not be able to insert the desired module properly, the MMTool will give you a meaningful error message (e.g. “Not enough space within the Volume”). In this case you should try to get the “small” variant of the NVMe module in “compressed” form inserted. If there should not even be enough space for this small sized module, I recommend to follow the advices given by MeatWar within the first post of >this< thread. - As final step you have to store the modded BIOS:
Click onto the button "Save Image as...", navigate to the previously created folder for the modded BIOS (e.g. D:\Mod BIOS) and give the modded BIOS a meaningful name (with the same extension as the original BIOS). - Now you have stored your modded BIOS within the related folder.
- Open the modded BIOS as written above by running the MMTool.
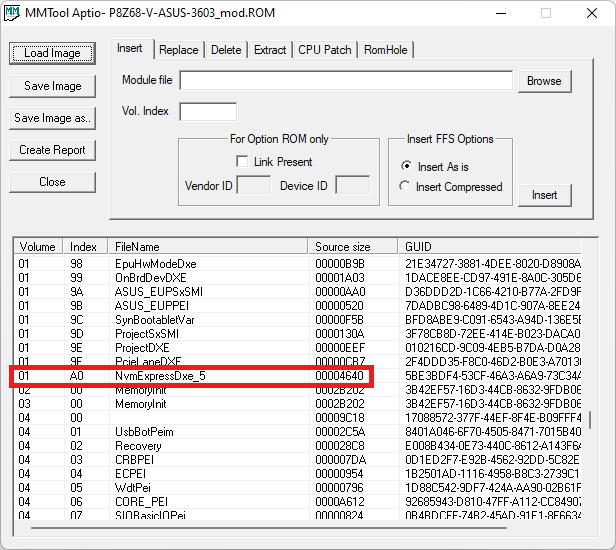
- Scroll down the content of the MMTool window showing the various modules of the DXE Volume (where the CSMCORE is located) until you come to bottom of that Volume.
- The last (undermost) "DXE Driver" module of the related Volume Number should now be new and named either "NvmExpressDxe_5" or "NvmExpressDxe_small" (depending on the module variant you had previously inserted.
- A picture like this is the proof, that the NVMe module has been successfully inserted: Warning:
- If everything looks fine, you can be sure, that the related module has been properly inserted into the correct GUID section, and you can save the modded BIOS and give it an appropriate name and suffix (usually similar to the original BIOS).
Only for ASUS BIOSes, whose capsule had been removed by extracting the “Body”, but shall be flashed by using the ASUS USB Flashback feature:
Don’t forget to re-insert the original capsule and to save the modded BIOS as *.CAP file according to >this< guide written by MeatWar. - Double-click onto the file named UEFITool.exe.
- Use the full size option to see the complete content of the UEFITool GUI.
- Click onto "File" from the UEFITool menu bar, choose the option "Open image file..." and navigate to the folder, where the source BIOS is located. If it should not yet been shown within the pop-up window, choose the file type option "All files (*)", which is located just above the "Open" button.
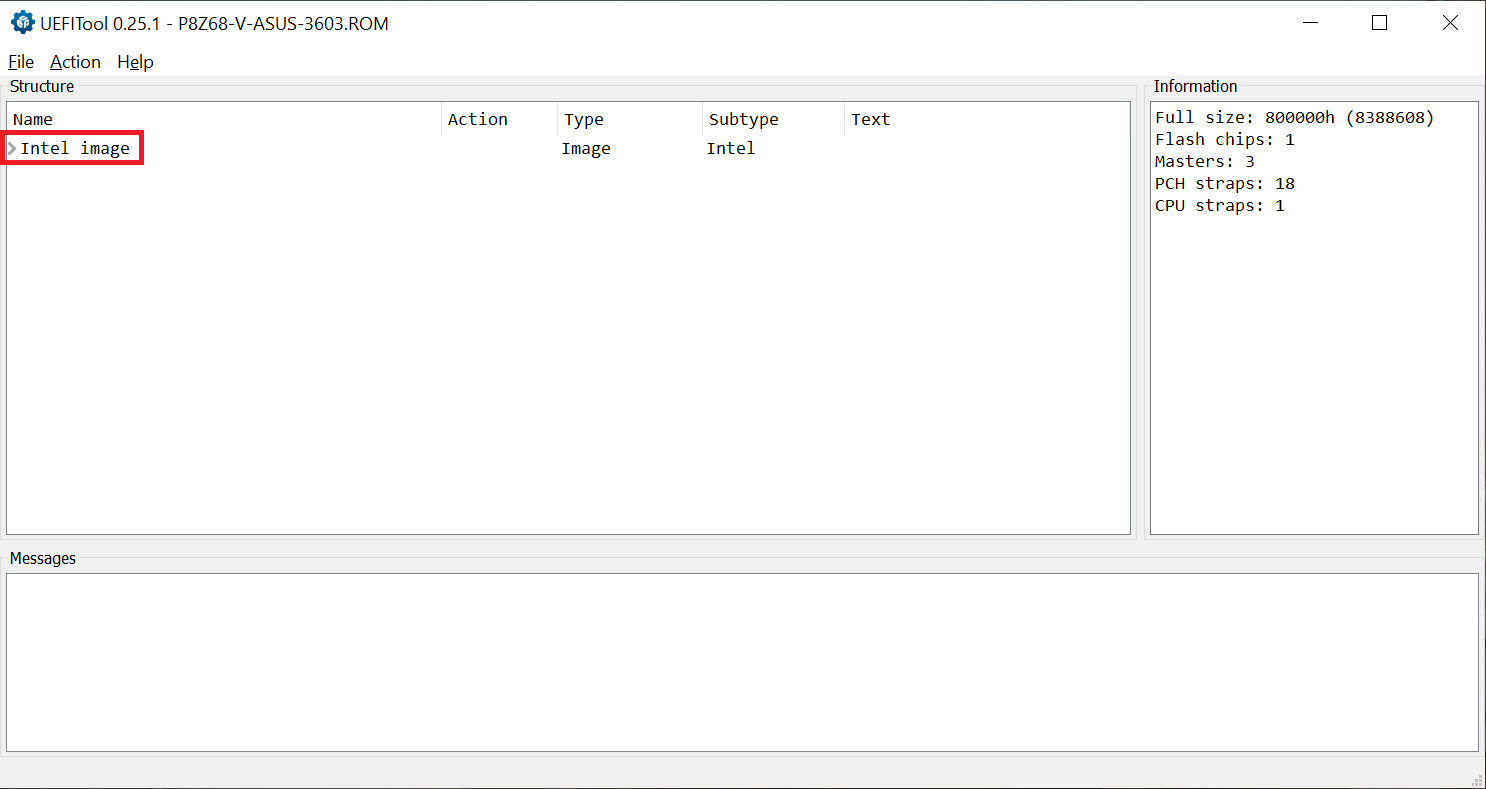
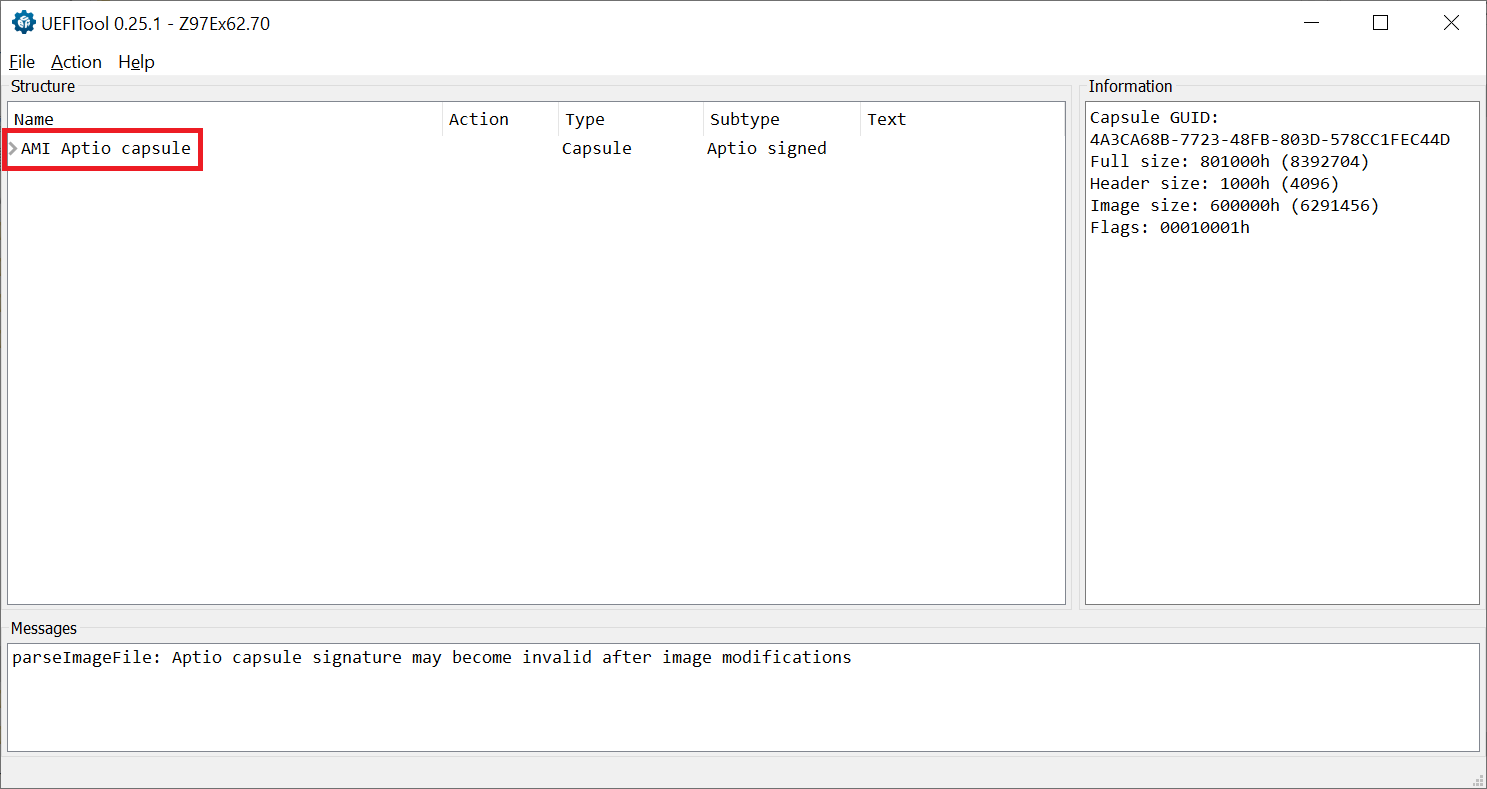
- After having double-clicked onto the BIOS file, which you want to get modified, you will see a picture similar to one of these:
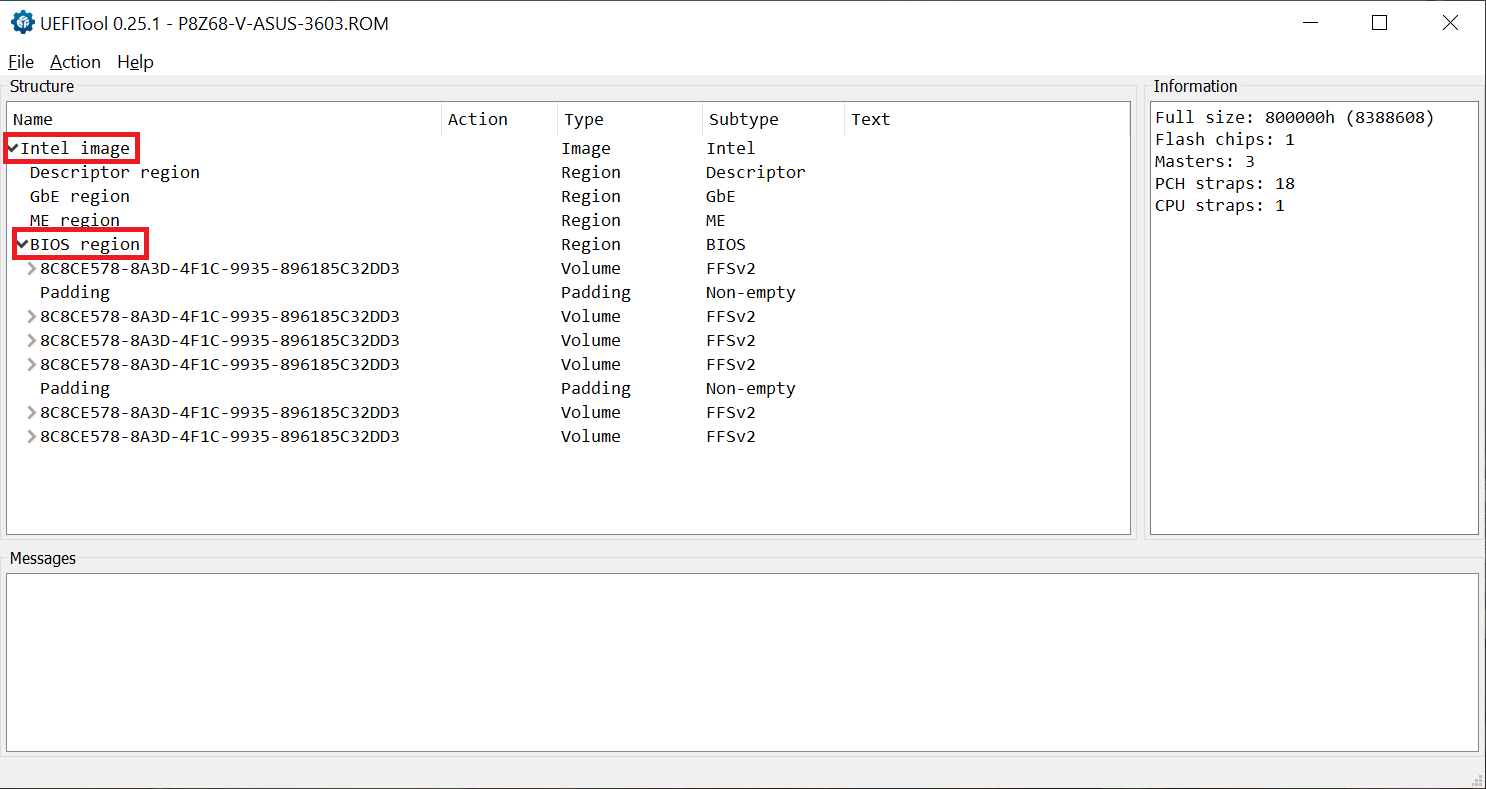
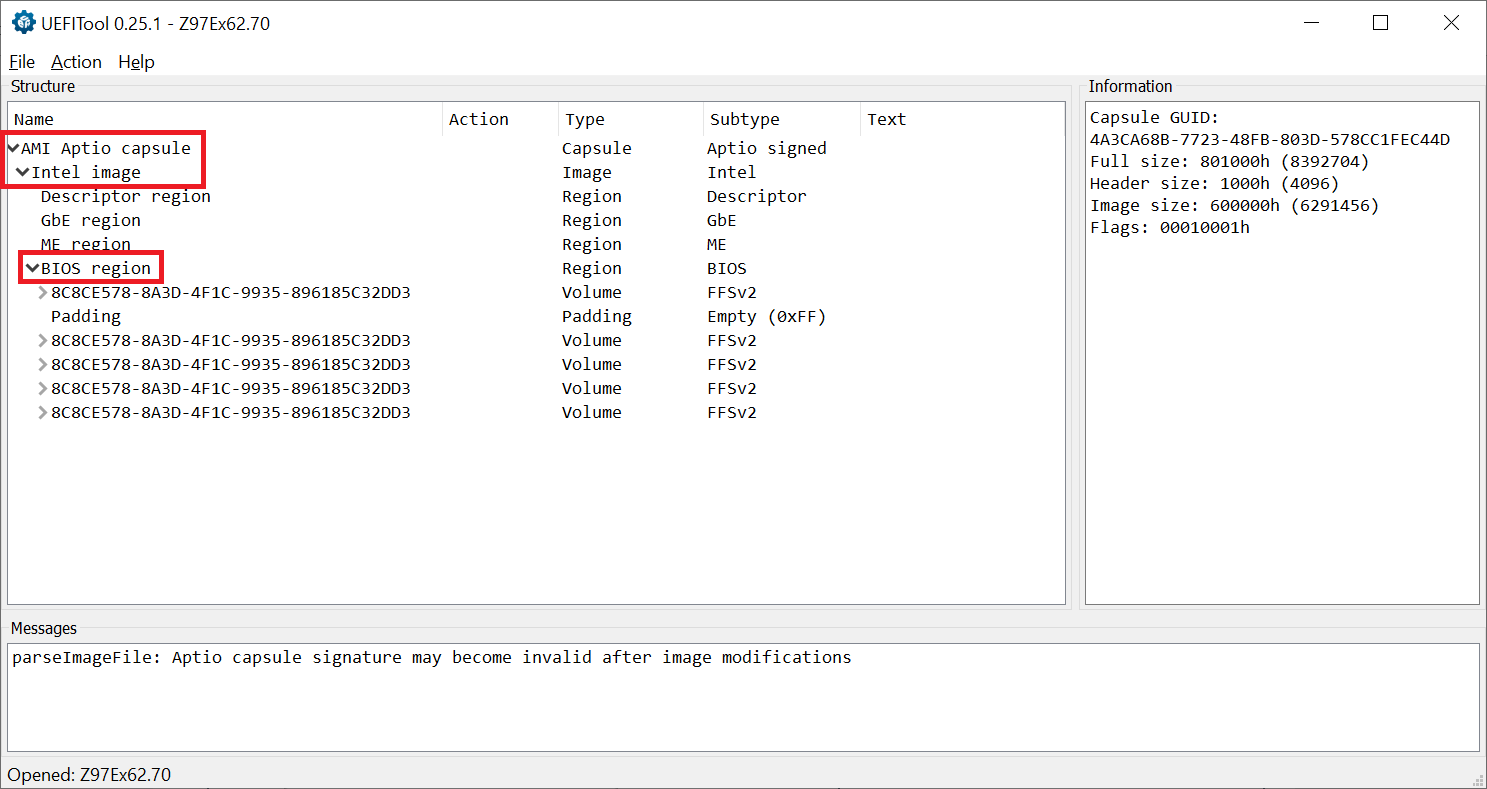
- Expand the shown image resp. capsule by clicking onto the right-direction arrow in front of them. Now you should see the main contents of the BIOS inclusive the most important "BIOS region".
- After having expanded the "BIOS region" by hitting onto the right-direction arrow in front of it, you will see a picture like one of these:
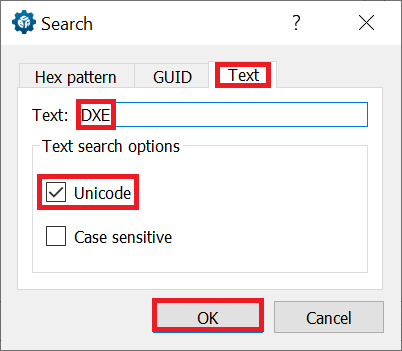
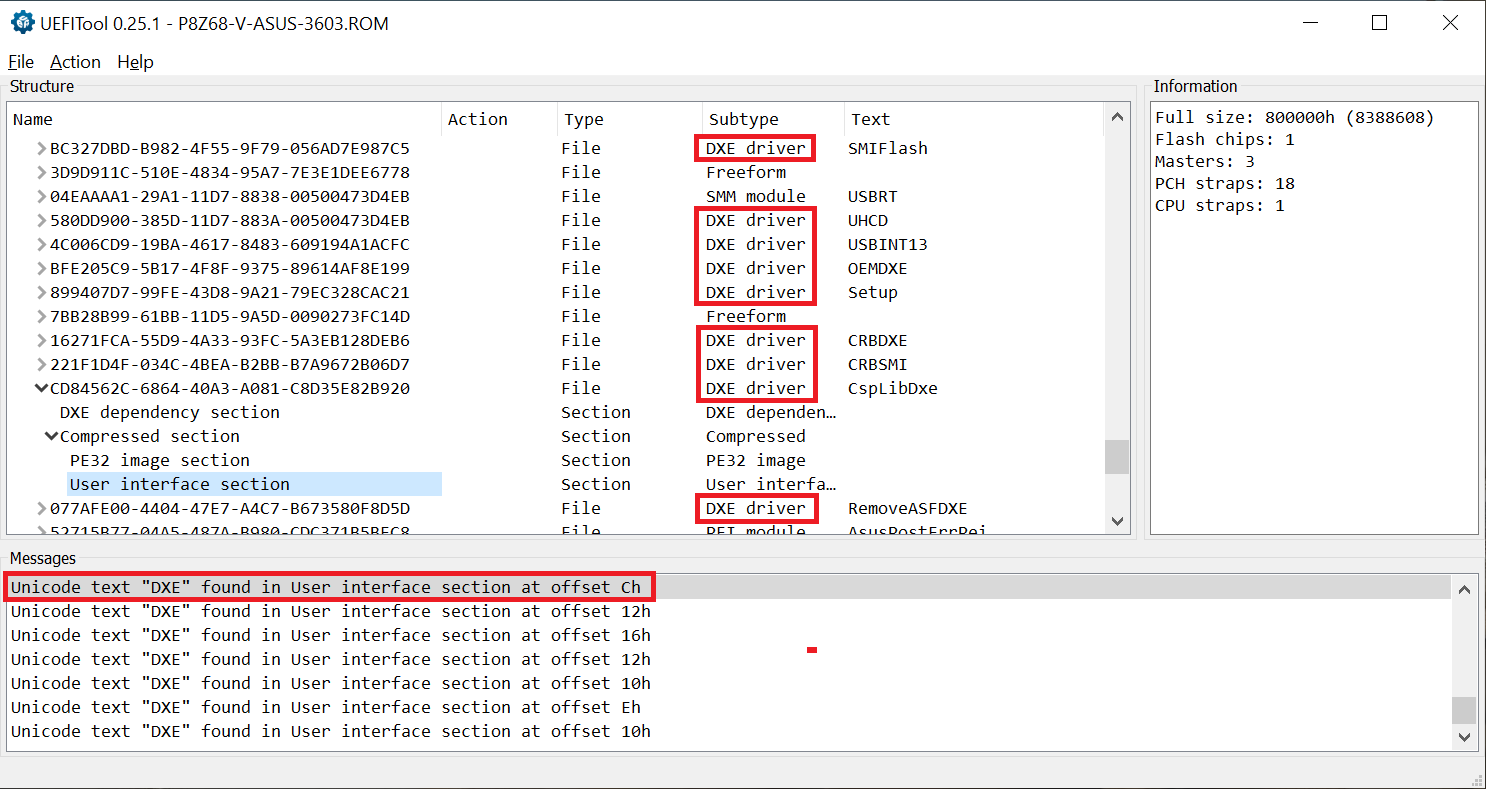
- Due to the complicated and mainboard specific internal structure of the "BIOS region", it may be rather time consuming to find the DXE Volume, where all the EFI modules are located and where an additional EFI module like the NVMe one has to be inserted. The easiest way to find it, is to use the "Search" option of the UEFITool.
This is what I recommend to do after having opened the source BIOS with the UEFITool:- Click onto the menu tab "File" and choose the option "Search...". Now you will get access to the UEFITool "Search" pop-up window.
- Click onto the tab "Text" and enter the word "DXE" into the Text box (the "Unicode" option will be checked by default). This is the related picture:
- Once you have hit the "OK" button, you will get a picture like this:
- Double click onto any line of the "Messages" you can see at the bottom of the UEFITool GUI. The result is a picture like this one:
- As you can see, you are now within the "Compressed section" of a "DXE driver" (which one doesn't matter).
This verifies, that you are now within the DXE Volume of the BIOS (= location, where the EFI modules are stored and can be inserted).
- If you close the sub-folders of the related DXE driver GUID by clicking onto the downside arrow in front of it, you will get a picture like this, where all the GUIDs are listed, which are inside the DXE Volume:
- Important: Make sure, that the target DXE Volume contains a module named “CSMCORE”.
Reason: Some BIOSes contain more than 1 DXE Volume, but only the one with the CSMCORE module is suitable for the insertion of a natively not present EFI module.
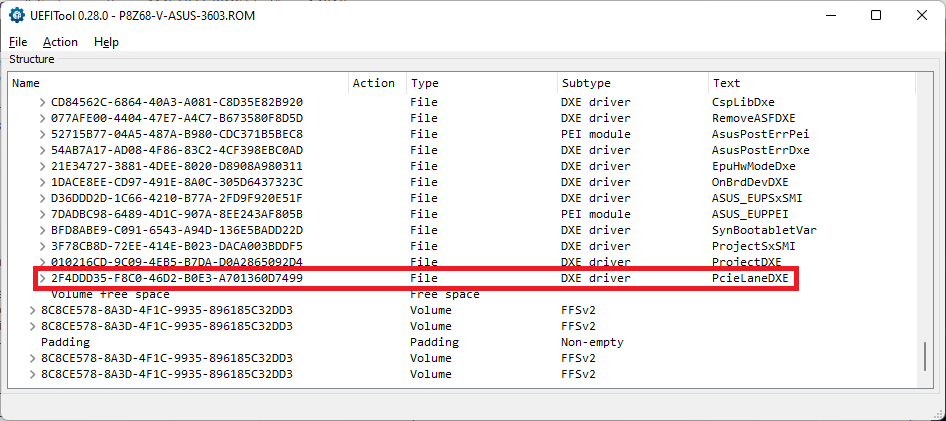
Note: In the very rare case, that no module named CSMCORE is listed, you have to search for the upmost Volume, which contains modules with the letters “DXE” within their name. - Once you have expanded the DXE Volume, scroll down to the undermost module, which is listed within the DXE Volume and has a GUID (no matter, whether its Subtype is "DXE driver" or "Freeform" and whether it is listed at the rightmost column with a "text").
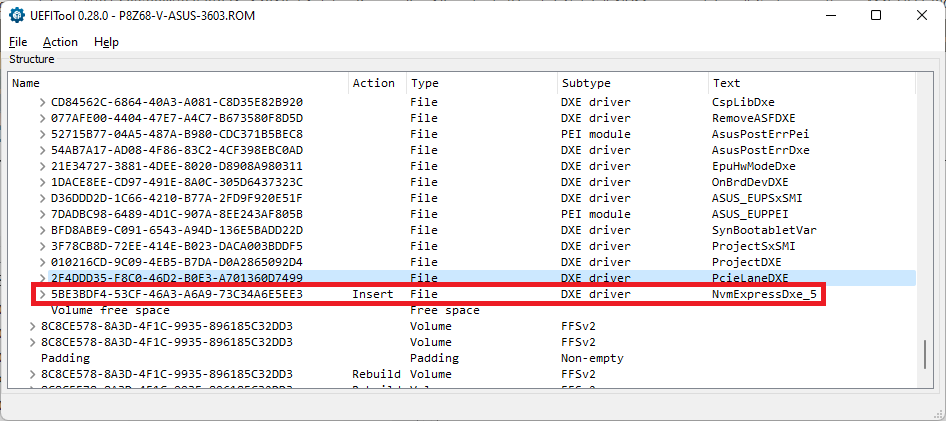
Here is the related picture (in this example it is the DXE File named "PcieLaneDXE", but - depending on the specific BIOS - it may have any other or even no name): - Right-click onto the GUID of the undermost listed "DXE driver" or "Freeform" module, choose the option "Insert after...", navigate to the EFI NVMe module file you want to insert (must have the suffix *.ffs!), and double-click onto it.
After having done that, you hopefully will see a picture like this:
Note: If the UEFITool should not be able to insert the desired module properly, it will give you the message “Not enough space within the Volume”. In this case you should try to get the “small” variant of the NVMe module inserted. If there should not even be enough space for this small sized module, I recommend to follow the advices given by MeatWar within the first post of >this< thread. - Don't forget to save the modded BIOS as final step of the modding procedure. You can start it either by clicking onto "File" > "Save image file..." or by hitting CTRL+S. Then you can navigate to the folder, which has been designed for the modded BIOS (e.g. D:\Mod BIOS), choose a meaningful BIOS file name with an appropriate suffix (you can use any suffix, if you choose the "All files" option) and click onto the "Save" button.
- Immediately after you have saved the modded BIOS the UEFITool will offer you the option to open the reconstructed file. Click onto "Yes".
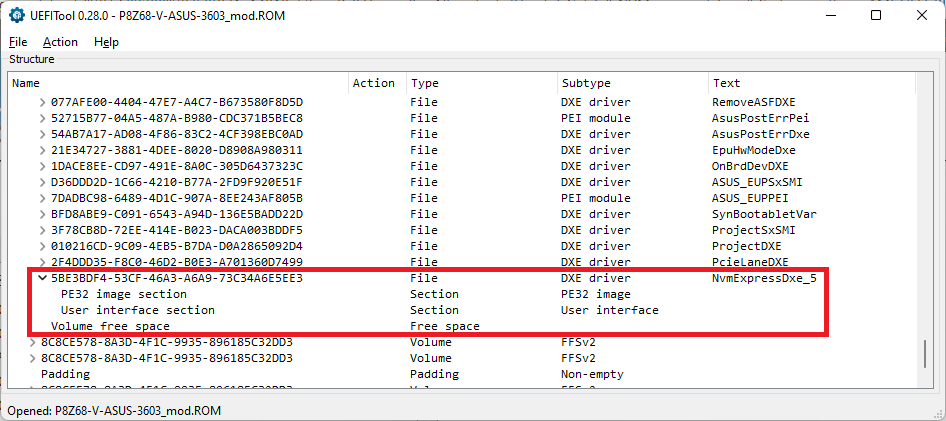
If you had already closed the UEFITool, you will have to re-run the tool as written above. - Expand the content of the "BIOS region" and its GUIDs until you have found the specific GUID again, which contains the modules of the Subtype "DXE driver".
- Scroll down and search for the "DXE driver" with the right hand text "NvmExpressDxE_5" resp. "NvmExpressDxe_small" (depending on what you had inserted).
- Expand the sub-sections of the freshly inserted NVMe module by clicking onto the downside arrows.
This is, what you should see:Warning:
In some cases the UEFITool may remove an existing “Pad-file” of the BIOS or create a natively not present Pad-file while executing its NVMe module insertion task (trying to “repair” a supposedly wrong BIOS structure). To avoid later problems after having flashed the modded BIOS, I recommend insistently to compare the entire “DXE Driver Volume” of the original and the just modified BIOS regarding the presence and location of Pad-files by using the UEFITool (the MMTool doesn’t show the “Pad-files”). The best visual way for such comparison is to open the original and modded BIOS side by side. For details look >here<. The only difference between the original and the modded BIOS should be, that a new DXE driver named “NvmExpressDxe_5” resp. “NvmExpressDxe_small” has been added. All other listed modules should be untouched by the BIOS modification.
If you should realize, that within the modded BIOS a natively present Pad-file module is missing resp. has been moved or a natively not present Pad-file has been added by the UEFITool, post a report into this thread, but don’t flash this modded BIOS! - If everything looks fine, you can be sure, that the related module has been properly inserted into the correct GUID section, and you can save the modded BIOS and give it an appropriate name and suffix (usually similar to the original BIOS).
Only for ASUS BIOSes, whose capsule had been removed by extracting the “Body”, but shall be flashed by using the ASUS USB Flashback feature:
Don’t forget to re-insert the original capsule and to save the modded BIOS as *.CAP file according to >this< guide written by MeatWar. - The preparation and the exact BIOS Flashing procedure depends on the mainboard's manufacturer and maybe even on the mainboard model (for details look into the manual of your mainboard).
- As medium for the modded BIOS during the flashing procedure you should take a 100% working and freshly FAT32 formatted USB 2.0 Flash Drive. It should contain just the modded "pure" BIOS file and nothing else.
- It is not recommended to flash a modded BIOS from within the OS.
- After having successfully flashed the modded BIOS, don't forget to re-enter the BIOS, to redo your personal BIOS settings and to make sure, that your system will be able to boot in UEFI mode.
- Users, who don't know where to find the specific BIOS settings, which are mentioned within this Guide, should set the BIOS language to "English".
- Verification of the successful BIOS Modding/Flashing:
(this test requires temporarily the BIOS option to Boot in LEGACY mode)- Make sure, that the NVMe SSD is connected to the mainboard.
- Enter the BIOS and choose the "BOOT" section.
- Set "CSM" to "Enabled". The "Boot Mode" setting - if applicable - should be "LEGACY" or "AUTO", but not "UEFI".
- Look for the listed bootable Disk Drives.
If you now can see a new disk drive named "PATA" or "PATA_SS", you can be sure,- a) that you have correctly inserted the NVMe module into the BIOS and
b) that the modded BIOS has been successfully flashed. - Don't forget to reset the BIOS settings, which had been altered for this test.
- Don't try to boot off the listed disk drive named "PATA" or "PATA_SS"! You will not succeed, because the required Option ROM is usually missing within the NVMe SSD. Nobody (except the user of a Samsung 950 PRO) is able to boot off an NVMe SSD in LEGACY mode.
- A. Preparation/Notes:
- If not already done, you can now insert the NVMe SSD resp. its M.2>PCIe adapter into the M.2 port resp. PCIe slot, which offers the best possible performance and doesn’t share the PCI lanes with other devices (please look into your mainboard manual):
- Enter the BIOS and look for the changes, which were caused by the BIOS modification (insertion of the NVMe EFI module). Don't be afraid about the fact, that the NVMe SSD's manufacturer and model will not be shown there (it will be bootable nevertheless later on). The only difference should be, that within the "BOOT" section now a new "Legacy Mode" device named "PATA" or "PATA_SS" is listed (only visible, when CSM has been temporarily set to "Enabled"). That is your NVMe SSD, but don't try to boot off it - only Samsung 950 Pro SSDs can boot in Legacy mode, because it has the required NVMe Option ROM in-the-box. All other NVMe SSDs can only boot in "UEFI Mode", but this requires the creation of an EFI Boot Sector named "Windows Boot Manager", which will be done during the installation of the OS (see next step).
- B. Best/safest procedure to get Win10/11 properly installed onto an NVMe SSD:
- Save the important data, which are currently on the NVMe SSD.
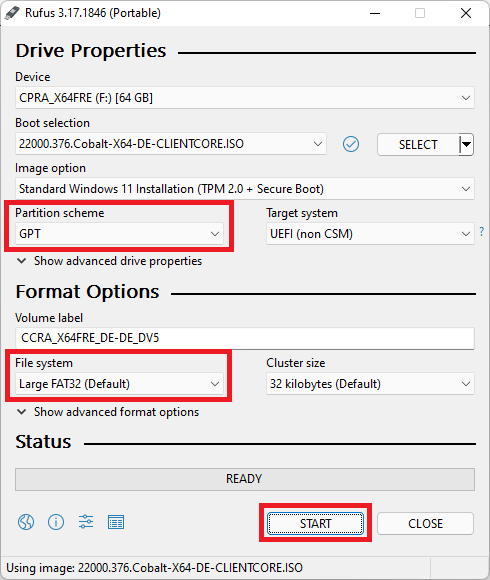
- Create an UEFI mode bootable USB Flash drive containing the desired Win10 image by using the latest version of the tool Rufus (important: choose the UEFI mode partition table = GPT).
Here is a picture, which shows the most important Rufus settings:
Important note: Usually the USB Flash Drive has to be FAT32 formatted to be bootable in UEFI mode, but this file system cannot be created, if any file within the ISO file (e.g. the install.wim) is bigger sized than 4 GB. In this case the tool Rufus will automaticly format the USB Flash Drive by using the NTFS file system, but nevertheless makes it possible to boot the USB Flash Drive in UEFI mode (provided, that the “Secure Boot” option within the BIOS has been set to “Disabled”). - Enter the BIOS and navigate to the "BOOT" section and - if applicable - the "SECURITY" or "Keys" section.
Make sure, that the "Secure Boot" and "Fast Boot" options have been set to Disabled. The "Compatibility Support Module" (CSM) can either be set to "Disabled" as well (better option, but requires full UEFI compatibility of the graphics adapter) or to "Enabled" with the ability/preference to load EFI BIOS modules for the Storage Disk Drives. If you see BIOS options for the "OS type", choose "other OS". This will disable the Secure Boot setting.
Tip to avoid SATA/NVMe interferences during the OS installation:
It is recommended to temporarily unplug all SATA connected devices and additionally to disable the on-board SATA Controller(s) within the "Storage Configuration" section of the BIOS before starting the OS installation.
These measures of precaution can/should be reversed once the OS installation onto the NVMe SSD has been successfully completed. - Insert the prepared USB Flash drive and boot off it in UEFI mode (the related bootable USB drive should be shown by the Boot Manager with the prefix "[UEFI]").
- When you come to the point, where you have to decide onto which Drive and which partition the OS shall be installed, delete all existing partitions from your NVME supporting SSD.
After having done that, let the Win10/11 Setup create a new partition for your future drive C: on the related SSD.
Then point to this just created partition as the desired future OS location. - The rest should be done by the Setup automaticly.
You will get a message, that some additional partitions have to be created. Accept that and follow the advice of the Setup where to install the OS. - Once the OS is up and running, shut down the computer, remove the bootable USB Flash driver and reconnect all your previously used storage drives.
- Before you restart cour computer, make sure, that the NVMe SSD resp. its listed "Windows Boot Manager" is on top of the bootable storage drives.
- C. Data Recovery from the previously used system drive: (not recommended)
- Since the required boot sector of an NVMe SSD is not compatible with the boot sector of a SATA SSD (although both boot partitions may be named "Windows Boot Manager"), you will not succeed by simply transfering the data of your previously used SATA SSD to the NVMe SSD.
On the other hand a clean install of the currently latest OS version is a good opportunity to get rid of the complete data garbage, which has been accumulated in the past and decreased the performance of the system drive.
That is why I strongly recommend to do a clean OS installation onto the NVMe SSD and not to try a recovery of the previous used drive C: data.
- Since the required boot sector of an NVMe SSD is not compatible with the boot sector of a SATA SSD (although both boot partitions may be named "Windows Boot Manager"), you will not succeed by simply transfering the data of your previously used SATA SSD to the NVMe SSD.
Step 1 - Preparation:
Open Guide: (open/hide by a click)
Step 2 - BIOS modification (2 alternative Methods):
A. Guide for the usage of AMI’s Aptio MMTool:
(easiest and usually successful method for AMI Aptio IV BIOSes)
Open Guide: (open/hide by a click)
a) Opening the BIOS file and finding the target DXE Volume:
b) Insertion of the NVMe module
c) Verification of the successful insertion
Very rarely even AMI’s AptioIV MMTool may touch a “Pad-file” of the BIOS while executing its NVMe module insertion task. To avoid later problems after having flashed the modded BIOS, I recommend insistently to compare the entire “DXE Driver Volume” of the original and the just modified BIOS regarding the presence and location of Pad-files by using the UEFITool (the MMTool doesn’t show the “Pad-files”). The best visual way for such comparison is to open the original and modded BIOS side by side. For details look >here<. The only difference between the original and the modded BIOS should be, that a new DXE driver named “NvmExpressDxe_5” resp. “NvmExpressDxe_small” has been added. All other listed modules and Pad-files should stay untouched by the BIOS modification.
If you should realize, that a natively present Pad-file module is missing within the modded BIOS or a natively not present Pad-file has been added within the modded BIOS, post a report into this thread, but don’t flash this modded BIOS!
B. Guide for the usage of the UEFITool:
(only recommended for users with advanced BIOS modding knowledge)
Open Guide: (open/hide by a click)
- a) Opening the BIOS file and finding the target DXE Volume:


b) Insertion of the NVMe module
c) Verification of the successful insertion
Step 3 - Flashing of the modded BIOS:
- The related detailed Guide can be found >here<. If you have a question regarding the BIOS flashing procedure or if you should run into a problem while trying to flash your modded BIOS, please post into >this< thread and not here.
Warning:
Please keep in mind, that this is the only really risky part of this Guide.
For BIOS modding beginners it is strictly recommended
a) to double-check the integrity of their modded BIOS and
b) to read carefully >this< Guide
before flashing any modified BIOS.
Additional Notes: (open/hide by a click)
Step 4 - Installation of Win10/11 onto the NVMe SSD:
Open Guide: (open/hide by a click)
This is what you hopefully will get:
Benchmark Results: (open/hide by a click)
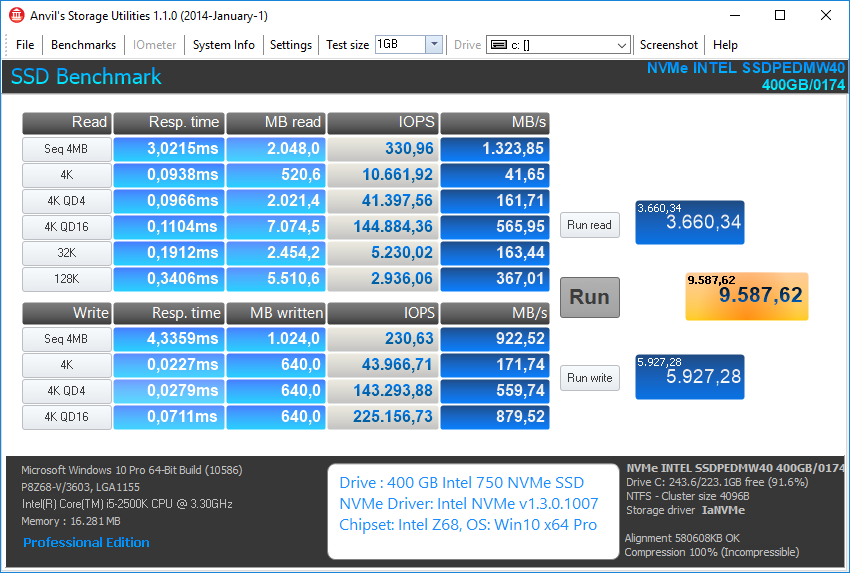
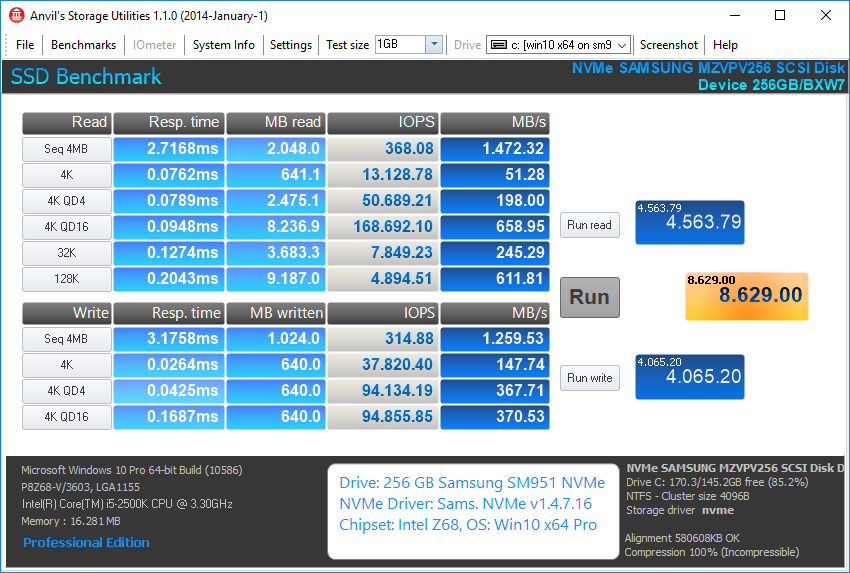
Here are some benchmark results I got with my Z68 system running 2 different NVMe supporting SSDs:
400 GB Intel 750 PCIe SSD:
256 GB Samsung 950 Pro M.2 SSD (connected via M.2>PCIe adapter card):

256 GB Samsung SM951 NVMe M.2 SSD (connected via M.2>PCIe adapter card):
Any feedback is much appreciated!
If you are satisfied with my work/support, you can send a donation to my personal Win-RAID CA PayPal account by clicking onto >this< link.
Good luck!
Dieter (alias Fernando)