Attached first part of complete bios (FD, GbE, ME) with cleaned ME.
There’s in fact a warning when opening the backed up bios: "Warning: The ME FW image loaded has been pulled from a previously booted system. Some FW settings will not be allowed to be changed. Warning: Could not set “Redirection Privacy / Security Level” to: 0x00000000000000000000000000000000000000987E9633A42B60E004F28647EC777C680EF6EE533E5494F6091DFF853E76A8F8C801, reverting to previous/default value: Default"
But this is regarding AMT redirection configuration: "Redirection Privacy / Security Level - This setting allows customers to configure the Privacy and Security level for redirection operations. Default enables all redirection ports (User consent is configurable). Enhanced - Enables all redirection ports. (User consent is required and cannot be disabled). Extreme - Disables Redirection and Remote Configuration / Client Control Mode"
I don’t think this should prevent the system from boot.
Anyway- there are two possibilities now- try everything as ‘native’ as possible and use the attached FD_GbE_Me with cleaned ME together with the empty stock bios now or- as proposed in my last post- go one by one: First stock bios, old/own ME, if that doesn’t work: Stock bios with cleaned ME.
@lfb6 - I’ll try the various configurations and report back.
@Lost_N_BIOS - Sorry about the excessive quoting. I’ll stop that
LCD is original. I’ve had the machine from new, and it’s never had anything replaced. Until this failed BIOS update, it’s never missed a beat. It does have an HDMI connector which I’ve tried, but nothing on the external monitor. P50’s have discrete graphics chips, and I assume the BIOS needs to fire this up.
@lfb6 & @Lost_N_BIOS - Progress. Before assembling anymore BIOS files, I thought I’d try the BIOS image that I gave a link to in post #10. After briefly disconnecting the CMOS battery, I pressed the power button, and it all looks to be working. I initially got this screen:
Date & Time is understandable, as is the mouse, because I hadn’t connected the keyboard or track pad yet. Not sure about the bad CRC though. After going into the BIOS to set the date & time and re-booting, I don’t get the CRC error any more.
Interestingly, when in the BIOS, it appears to have the correct serial, machine type, and what I assume is the correct UUID. No idea where it picked those up from. Here’s the BIOS screen you previously requested:
It’s obviously running an older version of the BIOS, and I assume I can just update to the latest version using the Lenovo updater. How do I know if this BIOS has all the security features enabled?
Even if we don’t stay with this BIOS flash, it does prove the hardware is all good.
OK, I didn’t have doubts about your hardware, but maybe worth a try. If the owner of the machine this is bios is backuped from (and you) both use the Windows OEM license there’s a slight chance that this could give a little trouble with activation. Some of the data you see in this screen might be stored other places.
What security features do you mean? Only difference in ME configuration is (despite AMT configuration) “Intel(R) PTT initial power-up state”, enabled for the foreign dump, disabled in your ME. (PTT= Intel Platform Trust Technology)
(Hidden) bios settings/ changes in NVRAM like the one Lost_N_BIOS proposed will be almost impossible to find out of.
I’d prefer starting with own config, or- if this isn’t possible- with a clean/ stock base. Said that it doesn’t matter if you try clean ME or stock bios or both first. I’d start with both: ‘clean ME’ and ‘stock bios’.
Anyway, you might try to use Intel ME11 tools (fptx.exe) for flashing puposes now, but I assume that the bios area has protected ranges or is completely locked for flashing and since the foreign bios dump still has a locked FD also ME won’t be flashable this way.
I also just noticed that Windows isn’t activated anymore, so it would be nice to use as much of my original bios as possible. Now I’ve proven hardware is all good, and can flash new bios quickly/safely, we can try as many configurations as we like.
When I asked about security features, it was kind of referencing some of the previous comments about the FD being unlocked. I don’t know much about the structure of a bios file, and not sure if this is a bad thing. Can anything we do to my bios leave me vulnerable to hacking in the future?
@IanP50 - Great to confirm that once working BIOS is there it will boot Serial/UUID may be stored in EC FW too I checked, and that UUID and serial are from your original BIOS, so it must be also stored and pulled from eslewhere, so must be EC FW stored as well. Surprisingly the MAC ID is wrong, so that must NOT also be stored in same place and is only pulled from GbE
I unlock users FD all the time It’s helpful in case they need to flash ME region later, if it gets corrupted. BIOS or SMI Lock, or FPRR may also need disabled in setup/VSS/NVRAM if you wanted to unlock it all to make way for easy FPT flashing in the future, but then that BIOS or those edited modules at least would need to always be used in all future BIOS or it would be relocked Hacker would have to sit down at your system for most of the hacking any of this would leave open availability too.
Be sure when ME is cleaned original BIOS/ME is used as base so system specific info gets carried over. Your serial, UUID etc also in ME FW, this will be wiped during a ME FW clean/UPD but there’s no way around this and no way to put it back either unless direct copy/paste doesn’t break the ME FW later. It may only be there interim during BIOS update process though, I don’t see it in the BIOS from post #10 your testing Windows activation we can fix later by putting back in DB-PK + EVSA Store (Key/OA3 ID at end of here) into NVRAM, if your full NVRAM as-is does not work into a clean BIOS/ME transfer
@lfb6 - Just tried p50_fd-fff_gbe_me-cleaned from #41 with 86_stock from #9, and I’m just getting a quick spin of the fans, and then it shuts off.
p50_desc_gbe_me_fd from #17 with 86_stock from #9 looks more promising. It initially went around in several boot loops (showing lenovo splash screen spinning the fans and shutting off), but eventually showed the same three errors shown in #43. After setting the date & time, it went through a couple more boot loops and then started Windows. Windows is still not activated. After all of this, further reboots don’t go through the boot loops. It seems to boot normally.
@IanP50 Good! Very sorry for cleaned ME not working, will check again what happened there.
Since your old ME does boot you should just check if this ME is not corrupted: Download Intel CSME System Tools v11 r34 from Intel Management Engine: Drivers, Firmware & System Tools, run at least once ‘MEInfo???.exe -fwsts’ and post the result. You could also run a ‘MEInfo???.exe -verbose’ and a ‘MEManuf??.exe -verbose’. (Please put the result in a spoiler!)
You should dump your bios once again since the NVRAM is now filled (that were the boot rounds) and post it again. Dumping will be possibly a lot easier now, you could try using ME tools, ‘fptxxx.exe -d bios.rom’ should just dump the complete 16MB to ‘bios.rom’ or whatever filename you choose.
If ME is OK/ not corrupt I’d leave it this way. Next step would be copying the information from your old NVRAM to you existing bios. This is something I’m not able to do, but Lost_N_BIOS did fortunately already mention he could do it!
Also note that Windows is now showing as activated. I think it was upset that it couldn’t see the internet. As soon as I plugged the WiFi antenna back in it sorted itself out.
@IanP50 Thank you! I can’t see anything wrong with your ME, from my point of view no further actions needed here.
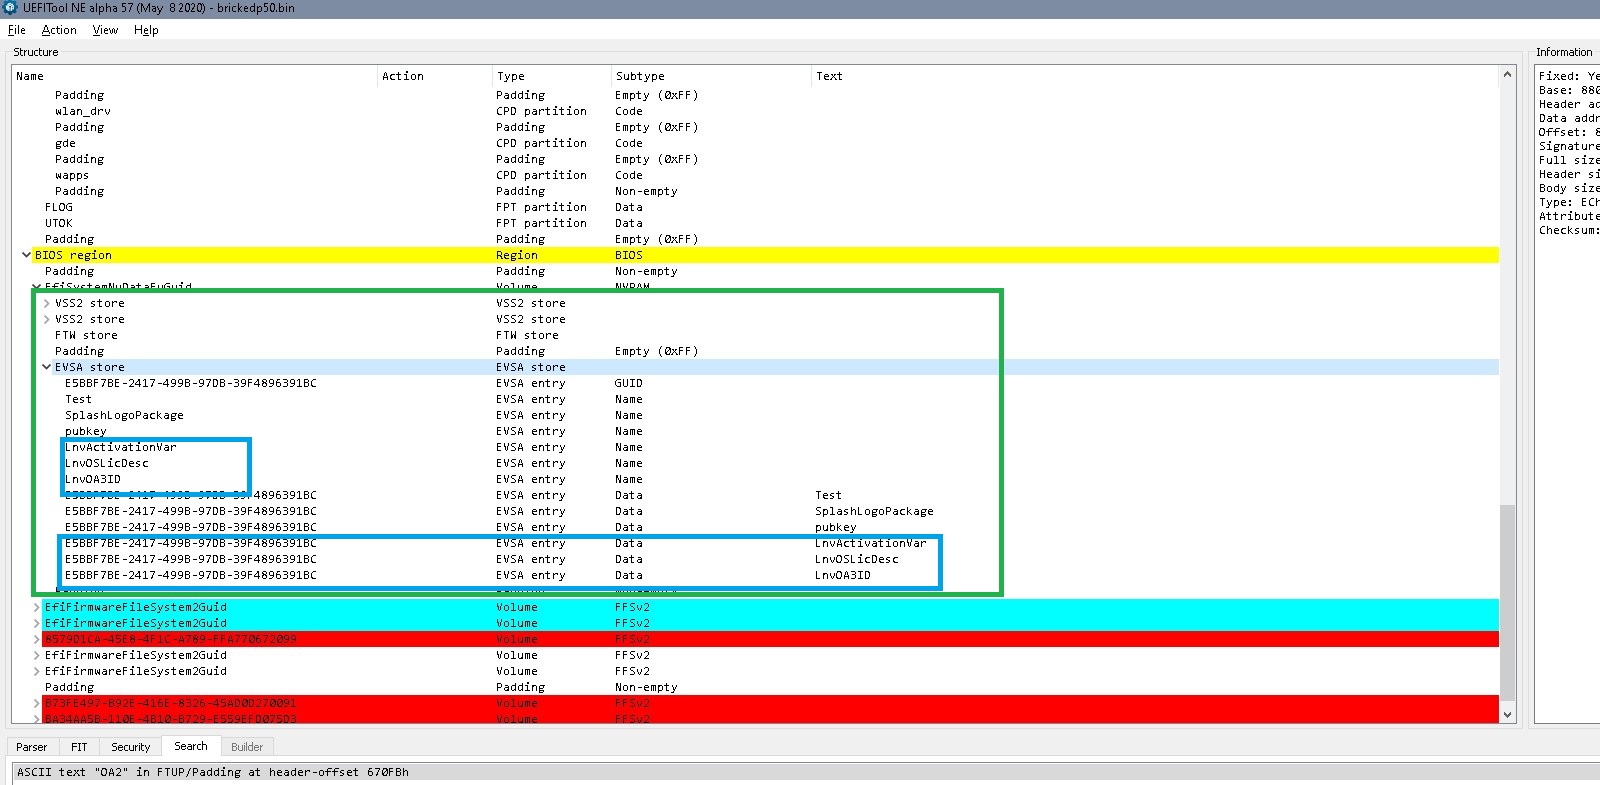
See picture (old bricked bios)- The area in green rectangle is stil different. FTW store is identic, EVSA store has the license information, that part is missing in your bios now (blue rectangle). Possibly this store can simply be exchanged. What might be hidden in those VSS2 stores- no idea.
Windows activated since it recognized that it was again on ‘known’ hardware. Is this an OEM package, meaning your OS fits to the version in the license information in bios or did you yourself install an OS with separate license?
I’d propose to transfer this EVSA store completely from your bricked bios to the latest dump, that’s not much data and was with high probability untouched during your bios- update. Whatever might be hidden in the two VSS2 stores might god or @Lost_N_BIOS know, I don’t see anything that should or could be transfered.
@lfb6 - Hopefully @Lost_N_BIOS can comment on the EVSA and VSS2 stores.
Regarding windows activation. When I got the machine, it came pre-loaded with Win7 via downgrade rights from Win10. Earlier this year, I manually updated to Win10, and I think licensing may be tied to my Windows user account. I didn’t have to do anything special to activate it. It seemed happy that my existing copy of Win7 was genuine, so activated Win10 automatically.
Yes, would be interesting if he could comment on the padding after EVSA, there’s a reference to bios version and some additional bytes which might be kinda key?
(Left side bricked, after failed update from 86 to 89. Right side latest dump 86) 86=N1EET86W=1.59
Question: Copy EVSA only or EVSA and padding?
BTW The empty Asset tag doesn’t seem to be something to worry about, it can be set user- defined by software together with other administrative information- lease time, warranty time… (1, 2)
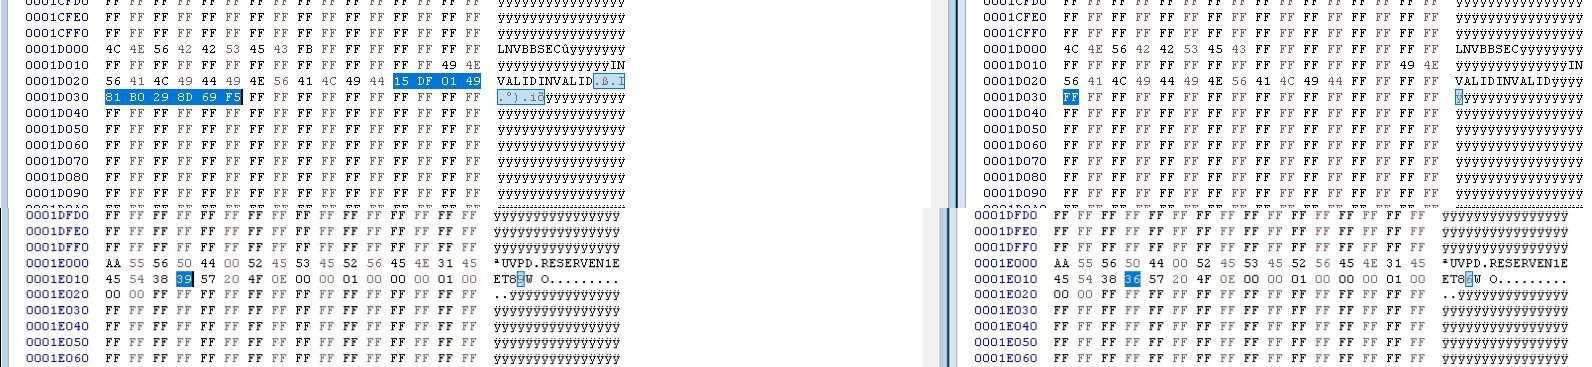
Edit: Seems that this sequence “LNVBBSEC” in paddnig has some meaning for TPM? (link)
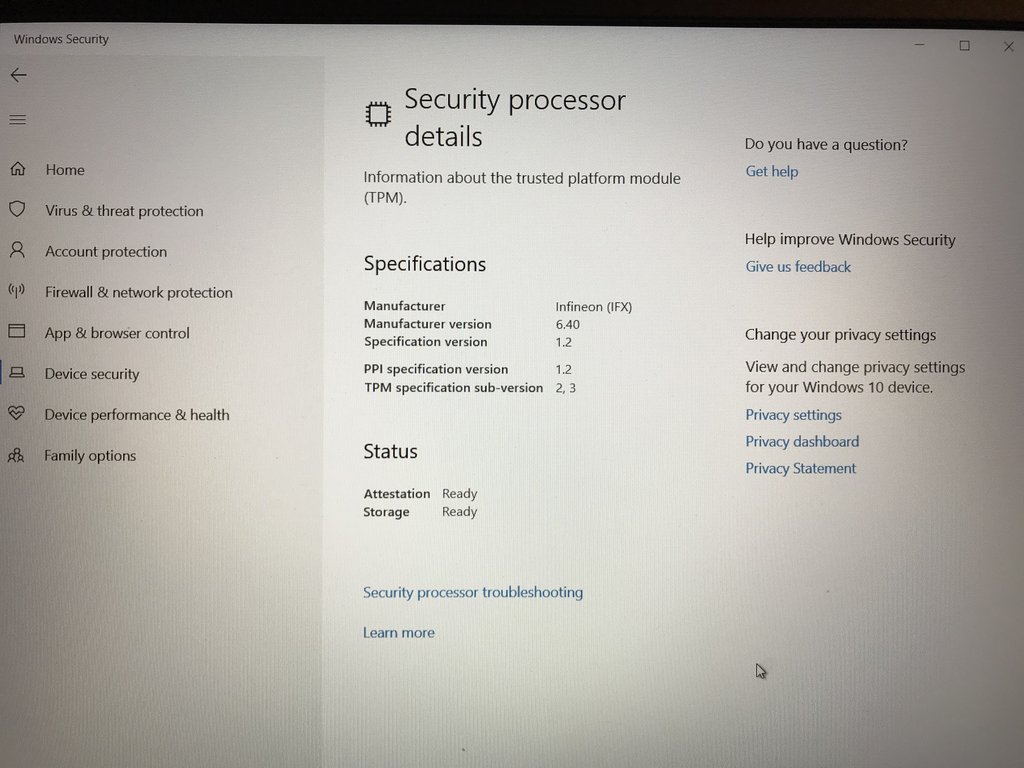
@IanP50 Do you have any information regarding TPM mpdule somewhere in bios?
This is all I can find relating to TPM. I can’t move the cursor to the ‘Security Chip Selection’, so don’t know what options there are. Where it says ‘Discrete T’, I believe that would read ‘Discrete TPM 1.2’ if it wasn’t truncated.
@IanP50 Thanks for the information about that TPM. Btw- there’s an security update for the TPM firmware from 2017 (link), but don’t do that now!
Checked padding once again. The green circled FF seems to set the board to mfg mode (your bios still has FF)/ will be changed if board is no longer in mfg- mode. The version information doesn’t seem to have any relevance, and the blue marked bytes are probably only important if board/ bios is no longer in mfg-mode.
Linked two files, EVSA store copied, padding not touched. The .rom file is the compete bios files, 16 MB. The rgn file is just the bios region, last 9 MB. You can try to flash the whole area by “fptxxx.exe -f bios_EVSA???.rom” (or of course by programmer). You can try to flash bios region only by “fptxxx.exe -bios -f bios_EVSA???.rgn” As always make a backup of your bios before flashing.
I assume anyway that you will not be able to software- flash a complete file or the bios region since bios region will be locked one or the other way.
Byte after LNVBBSEC Sets the system into MFG mod, or not, it’s not about current mode of anything in the BIOS or ME etc. I mean, you can use this to put TPM/System into MFG mode, or not. If/when in MFG mode, TPM should be disabled and unusable. From the image above, looks like this byte is currently set to MFG mode (ie FF). Original dump from this system that byte was set to >> 0xFBh, if you want to set it back to stock value Also, bytes after “INVALIDINVALID” should be as follows, if you want to set those back, if they do not currently match (I did not check) >> 15DF014981B0298D69F5 What do you guys want to know about EVSA store, I’m not sure what you’re asking? All I know about this is that your original windows key and OA3 ID is in there, so if you had continued window activation issues this should be copied back in (Which you’ve done now)
Great work, to the both of you!! It looks like you guys have sorted this all out now, correct? Windows activated, and is Ethernet LAN working?
@Lost_N_BIOS - I’ve yet to use the machine in anger, but it boots fine, Windows is activated and both Ethernet and WiFi are working.
Not sure about the TPM setting. I assume it’s a good security thing, so probably best to be enabled it. Just checked, and the bytes after INVALIDINVALID are currently all FF. Again, not sure if this is good or bad.
I don’t think there was a question regarding the EVSA store. That’s been copied across, although I’m not sure what impact it’s had. It was about the two VSS2 stores, and if they contain any important info/data/settings that would be good to have. They have a lot of ‘invalid’ entries at the moment, that aren’t present in my original damaged bios.
@IanP50 - Was that a joke Good to hear all that is working properly now! TPM should be disabled if you don’t use it, this is for drive encryption and no need for this unless you specifically set it up and use it. I mean, if you don’t know what it is, how to use, etc, then it’s of no use and not doing anything for you to be enabled, so not helping or being used right now…
For now, it’s disabled internally due to MFG mode set in hidden area of NVRAM (ie FF is not normal, publicly used/set for this) That only happened to be FF now due to how BIOS was rebuilt from stock and programmed in, where this byte would be skipped over during flash normally and original byte left in place. If you want board put back to how you had it before brick, that byte needs set back to FB not FF, then you can enable and use, or disable TPM properly. This is all about a single byte
After INVALIDINVALID, you may want to put back original settings, these all affect certain CPU Functions and features - Or you can leave all FF, up to you Sorry, I do not know which bytes there do what, only that these control enable/disable of certain CPU functions, and your original BIOS contents bytes for this area I posted above
EVSA store contains some parts of the windows activation stuff, as does some entries in VSS/VSS2 (this is all NVRAM type stuff). Invalid entries are just that, broken, invalid, or replaced due to either of those two. Next time you reflash BIOS using standard method it should all be reset and cleaned (load of optimized may do that too, but not sure, since it’s tough to clear CMOS and reset such things on laptop usually.
@IanP50 I think it’s not only TPM, but might be bootguard as well. One does find som references to that byte sequence via google. For the hidden bios menu see this page (link, picture), you got this hidden menu in your bios, too.
I think this mode is more extensive than thought. I assume it disables bootguard and (all?) other bios protection, too. Possibly all/ a lot of these not used/ not filled keys in vss2 store will be filled when leaving this mode for normal operation. The sequence Lost_N_BIOS gave us for disabling “bios lock” for example is still not there, pchinit guid in vss2 still “invalid”.
IanP50: - How did you flash the latest version? CH341 or fpt? - Did you check Windows avtivation/ license information in bios? Does it look like the information you did find in the ‘good’ bios (picture in #43)
If I’d plan a lot of bios hacking in the future I’d possibly be happy with this setting, otherwise I think I’d feel more safe with a little protection enabled.
@Lost_N_BIOS I’m not sure about the other sequence (15DF014981B0298D69F5), didn’t find anything regarding these are, but it’s different on the other ‘good’ bios IanP50 found.


 Serial/UUID may be stored in EC FW too
  It’s helpful in case they need to flash ME region later, if it gets corrupted.


 Was that a joke