Wow… This message board has a lot of limitations. lol It didn’t like me adding more than 3 images to the text field, so the last image is added as an “attachment” at the end.
Anyways, so that’s what’s going on with the boot section of the BIOS. The only way I can get the system to boot to anything is through the F8 Boot Menu. But even that isn’t working properly, and renders differently than in the original (OG) BIOS such that it makes it impossible to identify the entries if they happen to be the same type of device.
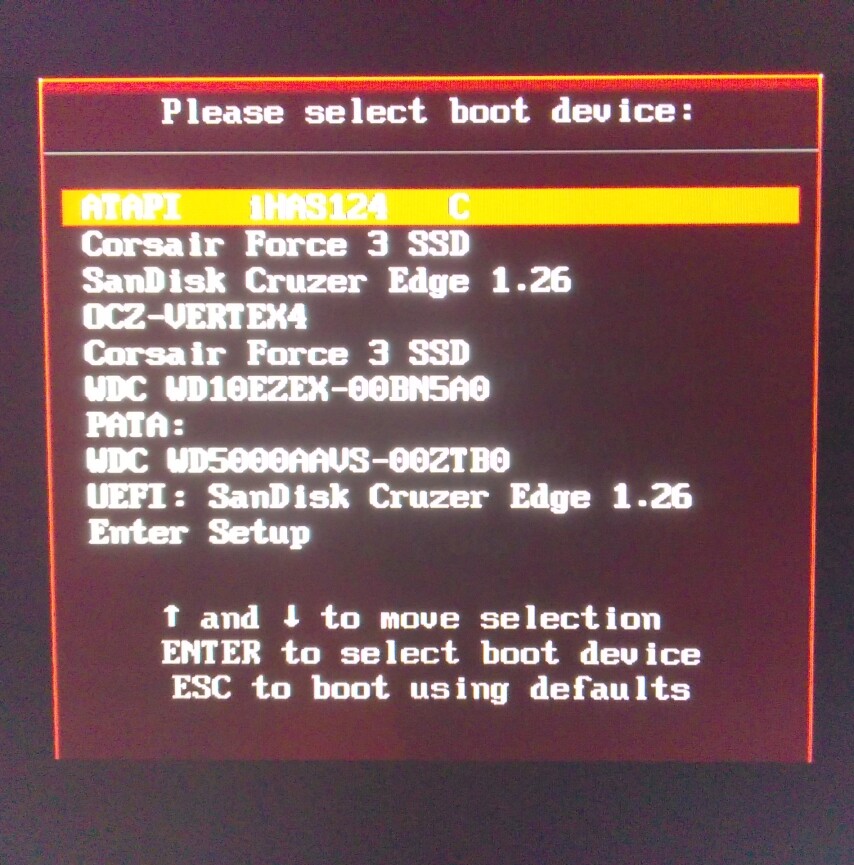
In the OG version, the entries had numbers in front of them, like so:
Whereas in the modded BIOS, there are no numbers, just labels, like so:
Also, the order in which the items appear in the F8 list seems to change at the whim of the BIOS, making matters worse for trying to figure out which of the Corsair SSDs I’m selecting. It’s just a toss-up each time. lol
Curiously, when I select PATA in the F8 menu, I get the Windows XP bootloader! So one of the Corsair SSDs gives me Win7, the other gives me WinXP, and the PATA entry gives me the WinXP bootloader. Very strange.
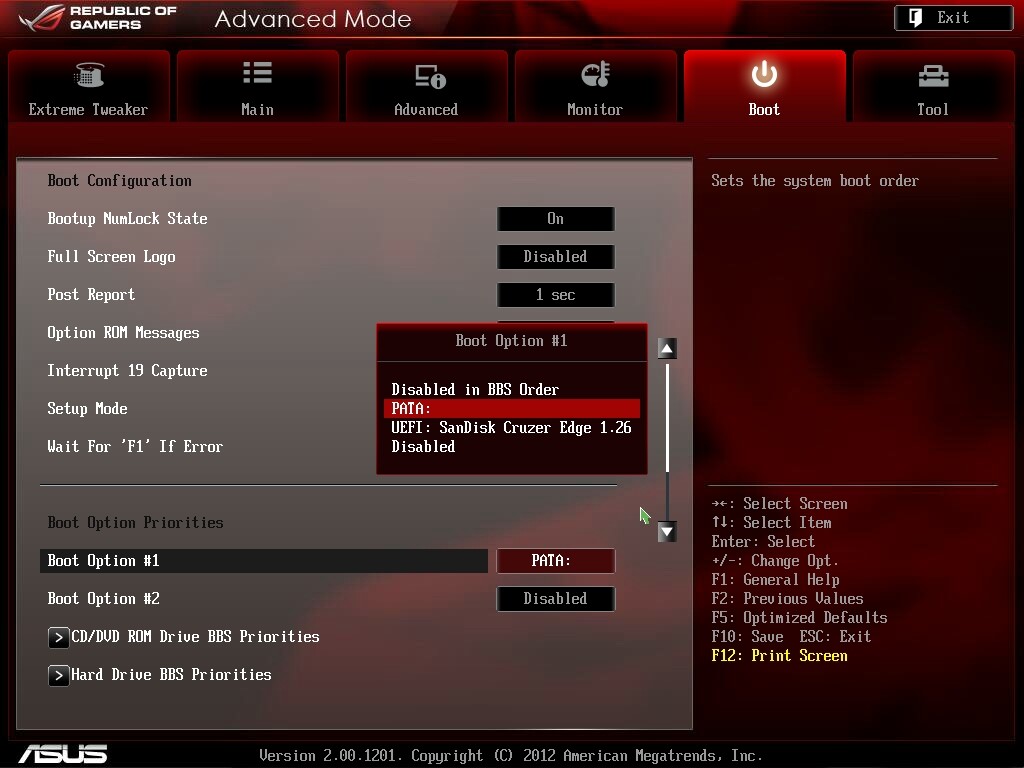
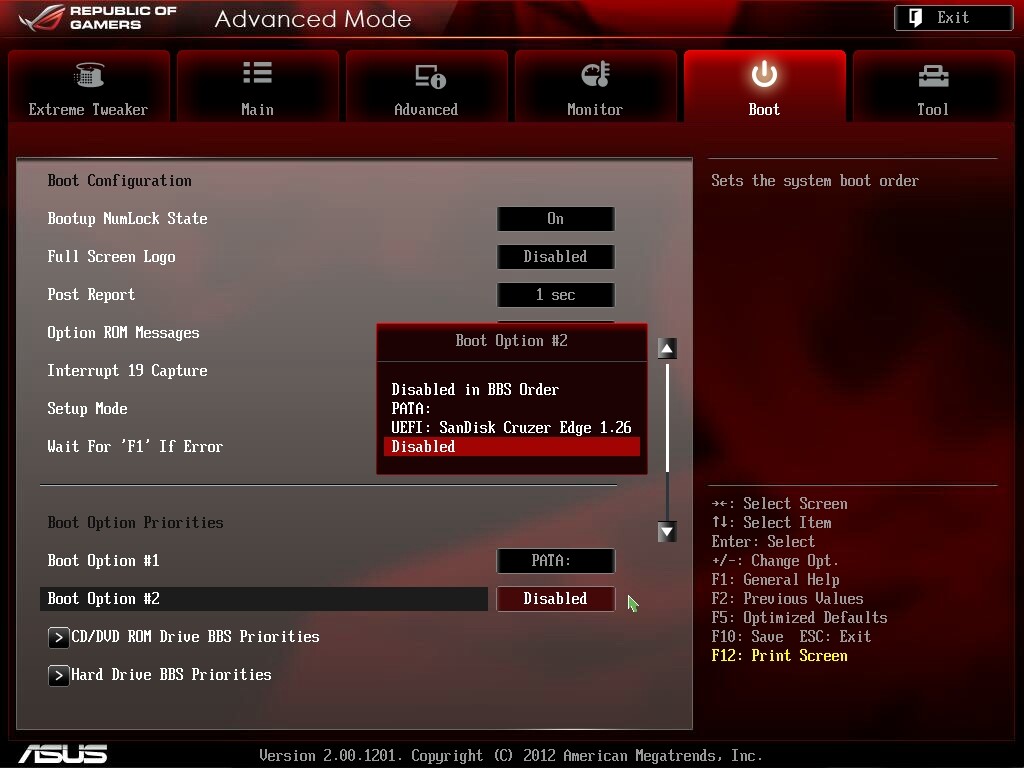
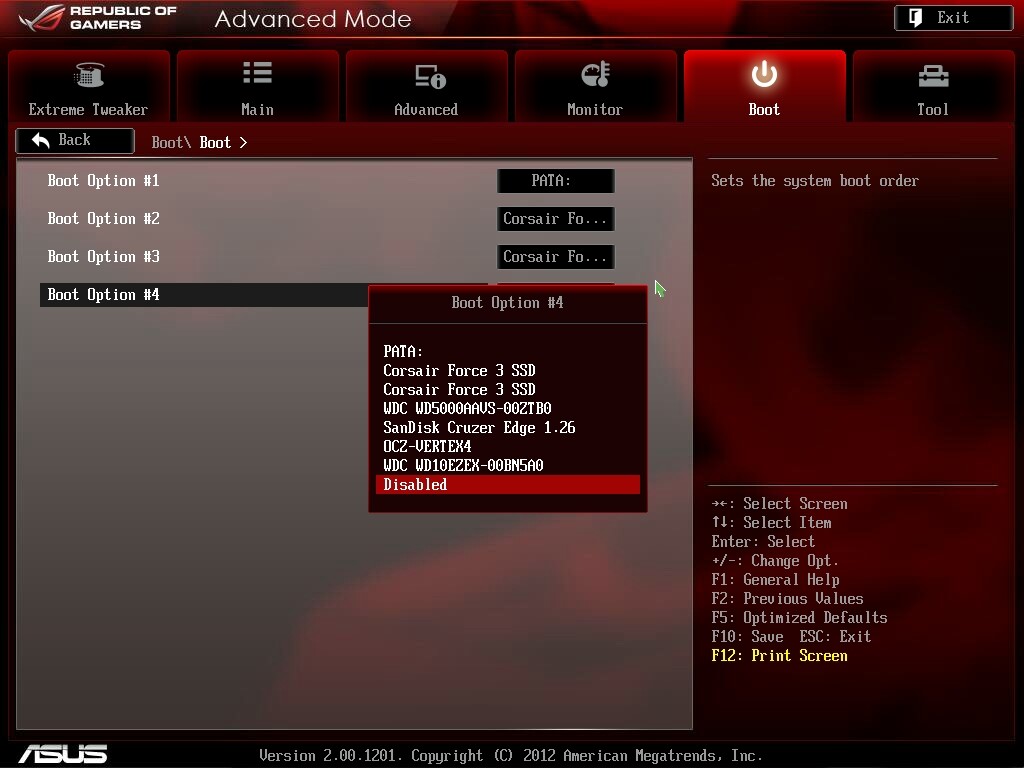
I am attaching a FEW F12 screenshots of the BIOS Boot section settings to better illustrate how it (mis)behaves. The items jump all around and change up every time I make any kind of adjustments… and then don’t do anything anyways. Notice how the available items in Boot Options 1 and 2 are consistent with one another, but completely differ from available devices in the Hard Drive BBS Priorities dialog. BTW, that particular SanDisk USB drive that’s listed is not a UEFI drive; It’s MBR. So it’s not being detected properly by the BIOS.
Do you have any idea what might be going on here? Thanks.
This a lot of info to look at. At first glance, if your system get stuck at the ASMedia controller, it seems to be because AHCI is not enabled for your NVMe drive. You can verify that in the Bios settings.
For booting, you have the new NVMe module in the Bios mod that detect your NVMe drive and get you to choose it to boot. That part seems to work fine because you can chose it in your list. It even list your boot manager so it is another proof that it is working fine.
From that point on, people usually install Windows 10 which includes the NVMe drivers. Since you are installing old and already existing OS then maybe your problem is that those OS don’t have the NVMe driver installed already. You didn’t mention that you had installed them so i suspect that. So that would explain why you get stuck each time your reach that point. I suspect that because as soon as you click on a drive to boot an OS, the job of the Bios and the NVMe module in it is over and ends there and the job of the OS start there to manage and boot the system. Without NVMe drivers, the OS can’t do it.
You must either install the NVMEe driver in those OS before tranfering them to the NVMe drive or do it manually after. The first method is easier.
That would also explain why your boot order changes often in the Bios. It can be because each time it tried to boot an OS on the drive, it was never able to release complete control to it so each time the system restart, it reset itself not knowing what order it will do because its last executed one was unsuccesfull. It is just a theory but a probable one.
If it is not the problem, maybe you forgot to mark your drive as bootable when you formated it. It is another thing to verify.
Yes it is usually possible to convert an existing MBR to a GPT. But i would not do it unless you can’t do otherwise because only Windows install seems to put the partitions at the correct size within the OS. I would install brand new then go to my old disk and get and reinstall what i need. I know… It is far longer to do but it is the right way and only need to be done once. Like i said, if you really can’t reinstall brand new, some programs can convert it for you.
Last comment: If your only concern is the wear and tear of the disk, it is worse to convert in place than simply wipe again and install brand new. The convertion involves a lot of files moving temporary around during the process.
Just to clarify, it doesn’t get stuck at any point in the power-up process - The ASMedia controller just posts and then continues on to the next screen. So each of those screenshots I posted of the power-up process are occurring in consecutive order, in real time; I just took picts of them all to show you all the data it is displaying at power-up.
Anyways, I don’t know what’s going on with it. Today, it’s acting totally contrary to the way I described it acting yesterday. I’m at a loss and ready to give up. I appreciate your time though. Thanks again.
Ok, thanks for the clarifications, good to know it is not stuck there.
I think it is just a little ridiculous thing that is bugging your PC and, like almost anything in a PC, the only real problem is just to find it. Trust me, i know it is the anoying part of the process…
Let’s try from the basic and go up from there. I don’t think it is the Bios but i will tell you what to do as if it is, just in case, so you can verify everything from the ground up with it:
- Sometimes a Bios get corrupted during the download. You can try to download it again, verify the checksum to be sure it is not corruted, and flash it again. It is very rare but that situation happened to me once so it is possible…
- Did you try clearing the CMOS after flashing, save and start once at default settings, then reenter your own settings? Sometimes old settings of an old Bios gets mixed up after a Bios upgrade and it is the only way to get rid of the internal mix up. In fact, in theory, this should always be done after ANY Bios upgrade but not many people takes the time to do it, myself included when i think the upgrade is too minor to matter and i don’t see any problem.
That is all i can see related to the Bios because everyone else seems to run fine with it in NVMe. Unfortunately, i don’t know if you are the first to try to start it with an old MBR setup in NVMe and if anyone reading this did try that, working or not, then please post your results whatever they are. Unfortunaltely, i can’t test it myself because i don’t have a NVMe drive. I don’t see why that would be a problem but i can’t be 100% sure untill someone confirm it one way or another.
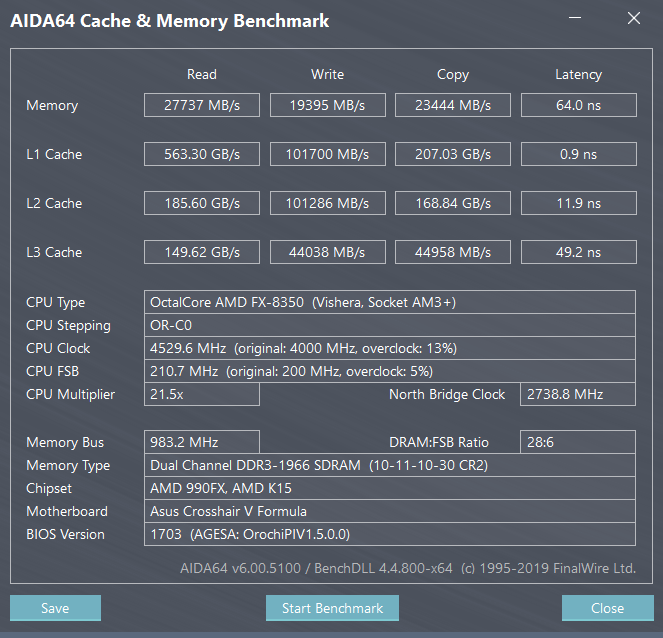
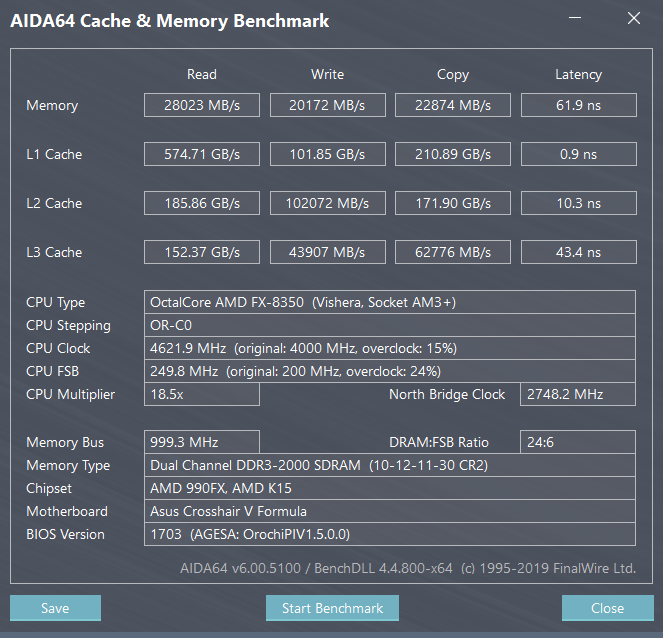
I decided to check> CrosshairV-Formula-ASUS-1703.ROM with AMD AGESA OrochiPI v1.5.0.2 mod v7 - as a result, I managed to lower the DRAM CASH # to CASH Delay timing from 11 (as I posted in the photo) to 8 on this BIOS It works stably, the display of the amd video card is correct CPU Frequency Multiplier Not Working Correctly RAM frequency management does not work HT frequency is fixed at 2800 and does not change! …
Help to understand. Before up-dating of BIOS, the processor held acceleration of 4670 hertz. Now the same settings, from the saved acceleration profile. But it is impossible to leave them the processor overheats. More than 90 degrees in seconds collect, and protection works, the computer is switched off. About 4560 hertz fell. Now overheating comes not so quickly, in 5 min. before temperature kept within 75 degrees in case of a maximum load. If to drop everything on a default everything perfectly works. Also doesn’t overheat and the blue screen doesn’t appear. CPU/NB recorded at 1:38 Volts but Volts raises till 1:42 the problem can here? Fixing on parameter 1.39 Volts here everything is good CPU VCORE, this parameter doesn’t change. was at me so [[File:1.4?.png|none|auto]] became now so
I know the problem can’t be the Bios itself because nothing was modified in it related to that. With that said, here are all you can verify:
- If you didn’t clear the CMOS, loaded and saved the default values in the Bios and restart after flashing it before entering your own settings then it is not impossible that there are some glitches from your old Bios that didn’t got overwritten properly. If in doubt, reflash and reset properly.
- Your settings for overclocking are probably fine. But it may be worth it to verify the other ones having an impact on the temperature. Verify if the Cool&Quiet feature is working. Verify also if your fan PWM for the CPU are set correctly if this apply to your cooling.
- From the symptoms you described, it is also very possible that your thermal paste is finished. If it is your problem, you should change it. This one is the cause i suspect the most to be your problem.
Just for reference, i remind you that the FX-8350 has a maximum operating temperature of 61°C (It is ideally also the max temp you should set in the CPU fan PWM in the Bios if you fan has 3 pins, if it has 2 pins then you should use CPU DC fan settings instead). Your CPU cooling and overclock settings should be set accordingly to try to stay within that limit.
Also for reference, i use “CoreTemp” when i want to see the CPU temp of each CPU core in real time in different conditions. You can google it if it can be usefull to you.
[Fixed] - Both modules AMD misc.bin should have been updated at the same time and to the same version as the modules 4392 and 4393
Some explanations: A long time ago, in the beginning at v1 to be precise, the AMD modules 4392 and 4393 were updated. But at the time, it was not at all a well known fact that the modules misc.bin was supposed to be updated at the same time as those for 4392 and 4393. Now that this fact is finally known and that i am now aware of it, i made the required corrections to the Bios. Please note that because misc.bin is only used with the modules 4392 and 4393, it will only be possible that you may see a differrence if you are using a RAID configuration. IDE or AHCI are not affected at all by this module. Furthermore, misc.bin affect only the AMD controller and not the AsMedia one. For those with a RAID, i am not using RAID presently and i don’t know the AMD changelog for that module so it is unkown if you will see any improvement or not, be it in speed, responsiveness or just stability. If you are using RAID, for curiosity, it could be interresting to report your findings and results if you detect any differrence or not with this bios fix.
Just updated to the latest "stable" build, and so far so good, downclocking / C&Q working fine, gonna have a play about and see if I notice any improvements, appreciate it thanks
Hi guys, sorry to hi-jack this thread, but my question could be related.
I have an Asus Crosshair V, running an FX-8370.
I have been using your modified BIOS - not sure which version at the moment. Even had some good success with overclocking.
However, lately, and about once a week this will happen. The partition information for all 3 of my drives (one Samsung SSD, and two mechanical drives) will be completely lost. Drives will show up in Windows (Windows 10 64bit) as un-initialized.
A simple restore from back up or running a partition recovery tool gets me back in business.
Would like to find the root cause and stop this from happening. Any ideas as to potential cause? (I have gone back to stock/default BIOS settings - still happens).
This is a very special problem you seems to have. One thing is for sure, it doesn’t come from the Bios. I instead suspect something in Windows like the drivers or something like that… More the “something like that” part. Because i doubt that it is the same driver for each of your 3 drives and seeing 3 drives become uninitialized at the same time is a first to me. I admit that i am not able to guess many things that can do that. As far as guesses goes, some of those can be long shots. But i will try:
- There may be a setting in Windows that make your drives detected as removable drives. That can mess with them at the same time. - Maybe a program is scanning all your drives once a week and unmount them to do the scan. But it somehow crash before re-mounting them. - You have a virus or malware that makes your drives disapear by corrupting the filesystems of your drives.
And that is pretty much all i got for now. I can’t think of anything else for now.
Maybe some more details would be usefull. Like…:
- Are your drives just unmounted or are all the partitions really gone? The two are not the same thing and using a software to correct the second can work even if the problem is just the first. - Are they disapearing while you use Windows or is it always only at start-up? By the way, the best proof that it is not the Bios is that they show up in the Bios and reach the step of showing up in Windows (initialized or not).
My last comments are that if they are unmounted, then it is probably an “unmount” command passed by a program and i suspect a software in Windows (maybe Windows itself). But if it is the partitions then it is a corruption and i suspect a virus/malware the most. Also worth mentioning about partitions is the fact that altough a MBR partition is rather easy to corrupt, GPT is by far way harder. Whatever partition system is in your drives, to make 3 drives corrupt at the same time and make the partitions disapear don’t usually happen by mistake. It feels volontary to me… Like done by a virus/malware.
Last possibility (even if i doubt it a lot) is that all your drives have simply too much errors in their filesystems. But 3 drives at the same time is beyond all odds… Anyway, you can try to use in the CMD prompt (as administrator) this command:
CHKDSK C: D: E: /X (C: D: E: are the letters of your 3 drives, replace the letters as needed) Answer “yes” everywhere then reboot.
I was able to restore my partitions, rebuild MBR, etc using a bootable USB straight into Minitool partition wizard (similar to old school partition magic). Only to boot into windows and find that my drives were all nuked again.
A bit more background. Drive C: 1TB Samsung 850 Pro using MBR, Drive E: 4TB Seagate using GPT, Drive G: 10TB Western Digital using GPT. All 3 of these would get nuked.
So before rebooting and beginning the process all over again, I removed the Gigabyte Aorus graphics card RGB light tuning tool that was starting up at windows boot (part of the Aorus Graphics card engine software package). Just removed everything associated with that software. Part of it was some Patriot SSD RGB application.
So far I seem to be good, but not enough time has passed to really know for sure. Think I can go to sleep at this point not worrying quite as much.
I updated the latest stable version of the firmware - I have 2 ssd in a RAID 0 array - the speed increased thanks to Phoenix48! RAID DriverVer=12/10/2012, 3.3.1540.40
hi i have problem instaled ssd hinix hfs256gd9tng, when computer starts give my massage pxe-e01: vendor and device ids do not match! i can use nvme ssd but is not in bios so cannot boot from it.
Not sure i can help you a lot on that except try to point you in the right direction. This error is not related to the Bios but rather to a formating problem. Somehow, an error exist in you MBR or GPT registry on your disk. Most common causes are a disk format that was interupted and can also be caused by bad sectors in the disk MBR or GPT area. It can also happen when trying to put a 32 bits system on a GPT disk made for x64. Other causes probably also exists. I suggest you google them.
If you can’t restore a MBR or GPT backup then I guess a clean and complete reformat of the disk is probably your best bet.
i think there is a problem with nvram i cant wiped it out even if i remove batery or use clrcmos notihng happen, time is just freeze, when diconnect all hard drives two boot option presist (windows boot manager) no mater what i do.