Well a number of other users have had good success with the BIOS/UEFI provided, so your risk factor is fairly low.
I’ve used 15.X version on my old Z87 board, but that is about the limit…14.X is pretty well a gimmee according to other users of this BIOS/UEFI.
Cheers
Hans
THANK YOU, sir, for saving me the headache of composing the file, F’ing up then bricking my mobo. You’ve helped me cheat fate. For the record, I was able to flash your modded bios painlessly (my existing Win 10 system still works fine – it’s currently running 2x SSD on SATA + 2x HDD on SATA, RAID interface, all GPT), HOWEVER, i’m now waiting on the PCIe adapter card + NVME ssd to arrive. I’ll be doing a fresh install of Win 11 onto the NVME. Crossing fingers but your guide and followup comments have made things pretty clear so I’m feeling extra confident; Cock ![]() of the Walk, as they say.
of the Walk, as they say.
Cheers.
UPDATE
Finally received the PCIe Adapter and SSD. The BIOS update worked smoothly. I didnt have to modify my settings. Windows 11 setup promptly recognized the new SSD as a boot drive. Within Windows desktop everything worked smoothly.
Hat’s off again for the superb mod. Now i’m wondering what more mods we can shove in to this 1903 bios. ![]()
UPDATE
Intel Virtualisation NOT WORKING. Modded Bios??
CPU: Intel i7 3770
BIOS: 1903 (modded from here, Jan 24, 2021 update)
Mobo: Asus Maximus V Formula
Even thought Intel Virtualization is ENABLED in the bios and Windows 11’s Task Manager > Performance tab shows Virtualisation: Enabled, Intel Processor Identification Utility (and Android Studio’s HAXM) state
NO Intel Virtualization Technology
NO Intel VT-x with Extended Page Tables
I can’t confirm whether the unmodded bios worked fine but last it was installed i dont recall there ever being an issue. I cant roll back the bios without much effort of reinstalling Windows from scratch onto a SATA connected HDD.
Just wondering if anyone has experienced this. Try downloading the latest Intel Processor Identification Utility and check under CPU Technologies.

Very strange…never saw this issue in this model with mods.
Theres 2 settings in bios for Virtualization
- Intel Virtualization Technology (in CPU Configuration)
- VT-d (in System Agent Configuration)
EDIT: The VT-d is not visible unless the mod has it unlocked.
Sry, not near the machine now.
AMIBCP 4.x works on this bios, NOT to change defaults/optimal values, NOT TO TOUCH IT. Only changing to User the parent Acess.
Nothing to do with OS version or state, i can enable/disable the 2 settings whenever i want.
I have another machine with Sabertooth Z77 and a 3370K, the settings and bios mods are the same, multi boot with OS Win7/10/11, same behaviours and no issues.
Thanks for checking. Yours looks perfect. For the record i checked my BIOS and did not see the VT-d option under System Agent Configuration. In fact it does not exist whatsoever. Intel Virtualization Technology does exist under CPU Configuration and is enabled. No luck though.
If it isnt too much trouble can you give me a snapshot of your BIOS’ CPU Configuration and System Agent sections. I want to see what else i’m missing.
So the issue could be a Windows thing. I did come across a post saying if Intel Virtual isnt enabled before the Windows 11 install then the OS skips adding the ability even though Task Manager shows it as Enabled. Kinda bizarre if you ask me but …
All Hyper V options within Windows Features are unchecked.

Due to the seriousness of the issue, so that I’m understanding what you’re saying … You are saying i should locate and download AMIBCP 4.x because it will allow me to modify this modded 1903 BIOS further? And that i should only modify the CPU Configuration and System Agent Configuration sections specifically the areas:
[Root] > Advanced > CPU Configuration
:: Intel Virtualization Technology
:::: Column [Access / Use] - Change from DEFAULT to USER[Root] > Advanced > System Agent Configuration
:: VT-d Capability
:::: Column [Access / Use] - Change from DEFAULT to USER:: VT-d
:::: Column [Access / Use] - Change from DEFAULT to USER
See snapshots below. No other columns are to be modified whatsoever; leave everything the way they are.
Then SAVE out the new M5F.CAP?
I would then take the newly unsigned, saved out M5F.CAP and flashback it to my BIOS and see if that fixes my issue.
Is the above correct?

First of all, backups of the current SPI (It has its own motherboard original data).
The changes with the tool are correctly done.
Now, you can do it in 2 ways:
(From the 1903 mod) Using USB BFB i recommend, using UEFItoolNE, extract only the Intel bios image region and apply the mods, then append back with UEFI tool 0.28, the final file should be renamed M5F.CAP
or
(From a current dump) Using Intel ME8 FPT tool, perform a dump of the bios region only (a full dump for safe keeping is a MUST), do the mod and flash it back again with FPT.
Note: Editing only the Intel bios region, doesn’t show the Unsigned notice by the AMIBCP tool, since the file isn’t a CAP.
Ok that all sounds beyond my skill set. I’m bound to break something. What can i provide you so that you can generate the proper modified .CAP file for me to simply reflash it without worries? I still require the wonderful NVME boot drive+ support of this mod, of course.
Sry i dont have time now for mods, maybe hancor can do it rigth now.
Or wait a few hours…
Still the back/dumps you can do it asap, do not share it as it contains the mb data.
You can share a cap or a “blank” mod file but do not advise sharing system dump.
EDIT: I didnt pointed “as” the issue, possible causes only and yes HVCI on Defender prevents it…not the OS itself, glad you made it.
UPDATE
I found a solution. The issue was not with the BIOS, as you pointed out. The issue was in fact with Windows and having to “Disable Windows Defender Credential Guard using Group Policy”. Specifically changing the setting “Turn on Virtualization Based Security” to DISABLED. This appears to turn off Windows Hypervisor which then eliminates the use of Windows Sandbox, unfortunately. Removing the Windows Sandbox feature alone doesnt help. One must specifically disable Turn on Virtualization Based Security, for whatever reason. After doing this the full set of Intel technologies appeared enabled.
So all good. Thanks for being willing to help out. Much appreciated.
First of all I want to thank you for your work. I succesfully updated the BIOS but I’m running into some issues. I’m not booting from NVMe yet cause I wanted to test it out a little bit. I’m glad I did since I seem to be getting very slow speeds, around 300mb/s. CrystalDiskInfo says the drive is running in PCIe 2.0 x1 even though it supports 4.0 and the slot is supposed to be 3.0
I’m using this adapter link
and crucial p3 plus 1tb SSD.
Does anyone know whats going on?
Thanks
The adapter maximum support PCIe interface is 4.0 but its just that, an adapter, what matters is the NVMe itself, the Crucial p3 plus.
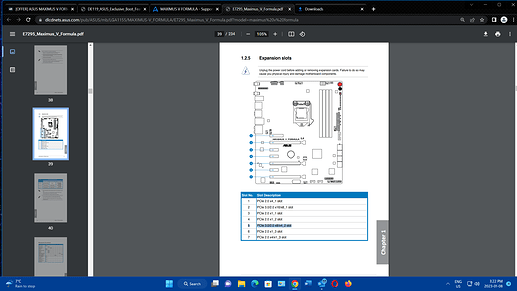
This motherboard can achieve a max of PCIe 3.0 x4 on slot x16(x16/x8)_1 using a iGPU and a max of PCIe 2.0 x4 on all other slots, thats it no more miracles here on a Z77 chipset, using any NVMe 3.0/4.0, int his case a max 3.0 from that Crucial.
It is recommended to use the slot x16(x4)_3 if using a dedicated GPU, but will use only PCIe 2.0x4.
If using slot x16(x8/x4)_2 it will split it to x8/x8 and decreasing GPU bandwith, both devices (GPU and NVMe) will then use PCIe 3.0.
That adapter model is really not the best choice and we should avoid mixed M.2 PCIe types and the ones using cable links if we want a pure PCIe connection, being the upper M.2 to a PCIe SATA (requires cable link) and the lower a PCIe NVMe (No cable linked).
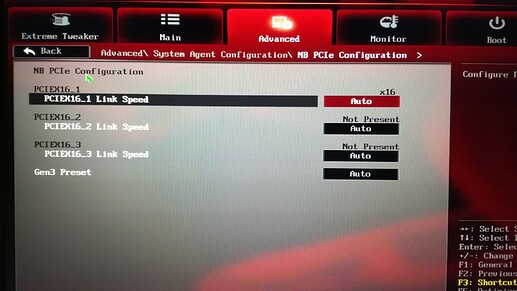
EDIT: Advanced/System Agent/NB
I am running a dedicated gpu and have the adapter in the x16_3 slot. How do I disable the x1 slots? If I understand correctly disabling the x1 slots will get me PCIe 2.0 x4 speeds is that right? I’m using the m2 to pcie slot on the adapter, not sata.
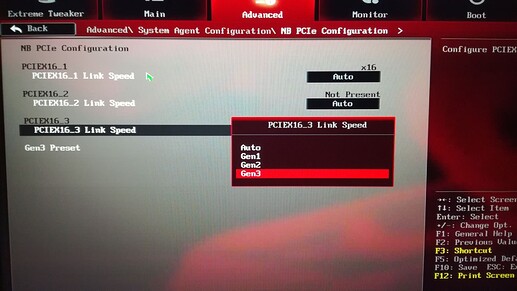
These are my options. I’m not sure how to disable them. In the drop down menu I have options for “auto”, "gen1, “gen2” and “gen3”.
I said adjust not disable.
PCIEx16_3 Link Speed to x4 not AUTO.
By the way, all i mentioned before is only available with an IVYBRIDGE 3rd GEN CPU not SANDYBRIDGE 2nd GEN.
EDIT: You’re correct, sorry i must confused with another Asus mboard, so it should be as ASUS states, PCIe 2.0x4 for the x16_3, if PCIe x1_3 is not occupied. But ASUS only clarifies this info using GPU’s…3xSLI @x8x4x4…this is where it may get tricky using other devices.
If the speed still persists, you’ll have to test the PCIex16_2…and you know what that means.
On a X79 or the V Extreme (Can assign PCIe by switch) it would be different… thats the limits here on the Z77.
I’m running an ivy bridge cpu so should be fine. I don’t have a x4 option.
These are my options.
Edit: So with my x1_3 slot being empty I should be getting PCIe 2.0 x4 speeds right? Something else must be up then.
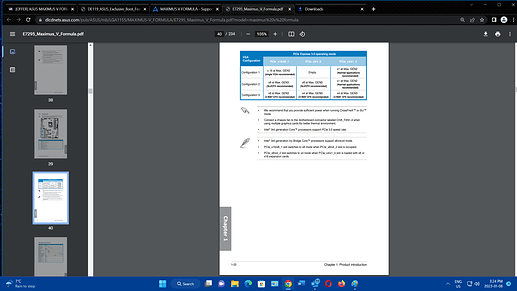
see page 1-21 and 1-22 for motherboard limitations and configuration options as they relate to Ivy Bridge…in particular contrast configuration options 2 and 3.
Cheers
Hans
You may need to juggle your PCIe card configuration to yield the correct PCIe connection.
So with my gpu occupying the x16 slot I’m limited to 2.0 x1 speeds on the third slot? That’s a shame. I don’t want to put it in the second slot and lose performance.
This was always a ASUS statement across several Z77 boards… if you look at the Deluxe model, it has the same PLX PCIe lane switcher and again you see this on her manual:
Now we look at the Thunderbolth version (has 1 more x16 slot and and no PLX) we see the sticker, again on the manual x4:
Even more confusing to users when they see the P8Z77-V:
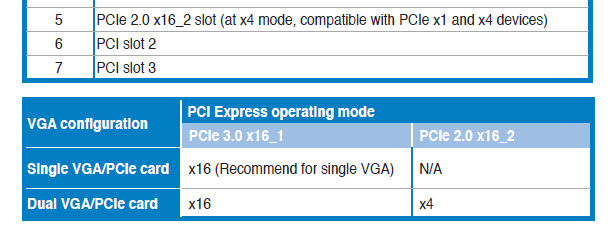
But we all know that the Z77 shares it and down to x8
So yes…Hancor is correct by reported user experiences…
EDIT: And this is the Sabertooth Z77… i remember now the x4 settings i previously mislead you, i still own a M5F, a V and this ST77

