@ag4189 - You’re welcome!!
Maybe some glitch, about the PM’s? I got your PM, checking now.
Here, flash this back via >> FPTw.exe -a 0xA00000 -l 0x3F0000 -d DXEVOLNVME.bin
http://s000.tinyupload.com/index.php?fil…239711467392973
If you see any red or “Size” error, DO NOT Reboot, take a screenshot showing command entered and error, then flash back in your original DXEVOL.bin
Then follow instructions at step #4 in the “Installation of the OS onto NVME” section of this guide
[Guide] How to get full NVMe support for all Systems with an AMI UEFI BIOS
I have a X1 Carbon 3rd (20BS), too.
While looking for a way to mod the BIOS to add support for NVME SSD, Google brought this thread to me. I am expecting a hero find a correct way to add support for NVME. Please, if possible, finish this mod. Thanx.
BTW, Several years ago, I bought one IPS panel from China to replace the old TN panel. It’s not hard (I can’t say very easy) to replace the LCD panel.
Dear Everyone,
As my old Opal SSD is pre-faliure, I have gone to buy a new good and fast SSD when I stumbled upon the 970 EVO for around 100$ (with a 27%VAT in Hungary it was a damn good deal). However upon installing, it turned out I was mistaken and bought an NVMe drive for a AHCI/mSATA laptop. After 1 day of googleing stuff, it turned out that my laptop does kinda support it, however booting from it is not natively supported.
Currently I am back on a fresh win install on my old SSD, and I have followed another forum post (NVMe support for X1 Carbon, and from there, the [Guide] How to get full NVMe support for all Systems with an AMI UEFI BIOS) and downloaded HWiNFO64, UEFITool0.27.0, and the Intel ME System Tools for v10.0 (r7). I have dumped the BIOS with the MEInfoWin in the Win32 folder (is there any difference between the 32 and the 64 if you are on a 64 bit OS?) which is the following :
1
2
3
4
5
6
7
8
9
10
11
12
13
14
15
16
17
18
19
20
21
22
23
24
25
26
27
28
29
30
31
32
33
34
35
36
37
38
39
40
41
42
43
44
45
46
47
48
49
50
51
52
53
54
55
56
57
58
59
60
61
62
63
64
65
66
67
68
69
70
71
72
73
74
75
76
77
78
79
80
81
82
83
84
2
3
4
5
6
7
8
9
10
11
12
13
14
15
16
17
18
19
20
21
22
23
24
25
26
27
28
29
30
31
32
33
34
35
36
37
38
39
40
41
42
43
44
45
46
47
48
49
50
51
52
53
54
55
56
57
58
59
60
61
62
63
64
65
66
67
68
69
70
71
72
73
74
75
76
77
78
79
80
81
82
83
84
Intel(R) MEInfo Version: 10.0.60.3000
Copyright(C) 2005 - 2017, Intel Corporation. All rights reserved.

  FPF and ME Config Status:             Match
Intel(R) Manageability and Security Application code versions:

BIOS Version:                           N14ET38W (1.16 )
MEBx Version:                           10.0.0.0007
Gbe Version:                            0.2
VendorID:                               8086
PCH Version:                            3
FW Version:                             10.0.50.1004 LP
LMS Version:                            Not Available
MEI Driver Version:                     11.0.5.1189
Wireless Hardware Version:              2.1.77
Wireless Driver Version:                18.33.11.2

FW Capabilities:                        0x7DF65A45

    Intel(R) Active Management Technology - PRESENT/ENABLED
    Intel(R) Standard Manageability - NOT PRESENT
    Intel(R) Capability Licensing Service - PRESENT/ENABLED
    Protect Audio Video Path - PRESENT/ENABLED
    Intel(R) Dynamic Application Loader - PRESENT/ENABLED
    Intel(R) NFC Capabilities - NOT PRESENT
    Intel(R) Platform Trust Technology - PRESENT/ENABLED

Intel(R) AMT State:                     Enabled
TLS:                                    Enabled
Last ME reset reason:                   Global system reset
Local FWUpdate:                         Enabled
BIOS Config Lock:                       Enabled
GbE Config Lock:                        Enabled
Host Read Access to ME:                 Disabled
Host Write Access to ME:                Disabled
SPI Flash ID #1:                        C22018
SPI Flash ID VSCC #1:                   20452045
SPI Flash BIOS VSCC:                    20452045
BIOS boot State:                        Post Boot
OEM Id:                                 4c656e6f-766f-0000-0000-000000000000
Link Status:                            Link down
System UUID:                            70615401-53af-11cb-ad01-8250f2e924f1
MAC Address:                            54-ee-75-36-12-74
IPv4 Address:                           0.0.0.0
Wireless MAC Address:                   Not Available
Wireless IPv4 Address:                  0.0.0.0
IPv6 Enablement:                        Disabled
Privacy/Security Level:                 Default
Configuration state:                    Not started
Provisioning Mode:                      PKI
Capability Licensing Service:           Enabled
OEM Tag:                                0x00000000
Slot 1 Board Manufacturer:              0x000017AA
Slot 2 System Assembler:                Unused
Slot 3 Reserved:                        Unused
M3 Autotest:                            Enabled
C-link Status:                          Enabled
Wireless Micro-code Mismatch:           No
Wireless Micro-code ID in Firmware:     0x095A
Wireless LAN in Firmware:               Intel(R) Dual Band Wireless-AC 7265
Wireless Hardware ID:                   0x095B
Wireless LAN Hardware:                  Intel(R) Dual Band Wireless-AC 7265
Localized Language:                     Hungarian
Independent Firmware Recovery:          Disabled
Keybox:                                 Not Provisioned
OEM Public Key Hash (FPF):              B4DBD88280E6308942A539505BE6CDC553FE657E9E7EA8217740932272C4A9EC
OEM Public Key Hash (ME):
ACM SVN FPF:                            0x3
KM SVN FPF:                             0x0
BSMM SVN FPF:                           0x0

                                        FPF                 ME
                                        ---                 --
Force Boot Guard ACM:                   Enabled
Protect BIOS Environment:               Enabled
CPU Debug Disabled:                     Disabled
BSP Initialization Disabled:            Disabled
Measured Boot:                          Disabled
Verified Boot:                          Enabled
Key Manifest ID:                        0x1
Enforcement Policy:                     0x3
PTT:                                    Enabled
PTT Lockout Override Counter:           0x0
EK Revoke State:                        Not Revoked
From my BIOS dump, I may have found the location where I am supposed to put the NvmExpressDxe_4.ffx (to UEFI image / 8C8CE578-8A3D-4F1C-9935-896185C32DD3 / 9E21FD93-9C72-4C15-8C4B-E77F1DB2D792 / EE4E5898-3914-4259-9D6E-DC7BD79403CF / Volume Image Section / 8C8CE578-8A3D-4F1C-9935-896185C32DD3 / somewhere around the last entries?) however I did not create the modified bios as after dumping with fptw.exe -bios -d xd.bin and then trying to reflash with fptw.exe -bios -f xd.bin, I get :
1
Error 280: Failed to disable write protection for the BIOS space!
For the BIOS chip I both found MX25L12805D and MX25L12835F (maybe this one is TPM?)
I guess now that I have the dump and the possible dxe location, it would be much easier to just flash it back from an SPI Programmer, but is it possible to know what causes write protection, and how can I disable it to mod it without special hardware?
Thank you!
Random
(Also, in case what kinda SPI programmer would I need?)
biosreg32.rar (2.91 MB)
@randoomkiller - Ohh no, look at that name!! 
NVME is inserted at the end of the main DXE Volume, follow the NVME mod guide you linked and check the images, you will see correct location. If using UEFITool for this, use version 25, not 25.1 and not newer, or you may brick the BIOS.
Be sure to check about the padding, added or removed can brick the BIOS, look from top to bottom in ANY volume you edit. If you see added or removed padding in the post edit file vs the original dump (open both side by side to compare), then you need to use MMTool instead.
If both tools add or remove a padding, you need to ask someone to do the edit for you instead, or risk bricked device.
SPI Programmer is probably not needed, but if you ever want to pickup since they are so cheap, you need CH341A + SOIC8 test clip with cable.
This is cheapest type of programmer, but there are many other kits/bundles, some branded and more expensive (not always better)
To get around error 280, send me your BIOS region dump from FPT spoiler above and I will tell you what to do next.
Or, is that what is attached above? not sure, since you said you dumped bios region as xd.bin but attached biosreg32, so not sure what you’ve got going on there
Here, in case you can do this all yourself, here is guide on how you get around error 280. You want to disable all of the following in grub - BIOS Lock, SMI Lock, FPRR or PRR, and BIOS Guard
[GUIDE] Grub Fix Intel FPT Error 280 or 368 - BIOS Lock Asus/Other Mod BIOS Flash
If you need me to get those variables for you (ie do step 1-5 in the guide), let me know and attach your bios region (xd.bin)
Thanks ![]()
Here I attach a freshly dumped(xd.bin), and then the modded(xd_nvme.bin) bios to which I’ve inserted the NvmExpressDxe_4.ffx after the PlatformSmmSecureBios Dxe driver. After comparing it to each other with 2 UEFI 0.25.0, I did not notice any change in the number of paddings, although the padding next to it has decreased in size from 2104 to 1728. Could you confirm whether the modded one is as is should be?
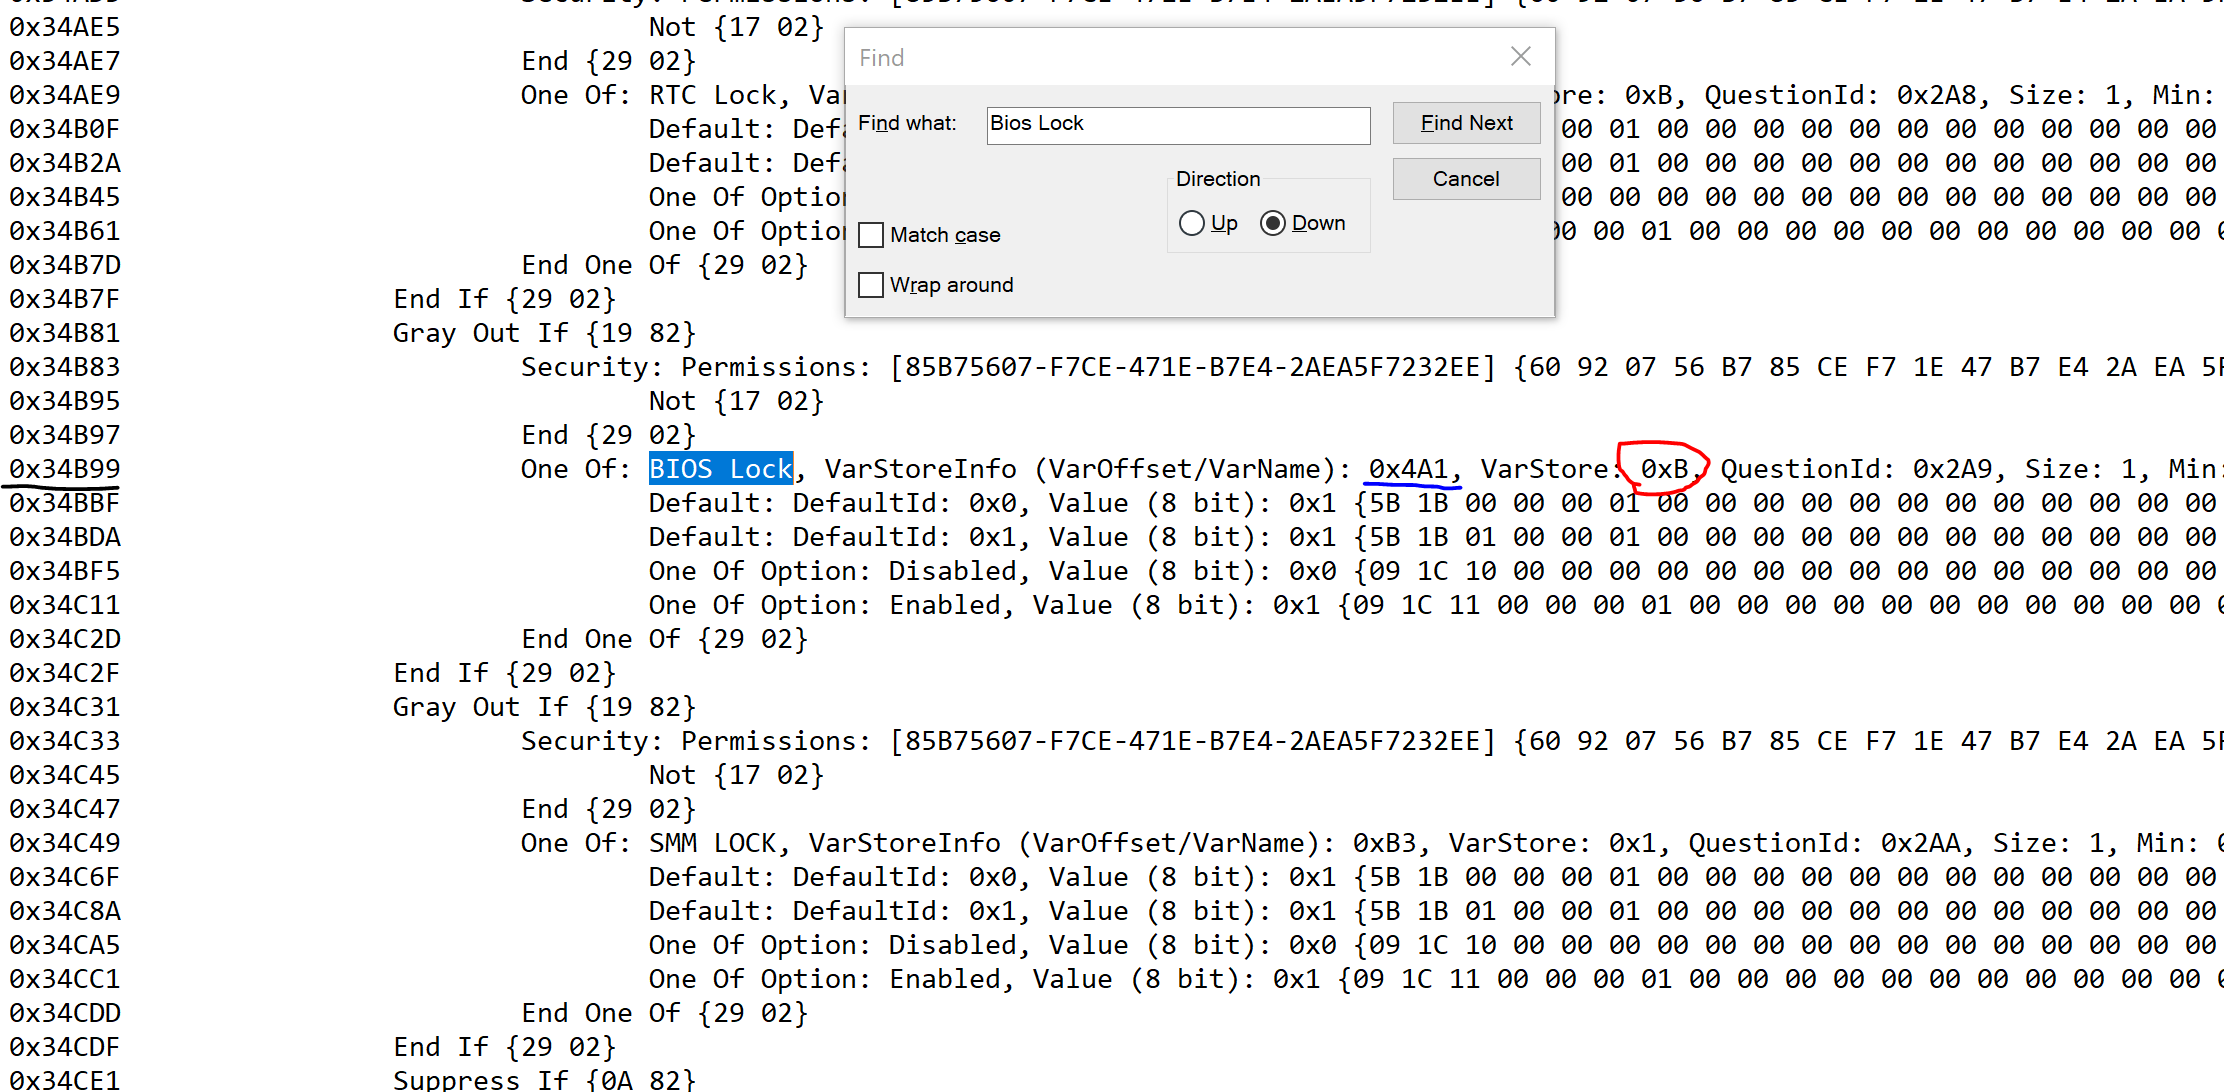
In UEFITool NE alpha 51, I have opened the original xd.bin, and searched for BIOS Lock, found that it’s under the GUID : CFEF94C4-4167-466A-8893-8779459DFA86
I have extracted the PE32 Image as is, and converted with the IRF extractor to a readable document. The picture I’ve uploaded shows everything around the BIOS Lock string.
However this is the point where I got lost, since as advanced the ASUS motherboard’s BIOS is in the tutorial, that simple is mine. If I understand correctly I am gonna have to boot an EFI image from a pendrive that contains a GRUB shell where with setup_var command I am gonna change that value to 0x0, right? So basically the tutorial goes and disables all Win10 only policy, and if I had a dual boot setup previously then I shouldn’t worry about it, and just go, boot that boot.efi and change 0x4A1 to 0x00.
After that I should be free to flash back the linked xd_nvme.bin correct? (but flashing that back would re-enable Smm lock wouldn’t it?)
preflashcheck.rar (5.81 MB)
@randoomkiller - To your last question >> Yes, you do not flash the above mod BIOS, you first need to disable all the locks, then make new FPT dump and confirm you can write it back, then once you can, that is the file you edit and flash back.
If you can never get past step #2 of spoiler below, you need flash programmer
If you have already modified the BIOS in ANY way, you will need to re-flash it back to factory defaults using factory method (NOT FPT)!!!
If you do not have Intel ME drivers installed, install them now from your system driver download page, then start over here after reboot.
Check your BIOS’ main page and see if ME FW version is shown. If not then > DOWNLOAD HWINFO64 HERE <
Once HWINFO is open, look at the large window on the left side, expand motherboard, and find the ME area.
Inside that section is the ME Firmware version. Take note of the version. (ie. write it down or get a screenshot)
Once you have that, go to the thread linked below, and in the section "C.2" find and download the matching ME System Tools Package for your system.
(ie if ME FW version = 10.x get V10 package, if 9.0-9.1 get V9.1 package, if 9.5 or above get V9.5 package etc)
> DOWNLOAD " ME System Tools " packages HERE <
Once downloaded, inside you will find Flash Programming Tool folder, and then inside that a Windows or Win/Win32 folder (NOT x64).
Highlight that Win/Win32 folder, then hold shift and press right click. Choose "open command window here" (Not power shell! >> * See Registry file below ).
If you get an error, reply to this post with a screenshot of it, OR write down the EXACT command entered and the EXACT error given.
((If "open command window here" does not appear, look for the "Simple Registry Edit" below…))
Step #1
Now you should be at the command prompt.
You are going to BACKUP the factory un-modified firmware, so type the following command:
Command: " FPTw.exe -bios -d biosreg.bin "
>> Attach the saved "biosreg.bin ", placed into a compressed ZIP/RAR file, to your next post!!! <<
Step #2
Right after you do that, try to write back the BIOS Region dump and see if you get any error(s).
Command: " FPTw.exe -bios -f biosreg.bin "
^^ This step is important! Don’t forget! ^^
If you get an error, reply to this post with a screenshot of it, OR write down the EXACT command entered and the EXACT error given.
Here is a SIMPLE REGISTRY EDIT that adds "Open command window here as Administrator" to the right click menu, instead of Power Shell
Double-click downloaded file to install. Reboot after install may be required
> CLICK HERE TO DOWNLOAD CMD PROMPT REGISTRY ENTRY <
If the windows method above does NOT work for you…
Then you may have to copy all contents from the Flash Programming Tool \ DOS folder to the root of a Bootable USB disk and do the dump from DOS
( DOS command: " FPT.exe -bios -d biosreg.bin " )
Sorry for not explaining everything, I assumed you were going to figure it all out yourself fairly easy from your first post
Your NVME edit looks OK in general, no added or missing padding or other modules in the volume you edited - But, as mentioned above, you want to wait until you’ve unlocked the locks, then dump and confirm you can flash back, once you can then that is the file you modify.
See also, this thread, near end, this model has Verified Boot Guard enabled, but I am 99.9% sure BIOS volume we want to edit is OK to edit, but not 100% sure.
If you want to be absolutely safe, get flash programmer and then we can test, if you feel 99.9% sure is enough for you to risk moving forward then we’ll try to bypass the locks blocking FPT flash.
NVMe support for X1 Carbon Gen 3?
OK, as for doing the grub stuff, due to how your BIOS has these locks set, and no exit to shell on exit page, I think RU method would be easier and maybe only way it will work
For this RU method, or grub stuff, what you are doing in BIOS first is basically disabling secure boot, so you boot legacy only for this process.
So disable secure boot, also remove any TPM/Encryption you have set in BIOS, and any BIOS password must also be removed before doing this.
You can set all back once you are done.
Please see here, Go to section 2.2 and make bootable USB with RU program, then read 2.3-2.5
http://forum.notebookreview.com/threads/…-issues.812372/
You will NOT be editing "Setup" ONLY as that guide shows, here is what you will edit and where etc.
In "Setup" - 4DFBBAAB-1392-4FDE-ABB8-C41CC5AD7D5D
SMM Lock variable to change >> @ 0xB3 >> If 01 >> Change to 00
In "PchPolicyVar" - E274D08E-69B6-4497-A4EB-D39C4B2F9FCB
BIOS Lock variable to change >> @ 0x4A1 >> If 01 >> Change to 00
In "CpuPpiSetupVar" - D1B99F1A-084B-49C3-B88E-378ABEFA118B
BIOS Guard variable to change >> @ 0x4 >> if 01 >> change to 00
Once done, then you make new BIOS region dump with FPT (Step #1 in spoiler), using new name so you know this is the unlocked one, then test flashing back with FPT (Step #2 in spoiler), if success then you edit this and flash it back
Edit - I checked around to see if anyone flashing mod BIOS on these, and I see whitelist and unlocked menu BIOS here, so boot guard does not cover the regions we need to edit as I suspected

https://www.bios-mods.com/forum/Thread-G…Lenovo-thinkpad
BUT, if we can’t get past the locks you will need flash programmer + SOIC8 test clip
Hey thank you,
It was clear, only the fact that I haven’t done this before made me want to clarify as much as possible, but the details are appreciated 
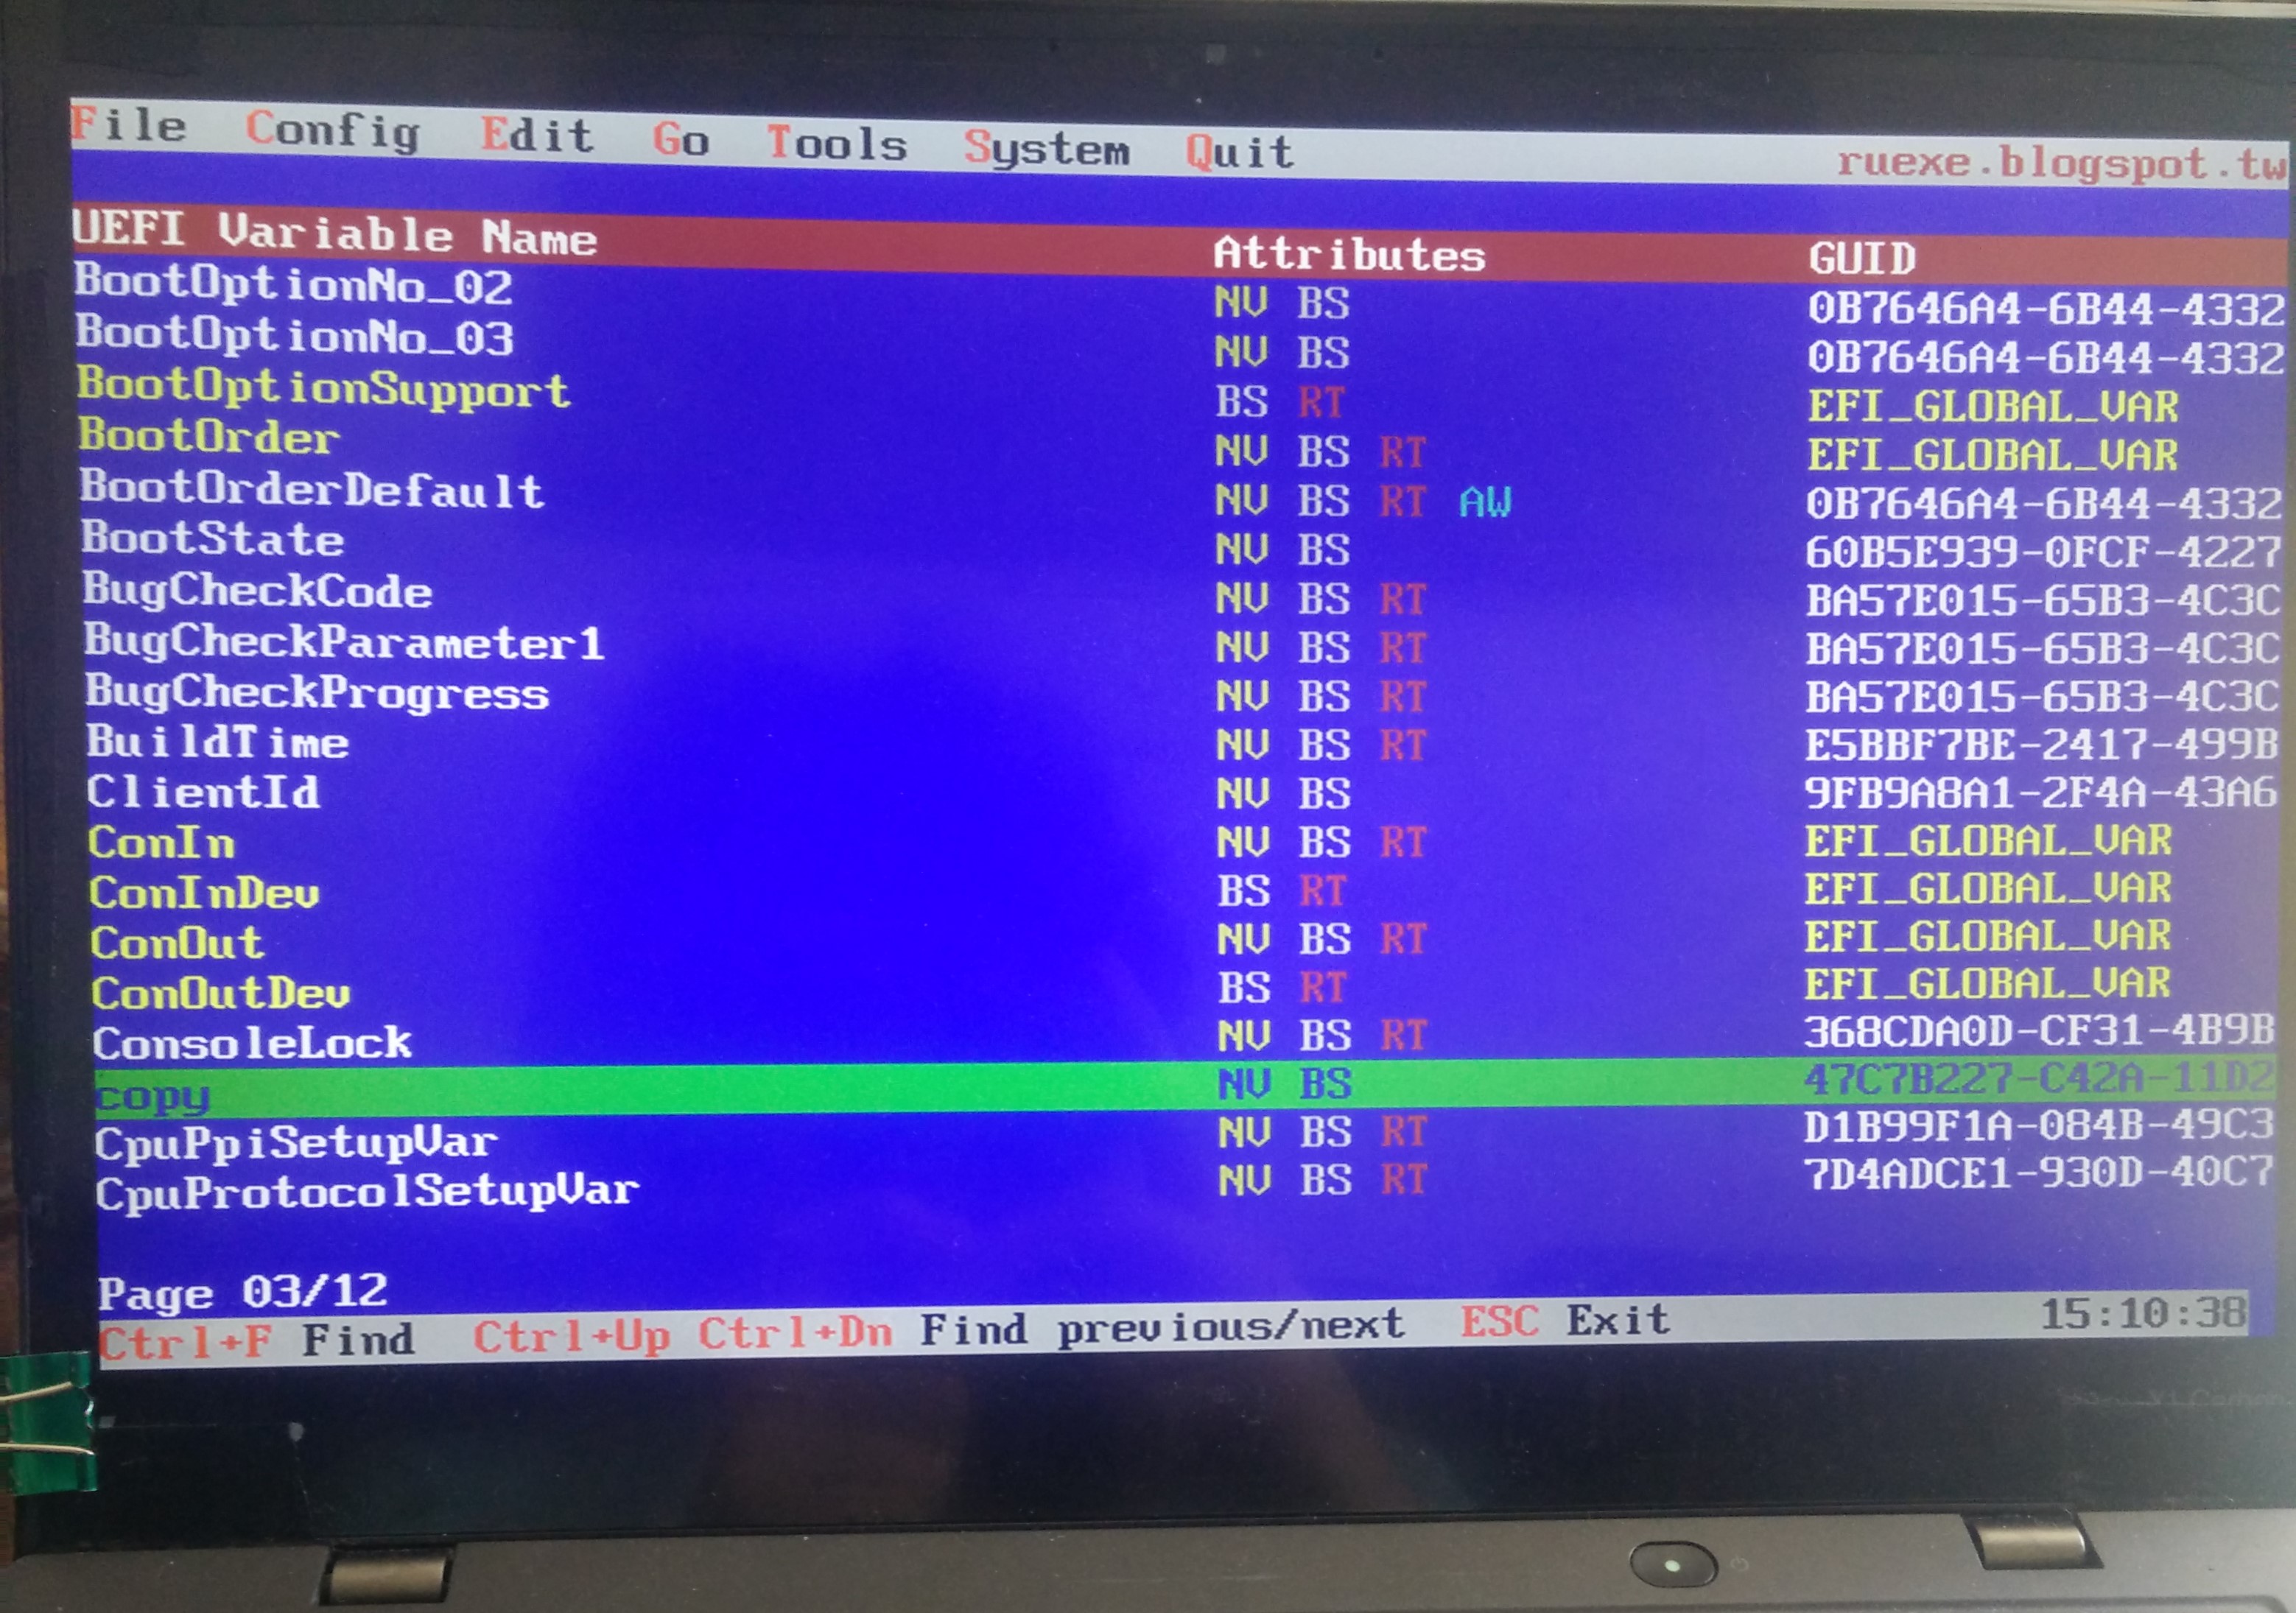
I have booted up RU, in several different version (17, 22, and 25) and I managed to find everything but I does not seem to be able to edit neither of these UEFI variables.
They all have RT NV and BS Attributes. I have disabled TPM and all the features that I could find, however when rewriting those 01’s to 00 I don’t seem to be able to affect them with Ctrl+W. Both Ctrl and W keys are operational as far as I can see.
My only idea would be to do a BIOS update or somehow reflash the stock BIOS prior trying to modify the Lock’s. Am I missing something? Or is this the proof that I’d need to get a flash programmer?
@randoomkiller - Did you try both CTRL keys when you try CTRL+W? Not at once, but I mean one then the other. The versions you mention don’t sound right? Latest version is 5.25.0379, use this version in case what you mention is some bug of previous version.
Or yes, it may not work due to boot guard. You may need to go back and try Grub/setup_var method instead, here’s how to do it with no exit to shell option on BIOS exit page (unless you already know how to boot to grub/shell, if so, do that but use the files in my guide)
Main guide, so you can grab the files needed - [GUIDE] Grub Fix Intel FPT Error 280 or 368 - BIOS Lock Asus/Other Mod BIOS Flash
Alt boot to grub when no boot to EFI on exit page - [Help needed] Hidden Advanced menu Bios HP Z1 J52_0274.BIN (2)
So, at Alternate link above, follow the first link I provide there and do step 1-2 only, then come back to link above and see image, copy file and renamed copies to folders laid out just like I did in that image, then boot to USB as mentioned.
I only see one area you need to edit in your screenshot >> CpuPpiSetupVar - D1B99F1A-084B-49C3-B88E-378ABEFA118B
Move down one from where you are in that screenshot and hit enter, then navigate to 0x4 and change to 00 if 01
Sorry, not sure what you are saying/asking in your last comment above? Stock BIOS has nothing to do with this, unlocking locks etc.
Flash programmer may or may not be needed, not sure, there is many things to try still (including SCEWin I’ve not yet mentioned, we’ll try that next if you can’t do grub/setup_var)
Flash programmer is suggested always, for all users, for any BIOS flash stock or mod. They’re so cheap everyone should have a set
Yes, I have tried them, and even tried Ctrl+I to show the firmware info. Other than that I meant 5.19, 5.23, 5.25, sorry for being too vague 
I have also tried to do it with grub, but I couldn’t figure out how to edit the proper variable (and as my flash programmer arrived that day I didn’t really bother more)
However now that I have a flash programmer, I found out that I don’t know how to edit the SMM/BiosLock/BiosGuard Variables directly. I have made several backups with it, now running from a live linux, and using flashrom, while trying to flash a working image on it. It turns out that if you instert the NVME mod to the non unlocked version it does not work (or maybe I missed something), it beeps 5 short and then 5 short again to get back to the NVME not supported (Lenovo 2103 error, why I came here at the first place). Is it possible that one of these security features deny the nvmexpress from loading as it should be?
Drive link for the dump from the programmer and the then tried nvme mod.
However I am curious, in the hex editor I could not find any HEX nor string that I was in the IRF extraction, while I was able to find it with UEFITool
1
2
3
4
2
3
4
Like
24 25 1A 9F B9 D1 4B 08 C3 49 B8 8E 37 8A BE FA 11 8B 07 00 4D 00 43 70 75 50 70 69 53 65 74 75 70 56 61 72 00
or
CpuPpiSetupVar
Is this compressed too? I assumed that the UEFITool was just making it readable for humans, I did not expect a kind of compression too.
Or which tools should I use to be able to edit the linked binary in a way that I should have been able to in RU?
I meant that I should reflash a stock bios in order to have a fresh and untouched one installed to work from that instead of the one that I have now but I feel like I am not making a lot of sense.
With RU.EFI I was unable to make clear screenshots too (although possibly having FAT32 and definietly not NTFS) hence only one picture. I found all the variables at the locations you noted, and tried to work from those 3 comments since
@randoomkiller - Can you erase chip, then write back your original dumped BIOS and system runs OK? But you can ONLY confirm that if you can directly erase chip first with flashrom, then program.
If yes, then flashrom and method you are using is OK, and the NVME edit you did is bad. If you cannot erase chip first, then program, like if it only does both at once, then this is not valid confirmation that it’s writing to the chip fully and or properly.
NVME insert looks OK to me, but that does not always mean OK. How did you insert and with what version of the tool?
Which chip did you dump? Also, you mentioned two BIOS chips at first post. Dump the other one and send to me too, so we can see what is there too.
For MX25L12835F and similar like MX25L12873F - From past experience with this chip use 1.31Free/1.40, ASProgrammer 1.4 or 1.41, or CH341A v1.1.1.32
All inside this package - http://s000.tinyupload.com/index.php?fil…213094641136166
User below said flashrom failed for him, so you may only be getting partial write, or corrupted write ect and failed erase in some areas, which is how/why stock program back works.
That’s why I mentioned above only valid test is full erase first and by itself, then program in dumped BIOS would prove it’s working.
Unable to flash BIOS with SOIC clip and programmer
It’s VERY hard to explain how to edit NVRAM, this is in NVRAM area at top of BIOS usually, and in mid-towards end of main DXE region too in some BIOS.
Better that I do it for you if you want that kind of stuff done. Yes, UEFI Tool and hex editor is used for this, along with info from setup IFR
I have tried to explain it to users a few times, if you can follow along with what I mentioned then you can get it yourself
NVRAM edit explained - Determine configurable aperture size from BIOS file
Setup and NVRAM editing here as well - [Request] Unlock advanced menu on 2019 Acer Predator Helios 300 PH315-52 (5)
But, this really does not directly apply to your NVRAM storage areas either, so it may be very hard for you to follow along and then apply this to your kind of BIOS/NVRAM.
Your NVRAM is in EVSA Store, and all in single modules not individual entries, so it will be very tough for you to sort out correct exact bytes to change.
Your NVRAM area is inside "EFISystemNVDataFVGUID" volume - FFF12B8D-7696-4C8B-A985-2747075B4F50 @ Middle of BIOS region X several EVSA modules, all need edited if any of what I gave above is found inside.
Yes, if you flashed in failed edits, then first flash stock BIOS again using stock method, then dump with programmer. Is above dump a clean dump after flash of stock BIOS, or does it contain failed edits you flashed in previously?
If it’s not clean BIOS, please flash in stock BIOS and dump again and send me a clean flashed BIOS dump, so there is no failed edits in there.
In regards to RU screenshots, I assume that’s not a thing? But if it is, and you’re having issues with it, just use a camera instead.
Do you want me to do complete edit of this BIOS, for all stuff you mentioned? Disable all the locks, do NVME mod etc?
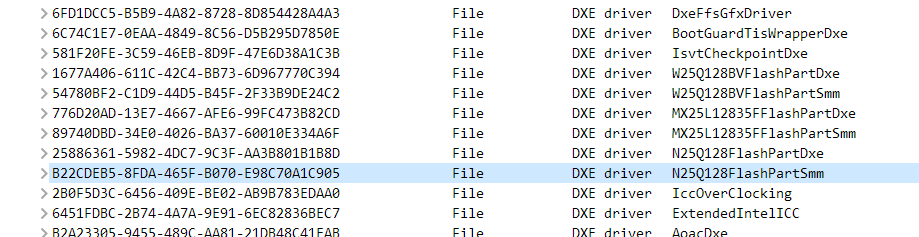
I used the AsPogrammer 1.41 with the SER and PAR drivers included in the package, on windows, and read both MX25L12873F, MX25L12805D, and MX25L12835F
And I now I realised I was using the programmer in MX25L12805D mode while the marking on the chip clearly says MX25L12873F, although in HwInfo it reads as MX25L12805D (possibly the default for MX25L128xxx). Another false path was the MX25L12835F, which I found clues in the BIOS, as it has DXE drivers for it (pic included).
I have rewritten the BIOS from the dump with MX25L12805D mode, and it seems to work (no crash although not tested for all functions), and now have managed to successfully update the BIOS by one version to bring it up to 1.17. (to reset all the modifications that likely came from using MX25L12805D)
Now working with MX25L12873F at AsProgrammer 1.41 and the updated BIOS I have made a dump and tried to edit it with UEFITool 0.25 (inserting nmvexpressdxe.ffs) but the result was the same. 2x5 Beeps and continuing to 2103 error (however I suspect that its not bricked, its just saying that there is a faulty module)
I am attaching the two dumps in a drive link, check whether there is anything wrong with my edit. I am also attaching a dump made after the failed boot attempt. The first one should be clean after update, the second is directly the edited and the third is from after a boot.
Link
I did not look into the NVRAM editing as of now but if you think unlocking is necessary then I might as well 
@randoomkiller - please reflash stock BIOS using stock BIOS flash procedure, then dump the chip with ASProgrammer and the correct exact ID MX25L12873F, then send me this and only this (unless after that you want to test nvme insert edit again to include), but I do not need a third dump or the ones above unless those are using the correct ID
Before making the BIOS dump, please be sure you have the following disabled in the BIOS (if visible to you) and any and all passwords removed (this applies to before flashing in mod BIOS as well) >> Secure boot, BIOS Guard, TPM and any encryption
On your edit, I have a PM coming your way, something for you to additionally edit program in before you dump once more and then do the NVME edit and program back your NVME mod to test
YOu didn’t answer me above, how did you do NVME insert for BIOS at post #7? If UEFITool 25 too, then OK, it looked OK as I mentioned. Anyway, try what I said in PM and let me know
Sorry, I’ve been using UEFITool 0.25 since you mentioned going above may brick my BIOS. Now, I am attaching an image, as stock as it could get as I know (there is no stock BIOS reflashing method as far as I could find, but only a BIOS update, which is supposed to reflash it (?)) All security feature should be disabled, no TPM, no pw, no secureboot. I could not access BootGuard, shall I try to work with that too?
The edit you sent me worked, I have no idea what it did, but now its a different kind of boot stuck. Without the NVME mod, it loads properly to the old SSD, with it, also. However when inserting the 970 EVO it stucks at the thinkpad boot splash screen, no visible effect of anything that I can do except restarting with the power button. Once I have managed to get into the windows install menu with an USB, but that meant removing the SSD and having no M.2 drive in at all. Inserting it after the WinInstaller loads however results in that the installer does not detect the drive at all(I’ve tried to refresh, but no use, it should be physically in).
Also from long ago, before writing the first post I installed a Debian to the new SSD, it succeeded, but I doubt it has to do anything with it. Just as a sidenote…
I am attaching the pure dump, and the then modded with nvmexpress, could you check whether I did something wrong?
Link
@randoomkiller - Is above linked image dumped with ASProgrammer and the correct exact ID MX25L12873F. That is all I meant, update/reflash stock BIOS using stock method, whatever that is.
Then disable secure boot, do not set any TPM/Encryption, or BIOS password, then dump the BIOS. You cannot do anything about Boot Guard, except check to see if Measured or Verified is enabled at the PCH via >> MEINFOwin.exe -verbose
I’ve replied in PM about the resist of your reply above, it’s confusing the way you wrote that out, but I explained a lot about what to do in PM. Sorry for not posting it here, I was not sure if I would have time to reply here, and I was already replying to your PM.
You’re attached file/edit looks OK
Correction : The edited file was edited following exactly the processes you described (MX25L12873F mode, dumped with AsProgrammer after bios update, it shouldn’t contain nor TPM nor pw, onebit edit, etc)
Everything should be okay, except that it wont get past the ThinkPad Bios Splash screen when booted with an NVME inserted into the motherboard. The splash screen seems to be stuck exactly like this (except if I’m pressing enter it stucks at "Interrupted", and then no input is accepted. I’m guessing it just crashing when it loads the nvme driver, and it can accept keystrokes since they are delivered to the BIOS chip a few seconds faster)
( )
)
) Note that it only occurs when NVME is inserted pre-boot which has now been formatted to contain no partition, and definietly no bootpartition, via linux, diskparted.
When I tried to boot without any M.2 drive in the Motherboard, I was able to run a live Linux, however even inserting right after grub loads, the live system does not recognise the drive. I’ve checked with lspci, and no drive was found.
The previous non-nvme SSD can still be booted from.
@randoomkiller - Please test with disk in RAW state, no formatting or initialization. if possible, also test other NVME, in case there is compatibility issue, and if you can, confirm this NVME does work on other device.
See this thread, post mid-way down (Post 7, not 3) with link to Toms, seems it worked for him. Also, see second page, for confirmation of Clover/DUET Bootloader methods working, so it’s not a slot/compatibility/whitelist issue
https://forums.lenovo.com/t5/ThinkPad-X-…/2064793?page=2
How did you do the NVME insert? Try other method and see if same result. If you used UEFITool 25.0, try with MMTool instead, and if you did with MMTool try with UEFITool 25.0 instead.
AHH!! I see possible issue (Post #15), if you do not edit safely (only insert where you did, edit nothing else) Intel Boot Guard is enabled (verified Boot) - NVMe support for X1 Carbon Gen 3?
Disk has been secure erased with nvme-cli linux command line package on another pc (following this guide https://tinyapps.org/docs/nvme-secure-erase.html), still doing the same. I can verify that I can access the SSD from a pc, with a live system, on a PCI - M.2 adapter.
The current bios has been dumped, however as I opened it in MMTool 4.50.0.23 I could not find neither CSMCORE nor anything related to the dxe drivers. My guess is it should be in Volume 00, but I’d rather leave trying with MMTool to you.
In UEFITool I was able to find that nvmexpressdxe driver is in the right place and all edits stayed as they were.
Are you saying by that, Verified Boot is enabled that we’d need to edit a security checksum somewhere too? How can I bypass Verified Boot?
Dump_2020_07_15
https://drive.google.com/file/d/1AgZc9AU…iew?usp=sharing
@randoomkiller - I was saying, if you don’t edit the BIOS properly, and touch any area covered by boot guard (ie last volume), in any way, it will = brick.
How did you do the NVME mod insert, and with what version of tool? If you used UEFITool 25, OK. Then also test mod BIOS with MMTool 4.50 insert as you discussed, ohh, sorry!
I see 4.50 does not show entire BIOS, this is Insyde BIOS really, not sure how MMTool opened it, but 5.07 works, NVME goes at end of 01:00-00 volume, but with this method only "Small + Compressed" can be done
That edit looks OK, but not sure if it would be working or not. If you want me to send you this edit let me know (Actually, I will include below, for your testing)
Also, you never clarified, I think, the NVME BIOS I sent you, and the one you did, if you program in those BIOS, but do not try to use NVME, then it’s OK, or not?
Here is two BIOS to try, one with MM in name was edited with MMTool 5.07. Other was done with ezh20_2.1.0.4 and NVME insert is not inside main DXE subvolume, but is inside that main DXE volume/FV (never tested BIOS like this, may be a fail in general, but worth trying)
For both, base BIOS used was one you sent me named BIOS_DUMP_2.bin that I first did the MFG edit, then each was NVME Mod edited.
BE READY 2 RECOVER >> Both may = brick, but it’s something you can try (your edit above looks OK, should be fine, and this just may be incompatibility issue)
http://s000.tinyupload.com/index.php?fil…753329646180151
I have tested both that you included. The EZETest.bin completely bricked it (after one second of being turned off it shuts down), but the small+compressed does exactly the same that my edit did, except it takes longer to get frozen.
In post 13 I have written that non-nvme ssd works with Windows 10 (on a MZNTE256HMHP from Samsung), and I can confirm that for the small+compressed edit you did with MMTool 5.07 worked as well.
I think the SSD is not faulty, and its not a hardware limitation, since as I mentioned as a first try I was able to install a Debian on it (when I did not know that dxe drivers were needed for nvme). Or maybe that first install did something.
Do you think that nvme secure erase wasn’t enough?
@randoomkiller - Yes, I assumed EZE may be bricked, for several reasons, but worth testing anyway just to be sure.
I don’t know about "Secure Erase" method you used, there is several ways to do that, not sure what all are valid/OK for SSD/NVME anymore. But yes, sometimes a messed up disk can cause freeze at boot or anytime while running, but if it’s OK as-is now in other systems, then it’s probably OK
Just to be sure though, use diskpart from windows installer, since you are trying to get windows going. I suppose you will need to do this with drive on another system in adapter, since it wont boot on this one.
Remove all drives except the NVME and USB you have windows installer on, then at first screen of installer (region, language selection page) hit Shift+F10 to get CMD prompt, then do as follows
1. Diskpart
2. List Disk << Here, identify what your target disk is by size/name etc, and make note of it’s #, you will use it’s # next
3. Select disk # << Here, instead of #, put target disk #, example >> select disk 0
4. Clean
5. Exit
Make sure CSM is disabled and secure boot enabled, or at least UEFI mode selected, then reboot and run the installer again, then point it at the raw/blank drive, do not load any drivers or create any partitions etc, just select drive and click next