@Petoparac - Sorry, your comment about old CPU, and returning old CPU, is confusing? I simply meant, I can remove all the old stock microcodes, and add ALL Coffee 906EA/B/C/D, since you don’t have old non-coffee CPU anymore.
USB Flash via Flashback is all you need to do now, since mod FD and ME is already in there. No ucode loaded in your image above 
I would not use file you linked above, you do not need to use CoffeeTime or Revlaays tool etc to do the microcode edits. I checked and the microcode edit is a mess and mis-matched volumes!
Also, one volume has microcodes inserted into it that should not have any 

It may work, and since it’s bootable, you can use it, but I would not.
Here is proper update, could not fit ALL Coffee microcodes, so this ONLY contains 906ED, 906EC, 906EA
All other microcodes removed, did not spend time seeing if any could remain, but we can later if you want, or only add 906EA + 906ED and see what others can remain for older CPU’s, if you want
Here, flash via USB Flashback - http://s000.tinyupload.com/index.php?fil…018001732447184
Or here, via programmer if you wanted - http://s000.tinyupload.com/index.php?fil…981815422397389
@Ari054 - you need flash programmer, and then yes, you can make H110 support 8400/8500, but some may depends on exact brand/model, so I can’t answer 100% sure since you did not mention brand/model
For example, Some MSI with 16MB BIOS may not be able to be modified to work with that CPU, may need crossflash to H2xx BIOS instead
Hi @Lost_N_BIOS , i want use i3 8100 with mb asrock z270 extreme4 , so i mod bios by CoffeeTime 0.85a to create file bios then i use UBU to remove instant protect flash . I flash bios done but when i place i3 8100 in main ,it not working .Can you help me solution this problem . Tks you so much
@Lost_N_BIOS - I apologize for my confusing comment about the old CPU and microcode. I wanted to say that I will only use the new CPU.
Now I am using the last BIOS file you sent me and I have just one more question
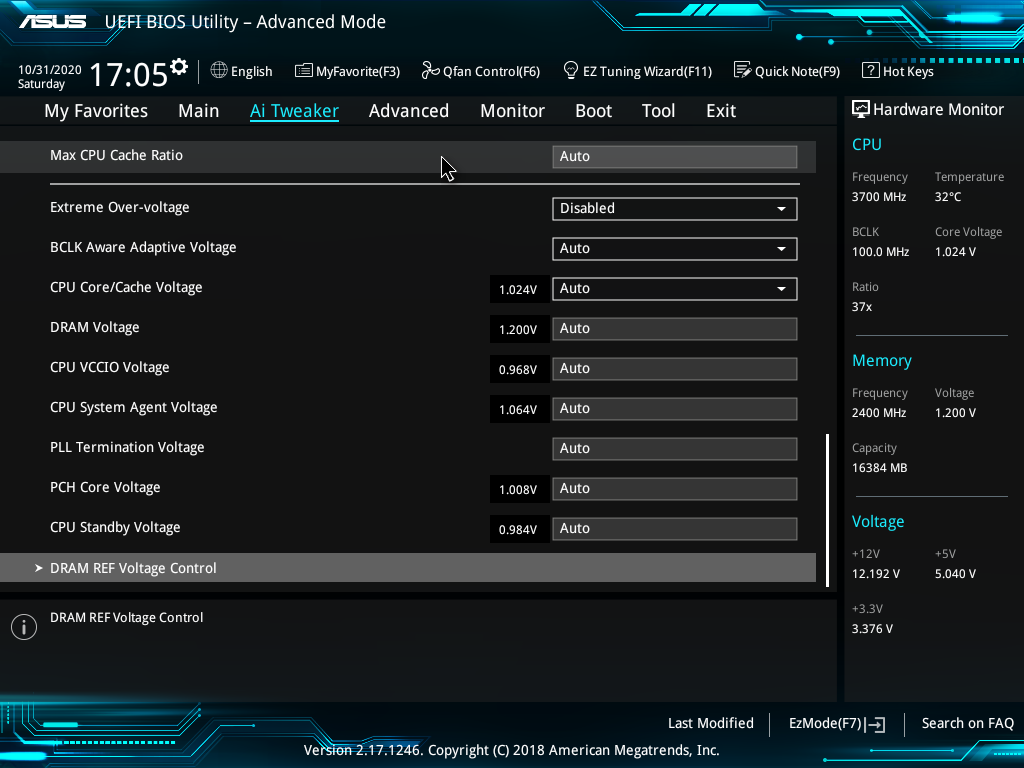
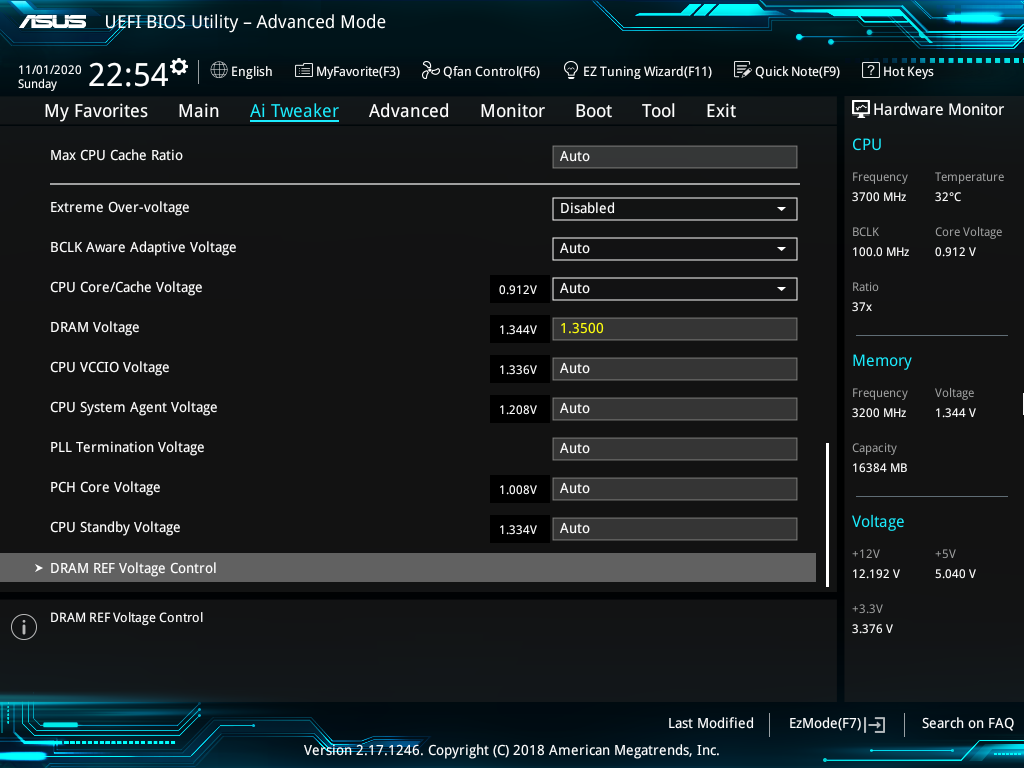
When I use an XMP memory profile BIOS automatically adjusts everything, even the CPU voltages. VCore sets to 0.9V and will not automatically increase it at full CPU load and then I get the BSOD. At the default BIOS settings, everything works properly and the voltage goes up to 1.2v at full CPU load. Should something be set up in the bios as I did with the old CPU? I think it should automatically adjust the voltage according to the load as it works on the default settings.
This is default settings
This is XMP settings
wrong post
this bios need a change?
[[File:Screenshot (19).png|none|auto]]
max boost 9100f is 4 gh
Unknown motherboard in aura!
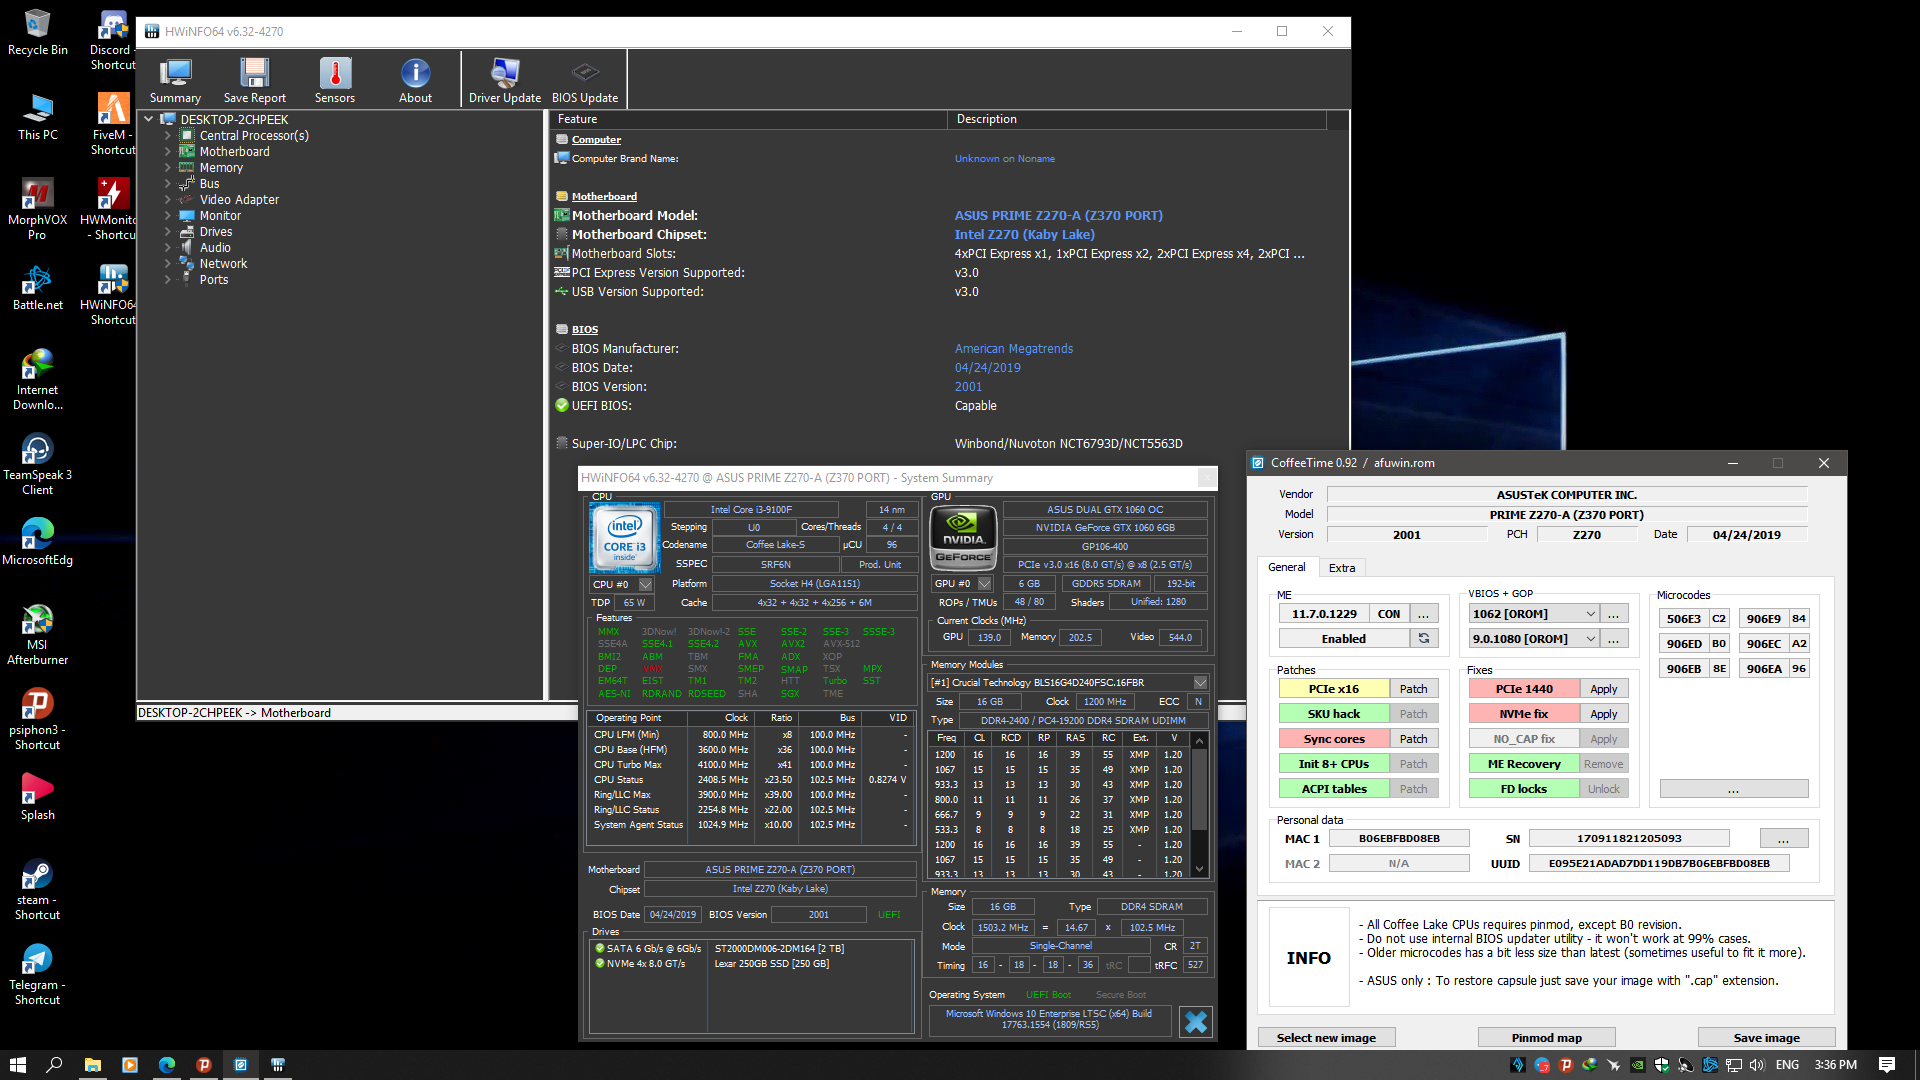
Hi @Lost_N_BIOS sorry for keep bothering you.
So, two days ago I’ve finally recived my i5 9600KF. And since then I’ve been trying to make it work on my G20CB motherboard with zero luck. I’ve tried almost evrything that i can think of.
The last time that i have managed to get a modded bios to work was on my G20CB with the “Bios region” from a G20CI (H270 chipset).
I don’t know, maybe I’m doing something wrong with the procidure.
Could you please try and mont me a bios file? (I’ll link them below)
Also, do you have any idea why this motherboard doesnt accept any kabylake cpu with its original bios but only with the bios region from a G20CI?
One more thing: if i try to mod a stock G20CB bios with revlaay’s AIO tool, i get an error during VBIOS & GOP update. “Invalid BMP binary or something” why is that so?
https://drive.google.com/file/d/1Pfwe9km…iew?usp=sharing
I have a question and also a request if it would be possible to add O6EC 06ED microcodes to the Asus z270f bios?
I mean converted I9 9980HK processors from BGA to LGA
Switching the Microcodes should be no problem, that is basic UBU work. But how do you get an BGA CPU onto an Z270F? If I remember correctly, the Package has neither the same form nor pincount as LGA1151.
@Petoparac - Old CPU is not new CPU, voltages will not be the same at all.
XMP should not change CPU voltage, if it does (Asus is to blame, or creator of the XMP, which I’ve never seen XMP be able to change a CPU voltage which is not related to memory). Anyway, if/when it does, then set that voltage manually to whatever you want, which you should do anyway (auto is not healthy)
Voltages adjusting automatically are controlled by windows power plan settings, and BIOS power settings such as Speedstep, C1E, C3, EIST etc. (None of this controlled or changed by XMP)
Also, take note, all these bits below apply directly to Asus/CoffeeMod BIOS
[ASUS] Overvoltage VCore (up to 1.5V) in Auto mode is a proprietary bug of ASUS motherboards. Setting the value “0.01” for the parameters “IA AC Load Line” and “IA DC Load Line” solves the problem.
[ASUS] To remove throttling on 2xxx bios will help the value “2.1” for the settings “IA AC Load Line” and “IA DC Load Line”
[ASUS] Sometimes for P0 processors the board sets “AVX Ratio Offset” = 1 by default. Microcode 906EC_rev_96 solves this problem.
[ASUS] Some 200 series boards can run 12-thread processors on 1xxx BIOS versions using 906EA_rev_6A microcode.
[ASUS] If the board does not want to start up with an XMP profile or with a known working memory overclocking, then try adjusting the " Boot Voltage VCCIO" and " Boot Voltage System Agent" parameters , setting both “1.1” or “1.2”.
[ASUS] A bug was noticed on the 8700K + Z170-ProGaming + Radeon RX470 bundle: a discrete video card from AMD was not initialized as a primary video adapter. The problem was solved by a one-time start of the system with a card from NVIDIA (the card determined the video adapter in the PCIe slot and set the necessary settings for this), after which the card from AMD started working normally.
@hongthaihp95 - What is your current ME FW version, check via HWINFO64 as shown below, if it’s above 11.7.0.1229 you will need flash programer to downgrade it, or do pinmod to unlock FD
Also, you cannot remove Asrock Instant protection in Z2xx with UBU, therefore you also need to flash mod BIOS region with FPT (FPTw.exe -bios -f filename.bin)
This is all you need to do, if ME FW is already the one mentioned above or a version below that.
@ALviK98 - Sorry, all that is very confusing!? 
Please link me to the stock BIOS download page for your actual motherboard.
Do you have a flash programmer? If not, order one now, then let me know when it arrives, then we can get that sorted out.
Revelaay would have to answer you about that error, I’ve never seen before
Kaby lake, not relevant here, if you want to use Coffee
@trebor985 - Yes, should be no problem as mentioned above, the microcode add I mean
You can add any microcode you want into BIOS, if it works or not is another issue
Regarding voltage changes and XMP: Many boards especially from Asus differentiate internally between full auto and oc auto mode. As sooon as you tweak any setting including activation of XMP, all defaults will change to whatever Asus considers a good idea for overclocking. Optimistic Vcore is only one aspect, more common is a drastic increase in powerlimits. So if you want to run a Coffee Lake at Intel sanctioned 95 W long term power limit because your board was designed for half as many cores, you better set a manual power limit because Asus will allow an 9900K to boost beyond 200 W and beyond indefinitly on some UEFIs.
@Lost_N_BIOS
Hi, thank you for you answer. I’ve alredy managed to make the system run. It booted to bios and seems to be working except nvme drive… It doesnt get recognised in the bios when i try to install windows 10.
But also, my bios file is very very strange right now.
I had to patch and inser microcode to both stock bios files through “CoffeeTime 0.92” and then extract “Bios region” from "G20CI bios and place it in place of “G20CB Bios region”
Then the system booted into the bios where i was able to check various info.
(On the screenshot you can see my model number “G20CI” but in reality it’s a G20CB motherboard)
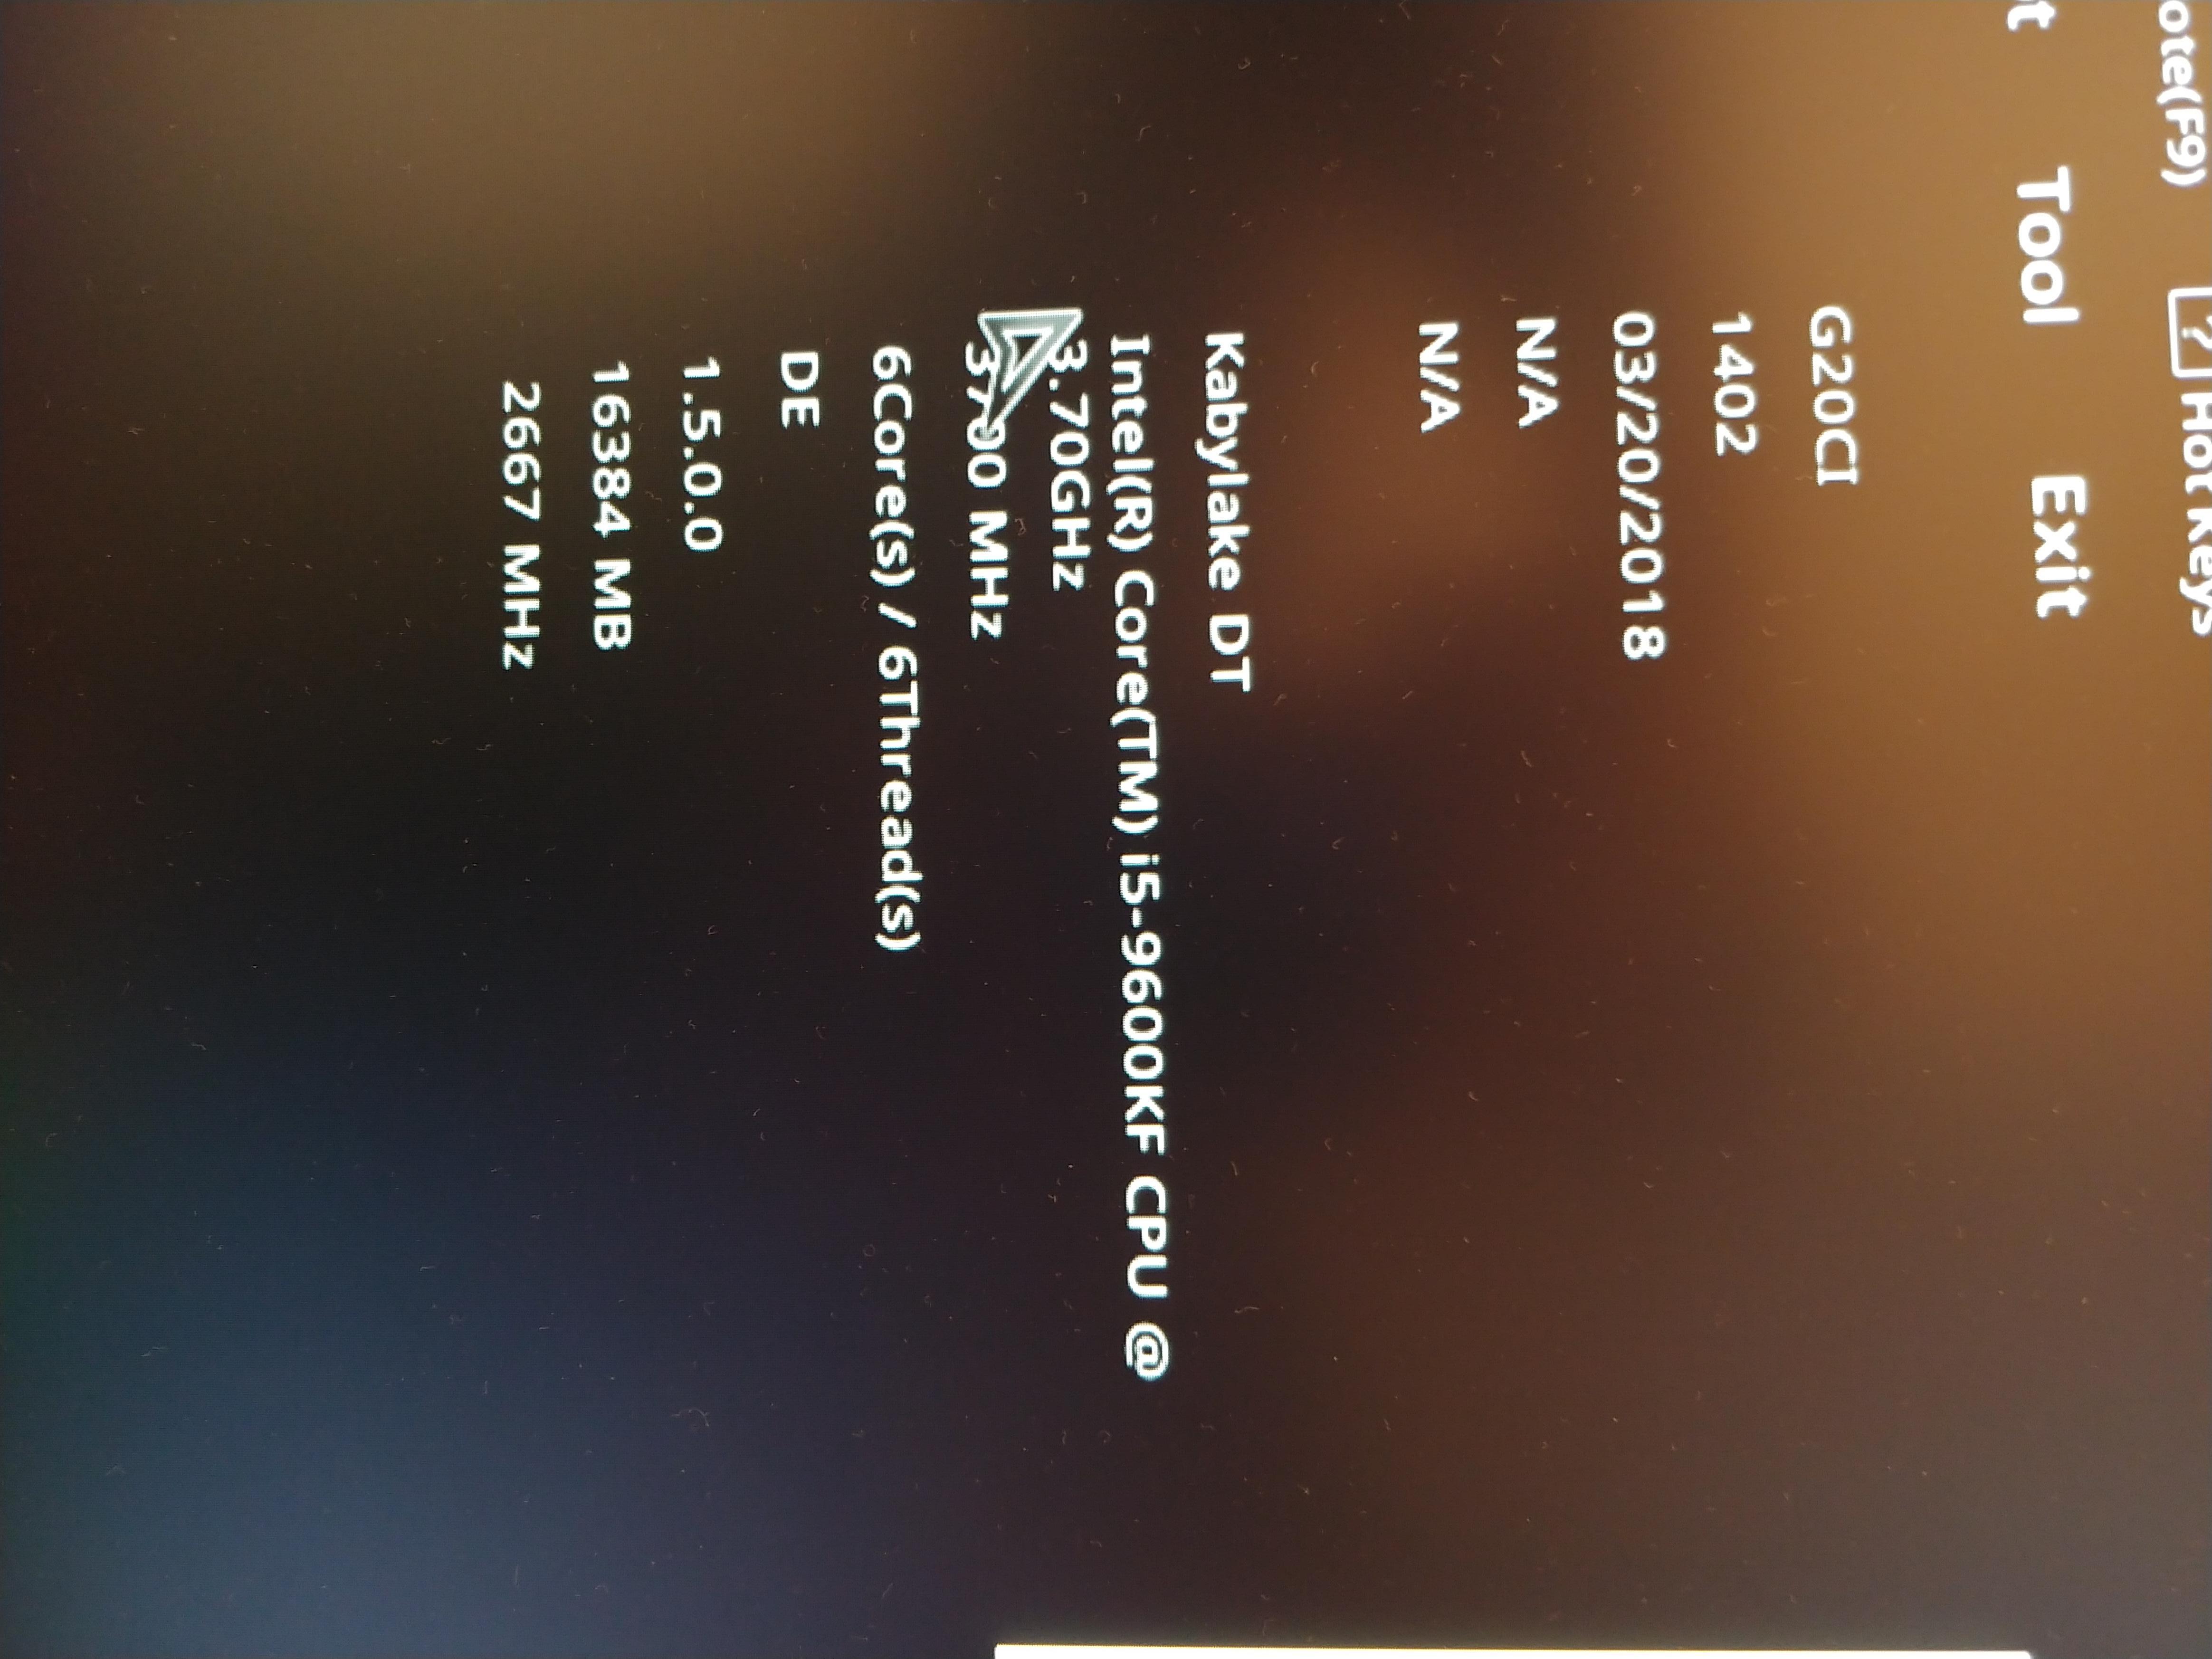
Right now i’m focussed on the nvme m.2
I’ve red on line that ot may be some pci-e lanes issue, but i have no clue where to even begin with…
Could i please send you my modded (working) bios file? Maybe you’ll be able to fix it somehow ![]()
https://drive.google.com/file/d/1qztV6wV…iew?usp=sharing
@Petoparac - Please read what PCGH_Torsten mentioned above ^^ - Thanks PCGH_Torsten 
@ALviK98 - Does NVME work on either of those stock BIOS with NON-Coffee CPU, with or without NVME mod? If not, please test
Also check whether NVME drive is accessible when booting from SATA (= BIOS problem with NVME recognition) or whether the drive does not get detected at all (= PCI-E might be faulty)
@Lost_N_BIOS Yes, I’ve tested it once with a 256gb nvme samsung drive with modded bios and a koffeelake cpu. It was working great. Right now i have a crucial p2 500GB nvme and nothing…
Nvme is working too since i’ve tested it on a laptop…
@Lost_N_BIOS - When the XMP profile is turned on, the CPU does not receive enough voltage
At full load, Vcore was under 1V and I got a blue screen. I mean from 0.6xx to 1V max.
I solved this problem by manually setting VCCIO = 1.175V and CPU System Agent Voltage = 1.1625V. After that Vcore changes depending on the CPU load.
Now core voltage is in the range of 0.6xx to 1.104V.
For now and with these settings, everything works normally and I didn’t have any problems. (XMP = 3200MHz)
If Vcore adjusted manually, this voltage would be constant and would not change according to CPU load.
The problem is that I don’t understand what all these voltages mean and what they are for.
I only understand CPU Core/Cache Ratio and DRAM Voltage
So, what is CPU VCCIO Voltage,
CPU System Agent Voltage
PLL Termination Voltage
PCH Core Voltage
And what value should be for them?
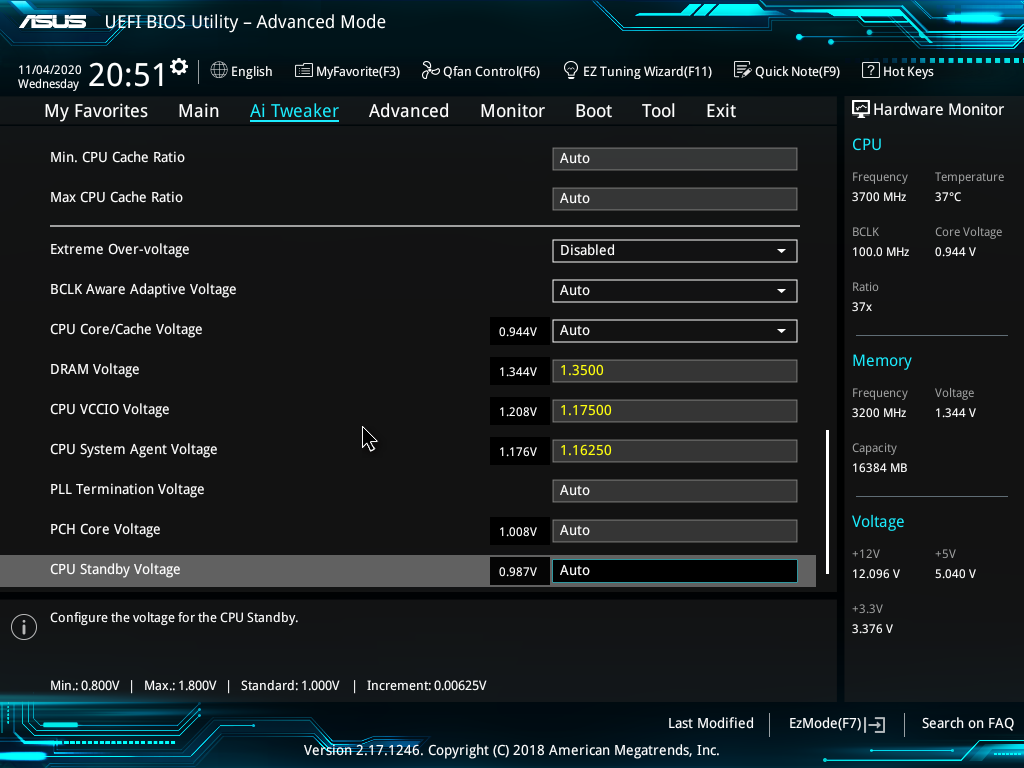
IO: As the name impies data exchange, so the PCI-E and the closely related DMI lanes
SA: predecessor of the SS, a German… the system agent mostly consist of the RAM controller
PCH: Plattfrom Controller Hub. Formerly known as “chipsets” when they were still sets of multiple chips. Should not be influenced by CFL mods as the Z?70 stays just the same.
PLL: Phased Locked Loop. A technology to generate clocks and/or transform voltages efficiently. So basically there are dozens of circuits using pll and I would like to deliver physical compliments to every UEFI designer who names any option after the technology and not after the purpose it serves. Likewise, there are termination voltages on almost any bus, though the most common one to be changeable would be Vterm of the RAM. This one should not be influenced be CFL mod either, but using old base UEFIs often results in faulty auto RAM settings.
@PCGH_Torsten im not sure if you were talking to me about my issue. But regardless, in my case nvmie doesnt get recognised in bios nor when booting via sata (with windows 10 on a 2.5" drive) or usb with windows 10 installer.
I’ve tried alredy disabling sata controller or CSM and evry possible combination…
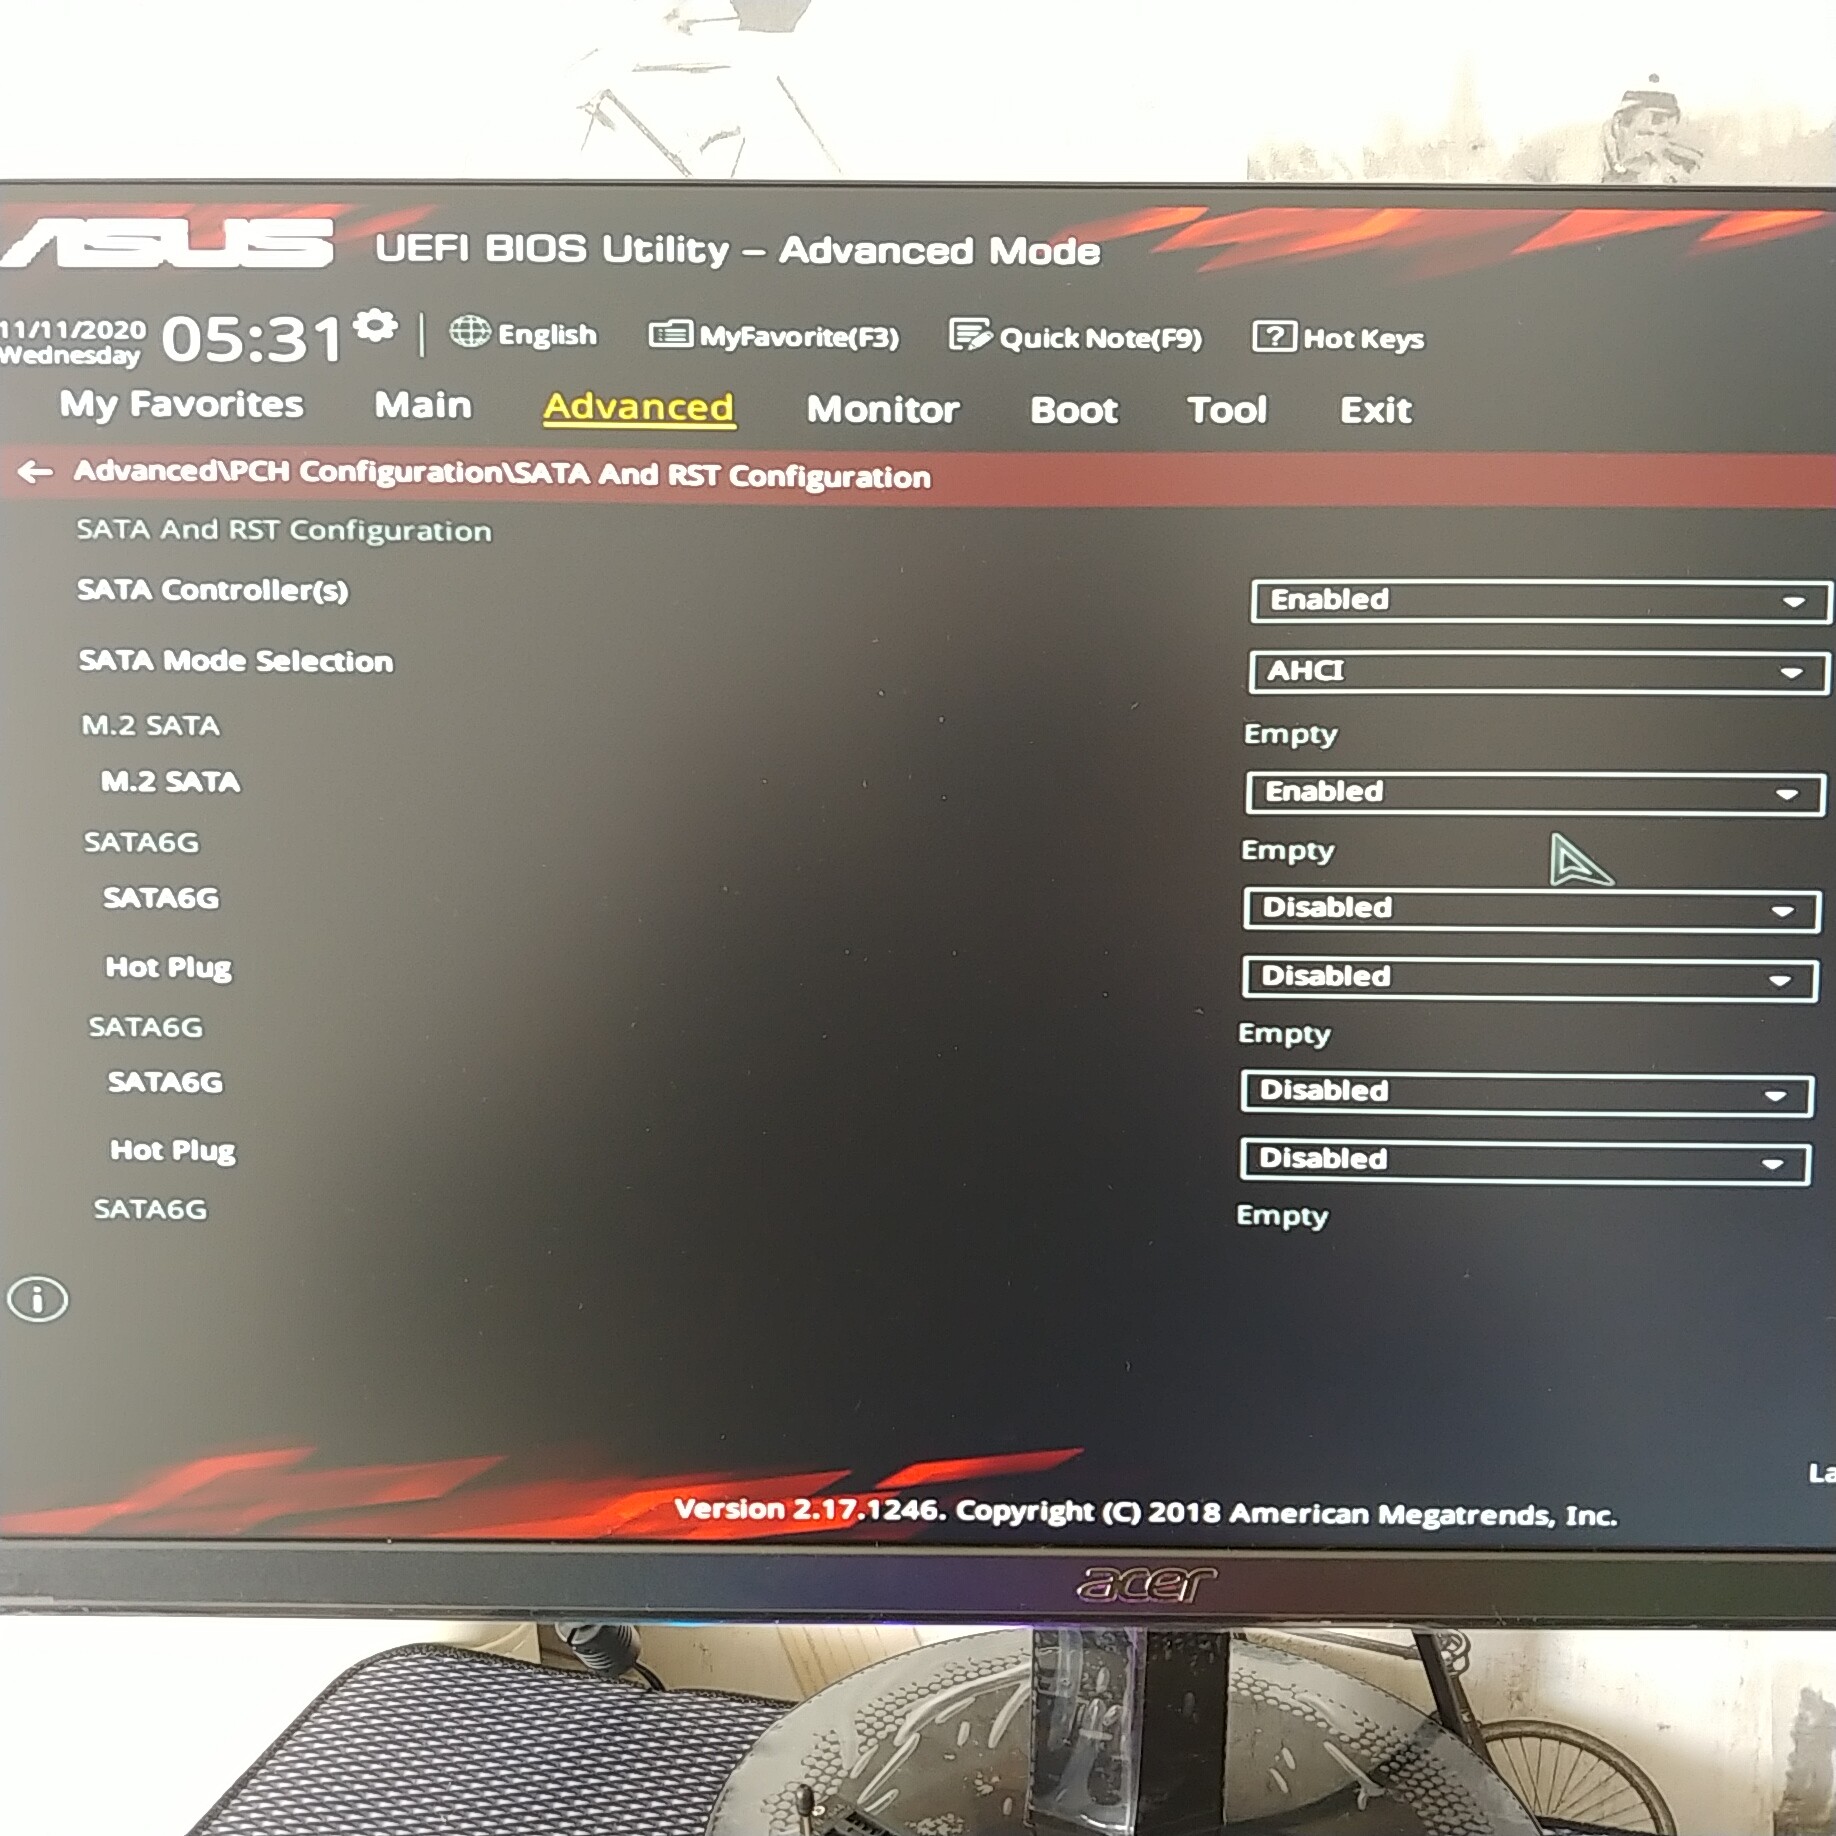
In the picture, M.2 SATA is enabled which will prevent NVME drives from beeing detected. But that should be taken care of by disabling SATA controller alltogether, so a PCI-E problem seems likely. However I do not know to further trouble shoot these.
Same as me. Since i modifies a lot inside of the bios(es) i think there is some kind of conflict or something…
I’m waiting for @Lost_N_BIOS response, if somebody can finure this out it’s him. Or else i’ll have to return this nvme drive and go with a standard sata m.2…
Finghers crossed q.q
Strange thing is: The M.2 is connected to the PCH, not to the CPU. So its accesspath should not even be modded.

