Preliminary Note:
Before you start with the BIOS modding procedure, you should have read carefully the “General Preparations for BIOS Modding” (>Link<).
Guide about how to
find/update/extract/insert an Option ROM module
of a non-UEFI AMI BIOS
A. Opening a non-UEFI AMI BIOS file
This is what you should do:
- Run the Windows Explorer and open the previously created BIOS processing folder (e.g. C:\test).
- Right click onto the MMTOOL3.26.EXE and choose "Run as Administrator".
- Hit the "Load ROM" button, browse to the AMI BIOS file, which is within the processing folder (e.g. C:\test). and open it. If the MMTool doesn’t find the BIOS file, you probably forgot to rename the extension of it to “.ROM”.
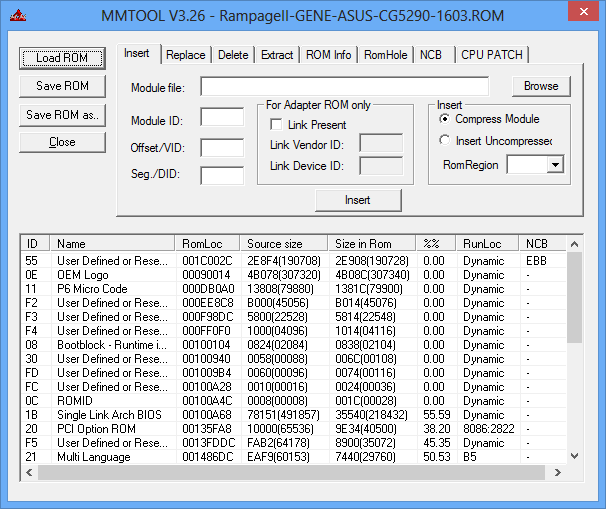
After having successfully opened the AMI mainboard BIOS file, the GUI of the MMTool will show you the content of the BIOS file within a great window beneath the header of the MMTool GUI:
- If the MMTool v3.26 should not be able to open the AMI BIOS file, it is not an old AMI standard (non-UEFI) BIOS, but probably a much newer AMI UEFI BIOS file. In this case you have to use an AMI Aptio UEFI MMTool (you can find the related Guide here:
>LINK<).
B. Searching for a specific Option ROM Module
Here are some advices to make it easier for you:
- All Option ROM Modules of the mainboard BIOS are named "PCI Option ROM" and can easily be found by scrolling down within the great MMTool content window.
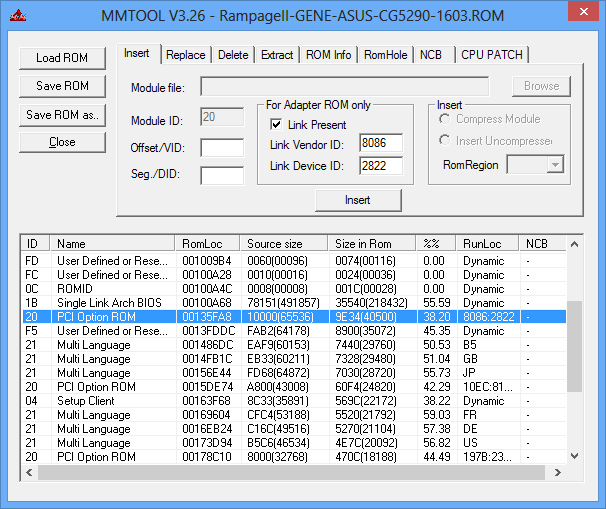
- To find out the sort and function of the different listed "PCI Option ROM" modules, you have to highlight the related line. After having done that, you will see the needed details within the "For Adapter ROM only" section of the MMTool GUI. The vendor of the PCI ROM module is shown with the 4 characters (digits or letters) of his unique VendorID (VEN_xxxx) and the related device with the 4 characters (digits or letters) of its unique DeviceID (DEV_xxxx):
Examples:
The chipset manufacturer with the VendorID VEN_8086 is the Company Intel.
So if you are searching for any Intel PCI ROM module, you have to focus on all "PCI Option ROM" lines, where the "8086" is shown as VendorID. - If you see more than 1 "PCI Option ROM" with the VendorID "8086" (= VEN_8086), you should check the associated Device ID:
- The Device ID with the digits "2822" (= DEV_2822) is the "Intel(R) Desktop/Workstation/Server Express Chipset SATA RAID Controller", which is the on-board Intel RAID Controller of mainboards with an ICH8R, ICH9R, ICH10R, 5-Series and 6-series Southbridge.
The Device ID with the digits "282a" (= DEV_282a) is the "Intel(R) Mobile Express Chipset SATA RAID Controller" and the on-board Intel RAID Controller of mobile (laptop) mainboards with a Southbridge from ICH8M up.
Important: Both Intel Devices DEV_2822 and DEV_282a need and are using exactly the same Intel RAID ROM module. That is why some mainboard manufacturers are lazy while building the BIOS file and give both types of mainboards (Desktop and Mobile) the same DeviceID (e.g. "282a"). So don’t worry about it, if you are checking a Desktop mainboard BIOS, but see "8086,282a" shown by the MMTool.
By the way: The shown digits of the Vendor and Device IDs don’t have any influence on the function of the BIOS or the ROM modules. - The DeviceID "2826" (= DEV_2826) is the "Intel(R) C600 Series Chipset SATA RAID Controller", which is the on-board Intel RAID Controller of mainboards with an Intel X79 chipset.
So if you want to extract or replace an Intel RAID ROM module, which is compatible with Intel’s ICH8R/ICH9R/ICH10R/5-Series/6-Series Chipsets, you have to look for a "PCI Option ROM" with the shown VendorID "8086" and DeviceID "2822", whereas users with an Intel X79 chipset mainboard should search for the "PCI Option ROM" with the Vendor ID "8086" and the DeviceID "2826". - The Device ID with the digits "2822" (= DEV_2822) is the "Intel(R) Desktop/Workstation/Server Express Chipset SATA RAID Controller", which is the on-board Intel RAID Controller of mainboards with an ICH8R, ICH9R, ICH10R, 5-Series and 6-series Southbridge.
- You can easily find out the vendor and device names of shown VendorID’s and DeviceID’s with other characters by doing a Google search. Just edit the VendorID as "VEN_xxxx" and the DeviceID as "DEV_xxxx" - each ID with the shown characters.
C. Extraction of an Option ROM module
Generally notes:
- The extraction of a PCI ROM module doesn’t effect the mainboard BIOS. It will stay untouched by the extraction.
- It is impossible to verify the version of the PCI ROM module as long as it is part of the BIOS file. So you have to extract it, if you want to make sure, that it is the desired version, which you want to flash into your own mainboard later.
This is the procedure, which is valid for all Option ROM modules:
- Start the MMTool v3.26, hit the "Load ROM" button and load the AMI BIOS file, which contains the desired PCI RAID ROM version.
- Search for the "PCI Option ROM", which is the desired Intel RAID ROM Module, and highlight the related line within the MMTool window.
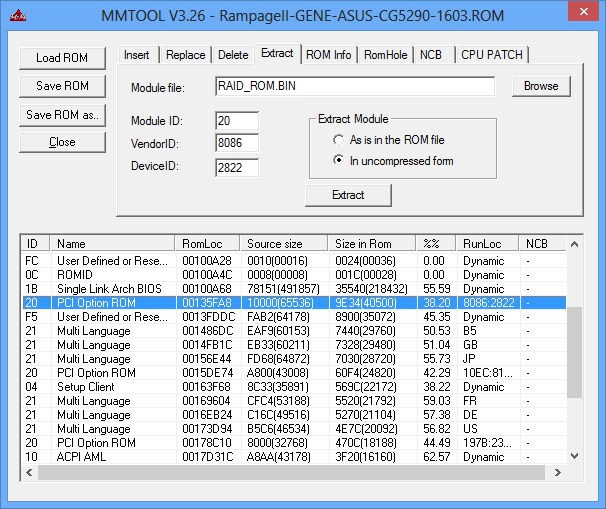
- Hit the tab "Extract", go to the "Module file" box and edit a name for the module file you want to extract. PCI ROM mudule files usually have the suffix ".BIN" (e.g. RAID_ROM.BIN).
- Make sure, that the default option "Extract Module in uncompressed form" is enabled.
The GUI of the MMTool should look like this:
- Now hit the "Extract" button.
- You will find the extracted file (named RAID_ROM.BIN or similar) within the processing folder (C:/test).
- As last step you should verify the sort and the version of the extracted Intel RAID ROM file.
Just open it with a Hex Editor and you will find on top of the right side a readable text with the sort and the version of the PCI ROM module (example: "Intel(R) RAID for SATA - v8.0.0.1038"):
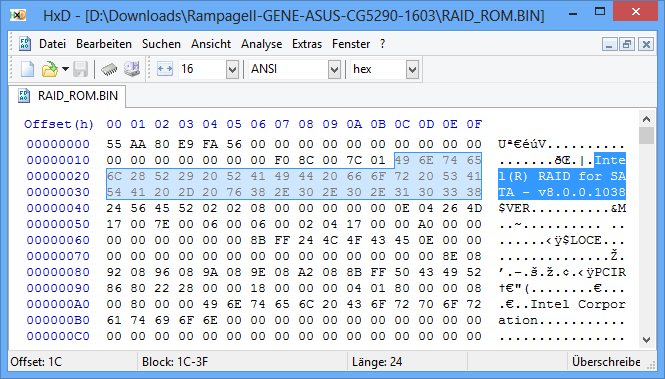
This means, that you have extracted the Intel RAID ROM v8.0.0.1038.
D. Replacement of an Option ROM module
This is what you should do:
- Run the MMTool v3.26, hit the "Load ROM" button and and navigate to the AMI BIOS file you want to modify (it should be within C:\test).
- Search for the "PCI Option ROM" you want to replace and highlight the related line.
- Hit the "Replace" tab.
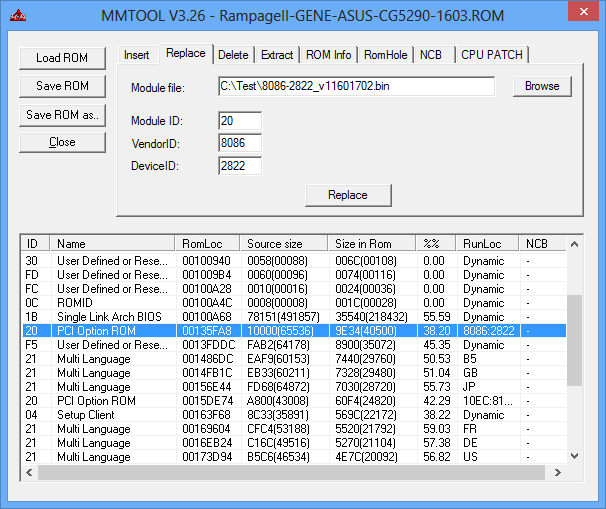
Now you can see the details (ModuleID, VendorID and DeviceID) of the "PCI Option ROM" you are going to replace by another version. - After having made sure, that the shown "PCI Option ROM" details are the correct ones, hit the "Browse" button and navigate to the Intel RAID ROM file you want to get into the AMI mainboard BIOS (it should be within C:\test and have the suffix ".BIN").
- Open the .BIN file by enabling it and hitting the "Open" button or by double click onto the file.
Now the MMTool GUI should like like this:
- If everything is ok, hit the "Replace" button. This will execute the replacement of the selected "PCI Option ROM" module.
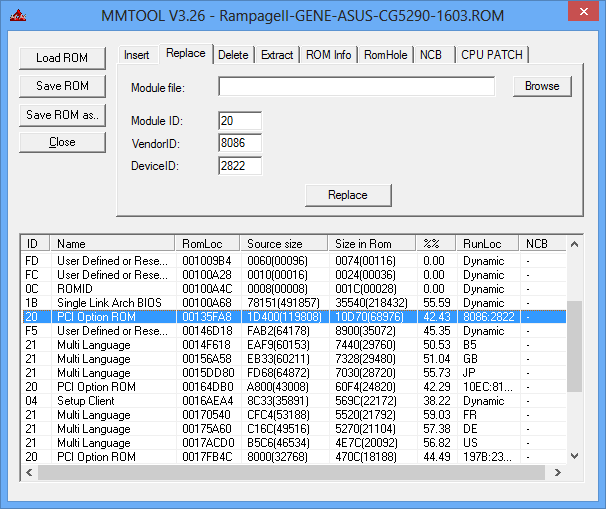
It is possible, that you will see some slightly changes regarding the size of the modules, which are listed within the MMTool GUI window. This happens, when the size of the inserted module is different from the replaced one.
In my test scenario I got some changes you see here:
Don’t worry about these changes. The MMTool is able to compress the modules dynamicly (within a certain bandwidth) with the result, that all modules will be completely inserted without changing the size of the entire mainboard BIOS file.
Attention:
Old AMI BIOS files are only small sized and it may happen, that the compression potential is not able to replace a small sized PCI ROM Module by a much bigger one. In this case you will get an adequate message.
Tip:
In some cases you can solve the space problem by deleting a module, which is not that important for the use of the computer, for example the "OEM Logo".
Just hit the "Delete" tab, highlight the line with the module you want to delete (example: "OEM Logo"), hit the "Delete" button and save this modification (otherwise you will not get the additional free space!). After having done that you can reopen the just modified BIOS and to retry the replacement of the PCI ROM module. - As last step the modified BIOS file has to be saved.
Hit the “Save ROM as …” button, create a useful name for the modded BIOS file (example: P8Z68-V-ASUS-0801_mod.ROM) and then save it. - You will find the modded BIOS file within your processing folder (C:\test). Due to the dynamic compression done by the MMToool it should have exactly the same size as the original BIOS.
E. Insertion of a natively not present Option ROM module
This BIOS modification is required, if you want to boot off a storage device (e.g. an NVMe SSD), which is natively not supported by the original BIOS.
Note: The related device will only be bootable in LEGACY mode!
This is what you should do:
- Run the MMTool v3.26, hit the "Load ROM" button and and navigate to the AMI BIOS file you want to modify (it should be within a separate folder, e.g. C:\test).
You will get a picture like this:
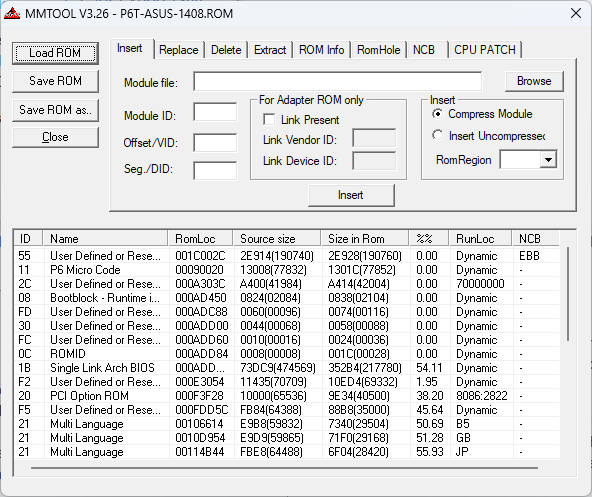
- Make sure, that the on top of the MMTool header located "Insert" tab is pressed.
- Hit the "Browse" button, navigate to the folder, where the desired and 100% matching Option ROM module is located and double-click onto it.
- Enter the required information into the following empty fields
a) “Module ID” (has to be “20” for an Option ROM module),
b) “Offset/VID” (= the VendorID of the related Storage Controller)
c) “Seg./DID” (= the DeviceID of the related Storage Controller)Here is the picture (as example):
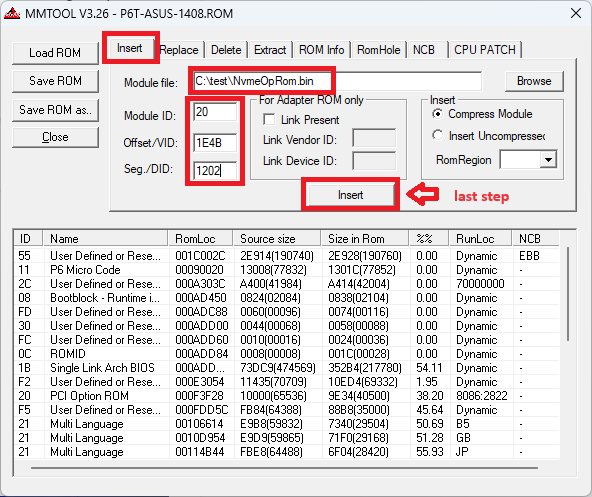
- Press the big "Insert" button. Now the MMTool will execute the integration of the desired Option ROM.
- Hit the "Save ROM as ..." button, give the modded BIOS file a meaningful name and hit the "Store" button.
- As last step you should verify the success of your BIOS modification.
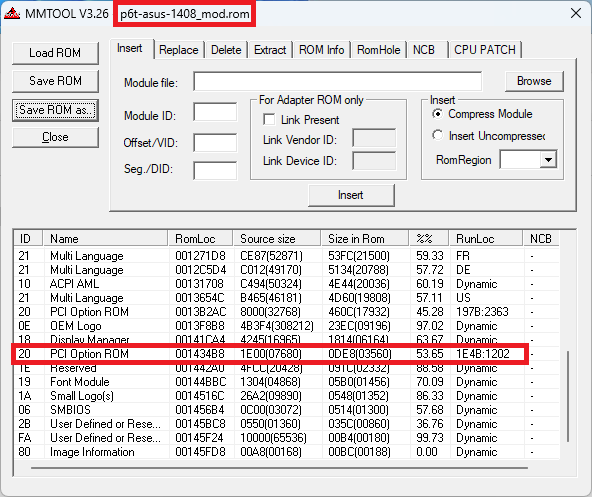
Open the just created modded BIOS and look for the just integrated Option ROM module by scrolling down the shown BIOS content.
This is how the success will be shown:
- Now the modded BIOS can be flashed (at own risk!).
Flashing the modded BIOS into the mainboard BIOS chip
It is strongly recommended to follow the following advices:
- Before you are going to flash the new BIOS, you should make a complete backup of your entire system and boot partitions or at least of all important data. After having done that, enter the BIOS and list all your special settings. Before you leave the BIOS, choose and save the DEFAULT settings.
- Since the BIOS file name usually is layed down by the mainboard manufacturer within the BIOS itself, the "modded" BIOS file should not be renamed unless the new name is "in the line" with BIOS files, which were previously released by the manufacturer.
- Users with an ASUS mainboard, who get a "Security Verification" warning while trying to flash a modified BIOS, should redo it by using the "USB BIOS Flashback" method (for details look into the mainboard manual, not all ASUS mainboards do support it). Important: The BIOS has to be renamed a special way according to the ASUS PDF files, if you use the ASUS "USB BIOS Flashback" method!
Users with an ASUS P8xxx mainboard, which doesn’t support the "USB BIOS Flashback" feature, may get the modified BIOS successfully flashed by following >this< guide layed down by CodeRush at [H]ard|Forum (thanks to Maikl for the tip). - After having flashed the new BIOS, you have to redo your previous BIOS settings.
Safest way (found >here<):
After flash is complete, shut down fully and switch off PSU, wait one minute and clear CMOS. Then turn on, boot to BIOS, load optimized, set the SATA Controller to the appropriate mode (AHCI/RAID) and save/apply/reboot back to the BIOS. Once in the BIOS again recover the previous boot settings (boot device and HDD boot order). If you have updated the Marvell 91xx AHCI/RAID ROM module, set the Marvell Firmware mode to "Force", then save/apply/reboot and let it load through to windows, before that happens Marvell Firmware will update and board will reboot. - Before you restart with your usual PC work, you should verify the full function of the updated PCI ROM module. If you have inserted a new RAID ROM version into the BIOS, you have to make sure, that the "RAID" mode of the on-board SATA Controller is enabled, and then you should run the RAID Configuration Utility by hitting CTRL+I, F10 or similar (look into your mainboard manual). Everything will be fine, if you can enter and use the RAID Configuration Utility without any problem (Don’t modify anything, if you don’t want it to be changed!).
Advice for users with a non-RAID system:
Users, who are running their SATA Controllers in AHCI or IDE mode, should check the function of the freshly updated RAID ROM module the same way. After having temporarily enabled the "RAID" mode of the on-board SATA Controller they should run the RAID Configuration Utility and look, if everything seems to be fine (but don’t create a RAID array!). Then they can close the Utility and reset the SATA Controller to the usual setting (AHCI/IDE mode). The data of their AHCI/IDE system will not be altered or destroyed by this procedure.
Any feedback is much appreciated. Most important is a short report about the success or failure of flashing the "modded" BIOS into the BIOS chip of your mainboard. Don’t forget to mention the vendor and the name of your mainboard and the sort and version of the flashed PCI ROM module.
Good luck!
Fernando