Help adding CPU Microcode to Dell 7060 BIOS?

Update : successfully installed my i3-9100 in this 7060 Micro !

Solution

I haven’t yet tested my i3-9100 in this flashed board yet because it hasn’t been received in the mail yet but I can briefly detail below the steps required to flash the updated 906EA/906EB microcode as well as additional 906EC/906ED microcode from 9th gen.
I didn’t use the hardware programmer to do the flash, but ordered one to resurrect a corrupted BIOS on an older 9020 M board and also for backup dump of ROM incase of failed testing.
All went as planned with no issues booting back into Windows so hardware flasher (CH341A) wasn’t required - but is an incredibly useful tool to have next to you anyway :slight_smile:

Again, a very special shoutout to @DeathBringer and @Lost_N_BIOS - without their help this project would be dead in the water. I just came up with the thought that this would likely be possible given 7070 Micro motherboard is identical (after having checked all components one by one all that could differ is internal pcb layer design). I’m just going to detail the steps mentioned in different posts throughout this thread into one for you.
Please note that the flash has ONLY been tested on 7060 Micro 35w TDP board @ time of writing (25/05/2020) - i’m waiting on a cpu cooler for my 7060 Micro 65w TDP board before testing the flash on that board but there shouldn’t be any issues !!
Steps are outlined below :

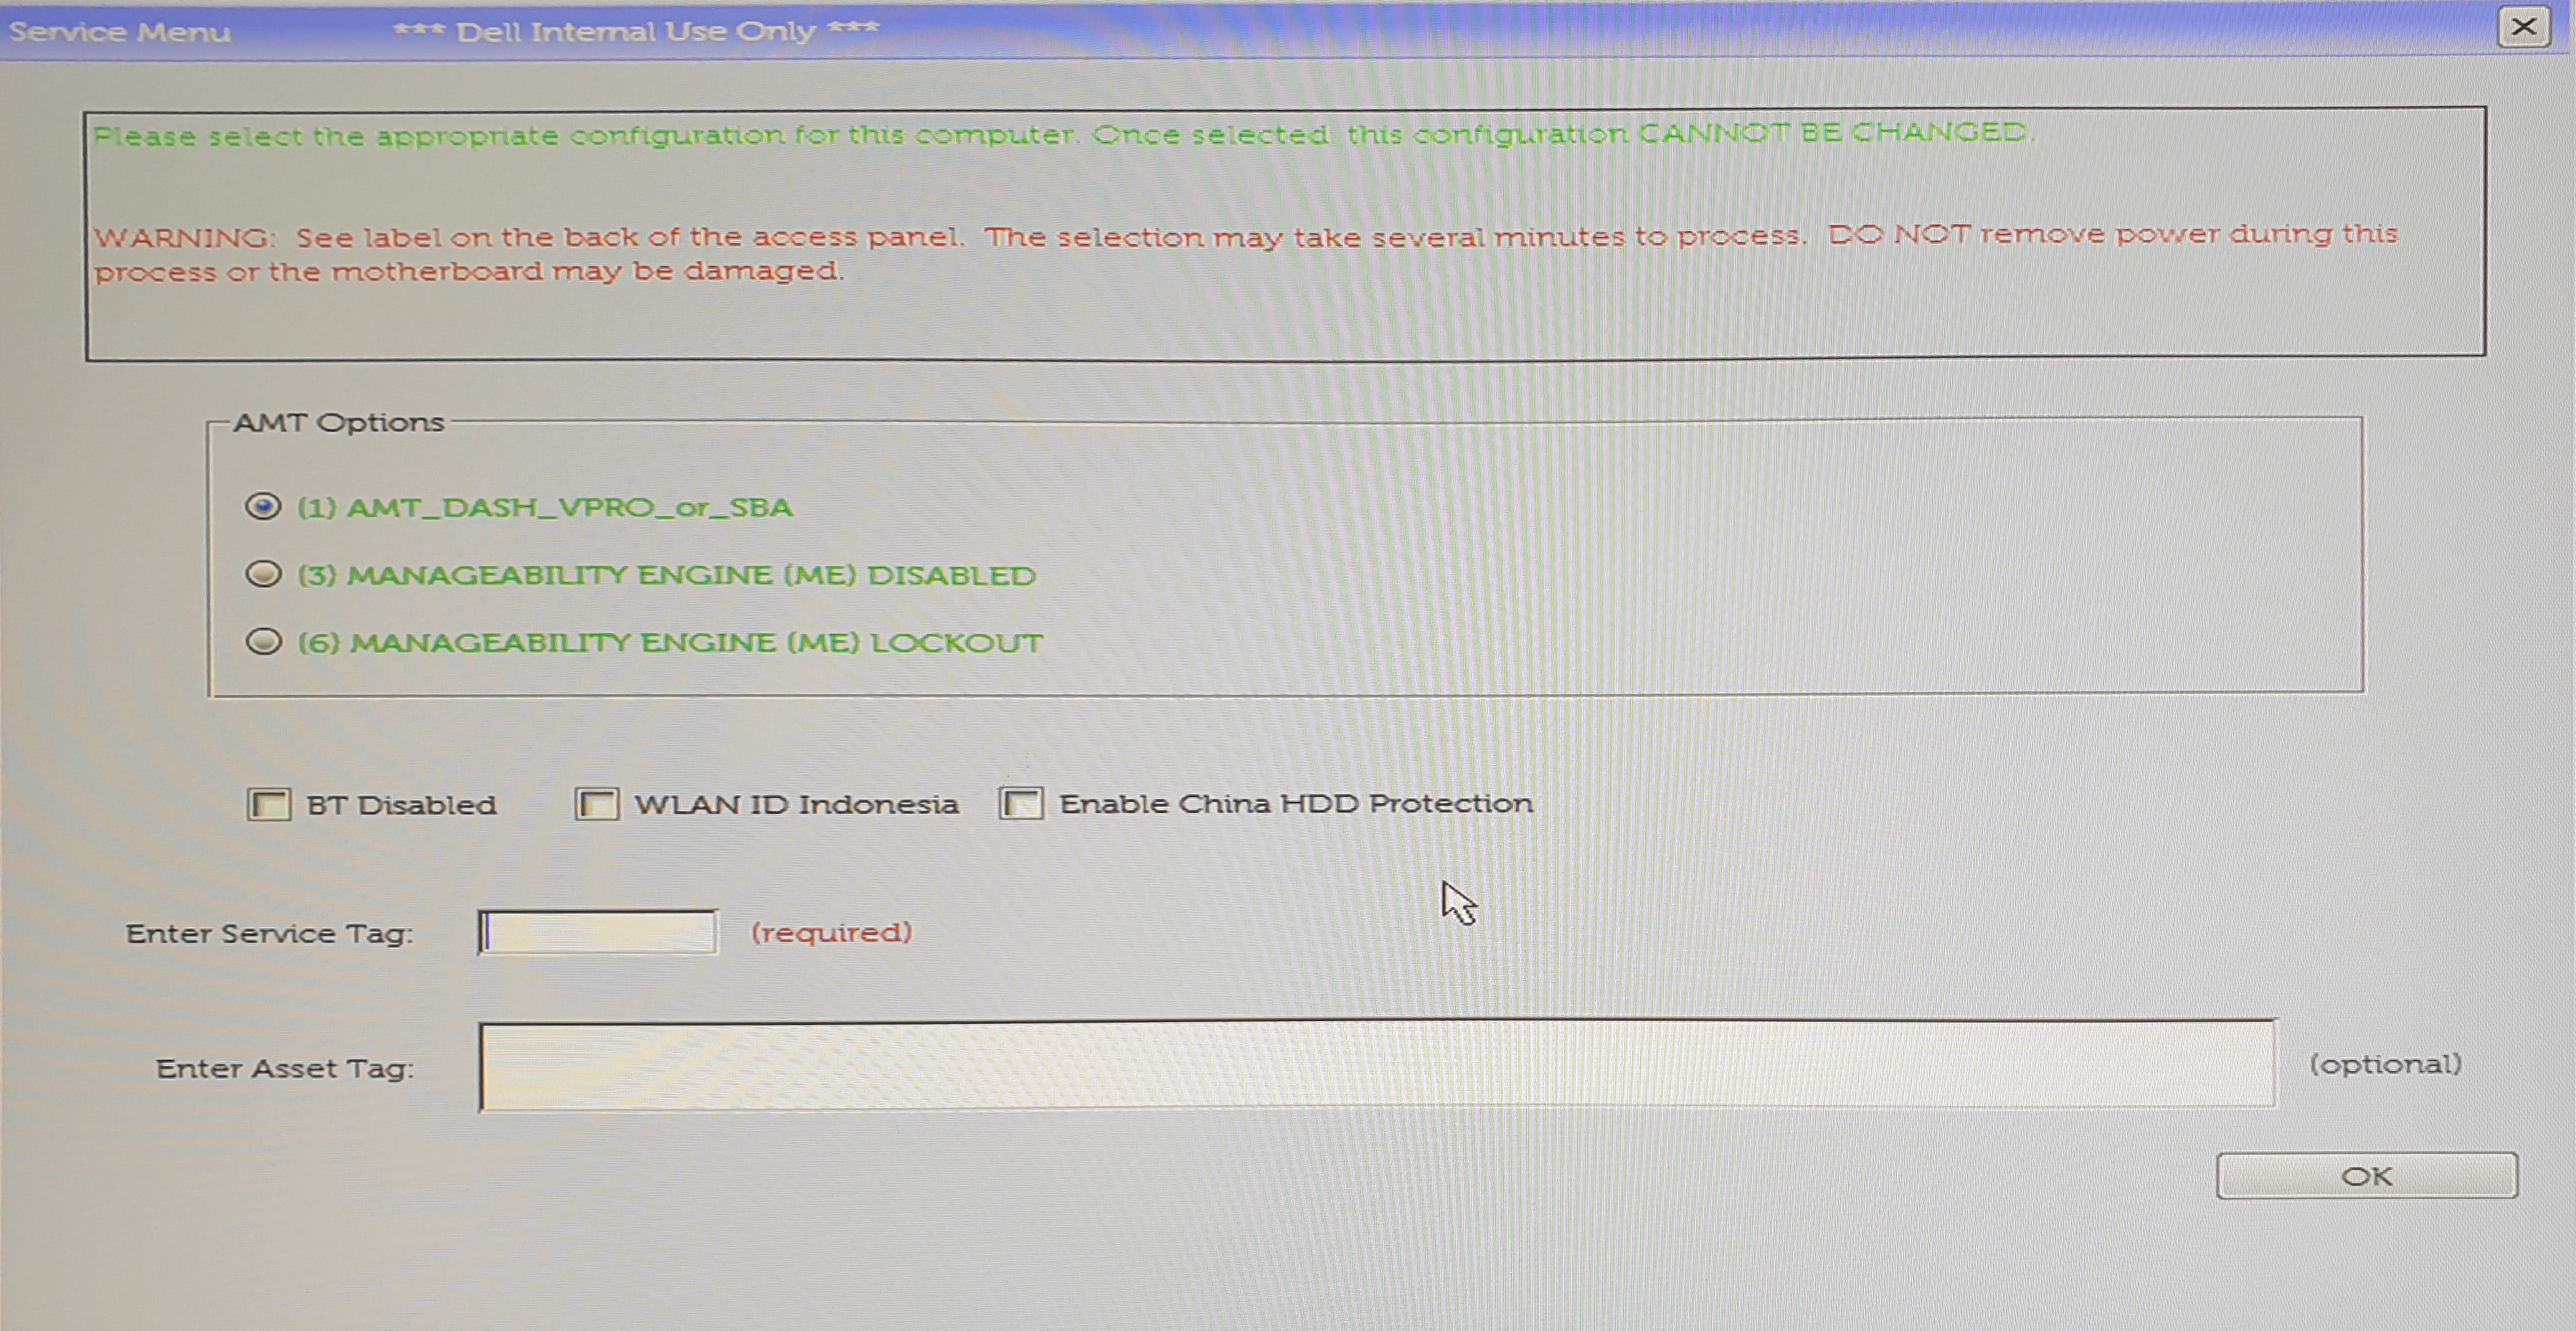
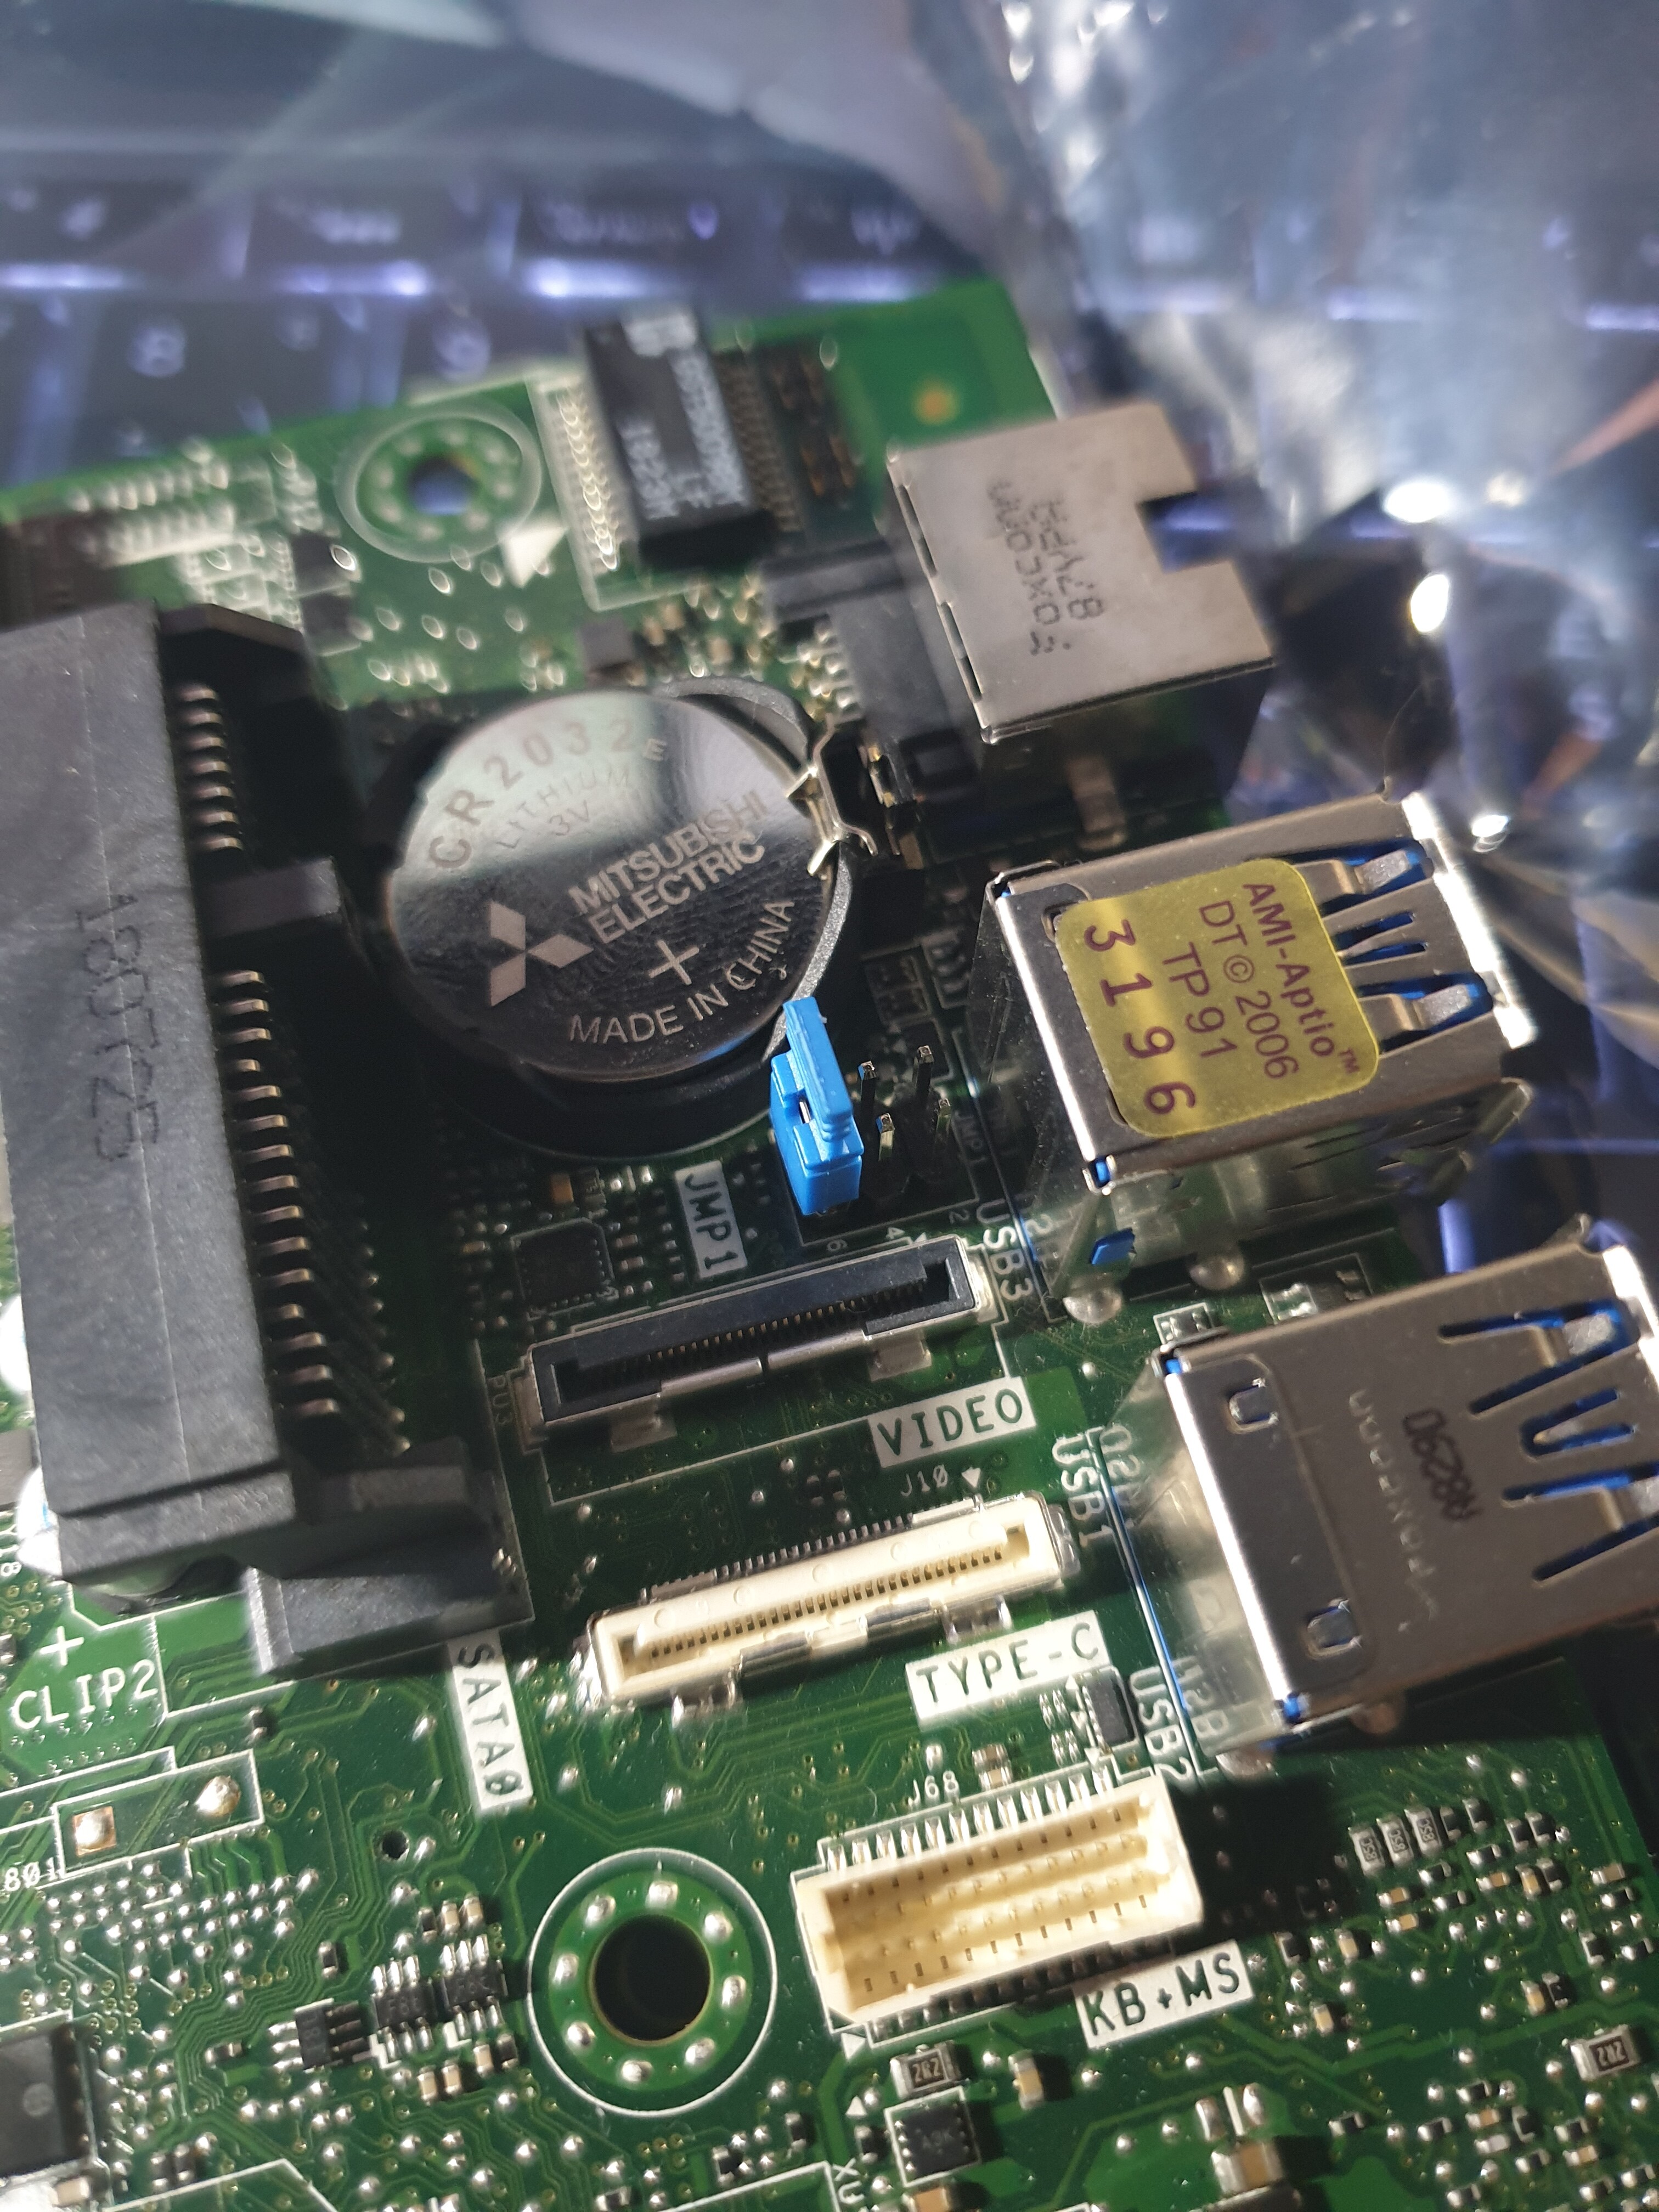
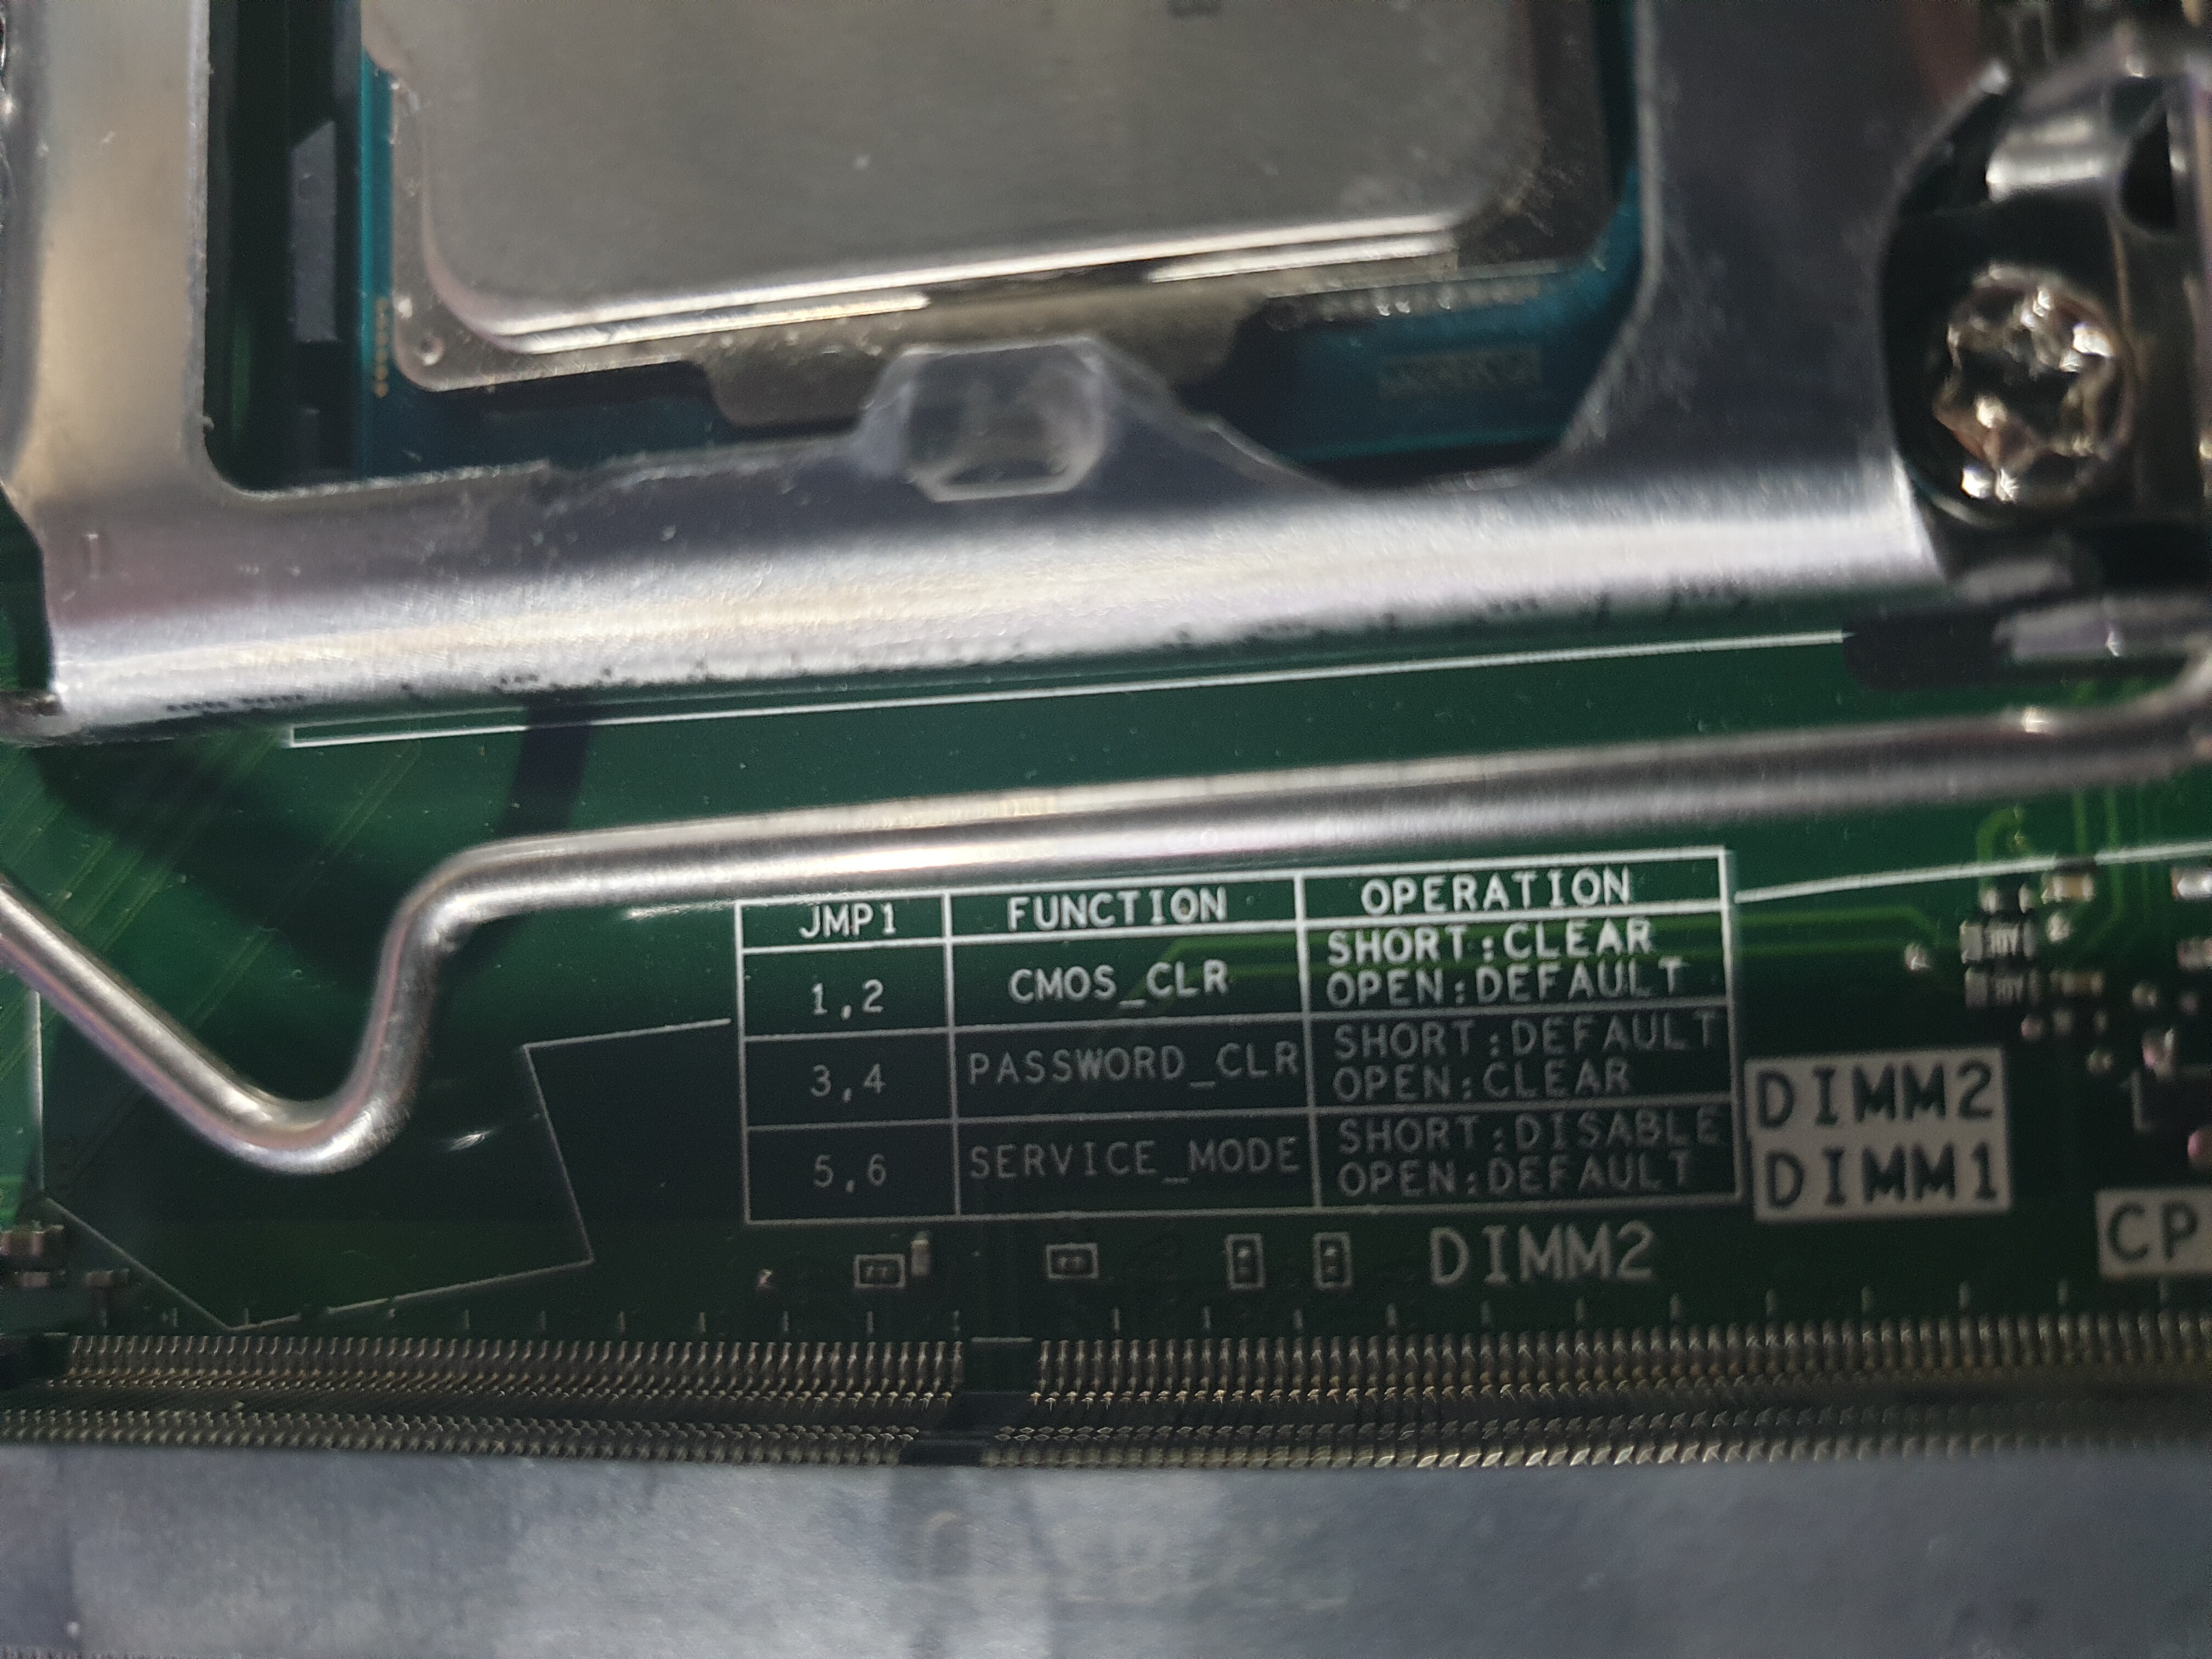
1. Service Mode jumper MUST be set on your 7060 Micro motherboard otherwise you will not be able to flash additional/updated mcode to BIOS with fptw

20200525_140046.jpg

20200525_140054.jpg


2. Download Intel CSME System Tools v12 r23 - (2020-05-03) - v12 is the correct version for 7060 mainboard - do not use any other main version. Link :
Extract contents, this guide will only reference Windows method by using contents from ‘/Flash Programming Tool/WIN64’ (or WIN32) folder. (DOS, Linux etc… versions available in same folder for those interested).

3. Download updated/additional microcode bin for 7060M → (100% credit to @DeathBringer )

4. Ensure 7060_micro_ucode_012020.bin file is placed in ‘/Flash Programming Tool/WIN64’ (or WIN32) folder.

5. In Windows, open cmd and type the following : fptw64 -a 0x1D20000 -l 0xF0000 -f 7060_micro_ucode_012020.bin

20200524_112557.jpg


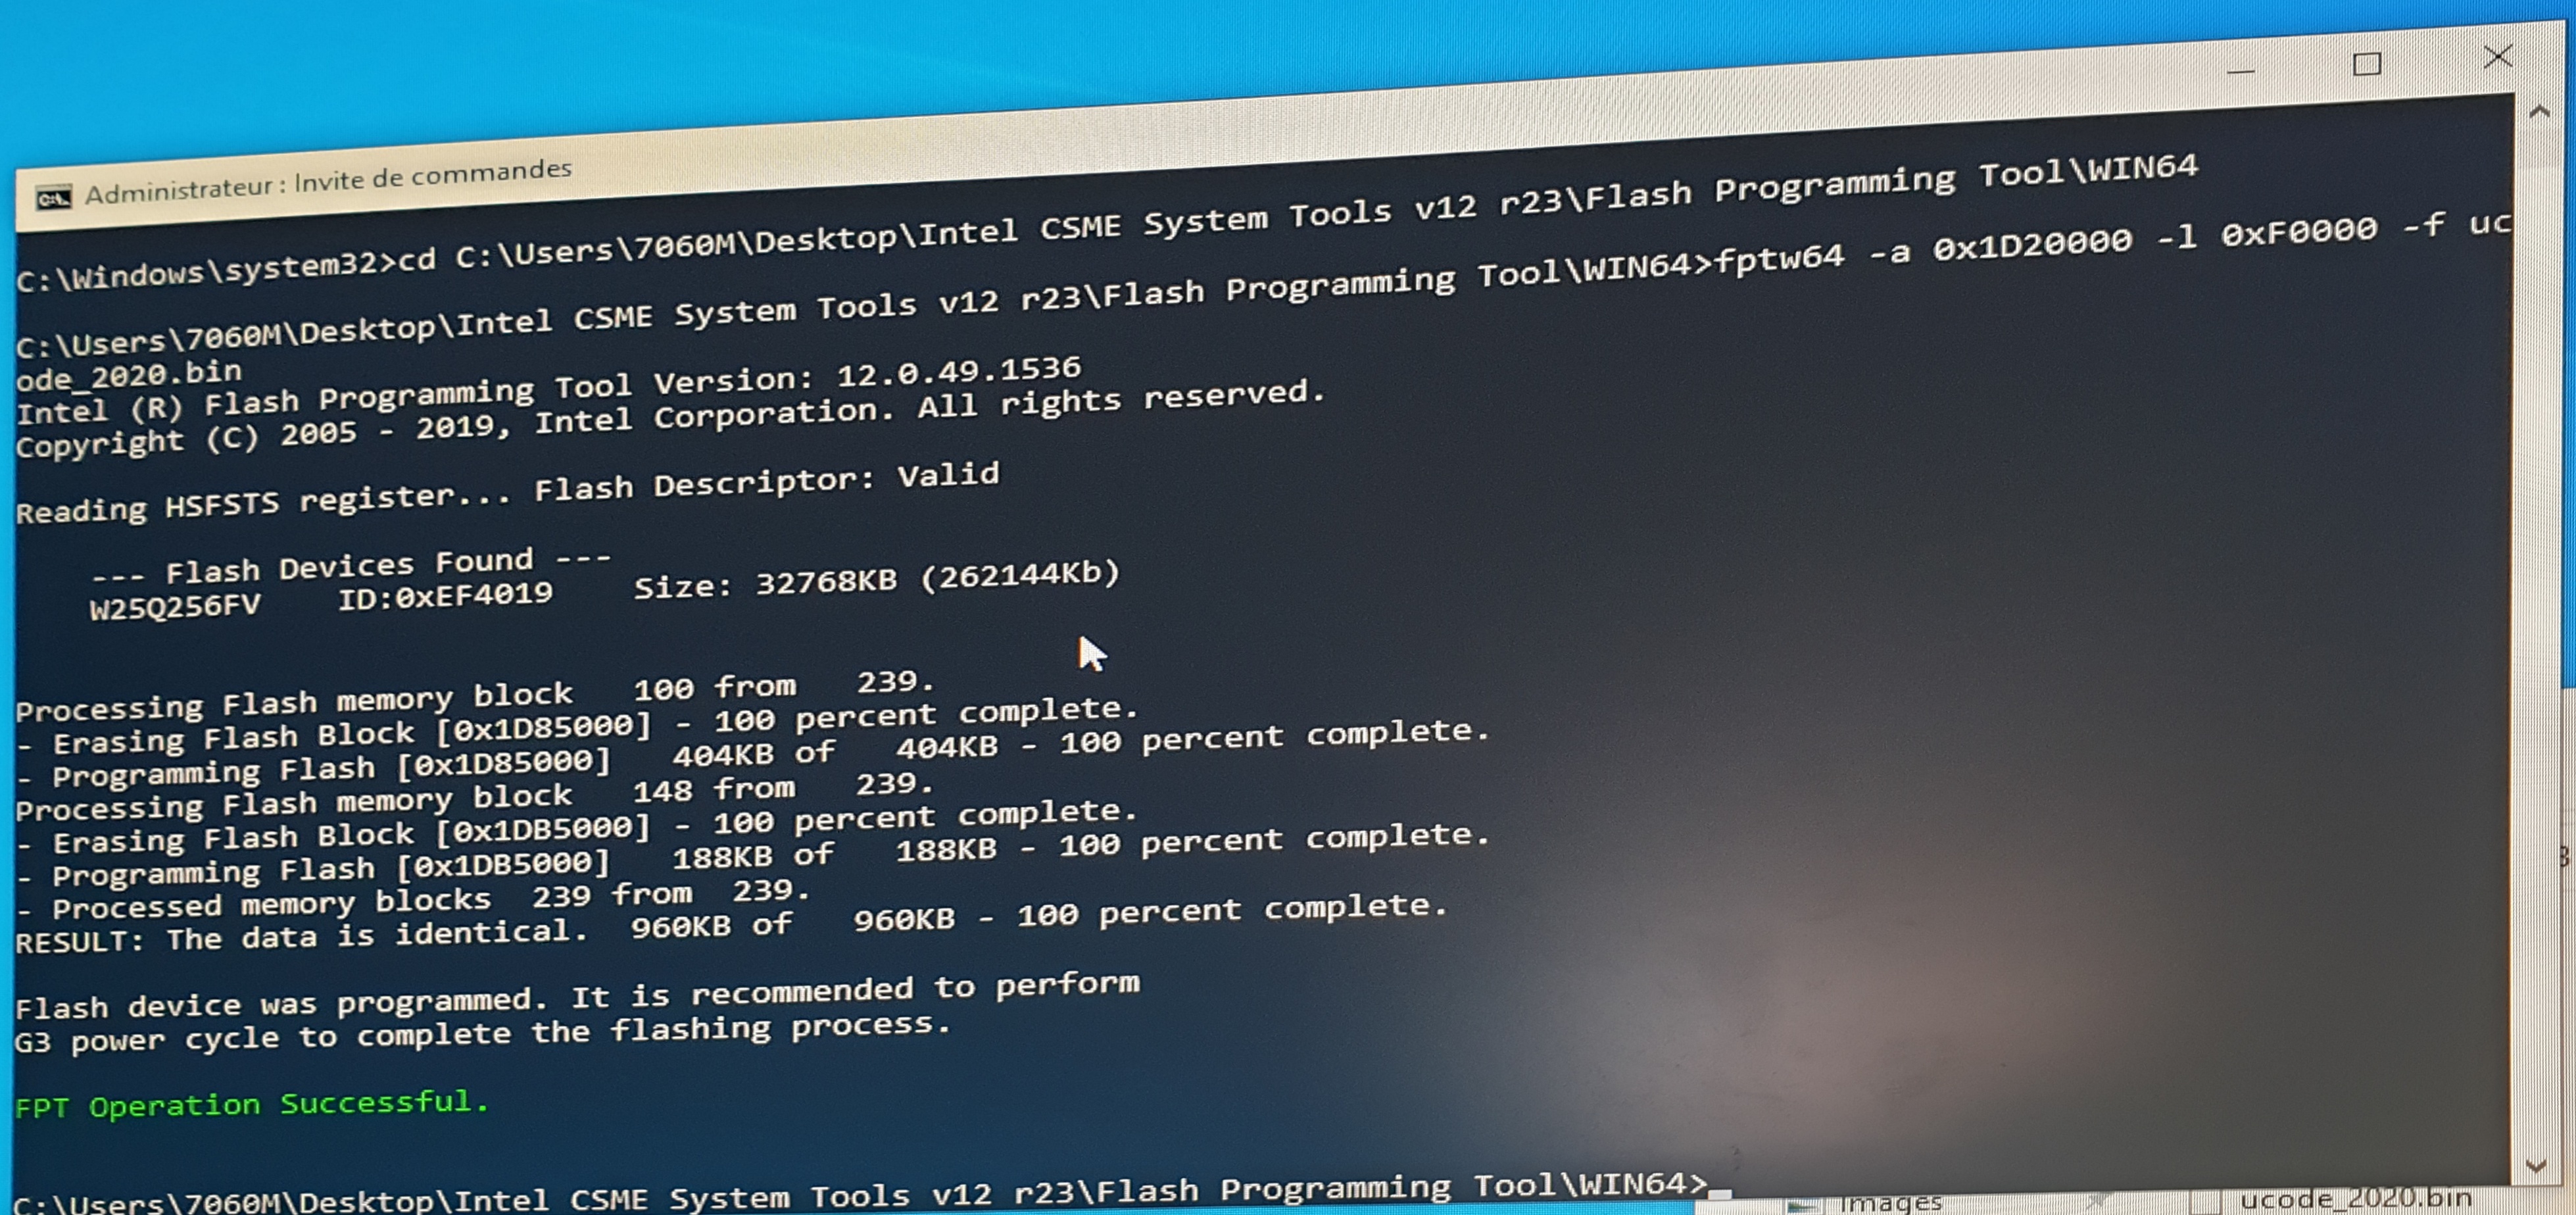
fptw will detect correct BIOS chip on your board and begin flashing the updated microcode. Once successful you may reboot PC, check it loads into Windows & you can perform CPU swap. Again, i’d advise atleast waiting until I install my i3-9100 to ensure everything works fine 100% ! (adding cpu microcode doesn’t necessarily mean 9th gen will be compatible on this 7060M mainboard despite myself having thoroughly checked every component on both boards - some tiny detail may have changed between both board iterations).

=====================================================================================================================

Hi all,
First time poster on the forum - although have been reading many a useful guide on here for a little while now!
Looking for some help & guidance regarding adding CPU microcode onto a Dell motherboard.

A bit of context before I dive into this one :

So we’re working on a small project to allow 9th Gen processor compatibility on the Dell Optiplex 7060 Micro (and subsequently all other formfactors). - will likely expand this project to Optiplex 3060 & 5060 at a later date.
The Dell Optiplex 7060 was sold with 8th gen CPUs → CPUID 906EA (Celeron, Pentium, i3 35W and 65W TDP variants) and 906EB (i5 and i7 - 35W and 65W TDP variants).
The Optiplex 7060 Micro has two boards, a board capable of running max 65W TDP CPUs, and another capable of running max 35W TDP CPUs. Both use same BIOS, & each different Dell P/N are referenced in some places.

The Dell Optiplex 7070 was released a year or so afterwards and is compatible with 9th Gen CPUs.
The 7070 35w & 65w TDP boards are identical to the previous generation 7060 boards. However, unfortunately, Dell has rather annoyingly never updated the microcode for Optiplex 7060/5060/3060 BIOS to include 9th gen compatibility. (I assume it wouldn’t do much good to their sales - the two units are identical in virtually every aspect except CPU and BIOS - even the chassis P/N is the same - heatsink/fan etc, all the same).
The plan is to make this BIOS available for 7060 systems so users can upgrade to 9th Gen on their 7060 platform, there are quite a few people enquiring about this on Dell forums and noone has responded in over a year.
If successful we’d like to do the same for Optiplex 3060 & 5060.

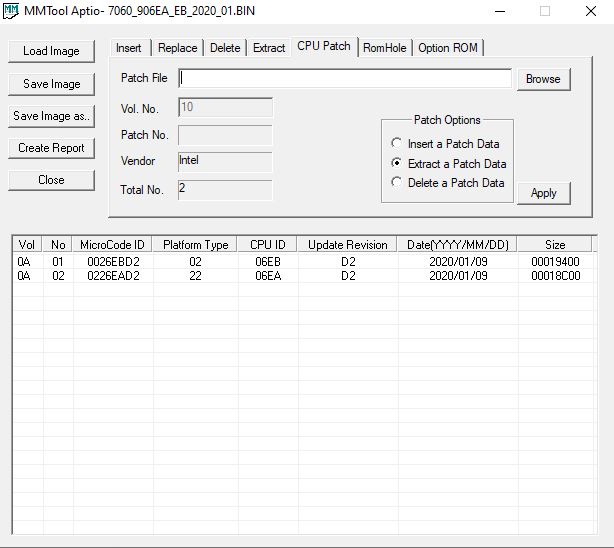
The Dell 7060 BIOS only includes 906EA & 906EB microcode whereas the Dell 7070 BIOS includes 906EA, 906EB, 906EC and 906ED microcode.
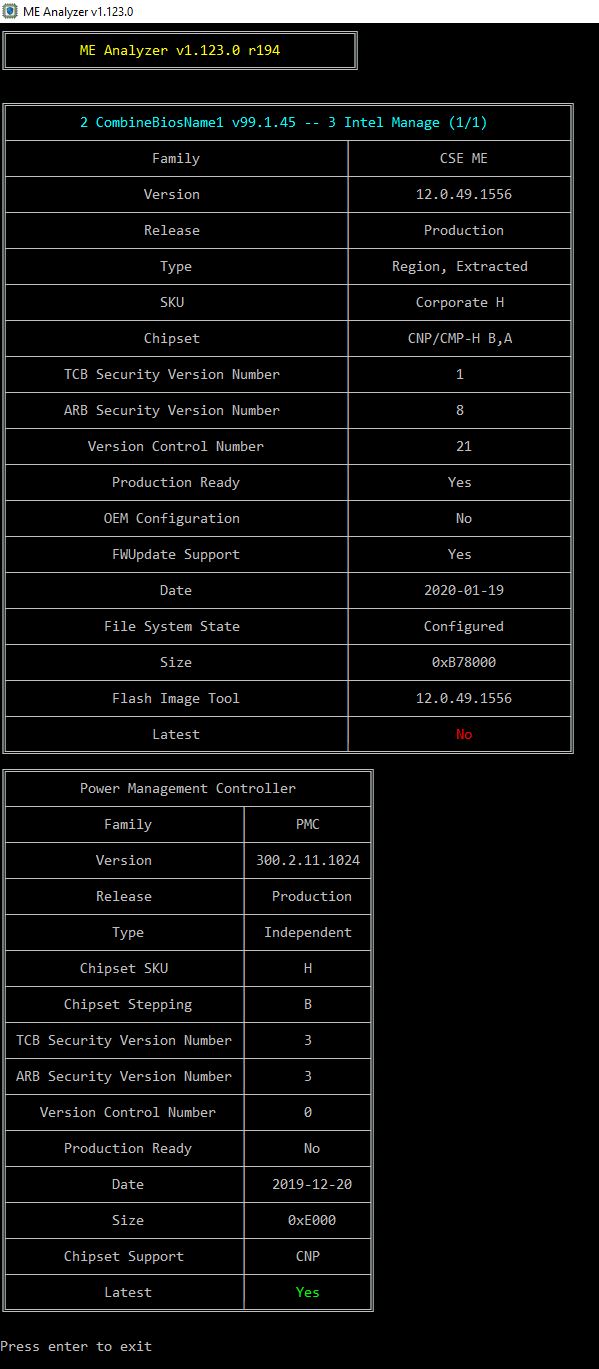
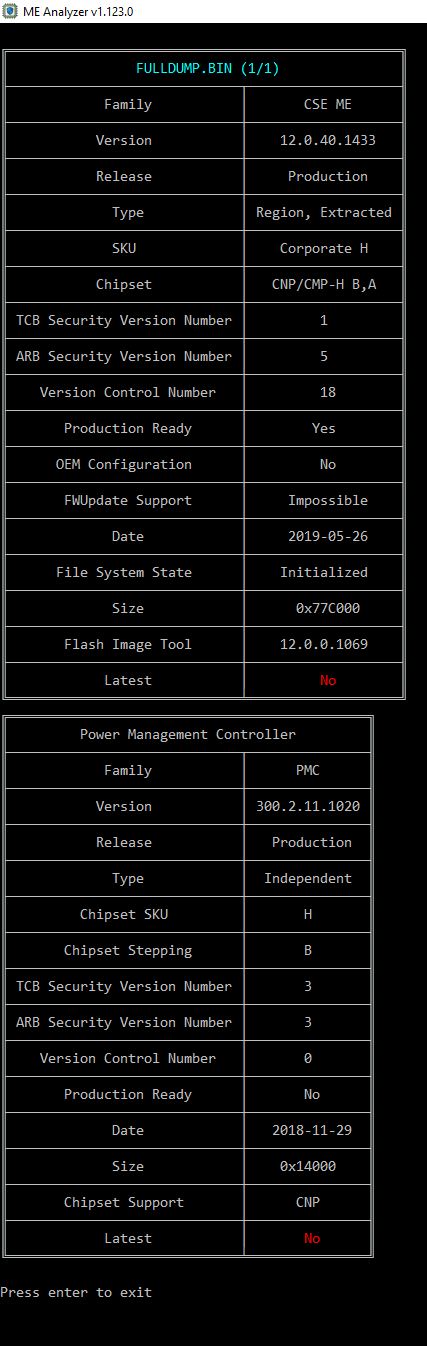
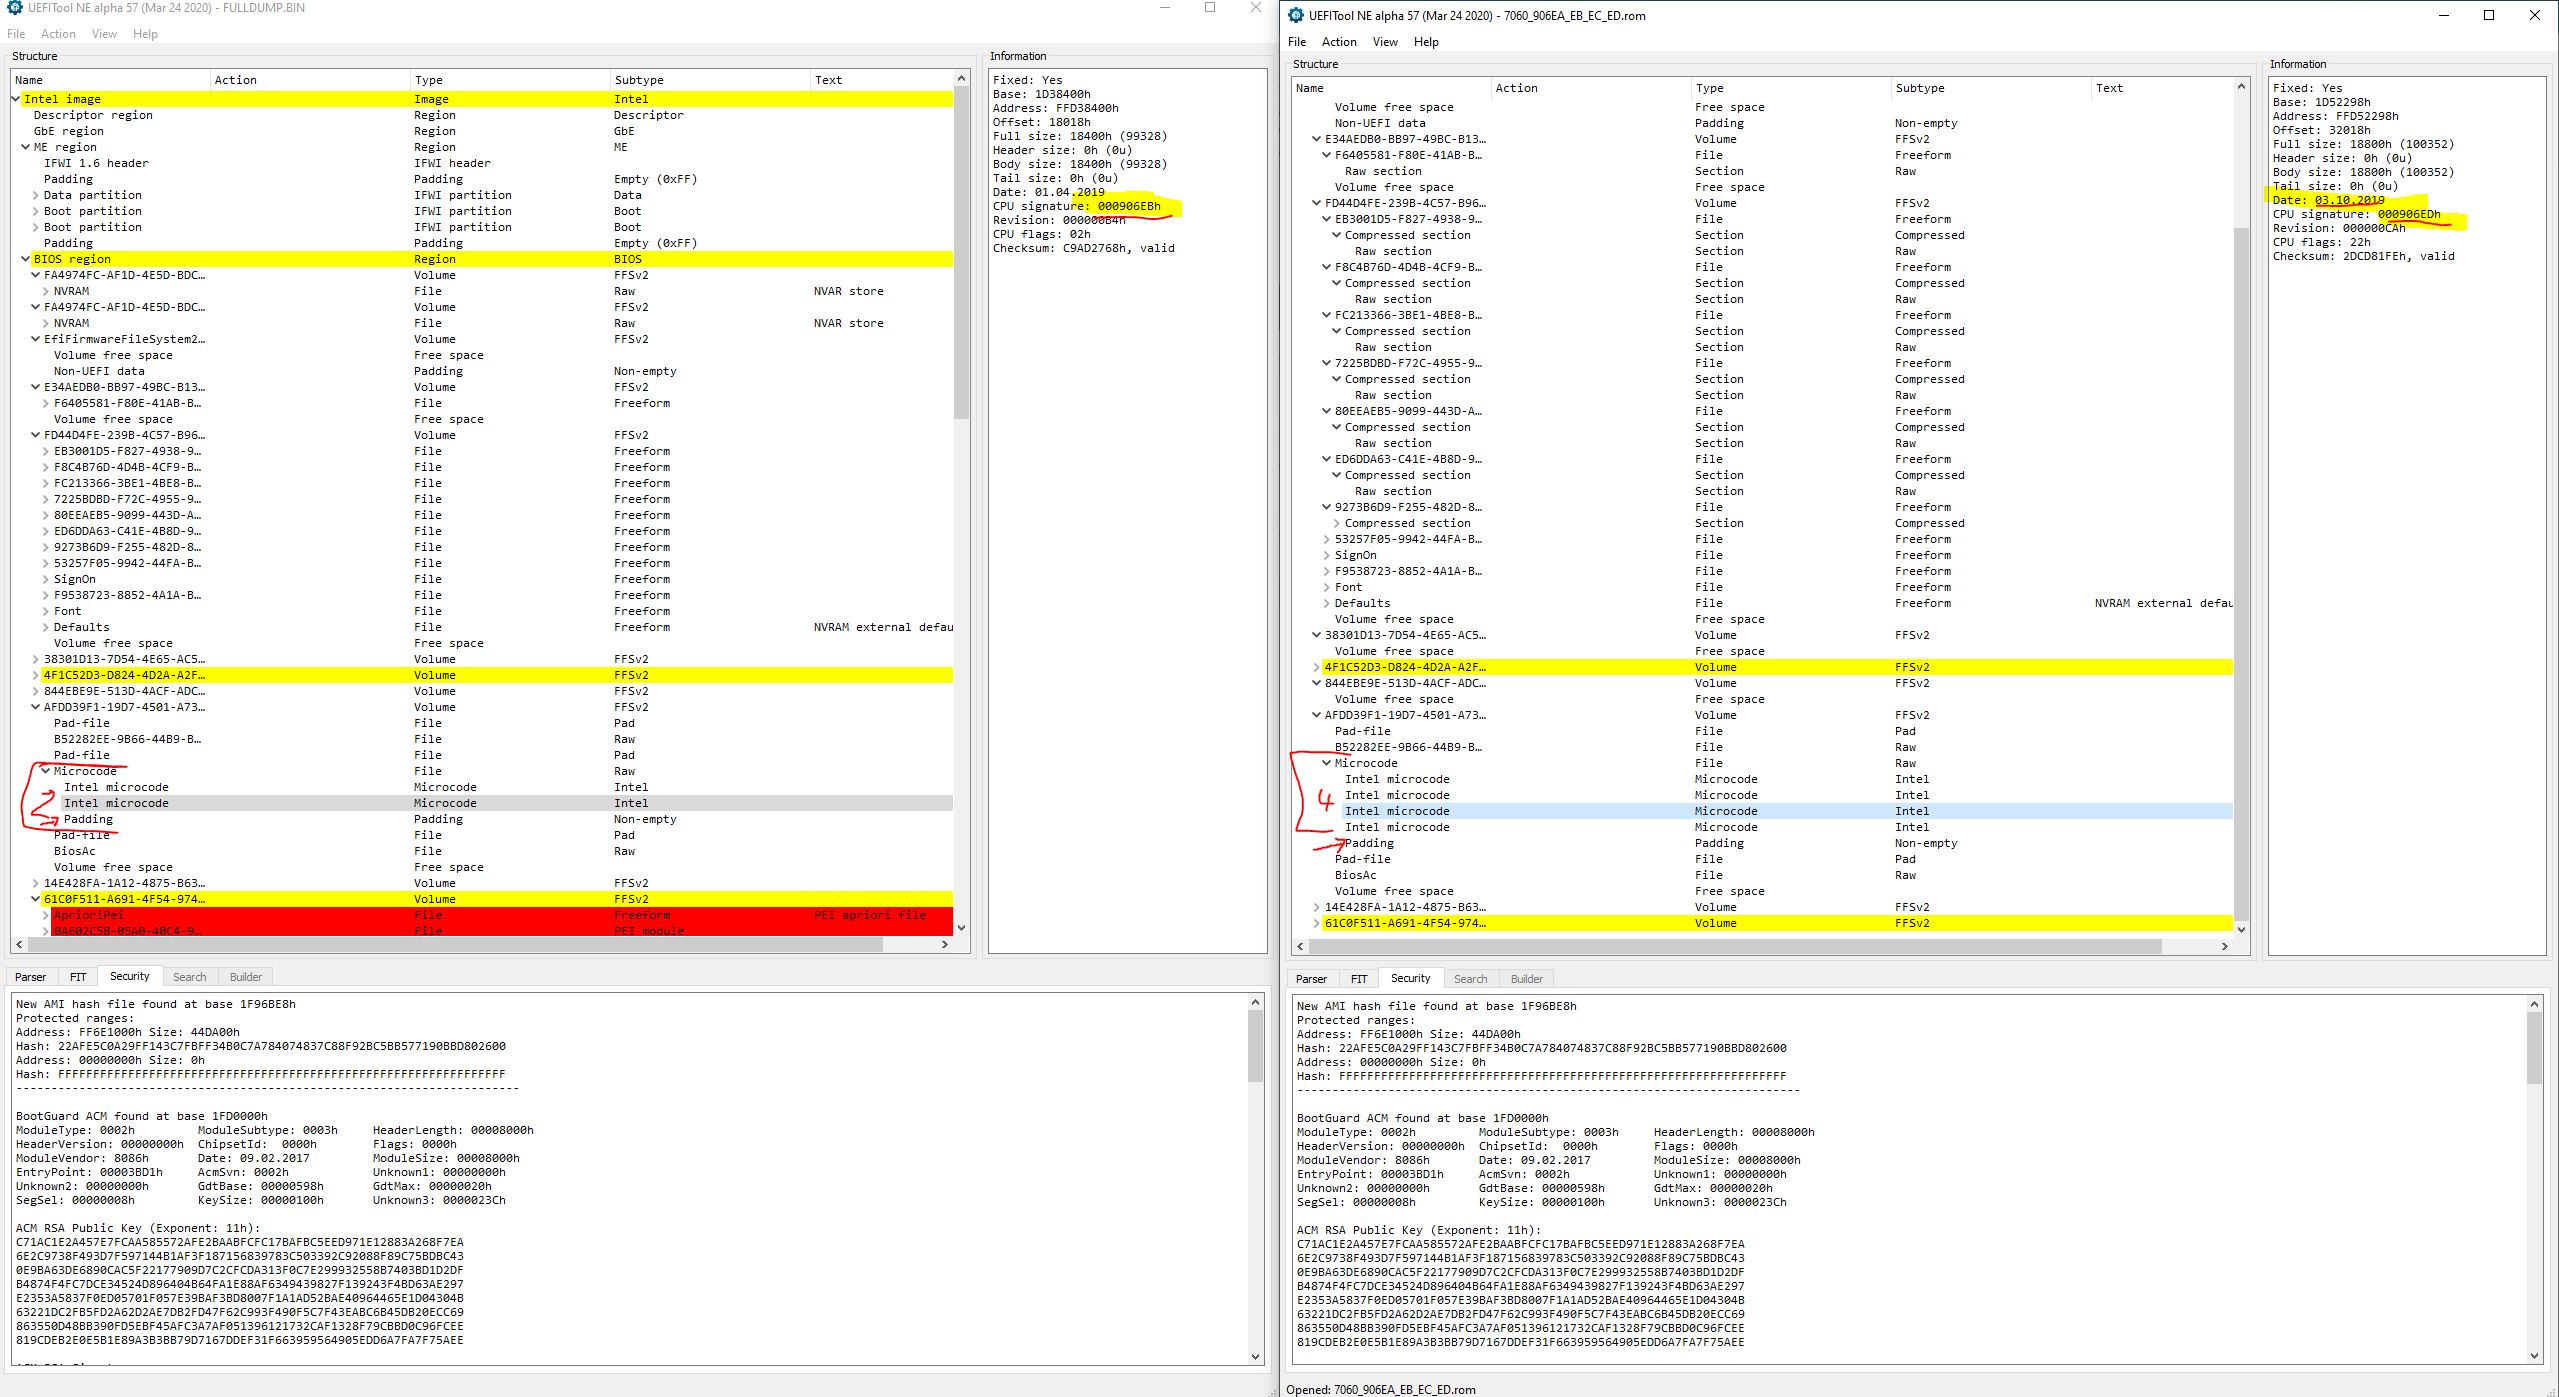
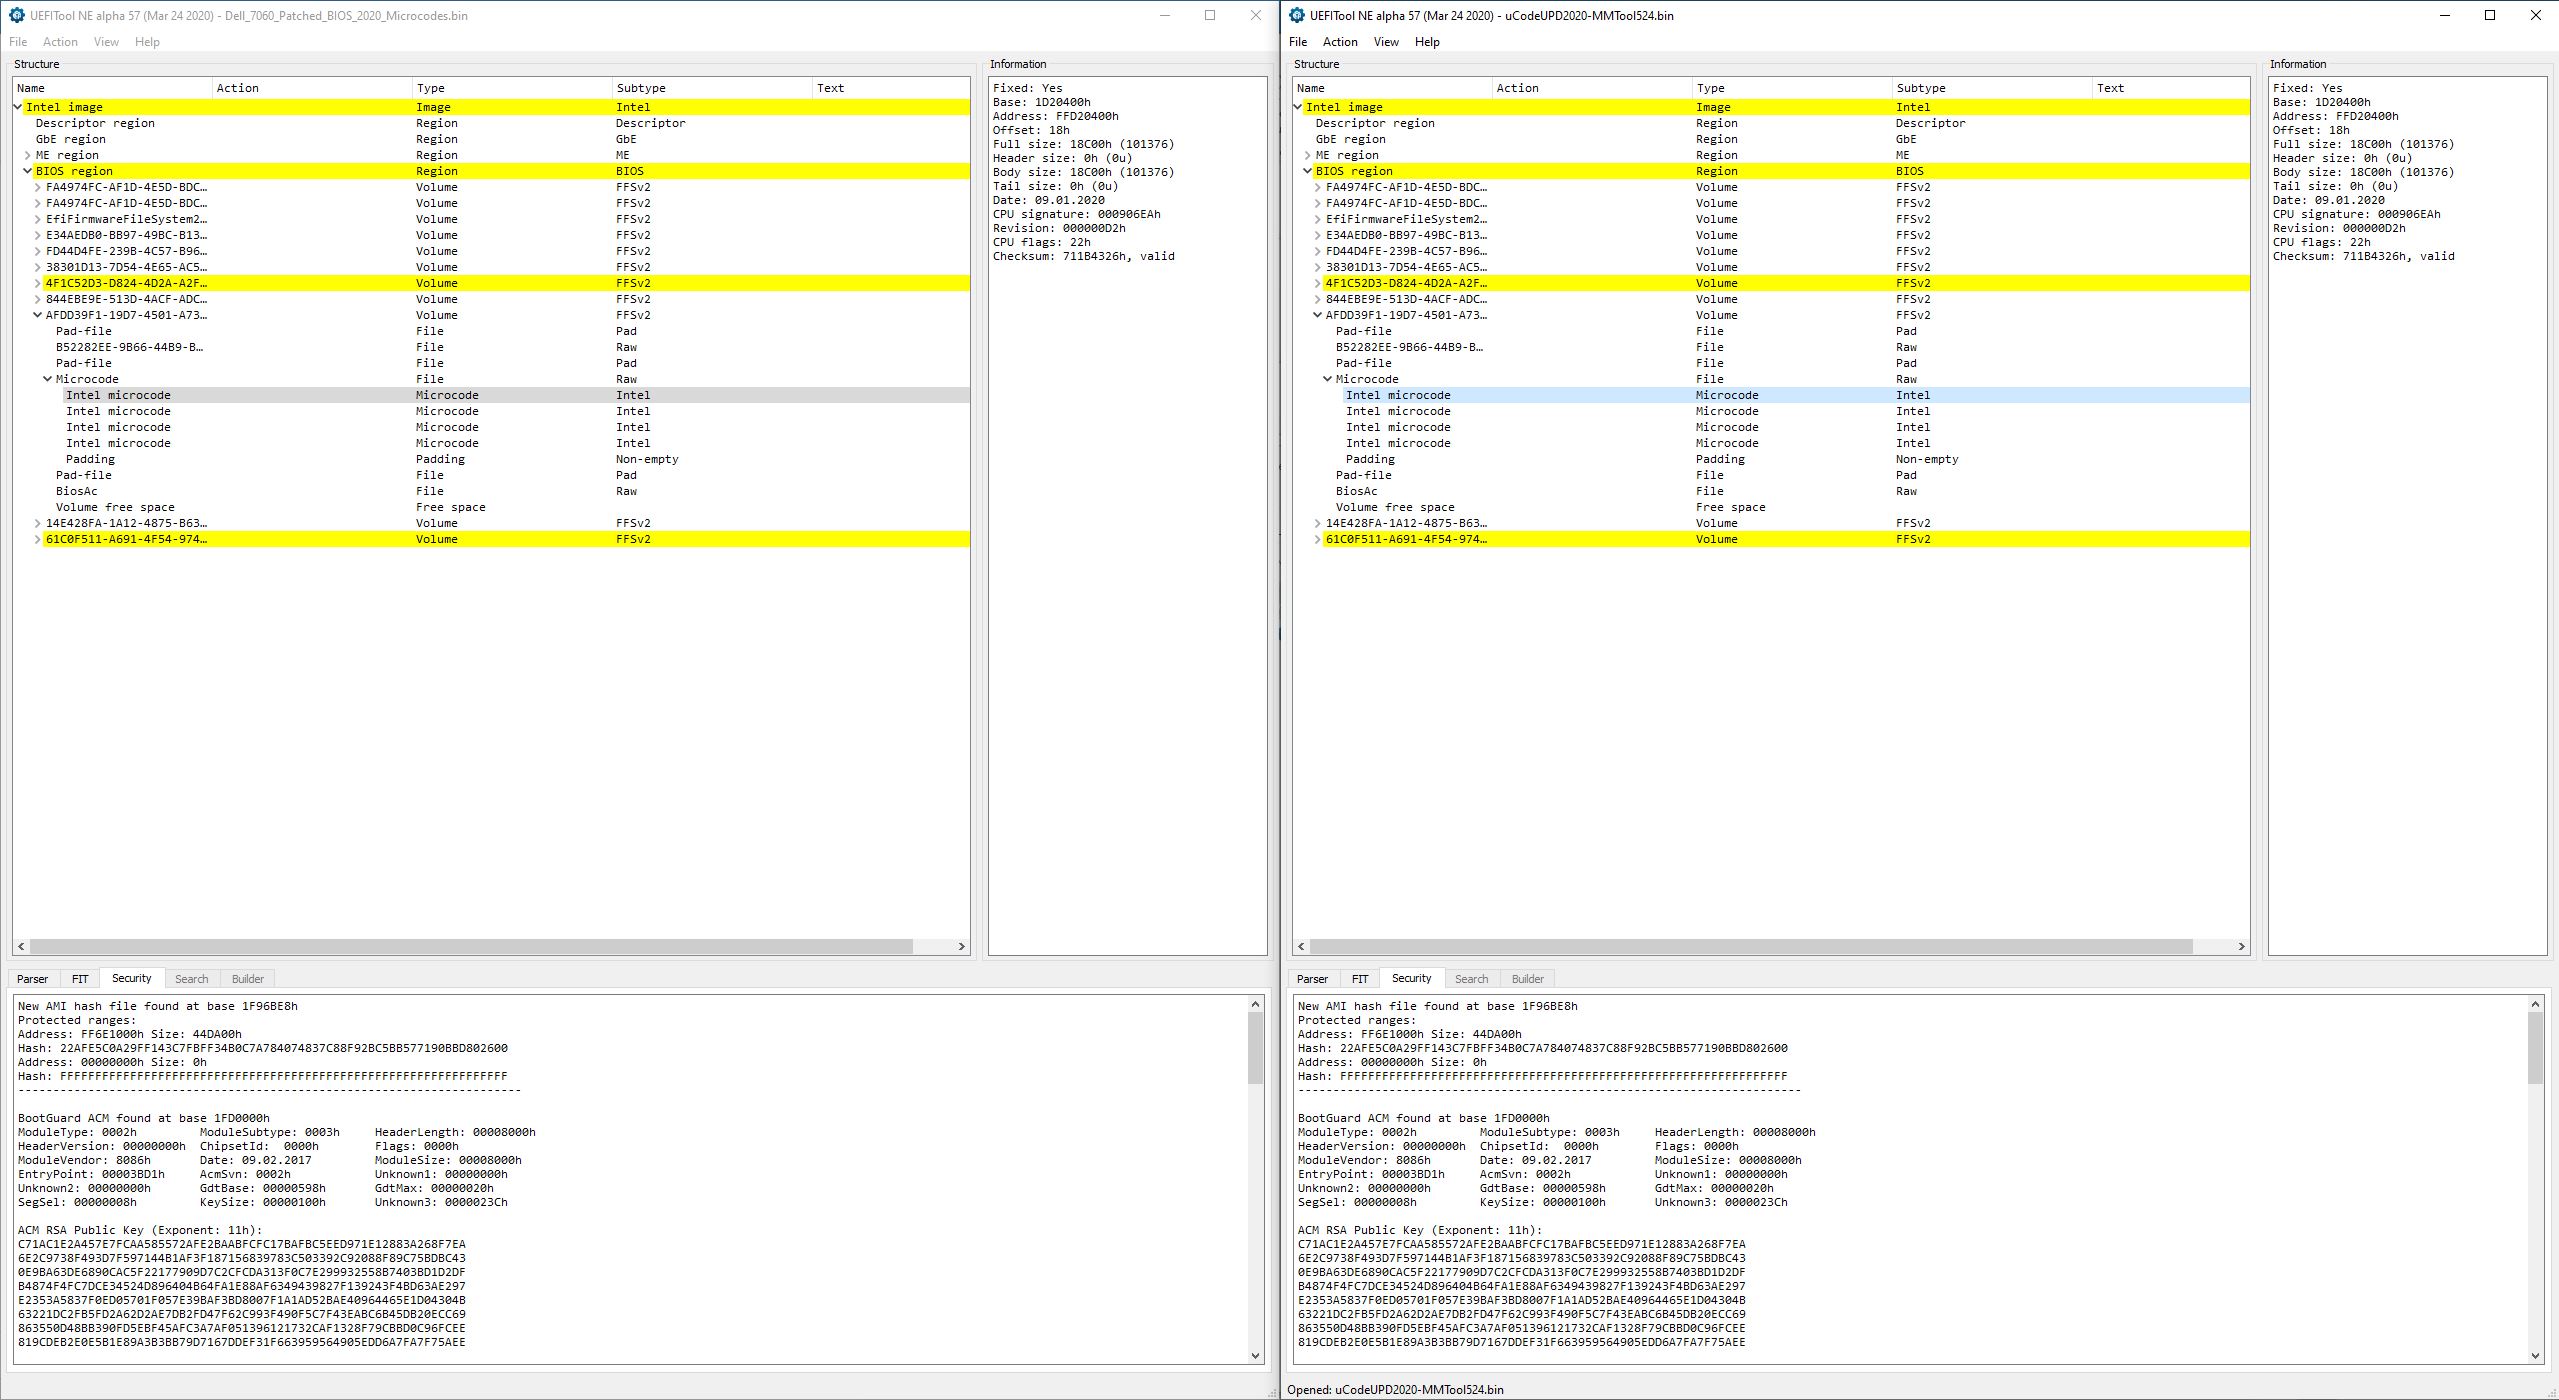
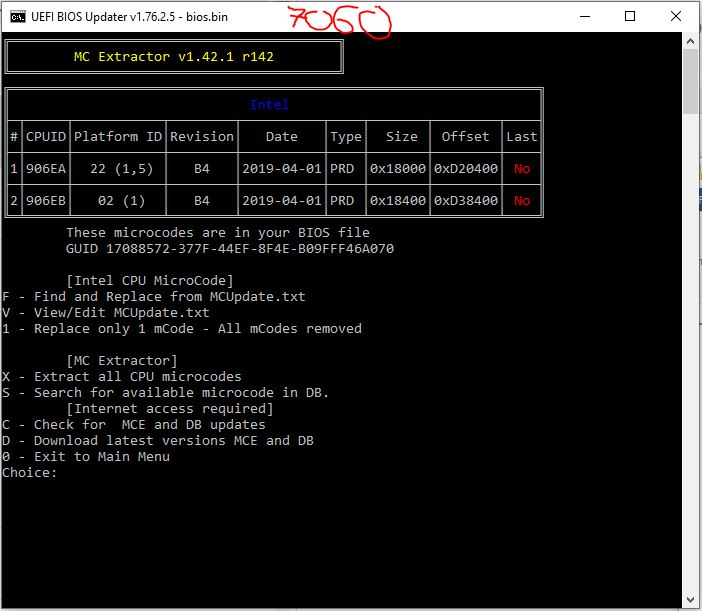
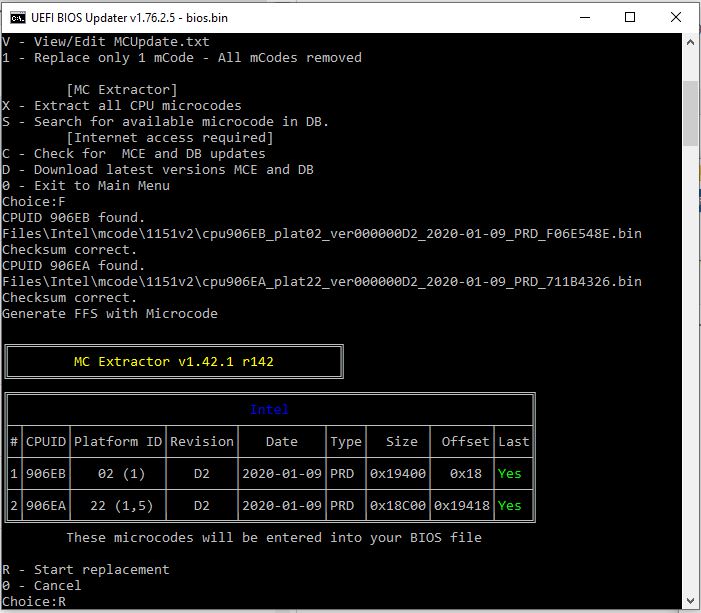
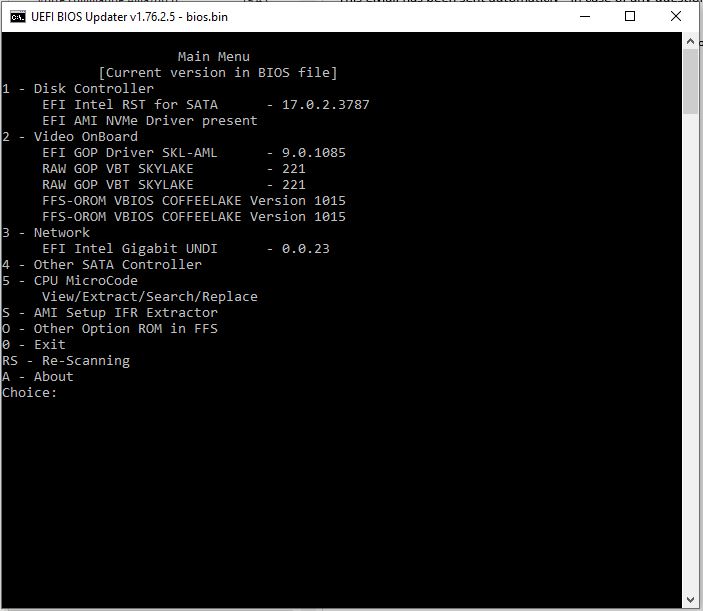
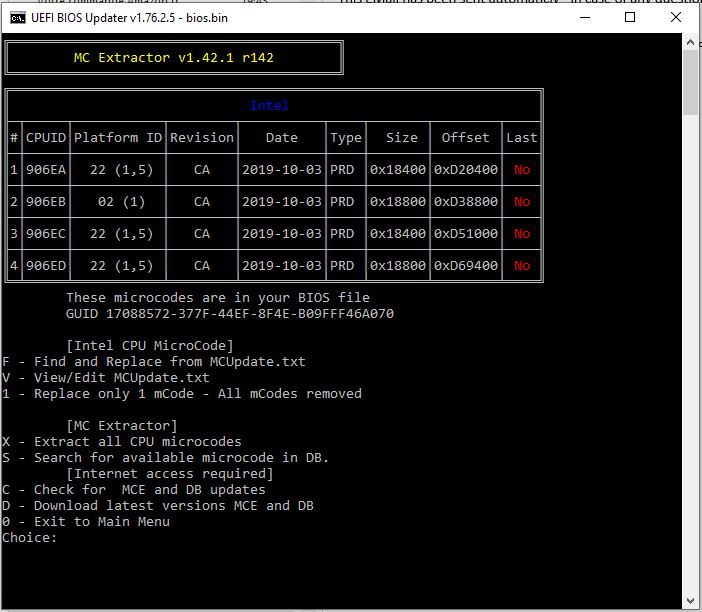
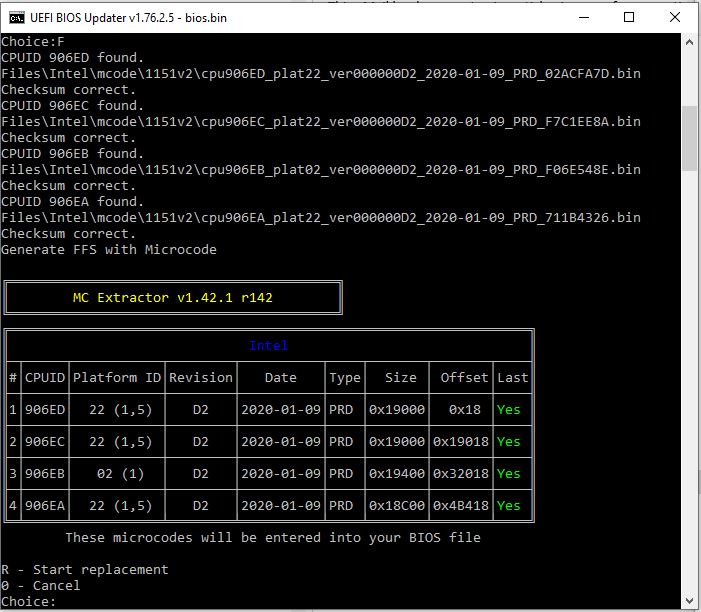
So far i’ve used UBU_V1_76_2_5 & latest MCE.exe to update MC ver000000CA_2019-10-03 to ver000000D2_2020-01-09 in 1.4.2 BIOS for 7060, same for 1.3.1 BIOS for 7070 - I also extracted 906EC and 906ED from 7070 BIOS (even though I already downloaded the bin files from here : https://github.com/platomav/CPUMicrocodes/tree/master/Intel).

Screenshots :

7060

7060UBU1.JPG

7060UBU2.JPG

7060UBU3.JPG


7070

7070UBU1.JPG

7070UBU2.JPG

7070UBU3.JPG


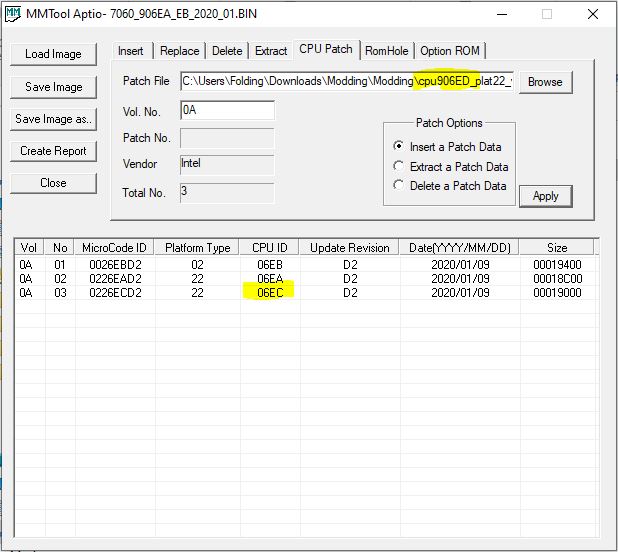
I’m now at the stage where i’d like to add 906EC & 906ED to BIOS of Optiplex 7060.
I prefer this option rather than attempting to flash 7070 BIOS onto 7060 motherboard despite them being identical boards - likely will lose stuff like Dell servicetag this way. - also unsure on risk proceeding this way.

Unfortunately UBU and MCE.exe only allows for updating already present MC or erasing all to replace with one MC (which didn’t work for me anyway).
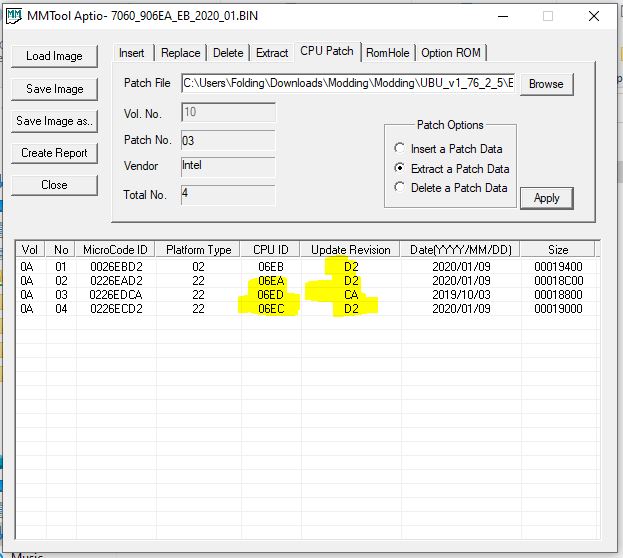
Ideally i’d like to have all 4 CPUID for full 8th Gen and 9th Gen compatibility as this board will see a variety of CPUs.

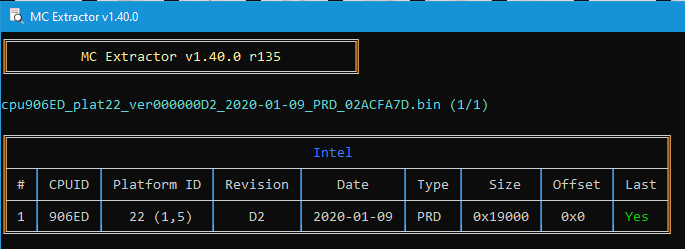
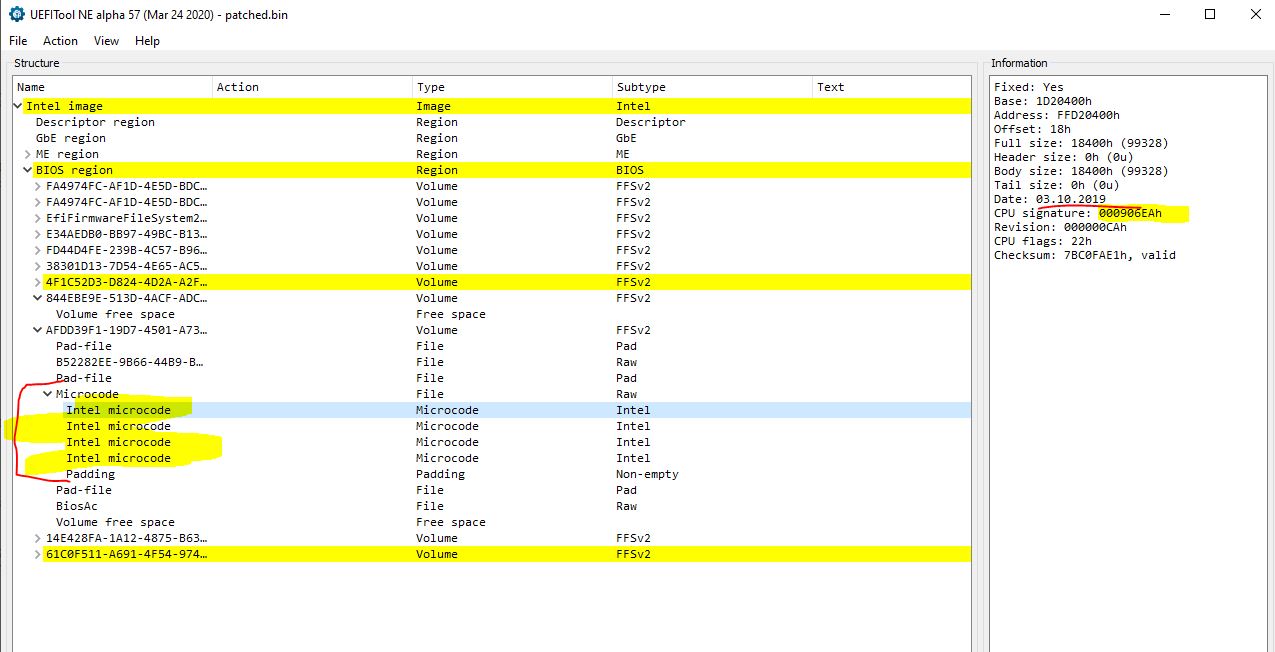
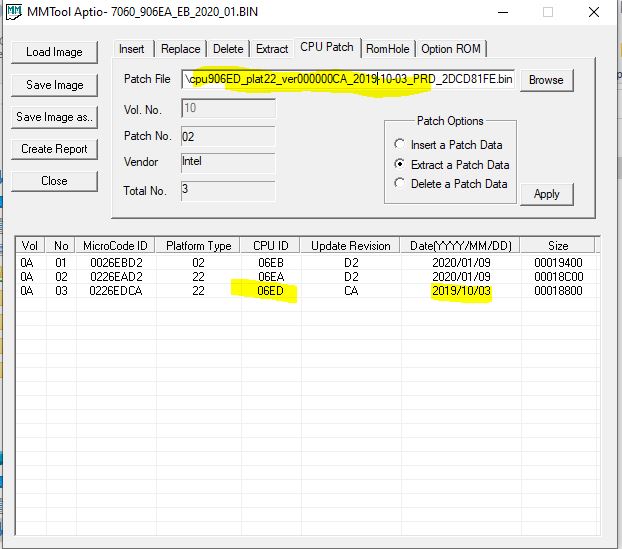
So I tried using MMTool 5.02.0025 to add the missing CPU Microcodes, but I noticed that the tool behaves strangely when using CPU Patch tab. I can add several extra microcodes but sometimes the CPUID that gets added doesn’t match the bin file I loaded, I tested a few times, managed to load 06EC into position 03 and then 06EA (2019-10) loads instead of 06ED bin file. After a few trials I came to the conclusion that the bin file for CPUID 906ED dated from Oct 2019 and not Jan 2020 as stated on github page → https://github.com/platomav/CPUMicrocode…RD_02ACFA7D.bin
So I decided to use the older 2019-10 microcode from 7070 Micro BIOS and add it through MMTool (after a few trials it was correctly added).

Question :
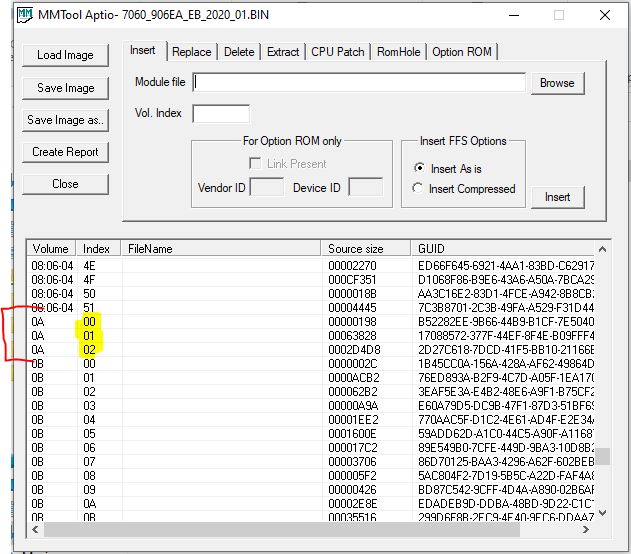
I noticed only 3 rows of data for Volume 0A - same volume I added the extra microcode too. I’m not too clear on process here but is this even going to work ?
I’ve included a few screenshots below for some examples of what i’ve done to date, any help/guidance would be much appreciated on what i’ve done so far and next steps.

Screenshots :

MMTool1.JPG

MMTool2.JPG

MMTool3.JPG

MMTool4.JPG

MMTool5.JPG


Below are all files i’ve referenced throughout this post :
:arrow_right:All 8 microcode bin files (2019 and 2020 versions) - would someone be able to confirm or not that cpu906ED_plat22_ver000000D2_2020-01-09_PRD_02ACFA7D.bin is actually from 10/2019 and that no newer MC exists ?
:arrow_right:Latest 7060 & 7070 BIOS in zip format (both were extracted from .exe using Dell FPS Extract)
:arrow_right:Dumped BIOS from a 7060 35w tdp motherboard (has 2019-10 MC)
:arrow_right:Output file from MMTool (in .fd format)

Found a little time to work on this some more this weekend but am unclear on what to do next - after saving the modifications made in MMTool i’m now left with a file in ‘fd’ format.
How can I convert this back to ROM ?
Are they any other steps I should do afterwards ? I read quite a bit about ‘FIT’ table in the forums but am unclear on what needs to be done at this stage.
To recap what I did last week in MMTool : Added two extra CPUID to the ROM file (906EC & 906ED) as well as update CPUID 906EA & 906EB.
Any help would be much appreciated.
Thanks

You can just rename it cuz .fd is the same as .rom. Great job on figuring this out on your own btw! It’ll help others, myself included as I was just about to look into adding microcodes to some older Optiplex models.

As for the _FIT tables, I have no idea about that either. I modded a couple of BIOS with NVMe and other small things and never touched or messed with those tables. I did use Intel FIT to build the images but thats something else I’m sure haha.

Keep us posted on this _FIT table, I’m curious if this is needed in all circumstances or only rarely.

Thanks ! Excellent news ! I really didn’t imagine this would be the simplest part - just a quick rename ! Perfect !
I’m waiting on a new BIOS reflash tool incase of corruption before testing this ROM out.
Would be glad to help on some of those older Optiplex models if needed. How old ?
I have a few 9020M/3020M models around too, but that’s merely 4th gen - maybe not quite old enough ?
Regarding FIT tables I tried to follow Lost_N_BIOS’s guide here : [GUIDE] Update CPU Microcode + Fix FIT Using UEFITool / Hex
But got a little lost - haven’t much experience with hex editior but will try & have another bash at it later on this week !

Here’s the link to the ROM with added 9th gen CPU microcode if anyone’s got the time / knowledge / curiosity to take a peak.
Thanks !

@Sleinous - I need to update that FIT Guide, there is a MUCH easier way to get the values you need now, I just never have time to update it yet!
UEFITool NE Alpha version 51 or above, shows each microcode individually and each ones “header Address” which is what you use (backwards / Little Endian) instead of all the math from the original guided method

MMTool loads uCodes as you feed, so if you leave some in, the new will be inserted under that. If updating them all, I always leave one, then remove all below it, then insert the newer one of the last remaining, then delete it (same method used to ensure whichever you want is first/at top)

Watch out for microcode volumes in PEI BIOS volumes, replace those microcodes only by direct hex edit (and then fix checksum for that module) or by MMTool only, unless forced to use UEFITool (and then only use version 25)
Also watch for padding above/below microcode modules and FIT module, if they are there in stock they must be there when you are done. If they are missing in stock they should not be added when you are done.

Also be careful with MMTool when adding or removing micrcode and seeing incorrect info as you noted, sometimes this means it’s breaking the BIOS and you need to use some other method.
There should be no trial and error, add as needed, remove as needed to sort order, but don’t dance around some info/version/date issue because that means it’s breaking something.
The above linked microcode - cpu906ED_plat22_ver000000D2_2020-01-09_PRD_02ACFA7D.bin << IS correctly dated (2020), see image below

906ED-D2-1-9-2020.png


You may need to update or downgrade ME FW too for certain CPU’s, but you can only do this within same major family (ie you can’t update V10 to V11, or downgrade V12 to V11)
This, and microcodes is also not always the only things that make a CPU compatible with a board or BIOS, sometimes hardware revision is made/needed (can be as tiny as a single resistor added or removed etc), other times they directly block CPU in BIOS
So, don’t expect this is for sure all you need to do and CPU will magically work. Sometimes though, yes, this is all that’s needed (microcode)

What you asked about in regards to the various volumes (like 0A only having three entries), this is normal, these are all different BIOS volumes. Open BIOS in UEFITool and you will see as you expand the volumes.

I grabbed your dumped BIOS and updated all microcodes (+ Added 2 you wanted added) and had no issues or dancing around problems with MMTool, CPUID and all info always matches what I inserted
So all microcodes 906EA/B/C/D = 1-9-2020 version - I then corrected FIT (properly) once done, since MMTool messes it up almost always. (Wow, did not need to do, MMTool did perfectly, so rare!)
Version 5.02.0024 was used - If you want this file to use, or to inspect etc, let me know and I will upload for you

Be VERY careful what you edit in this BIOS, I see at the BIOS side Intel Boot Guard profile #5 FVME is enabled, so I assume Measured or Verified Boot is enabled and key burned into the PCH FPF fuses, so you can ONLY edit areas of the BIOS not colored when looking at BIOS with UEFITool NE Alpha 51 or above)
This can be confirmed with this command, ran from V12 ME Info from the ME System tool v12 package (link below, tools in section “C”) >> MEInfowin.exe -verbose << Look at bottom of that report, if you see Measured or Verified boot Yes on the left/FPF side then heed this warning or = brick BIOS
Intel Management Engine: Drivers, Firmware & System Tools

UEFITool 25 (v25.1 is not V25, go to next page) and 51+ NE Alpha (A57 is latest Alpha) all available here in the “releases” tab at top/middle
https://github.com/LongSoft/UEFITool

@stovorsen - FIT Tables should always be corrected when present in BIOS, otherwise microcodes often do not load properly
But, not all BIOS use FIT, those that do, if you see it blank/empty fix it

Sleinous
Have you a hardware programmer?
Replace data in your dump from 0x1D20000 offset with my mod.
BTW: this system has activated Boot Guard - https://www.bios-mods.com/forum/Thread-O…65149#pid165149

P.S. You can try to flash official BIOS from OptiPlex 7070 with /f key (in Windows command line with administrative rights).

@Lost_N_BIOS Thanks for your very detailed reply - I learnt loads just reading it through a few times !!


Regarding this first, essential step - I retried during lunchbreak by removing all but 906EA, then adding updated 906ED/EC/EB and then adding 906EA updated + removing old version at the end. Unfortunately it still didn’t work out for me and I still see 906ED with 2019 version date. Like you mentioned previously - I must be breaking the BIOS at this point as date never matches what MC Extractor is reporting. (Am using latest release of MMTools 5.02.0025 - and I noticed you are using 5.02.0024 but I doubt this makes a difference ?) In anycase yes i’d be very interested if you have time to send the BIOS you successfully managed to add 906EC/ED & updated EA/EB too so that I can compare. Hopefully i’m not too far off :slight_smile: Would love to understand where I went wrong.


So the Dell Optiplex range are quite interesting in terms of motherboards because they have a service jumper onboard - as it allows us to unlock the flash descriptor.
I’m able to see both ME FW versions from latest 7060 BIOS and 7070 BIOS using ME Analyzer v1.123.0 r194 but will need to use MEInfo -verbose as you mentioned to get the ME HW version, and I assume i’ll also need to do this on a 7070 motherboard to obtain the same information right ?
I wonder if replacing 7060 ME FW 12.0.40.1433 by 7070 ME FW 12.0.49.1556 would be sufficient ?
On an unrelated note : I noticed that Power Management Controller version wasn’t the same either between 7060 and 7070 BIOS. Not sure if that’s really important though.
Both BIOS are shown below :


7070 :


7060 :


Totally agree that there can also be tiny motherboard differences between the two but have spent quite a bit of time on these two boards comparing every onboard component - the only thing I can’t check is the PCB layer layout underneath. So fingers crossed that this is just a MC update / or MC update and ME FW tweak !


Thanks ! I understand what you mean now, OK that makes sense !


I will take a look at this thanks, I didn’t realise what the colour coding was for in this instance - yes these Dell Optiplex systems all use bios guard and this is going to be the biggest headache to work around I think. When you say bricked BIOS - i’m assuming it’s still recoverable with a regular USB hardware flasher and a SOIC16 clip by reflashing original dell ROM ?


Hi there @DeathBringer Many thanks for the reply & mod (I just saw you replied at same time as I was typing up the above post), so if I understand correctly i’d have to replace everything after 0x1D20000 offset with the link provided using a hex editor ?
(Don’t have much experience with hex editors so learning as I go on this one)

Regarding the link to bios-mods it’s funny because the member that posted that thread is the same user that posted on the dell forums, I contacted him recently actually ! He has a 65w TDP 7060 board (i5 8500) - I have both a 35w and 65w 7060 board for testing.
I noticed he didn’t have a hardware programmer incase of issues - I have one but I didn’t have a SOIC16 clip, (just a SOIC8 clip - so that’s coming in the mail soon ! :slight_smile:
Am I right in assuming this should prevent me from bricking BIOS ? I can just reflash the original ROM if I dump it prior to testing this all out ?

Yes, you are right. Post result’s file to check.

Yes, you can restore original dump by a hardware programmer.

Can you show information of CHIPSEC about write protect (https://www.bios-mods.com/forum/Thread-O…65202#pid165202) ?

@DeathBringer I have just finished preparing a bootable USB drive as per instructions and was going to attempt to show you information from CHIPSEC as requested.
However upon powering on the 35w 7060 refurb board (first time boot for this board) I was confronted with the Dell Service Menu as shown below :

20200504_163532.jpg


This is the first time i’ve seen this, i’m assuming this board had never been configured previously (refurb board) and therefore has no service tag assigned yet and AMT options haven’t been chosen yet.
I have no idea which option to choose, as some say this isn’t actually the Intel Management Engine ? But rather MEBx ? (Don’t have too much experience on this part)
Which option should I select - could this directly influence ability to successfully flash modified BIOS with added microcodes ?
I haven’t proceeded any further on this board yet because my understanding is whatever I select on this screen will be permanent.

Sorry, but I see it in first time too.
Can you close this window by pressing [x]?

@DeathBringer Unfortunately it is mandatory, as soon as I press x it will just reboot PC into same window - I have to chose an option for this board before being able to use it for the first time (else it will just continously boot into this Dell Service Menu until configured) - I have the service tag at hand that I will enter but not sure which option to select - i’m currently researching which option I am meant to choose but am unsure if I shoudl choose option 1 or option 3, my understanding is option 1 will give me vpro support ? But i’m unsure on option 3 - some say it disables ME and is a spec sold by Dell since a few years since Intel ME came into the spotlight, others talk of MEBx and say it’s only releated to this. So far i’ve found the following URL that best describes what i’m facing - and I think i’m meant to choose option 1 : https://www.dell.com/community/Desktops-…t/true#M1017938
Once i’ve understood which option to choose I will proceed to gather the information requested from CHIPSEC :slight_smile:

Yes, you are right. Post result’s file to check.


As requested please find here the FULLDUMP.BIN with added microcode that you shared - end result doesn’t seem to open in UEIFTool anymore though. Ok how odd, patched.bin seems to open now in UEFITool - i’ve included link below for you. Only thing I noticed is all 4 microcode are from 2019 but I assume I could easily update those to latest jan 2020 using UCU.


@Lost_N_BIOS I downloaded UEFITool NE alpha 57 and had a final look through the original dump and through my ‘initial’ attempt at adding just the microcode through MMTool and now I understand what you mean by the colour coding related to Intel Boot Guard. I also noted padding was present in modified ROM and all 4 microcodes too but as you know - I was still unable to pull in the updated 2020 microcode for 906ED CPUID (as can be seen from below screenshot).

It’s OK.

I don’t recommend it.

I don’t recommend it.


What about MMTool ?


Use my new version for this volume - https://drive.google.com/open?id=1hoV6pv…VhFxxtLR75ZIOAk

Thanks for jumping in here to help @DeathBringer !

@Sleinous - You’re welcome! Yes, .25 may be what is causing the issue, no problems with .24, test it and see if you want.
If you still need my file for inspection let me know, otherwise I’ll assume you’re getting all the help you need above anyway
Both BIOS use V12 ME FW, so you’re OK there MEInfoWin -verbose << was only to check to confirm Boot Guard is enabled at the PCH FPF side, but this is confirmed already by DeathBringer, I assumed it was after seeing profile #5 FVME set at ME FW side
BIOS Guard and Intel Boot Guard are two very different things and are not related.

On your image above, leave default selected (1), don’t disable or lockout ME (3/6), this way it will be a normal functioning system with ME FW enabled and vPRO/AMT possible, if you want to use (if you don’t then you wont notice anything about it)

About padding, look at this in version 51 after you are done editing, not version above that, or version 25 (non-Alpha). You can double click from the FIT tab at bottom directly to FIT and or microcode volume
Padding will always be there, but this (in your image using V57) is not the way of checking I was referring too, above 51 shows microcodes in a different way.
You have to compare before/after BIOS and ensure padding above or below microcode remains same in each above microcode and or FIT (ie there, or not)

Here’s my edit just so you can see edit is OK and microcodes are 2020 using MMTool 5.02.0024 - This is ONLY edited to add/UPD all microcodes as mentioned at post #5
http://s000.tinyupload.com/index.php?fil…779282763268836

@DeathBringer Thanks for the new file - so i’ve run the same process again and you can find new BIOS here
Hopefully that’ll be enough - if all looks good i’ll try & flash it as soon as I have my new USB hardware flasher and have tested it a few times to ensure it’s working as expected. (Should arrive within a week).

@Lost_N_BIOS - Theoretically then above attached file should be the same as your file :slight_smile: & again thanks to you both without your help I wouldn’t have gotten this far, I was stuck on these more complicated parts :slight_smile:
I’ve spent a bit of time comparing both BINs and they seem identical but maybe I overlooked something - in any case i’m excited to give this a go !


I assume the slightly different ME FW sub versions won’t be an issue, just like the varying ‘Power Management Controller’ versions ?


Thanks ! Have been reading up on this all evening on various forums and it seemed like option 1 was the way to go but just wanted to make sure I was making 100% the right decision :slight_smile: I will go ahead and do that now and try out my UEFI USB stick to obtain CHIPSEC information.

@Lost_N_BIOS Regarding padding I will download version 51 as well and compare as you suggested - my bad, didn’t realise later versions didn’t work the same way :slight_smile:

Again thankyou all for your help so far !!

They have differences after last (4th) microcode. I’ve left unchanged length of padding.

@DeathBringer - Good spot ! Totally missed that, I remember Lost_N_BIOS saying padding was important earlier on in this thread :


I will try & look into this tomorrow & fully understand how to sort that issue out.


Regarding CHIPSEC :
I have partly managed to run chipsec_main.py but am getting following error message now :
No longer an issue, my file structure was incorrect - that’s corrected now and you’ll find the results below :

I grabbed your FULLDUMP.BIN ONLY updated CPU microcodes (Added x2 + UPD All to 1/9/2020 version) using MMTool 5.02.0024, then FIT was fixed by MMTool on rebuild, nothing else was updated or touched - Did not touch ME FW/PMC etc
I would do it differently if done manually, probably just like DeathBringer did, I only used MMTool because you said you had issue so I wanted to check to confirm if using .0024 all was OK and it was

Ah understood, thanks for clarifying ! Just for my general knowledge i’m also going to try with MM tool 5.02.0024 later today to see if i can get to the same result as you.