Dear @fernando,
I have the same BIOS as the Forum member Loud in an Acer X4610G. The latest BIOS download can be found here: h ttps://w ww.acer.c om/ac/nl/NL/content/support-product/3650?b=1 (can’t link, New members need a minimum of 5 posts before posting external links). In my understanding the BIOS code is locked / signed by Acer. Would it be possible to tweak that BIOS code with your guide? (And would Windows still start, with OEM license validation?)
EDIT by Fernando: The blue marked text has been added by me after having removed the fully quoted post (to save space). This way the quoted post was dispensable.
@Marty1 :
Welcome to the Win-RAID Forum!
As I just have tested myself, it is no problem to get the NvmExpressDxe_4.ffs properly inserted “as is” into the BIOS by using the AMI MMTool v4.50.
If you want to know how to get a modded BIOS properly flashed, please read the start post of >this< thread. The AMI AFUWin tool, which is within Acer’s BIOS package, may work. If not, try it with the " /GAN" suffix.
Good luck!
Dieter (alias Fernando)
@Lost_N_BIOS , Hello! I don’t have offset as in your manual( I have ME region offset 1000h. My MB is Asus P9D WS (P9DWS.CAP) Do I need such game with offset?
Original CAP from asus site (their latest edition):
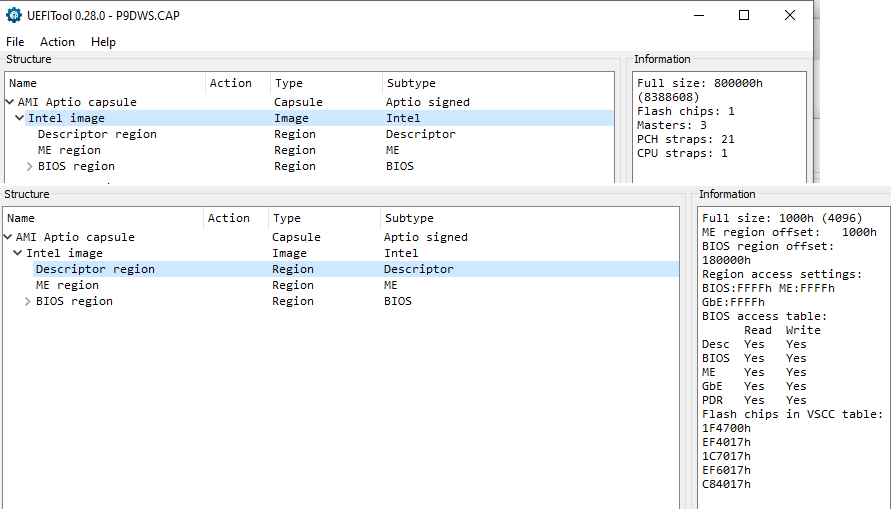
EDIT by Fernando: Inserted screenshot resized and directly attached (can be enlarged at any time by clicking onto it)
P9DWS.zip (5.15 MB)
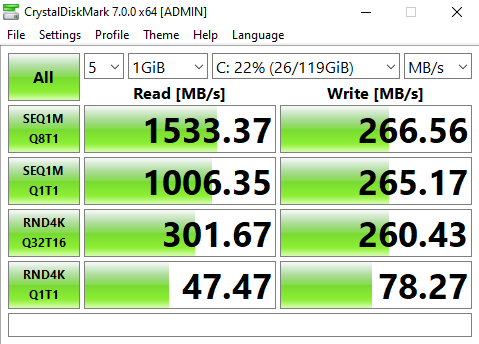
@Lost_N_BIOS I tried flash bios without extracting body from CAP file, using manual of @Fernando
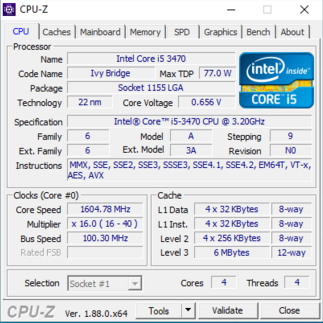
Motherboard: Asus P9D WS
Intel 760p 128gb
Adapter: AMPCOM M.2 NVME to PCI Express 3.0 x4
I
- downloaded original bios p9dws.cap from asus site
- inserted mod using UEFITool (as in @Fernando instruction)
- saved new CAP file p9dwsMod.cap
- flashed bios using AI Suite 3 (follow this)
I rebooted, entered in bios and saw PATA SS
After I edited bios like this and this
I installed windows10 from usb and saw NVMe ssd
Windows started without problems.
Sorry, images were too big. EDIT by Fernando: I have shrinked them, but it is no problem to enlarge them by a click.
@alexel :
Welcome to the Win-RAID Forum and thnks for your feedback!
We are happy with you, that you succeeded. Regarding the WRITE scores I recommend to read point 9 of the start post of >this< thread.
Enjoy the performance of the NVMe SSD with your old PC!
Dieter (alias Fernando)
I struggled somewhat until I carefully re-read and followed the instructions to get a new install of Windows 10, booting on my NVME SSD. So thank you to @Paulos7 for the modded BIOS Z77PRO41.80.zip in your post and especially to @Fernando for starting and keeping this forum alive. I used your interactions with @Kaman_T in Dec 2018, #msg66632
While I was happy to find it worked, I really did not want to reinstall everything, I just wanted to migrate my existing Windows 10 installation from my MBR SATA HDD to my GPT NVME SSD. Eventually I found a very useful guide:
Restoring an MBR System image to UEFI/GPT[/URL] URL: knowledgebase[dot]macrium[dot]com/pages/viewpage.action?pageId=23396929
I first made an image of the Windows 10 partition of my HDD using Macrium Reflect Free. Perhaps it would have worked anyway but I thought to use some of the advice from Fernando on page 1 of this forum to tweak the instructions. So instead of directly creating a bootable USB within Macrium Reflect, I used it to create a Rescue Media ISO, using the default options. I then used Rufus to add that ISO to my USB in UEFI mode, per this forum’s advice. I then followed the Macrium guide to use Diskpart to clean and add the 2 required system partitions on my SSD. I then used Macrium Reflect Free - the restore function - and dragged my cloned partition image into the unallocated space on my SSD.
Once the partition image was copied, I was directed to follow this guide: Fixing Windows boot problems knowledgebase[dot]macrium[dot]com/display/KNOW72/Fixing+Windows+boot+problems#FixingWindowsbootproblems-FixBootproblemsforGPT/UEFIBootSystems
So still within the Rescue Media boot environment, I was instructed to use the Macium Reflect “restore” menu to “fix boot problems”. At first it did not work. I then remembered on this forum to unplug all other drives leaving only my MR rescue USB plugged in. I ran the “fix boot problem” function and it successfully rewrote the CBR on my NVME SSD.
I shut down. I plugged in all my drives. I booted. It worked. 


Perhaps someone can try using the Macrium Reflect Free guide without using Rufus etc, to see whether it still works. I suspect at least the unplugging of all other drives before fixing the boot problems, will need to be done.
So thanks to Macrium Reflect Free and especially to this forum - I successfully migrated my Windows 10 installation, on a 10-year-old Mainboard, from an MBR HDD to a GPT, NVME SSD.
Apologies for the non-linking URL’s but I cannot include them as I have fewer than 5 posts on this forum.
_____________________________________________________________________________________________________________
MB: Asrock Z77 Pro4 P1.80 | Adata XPG SX8200 Pro M.2 SSD 256GB | Adaptor: Orico M.2 NVMe to PCI-E 3.0 x4 Expansion Card
@SuckSeeds :
Welcome to the Win-RAID Forum and thanks for your report.
It is fine, that you succeeded and now can boot off your NVMe SSD.
Enjoy it!
Dieter (alias Fernando)
Thank you again I am enjoying it.
I was actually surprised to find a free tool to migrate Windows from an MBR HDD to a GPT SSD drive.
For other users of the Asrock Z77 Pro4 Mainboard, in the BIOS, CSM must remain enabled, or the NVME drive is not detected. In my case I used the PCIE Gen3 16x slot although NVME only runs at PCIE 4x. The 16x slot was empty after my graphics card packed up. There is also a Gen 2 4x slot, which I could use for the NVME adaptor should I buy a new graphics card. Lets see how long the MB lasts.
@night_hawk - Yes, it is risky, but often will work. If you plan to buy another laptop instead, then it’s definitely worth using that method vs buying a new laptop
And, or, as mentioned, programmer is cheap, order and wait for it to arrive, then you can do without worries. This is not as hard as it sounds or may look, people do it all the time without any previous knowledge of what the inside of a laptop, or even what a motherboard, looks like
We have guide with plenty of images to help, it’s easy  - [GUIDE] Flash BIOS with CH341A programmer
@alexel - To be able to answer your offset questions, I need link to the stock BIOS download page for your model (not the BIOS download link, or attached file etc) - This is so I can keep BIOS file in properly named folder.
ME region offset does not matter to any of this, nor does anything you’ve shown in the attached image. What you need to look at is the BIOS image offset inside the capsule, where the BIOS Image (Intel/UEFI) starts, you can only see this with UEFITool NE Alpha version
Seems you already successfully flashed incorrectly mod BIOS bypassing the capsule security using AI Suite method, so you do not have to worry about this now.
But, for your reference, below is link to guide and image that shows you where you look to see the BIOS Image (Intel/UEFI) starting offset, see point #3 and that image
[Guide] How to get full NVMe support for all Systems with an AMI UEFI BIOS (394)
@SuckSeeds - for your references or possible later usage by you or others This can be used for Win7-Win10, clean or already in-use OS installs. If Win10 system, skip steps #1-3 & #5-6
Installing Clean Win7x64 on M2.2280 PCIe Gen3x4 SSD A-DATA SX8200 Pro
See also
[Guide] How to get full NVMe support for all Systems with an AMI UEFI BIOS (330) << Fernando’s way
[Guide] How to migrate Windows 7 64bit boot drive from MBR SATA to UEFI NVMe without data lose << Shawn’s way
@Lost_N_BIOS Hi. Thanks for answer. “you do not have to worry about this now” - you mean that bios work as expected? I don’t see error. Maybe I’m wrong.
This is Asus Bios official link (https://dlcdnets.asus.com/pub/ASUS/mb/so…S-ASUS-2402.zip) I don’t see offset.
@alexel - You’re welcome! I meant, it looks like you do not have to worry about offset and rebuilding properly encapsulated BIOS because you bypassed needing that by using AI Suite flashing work around method, and have already flashed your incorrectly encapsulated BIOS
This only needs done properly if you are using USB Flashback, AI Suite rips off the capsule anyway, so not sure it matters for that and many users this method fails anyway, so not much feedback there to know.
Starting BIOS/Intel Image Offset is here shown in image below for your BIOS, I showed in image at link above (image in point #3), and told you what you need to use (UEFITool NE / Alpha), to see this

After my successful clean install, I tried restoring an image of my old Windows partition onto the new windows partition of my SSD, but it wouldn’t boot. The problem was I hadn’t converted my MBR HDD to GPT. Both @Fernando and @Shawn show methods starting with converting the MBR drive to GPT. But I wasn’t aware of this requirement, and it lead to my search for a direct way to clone my MBR HDD partition onto my GPT, NVME SSD. Thus I found the Macrium Reflect guide. Perhaps I could have done it with Macrium Reflect Free alone, but I used Rufus as well, per my original post.
Another satisfied customer. I added the module to an Asus P8Z68-V today, and it went very well.
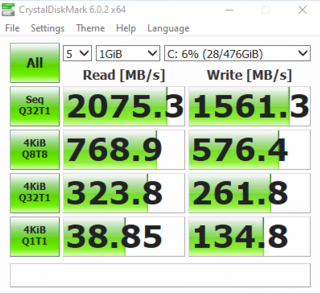
I thought I would add some more information that I have discovered through benchmarking. I had only tested this machine with the onboard video, but I recently began testing it with an Nvidia GTX 750 Ti. After adding the card to the uppermost PCIe slot, it took forever to boot up. I began to worry that, though it worked fine with the onboard video, it wasn’t going to work with a PCIE video card. I tried clearing the CMOS, and it began working normally; but when I tested the drive speed, it was now very slow (400 MB/s). This was with the NVME drive in the lowest PCIe slot. Looking in the manual, that slot is capable of 4x, but it defaults to 1x - so clearing the CMOS had dropped it from 4x to 1x. I set it to 4x, and I got nearly all of the speed back, and all else was still working properly. I decided to try something I hadn’t before - putting it in middle PCIe slot. This would split the bandwidth between it and the video card, making each slot 8x. This increased the speed from about 1600 MB/s to 1900+, and the 3D Mark 11 score was unaffected. So, maximum drive speed will only be achieved by using the onboard video rather than a PCIe video card, but the speed loss is negligible.
At first, thank you for the initiative. I am facing a difficulty. Your help would be highly appreaciated…
Screenshots:
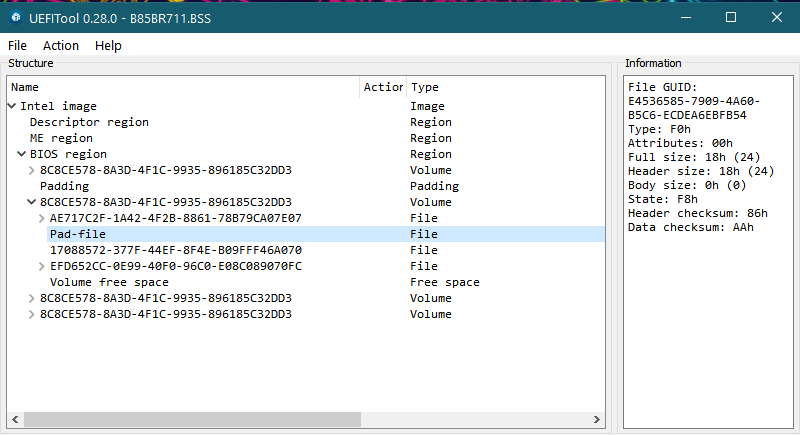
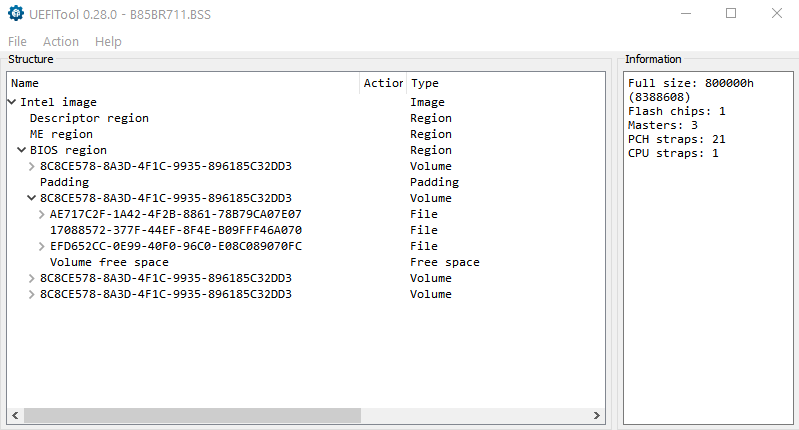
Left Pic: Modified bios Right Pic: Original bios
Left bios has this additional pad file than the original one…What to do?
EDIT by Fernando: Desktop screenshot devided, resized and reinserted as 2 separate pictures (to save space, can be enlarged by clicking onto them)
@Tanmay_Sarkar - Try doing the mod using UEFITool 25.0, then if same, try again using MMTool instead. If you still cannot get it, link me to the stock BIOS you are editing and I will do for you.
Sometimes this is OK to add/remove padding, but only way to know is test flash BIOS, and if it’s a brick and you don’t have programmer, then no way to recover.
So do not “go ahead and try it” unless you have a programmer, backup made, and are ready to recover. Don’t rush around, if you can’t get, wait and I or someone will help you 
Thank you so much. it works ![]()
EDIT by Fernando: Attached desktop screenshot devided and 2 pictures directly inserted (can be enlarged by clicking onto them)
@Tanmay_Sarkar :
Welcome to the Win-RAID Forum and good luck!
@locduydt :
Welcome to the Win-RAID Forum and thanks for your feedback!
Enjoy your NVMe SSD as bootable system drive!
Regards
Dieter (alias Fernando)
Can anyone help me, I’m looking to modify a bios for a MSI Z87-G41.
I’ve done all the steps with UEFITools but the pad has disappeared, is there any way to remedy this.
if someone could take a look at the 2 files for me that would be very much appreciated.
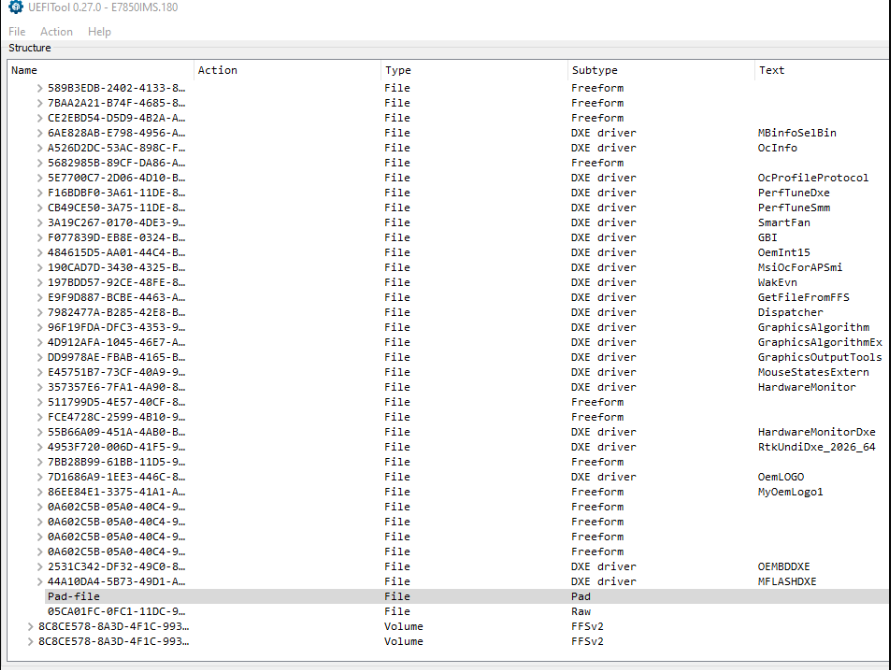

EDIT by Fernando: Inserted pictures resized to save space (can be enlarged by clicking onto them)
@LiquidCRA :
Welcome to the Win-RAID Forum!
Yes, according to my experience the UEFITool touches an originally present Pad-file more often than the MMTool.
This is what I get after having inserted the NVMe module with the AMI MMTool v4.50:
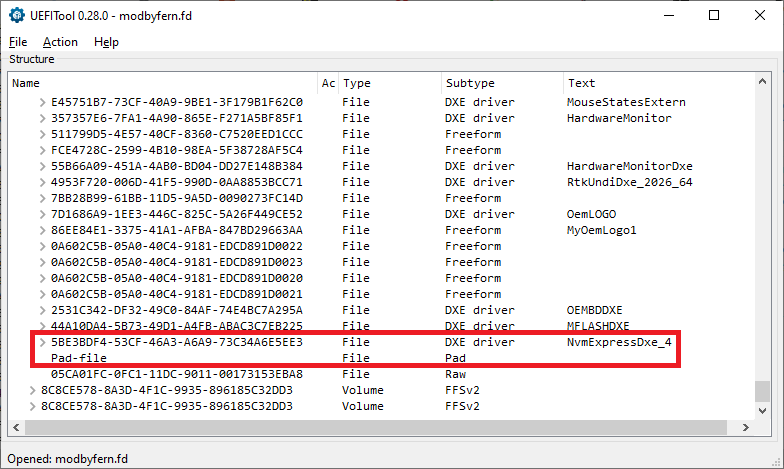
As you can see, the Pad-file has not been removed by the MMTool.
Good luck!
Dieter (alias Fernando)
Is there a sure fire way to know if a modded bios will work or at least not brick a motherboard?, the board in question does not have flashback so if I was to do it I would need to know if it was going to be successful.