Yes, U right, bios from offsite unlocked in FD, but backup may show another result 
MAC address needs only when we have GbE region, LOM intel.
Yes, U right, bios from offsite unlocked in FD, but backup may show another result
MAC address needs only when we have GbE region, LOM intel.
@Michael_Code - Yes, FD on board often is locked while stock may be unlocked, generally because it’s never written into BIOS so does not matter and they leave unlocked
About MAC, sometimes it is stored in one or several padding areas of the BIOS, along with serial, UUID etc. And sometimes it’s stored in NVRAM too, but yes, it may not be needed to be put back in those areas by you, for functionality of LAN, unless there is used GbE region
But serial, UUID, etc most users will want back into the proper places. This stuff is important to many users, but is by far the least concerning issue with your suggested flash command though, so be careful with FPT as I mentioned 
Done! I hope, that it is clear enough now.
Thanks for your additional advice! 
@Fernando - You’re welcome! Looks good, but should be DXE not DYE, just typo I know
Also, same comment should be copied to MMTool section as well
Hello all, hope you can help me. I have a Sony Vaio Pro 13 (SVP1321C5E) and i’d like to upgrade the default 256GB SSD to a new one, 1TB should be good. Unfortunately it seems every SSD PCI-E out there are NVMe nowadays and, reading a bit, looks like my mainboard doesn’t support NVMe drives to straight boot OS, is that correct? I wish to do a new clean fresh installation of Win10, don’t know if that matters. Otherwise seems like i need to mod and flash the BIOS, if that’s the case hope you can help me doing that. Thanks
@night_hawk :
Welcome to the Win-RAID Forum! Before you start following the guide (= start post), you should check, whether there is an Nvme module within the latest BIOS for your Sony Vaio Pro 13.
Good luck!
Dieter (alias Fernando)
@Fernando @night_hawk - This model is NOT NVME natively. Flash programmer is required to safely reflash mod BIOS on this model - Sony Vaio Pro 13 - SVP1321C5E bios issues (3)
Unless you want to use risky AFUDOS 3.04-3.06 and /GAN - Method outlined here if you want to risk it - [Sony VAIO] BIOS modding/hacking/unlocking - Some Questions (5)
I see, so without hardware flashing I’m out of luck. Better to save-up for a new laptop then. Thanks anyway ![]()
@night_hawk - No, you can use AFUDOS w/ /GAN method - No need for a new laptop
And, really, flash programmer set is only $7-15 depending on how fast you want it, so even waiting on that to arrive instead, no need to buy a new laptop
@Lost_N_BIOS
Thanks for your help but, in your previous message you said that AFUDOS procedure is very risky and i can’t risk to burn my pc. As for hardware flasher i never messed up with those kind of stuffs, so it would be even worse than AFUDOS procedure for me eheheh.
Dear @fernando,
I have the same BIOS as the Forum member Loud in an Acer X4610G. The latest BIOS download can be found here: h ttps://w ww.acer.c om/ac/nl/NL/content/support-product/3650?b=1 (can’t link, New members need a minimum of 5 posts before posting external links). In my understanding the BIOS code is locked / signed by Acer. Would it be possible to tweak that BIOS code with your guide? (And would Windows still start, with OEM license validation?)
EDIT by Fernando: The blue marked text has been added by me after having removed the fully quoted post (to save space). This way the quoted post was dispensable.
@Marty1 :
Welcome to the Win-RAID Forum!
As I just have tested myself, it is no problem to get the NvmExpressDxe_4.ffs properly inserted “as is” into the BIOS by using the AMI MMTool v4.50.
If you want to know how to get a modded BIOS properly flashed, please read the start post of >this< thread. The AMI AFUWin tool, which is within Acer’s BIOS package, may work. If not, try it with the " /GAN" suffix.
Good luck!
Dieter (alias Fernando)
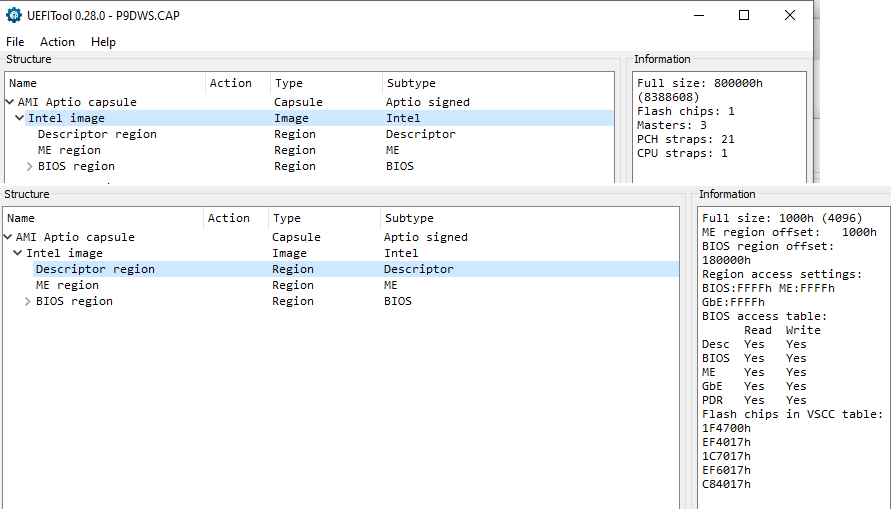
@Lost_N_BIOS , Hello! I don’t have offset as in your manual( I have ME region offset 1000h. My MB is Asus P9D WS (P9DWS.CAP) Do I need such game with offset?
Original CAP from asus site (their latest edition):
EDIT by Fernando: Inserted screenshot resized and directly attached (can be enlarged at any time by clicking onto it)
P9DWS.zip (5.15 MB)
@Lost_N_BIOS I tried flash bios without extracting body from CAP file, using manual of @Fernando
Motherboard: Asus P9D WS
Intel 760p 128gb
Adapter: AMPCOM M.2 NVME to PCI Express 3.0 x4
I
- downloaded original bios p9dws.cap from asus site
- inserted mod using UEFITool (as in @Fernando instruction)
- saved new CAP file p9dwsMod.cap
- flashed bios using AI Suite 3 (follow this)
I rebooted, entered in bios and saw PATA SS
After I edited bios like this and this
I installed windows10 from usb and saw NVMe ssd
Windows started without problems.
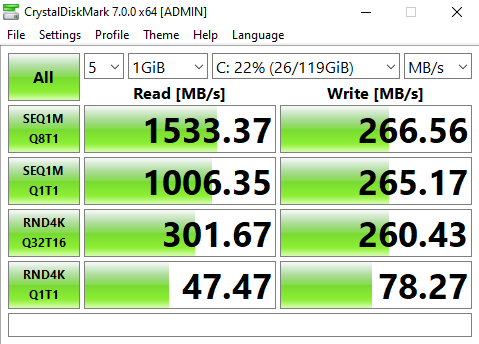
Sorry, images were too big. EDIT by Fernando: I have shrinked them, but it is no problem to enlarge them by a click.
@alexel :
Welcome to the Win-RAID Forum and thnks for your feedback!
We are happy with you, that you succeeded. Regarding the WRITE scores I recommend to read point 9 of the start post of >this< thread.
Enjoy the performance of the NVMe SSD with your old PC!
Dieter (alias Fernando)
I struggled somewhat until I carefully re-read and followed the instructions to get a new install of Windows 10, booting on my NVME SSD. So thank you to @Paulos7 for the modded BIOS Z77PRO41.80.zip in your post and especially to @Fernando for starting and keeping this forum alive. I used your interactions with @Kaman_T in Dec 2018, #msg66632
While I was happy to find it worked, I really did not want to reinstall everything, I just wanted to migrate my existing Windows 10 installation from my MBR SATA HDD to my GPT NVME SSD. Eventually I found a very useful guide:
Restoring an MBR System image to UEFI/GPT[/URL] URL: knowledgebase[dot]macrium[dot]com/pages/viewpage.action?pageId=23396929
I first made an image of the Windows 10 partition of my HDD using Macrium Reflect Free. Perhaps it would have worked anyway but I thought to use some of the advice from Fernando on page 1 of this forum to tweak the instructions. So instead of directly creating a bootable USB within Macrium Reflect, I used it to create a Rescue Media ISO, using the default options. I then used Rufus to add that ISO to my USB in UEFI mode, per this forum’s advice. I then followed the Macrium guide to use Diskpart to clean and add the 2 required system partitions on my SSD. I then used Macrium Reflect Free - the restore function - and dragged my cloned partition image into the unallocated space on my SSD.
Once the partition image was copied, I was directed to follow this guide: Fixing Windows boot problems knowledgebase[dot]macrium[dot]com/display/KNOW72/Fixing+Windows+boot+problems#FixingWindowsbootproblems-FixBootproblemsforGPT/UEFIBootSystems
So still within the Rescue Media boot environment, I was instructed to use the Macium Reflect “restore” menu to “fix boot problems”. At first it did not work. I then remembered on this forum to unplug all other drives leaving only my MR rescue USB plugged in. I ran the “fix boot problem” function and it successfully rewrote the CBR on my NVME SSD.
I shut down. I plugged in all my drives. I booted. It worked. 


Perhaps someone can try using the Macrium Reflect Free guide without using Rufus etc, to see whether it still works. I suspect at least the unplugging of all other drives before fixing the boot problems, will need to be done.
So thanks to Macrium Reflect Free and especially to this forum - I successfully migrated my Windows 10 installation, on a 10-year-old Mainboard, from an MBR HDD to a GPT, NVME SSD.
Apologies for the non-linking URL’s but I cannot include them as I have fewer than 5 posts on this forum.
_____________________________________________________________________________________________________________
MB: Asrock Z77 Pro4 P1.80 | Adata XPG SX8200 Pro M.2 SSD 256GB | Adaptor: Orico M.2 NVMe to PCI-E 3.0 x4 Expansion Card
@SuckSeeds :
Welcome to the Win-RAID Forum and thanks for your report.
It is fine, that you succeeded and now can boot off your NVMe SSD.
Enjoy it!
Dieter (alias Fernando)
Thank you again I am enjoying it.
I was actually surprised to find a free tool to migrate Windows from an MBR HDD to a GPT SSD drive.
For other users of the Asrock Z77 Pro4 Mainboard, in the BIOS, CSM must remain enabled, or the NVME drive is not detected. In my case I used the PCIE Gen3 16x slot although NVME only runs at PCIE 4x. The 16x slot was empty after my graphics card packed up. There is also a Gen 2 4x slot, which I could use for the NVME adaptor should I buy a new graphics card. Lets see how long the MB lasts.
@night_hawk - Yes, it is risky, but often will work. If you plan to buy another laptop instead, then it’s definitely worth using that method vs buying a new laptop
And, or, as mentioned, programmer is cheap, order and wait for it to arrive, then you can do without worries. This is not as hard as it sounds or may look, people do it all the time without any previous knowledge of what the inside of a laptop, or even what a motherboard, looks like
We have guide with plenty of images to help, it’s easy - [GUIDE] Flash BIOS with CH341A programmer
@alexel - To be able to answer your offset questions, I need link to the stock BIOS download page for your model (not the BIOS download link, or attached file etc) - This is so I can keep BIOS file in properly named folder.
ME region offset does not matter to any of this, nor does anything you’ve shown in the attached image. What you need to look at is the BIOS image offset inside the capsule, where the BIOS Image (Intel/UEFI) starts, you can only see this with UEFITool NE Alpha version
Seems you already successfully flashed incorrectly mod BIOS bypassing the capsule security using AI Suite method, so you do not have to worry about this now.
But, for your reference, below is link to guide and image that shows you where you look to see the BIOS Image (Intel/UEFI) starting offset, see point #3 and that image
[Guide] How to get full NVMe support for all Systems with an AMI UEFI BIOS (394)
@SuckSeeds - for your references or possible later usage by you or others This can be used for Win7-Win10, clean or already in-use OS installs. If Win10 system, skip steps #1-3 & #5-6
Installing Clean Win7x64 on M2.2280 PCIe Gen3x4 SSD A-DATA SX8200 Pro
See also
[Guide] How to get full NVMe support for all Systems with an AMI UEFI BIOS (330) << Fernando’s way
[Guide] How to migrate Windows 7 64bit boot drive from MBR SATA to UEFI NVMe without data lose << Shawn’s way
@Lost_N_BIOS Hi. Thanks for answer. “you do not have to worry about this now” - you mean that bios work as expected? I don’t see error. Maybe I’m wrong.
This is Asus Bios official link (https://dlcdnets.asus.com/pub/ASUS/mb/so…S-ASUS-2402.zip) I don’t see offset.