[OFFER] Skylake Non-k OC BIOS Archive

Looking for a Z170 BIOS to overclock your Skylake Non-K CPU using baseclock? It could be here!

SKYLAKE NON-K OC BIOS ARCHIVE

The archive contains BIOS for the following Skylake motherboards;

ASROCK NON-K OC BIOS
ASROCK Fatal1ty B150 Gaming K4-Hyper (B150 chipset)
ASROCK Fatal1ty E3V5 Performance Gaming-OC (C232 chipset)
ASROCK Fatal1ty H170 Performance-Hyper (H170 chipset)
ASROCK Z170 Extreme3
ASROCK Z170 Extreme4
ASROCK Z170 Extreme4+
ASROCK Z170 Extreme6
ASROCK Z170 Extreme6+
ASROCK Z170 Extreme7+
ASROCK Z170 Gaming K4
ASROCK Z170 Gaming K4-D3
ASROCK Z170 Gaming K6
ASROCK Z170 Gaming K6+
ASROCK Z170 Gaming-ITX-AC
ASROCK Z170 OC Formula
ASROCK Z170 Pro4
ASROCK Z170 Pro4-D3
ASROCK Z170 Pro4S
ASROCK Z170 Professional Gaming i7
ASROCK Z170A-X1-3.1
ASROCK Z170M Extreme4
ASROCK Z170M Pro4
ASROCK Z170M Pro4S
ASROCK Z170M-ITXac

ASUS NON-K OC BIOS
ASUS Maximus VIII Extreme
ASUS Maximus VIII Formula
ASUS Maximus VIII Gene
ASUS Maximus VIII Hero
ASUS Maximus VIII Hero Alpha
ASUS Maximus VIII Impact
ASUS Maximus VIII Ranger
ASUS Z170-A
ASUS Z170-Deluxe
ASUS Z170-E
ASUS Z170-K
ASUS Z170-K D3
ASUS Z170M-PLUS
ASUS Z170-P
ASUS Z170-PRO-GAMING

BIOSTAR NON-K OC BIOS
BIOSTAR Gaming Z170T
BIOSTAR Gaming Z170W
BIOSTAR Gaming Z170X
BIOSTAR Hi-Fi Z170Z5

EVGA NON-K OC BIOS
EVGA Z170 Classified
EVGA Z170 FTW
EVGA Z170 Stinger

GIGABYTE NON-K OC BIOS
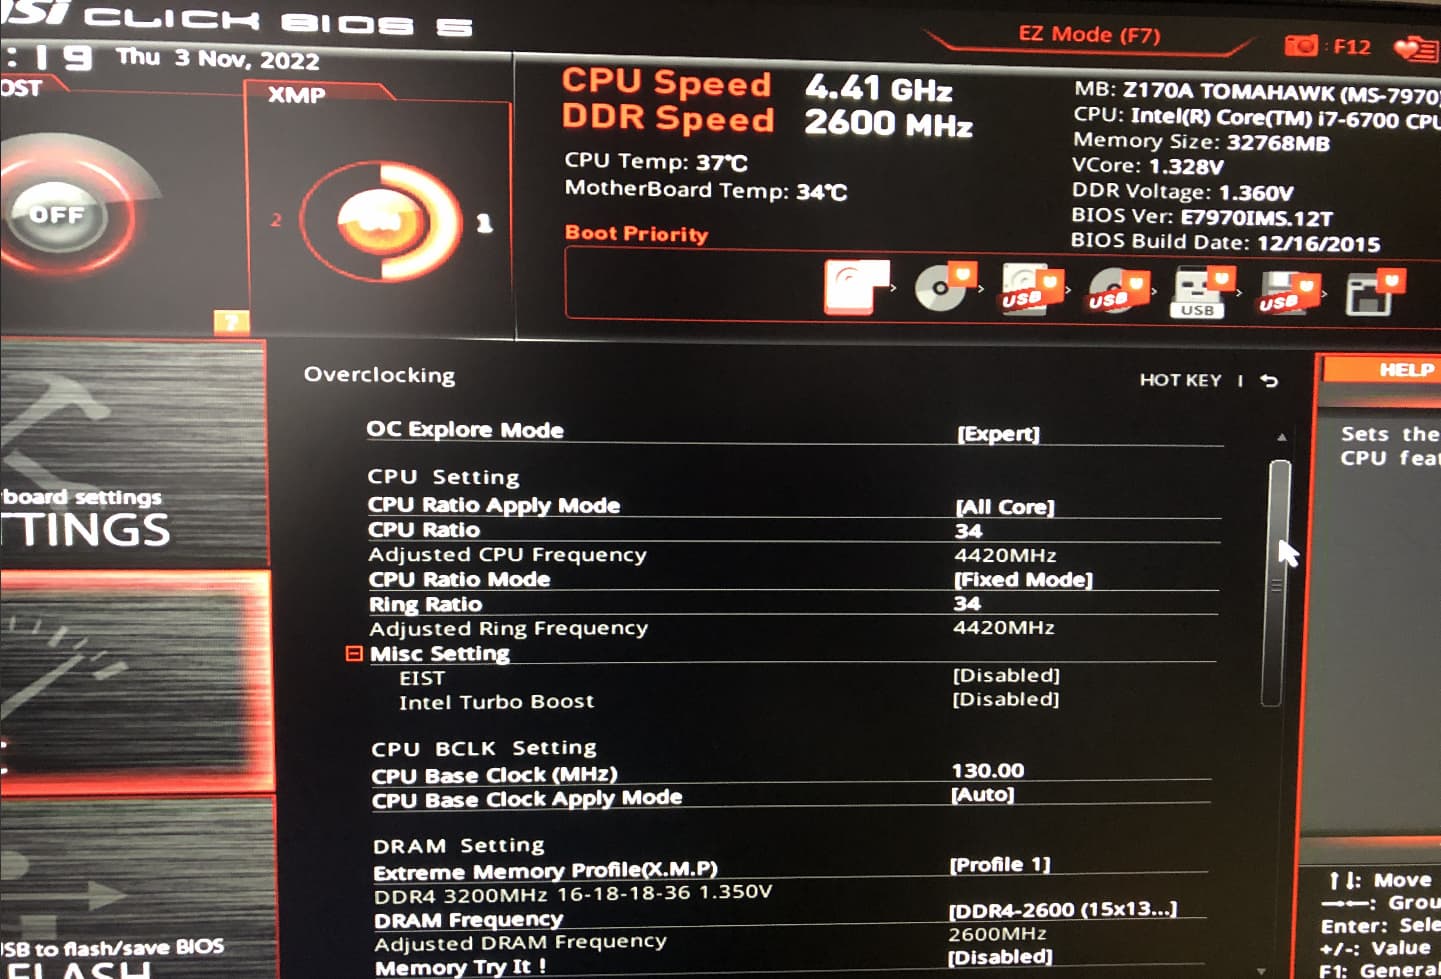
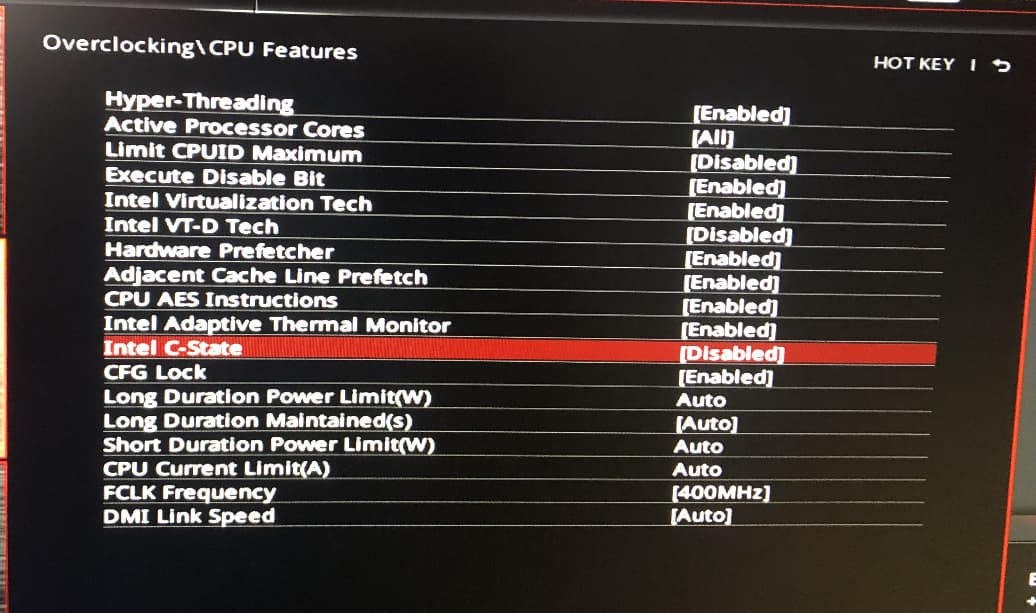
GIGABYTE Z170 G1.Sniper
GIGABYTE Z170 Gaming K3 (Rev 1.0 & 1.1)
GIGABYTE Z170-D3H
GIGABYTE Z170-HD3
GIGABYTE Z170-HD3-DDR3
GIGABYTE Z170-HD3P
GIGABYTE Z170M-D3H
GIGABYTE Z170MX Gaming 5
GIGABYTE Z170N-WiFi (Rev 1.0 only)
GIGABYTE Z170X Gaming 3
GIGABYTE Z170X Gaming 5
GIGABYTE Z170X Gaming 6
GIGABYTE Z170X Gaming 7
GIGABYTE Z170X Gaming G1
GIGABYTE Z170X Gaming GT
GIGABYTE Z170X SOC Force
GIGABYTE Z170XP-SLI
GIGABYTE Z170X-UD3
GIGABYTE Z170X-UD5
GIGABYTE Z170X-UD5 TH

MSI NON-K OC BIOS
MSI Z170(A) KRAIT GAMING
MSI Z170A GAMING M3
MSI Z170A GAMING M5
MSI Z170A GAMING M7
MSI Z170A GAMING M9 ACK
MSI Z170A GAMING PRO
MSI Z170A GAMING PRO CARBON
MSI Z170A KRAIT GAMING 3X
MSI Z170A KRAIT GAMING R6 SIEGE
MSI Z170A PC MATE
MSI Z170-A PRO
MSI Z170A SLI PLUS
MSI Z170A TOMAHAWK & TOMAHAWK AC
MSI Z170A XPOWER GAMING TITANIUM
MSI Z170A-G43 PLUS
MSI Z170A-G45 GAMING
MSI Z170I GAMING PRO AC
MSI Z170M MORTAR

In 2016 Roman “der8auer” Hartung hosted a website ‘overclocking.guide’ with in-depth details on how to overclock non-k Skylake CPU’s, I have copied some text from the site as it is no longer live (special thanks to der8auer).

The non-K BIOS is skipping some parts of the power-management, so there are few things you have to keep in mind:

• The missing power-management will not allow to read out any core temperature. However, you can read-out the package temperature (make sure to stay below 70°C package temperature)
• No C-States. CPUs will always run full speed and full voltage.
• No Turbo-Mode.
• No iGPU.
• Intel AVX is screwed. Some benchmarks like Intel XTU use AVX and you will have about 4-5 times lower score.
• Avoid high memory clocks. Everything around 2600 MHz will be fine for the start. You can try to run higher memory clocks once you have a running system.


Guide for NON-k OC on ASRock motherboards;

Example OC in 8 steps

BCLK depends on the CPU.

• Enter the BIOS
• Go to OC Tweaker – CPU Configuration
• Set the BCLK you need (e.g. 122)
• Go to OC Tweaker – Voltage Configuration
• Set the CPU Core Voltage to 1.325 and the the CPU Loadline Calibration to Level 1
• Go to OC Tweaker – DRAM Configuration
• Load the XMP Profile
• Adjust the DRAM Frequency to a value around 2600 MHz

Depending on the CPU quality you migh also need a little bit more CPU Core Voltage. Up to 1.40 Volt is safe to use with sufficient cooling.

If the setting is working well you can also try to use a higher memory clock.

Guide for NON-k OC on Asus motherboards;
Example OC

BCLK depends on the CPU. Example with Pentium G4500T to 4400 MHz.

• Enter the BIOS
• Go to Advanced CPU Configuration
– Set Boot Performance Mode to Turbo Performance
• Go to Advanced CPU Configuration and to the sub-menu CPU Power Management Configuration
– Set Intel(R) SpeedStep™ to Disabled
– Set CPU C states to Disabled
• Go to Extreme Tweaker and to the sub-menu External Digi+ Power Control
– Set CPU Loadline Calibration to Level 7
• Go back to Extreme Tweaker
– Set Ai Overclock Tuner to XMP
– Change the BCLK Frequency to the value you need (e.g. 147)
– Adjust the DRAM Frequency to a value around 2600 MHz
• Set the CPU Core Voltage Override to 1.325

Depending on the CPU quality you migh also need a little bit more CPU Core Voltage. Up to 1.40 Volt is safe to use with sufficient cooling.

If the setting is working well you can also try to use a higher memory clock.

Guide for NON-k OC on Gigabyte motherboards;
Example OC

BCLK depends on the CPU. Example with Pentium G4500T to 4300 MHz.

• Enter the BIOS
• Go to Advanced Frequency Settings and to the sub-menu Advanced CPU Core Settings.
– Adjust CPU Clock Ratio to the maximum all core value
– Adjust Uncore Ratio to the maximum value (same as CPU Clock Ratio)
• Go back to Advanced Frequency Settings
– Change the BCLK Frequency to the value you need (e.g. 143)
– Load the XMP Profile (if available)
– Adjust the System Memory Multiplier to stay below 2800 MHz or lower if you have a memory kit with lower specs (e.g. 2133 MHz)
• Go to Advanced Voltage Settings and to the sub-menu Advanced Power Settings.
– Set CPU vCore Loadline Calibration to High
• Go back and go to the sub-menu CPU Core Voltage Control
– Adjust CPU Vcore to 1.325 Volt
• Save settings and exit (F10)

Depending on the CPU quality you migh also need a little bit more CPU Core Voltage. Up to 1.40 Volt is safe to use with sufficient cooling.

If the setting is working well you can also try to use a higher memory clock.

Guide for NON-k OC on MSI motherboards;
Example OC in 8 steps

Ratio and BCLK depend on the CPU.

• Enter the BIOS
• Go to OC on the left
• Set OC Explore Mode to Expert
• Set Beta Runner to NOC (this is the option to enable non-K OC!)
• Change the CPU Base Clock (BCLK) to the value you need (e.g. 120)
• Set the Extreme Memory Profile (XMP) to Enabled
• Adjust the DRAM Frequency to a value around 2600 MHz
• Set the CPU Core Voltage to 1.325

Depending on the CPU quality you migh also need a little bit more CPU Core Voltage. Up to 1.40 Volt is safe to use with sufficient cooling.

If the setting is working well you can also try to use a higher memory clock.

How could i do for non K cpu on Asus Z170-P D3?
Do you have a bios for this motherboard or could you make it?

@antovm After a bit of hunting around I found BIOS 8002 on this page, with a mediafire link to Z170-P-D3-ASUS-8002.zip.

To prove this BIOS can oc non-k Skylake there is a validation for an overclocked 6400 with this BIOS here.

I have also added a new folder for the ASUS Z170-K D3 to the mega link in the original post of this thread in case the mediafire link goes down.

Thank you soo much :sunglasses:

Hello, @chinobino
Can you help me pls

I have MSI z170a tomahawk, i installed E7970IMS.12T bios normally, with m-flash.
At first overclocking was worked, i got 4.5 GHz on my i7-6700, then i reinstall windows. And now if i have bclk frequency > 100 i cant boot bios & windows normally.

I downgraded bios to another one, UI was changed to MSI Pro Series, looks as needed.
But experiencing the same problem, i set bclk 101 and pc rebooting so many-many times
Maybe somebody have any ideas?

I think it might be windows micro code updates, how i can prevent it or rollback? I saw few solutions but it is not working correctly.
I have official windows 10 on my PC now


I think, it probably was my cpu microcode update.
Maybe, I need use MCExtractor and then install earlier one microcode update
Or i need special bios for this?

Regards, Vadym

Hello, @chinobino
Can you help me pls

@vadymkutsenko Hi, yes I will try.

I have MSI z170a tomahawk, i installed E7970IMS.12T bios normally, with m-flash.
At first overclocking was worked, i got 4.5 GHz on my i7-6700, then i reinstall windows. And now if i have bclk frequency > 100 i cant boot bios & windows normally.

Regardless of which Windows version is installed you should be able to overclock baseclock in BIOS using E7970IMS.12T as this is before Windows even starts to boot. If 101 won’t work try another value such as 103 or 105, keeping in mind that your memory must also be capable of the higher clock speeds.

I downgraded bios to another one, UI was changed to MSI Pro Series, looks as needed.
But experiencing the same problem, i set bclk 101 and pc rebooting so many-many times
Maybe somebody have any ideas?

You should stick to using the E7970IMS.12T BIOS especially if it was working before. It has modifications and a specific combination of microcode and ME Firmware that allows baseclock overclocking.

I think it might be windows micro code updates, how i can prevent it or rollback? I saw few solutions but it is not working correctly.
I have official windows 10 on my PC now

Windows 10 will attempt to load a microcode that is later than the one in the E7970IMS.12T BIOS (56). The baseclock overclock should have already been running from boot at this stage and I do not know what happens when Windows attempts to override the microcode when the baseclock is higher than ~103 MHz - the system may face a BSOD or nothing may happen at all.

To use the earlier BIOS and microcode that allows bclk overclocking you should delete/rename the file ‘mcupdate_GenuineIntel.dll’ on a Windows 10/11 system to stop it from overriding the older microcode in BIOS when Windows starts.

It is located inside ‘C:\Windows\System32’ and you will need to take ownership to rename/delete the file.

Note that this file will be restored if you run the system file check “sfc /scannow” or if a Windows update reinstates mcupdate_GenuineIntel.dll.

I think, it probably was my cpu microcode update.
Maybe, I need use MCExtractor and then install earlier one microcode update
Or i need special bios for this?

Regards, Vadym

It 's not just the microcode - there are specific changes to the E7970IMS.12T BIOS as well as the microcode and ME firmware combination.

1 Like

Hello again, i got some results and i want to share my experience

I reassemblied my pc again to z170.
At first, mcupdate_GenuineIntel.dll was deleted, i had earliest one available firmware (1.0) for my motherboard
https://www.msi.com/Motherboard/Z170A-TOMAHAWK/support

Then i installed your modified E7970IMS.12T again.
I set around 4.400 MHz, first windows run was succesful, but i got 4250 MHz. After restart i could not run my pc anymore.

Then i installed newest one bios 7970v1E, and after E7970IMS.12T again

It was victory, i easy started my pc on 4250 MHz and it was so stable

Now i have ~4400 MHz, bclk 130, RAM = 2600, core voltage 1.320v

Max temp was 73C, i believe it is safe for my i7 6700

Thanks so much for a help, amazing forum

I hope my pc will be stable, but let’s see )

1 Like

@vadymkutsenko Very unexpexted that bios 7970v1E allows baseclock overclocking but if it works for you that’s great! Nice overclock too :+1:

1 Like

Good morning, i have new information

Yesterday i got 1 BSOD, and recovery process was started
Today, my pc did not start normally, he rebooted ~5 times and then ran normally 1 time

After that, I could not run my pc anymore.

I installed newest one bios 7970v1E, and after reinstall E7970IMS.12T
Now it works again

I fully disabled windows update service (at services.msc), ‘mcupdate_GenuineIntel.dll ’ was not restored

I do not know, probably, some others windows 10 tools affect overclocking
Does anyone has some ideas?)

Regards, Vadym

If you are getting BSOD you may not have sufficient Vcore (or DRAM voltage if your RAM is being overclocked).

What did you set Vcore to?

1 Like

I have 1.325v for now and it is looks fine for first run after patching by E7970IMS.12T BIOS.
Only after first overclocked run I’m starting to have problems

I got bsod only once, when have much lower voltage.
I’m sure of the next bios parameters for my system:

  • 34 multiplier
  • 130 bclk
  • 1.325 core voltage
  • 2600 RAM frequency

I want to deal with windows firmware updates :slight_smile:

I also set SearchOrderConfig value to 0 at Computer\HKEY_LOCAL_MACHINE\SOFTWARE\Microsoft\Windows\CurrentVersion\DriverSearching

Secure boot was disabled at bios

And i changed Local Group Policies at Administrative Templates/Windows components/Windows Update:

mcupdate_GenuineIntel.dll was deleted after reinstalling windows, windows update service was stopped as well

Or do you think it cause by wrong bios parameters?

The CPU may need more than 1.325 V.

Does the board have LLC (Load Line Calibration)? …and if so what is it set to?

1 Like

Thanks, i will try, i have used it before.
LLC is set to auto now, on my motherboard i have 2 options:

  • Auto
  • Mode 1

I also tried to start with 1.340-1.350 V and it was unsuccessful too.

Overclocking works only once immediately after instaiiling E7970IMS.12T, after first run i cant boot bios with changed BCLK or Vcore parameters :cry:
Endless boot loop

I`m not sure yet, but it seems like success.

In additional to previous post, i did next manipulations

Windows manipulations:

  1. set ExcludeWUDriversInQualityUpdate to 0 at HKEY_LOCAL_MACHINE\SOFTWARE\Policies\Microsoft\Windows

  2. added AllowOSUpgrade at HKEY_LOCAL_MACHINE > SOFTWARE > Microsoft > Windows > CurrentVersion > WindowsUpdate > OSUpgrade

  3. changes my local policies at Computer Configuration > Administrative Templates > Windows Components > Windows Updates

  4. delete mcupdate_GenuineIntel.dll

  5. disable windows update service

  6. set SearchOrderConfig value to 0 at Computer\HKEY_LOCAL_MACHINE\SOFTWARE\Microsoft\Windows\CurrentVersion\DriverSearching

Bios manipulations:

  1. disabled secure boot
  2. 34 multiplier
  3. 130 bclk
  4. 1.325 core voltage
  5. 2600 RAM frequency
  6. LLC mode from auto → Mode1 (i have only one available option)
  7. disable C-states

Let`s see how long it will works normally. Maybe i missed some settings, it were so many attempts :slight_smile:

Thanks so much @chinobino for help


Additional screenshots:

Received results:

Bios settings:


Additional links:


Also i used:

@vadymkutsenko

For MSI BIOS LLC mode 1 is usually the most aggressive LLC mode for increasing voltage when under load - however with 1.325 V core voltage plus override mode with C-states disabled you should be pretty safe to not go over 1.40 V and keep your ~4.420 GHz overclock stable.

Looking good.

1 Like

@chinobino how can i check core voltage?

In CPU-Z i see Core Voltage 1.328 V, In hwinfo64 max possible value is 1.328 V too
Can i trust to CPU-Z or hwinfo64?

@vadymkutsenko

If you can see the motherboard’s VROUT (Voltage Regulator Ouput) in hwinfo it should show a similar voltage to 1.325 V.

There may be more than one VROUT so look at all the values.

1 Like

@chinobino Can i ask for a favor?

In theory, can you modify latest bios for my motherboard with changes, than contains in E7970IMS.12T?

7970v1E.zip (7.3 MB)
https://www.msi.com/Motherboard/Z170A-TOMAHAWK/support

I will try to experiment with core voltage more, but I`m almost sure that probles is not in (bios)UEFI parameters.
If new modified bios will not work, the next step i will try to downgrade to windows 7

I noticed few interesting facts:

  • Posibility to boot pc normally will be affected in next 2-5 runs
  • Installing E7970IMS.12T after oldest bios does not take needed effect
  • Only installing E7970IMS.12T after newest bios does take needed “temporary” posibility for overclocking

Sorry if I`m annoing you :slight_smile: I just can’t accept the fact that my pc can works so productive, but microcode updates, windows capsule updates or something else prevent it.

It looks like next idea “Do you want perfomance? Go to store, spend your money for new configuration and be happy. Do not try to hack us :smiley:” © Microsoft (or Intel) :rofl:

@vadymkutsenko I did not modify any of these BIOS - they are all the original BIOS supplied by the manufacturer back in 2015/2016.

Intel was not happy with the vendors allowing non-k overclocking and told them to take the BIOS down (which is why you can’t find them on the vendor’s website anymore).

Any BIOS that supports Kabylake CPU’s is unlikely to be able to modified successfully (such as E7970IMS.1E0) as certain modules have been updated by Intel to disallow base clock changes above ~103 MHz.

Have you tried using the other BIOS I uploaded (E7970IMS.33T) for your motherboard? (It’s in the same folder in the link in the first post).