Enable/disable or hard disabled, doesn’t matter. Thanks a ton!
link to bios: https://dlcdnets.asus.com/pub/ASUS/mb/LG…G-ASUS-0707.zip
@click4dylan - Here, do not rename, flash via USB Flashback, hopefully you know that drill already 
http://s000.tinyupload.com/index.php?fil…857565745982340
All three changes are at Advanced >> PCH Config. I assumed you could already see this submenu, if not, let me know and I will make it visible)
If they are still not visible, one more edit needed, but it will probably make a lot of things visible. Hope you wont mind, if it comes to that 
Wow that was fast, thanks so much!!! I will go try it now
----------------------
Followup, it works and shows up! I also noticed the ability to disable the bluetooth and wifi radio which didn’t seem to exist before, which is really nice. HPET still shows up in windows device manager unlike Z77 but this also happens on AMD hardware which I guess is just how these new chipsets work. Here is a screen cap of the newly phenominal DPC latency on windows 7
with 10700k 
@click4dylan - Yes, some extra things other than I mentioned may also sometimes become visible, due to some settings all suppressed together
Nice to see it’s all there, and working, also good to see HPET disable helped fix DPC issue for you too
Yes, HPET always shows in Win10 vs Win7, they changed how all this works in Win10.
See my testing and comments here under change log area, about HPET and Win10 BCDEdit + BIOS enable/Disable HPET
[OFFER] Gigabyte Z390 M Gaming UPD + Completely Revised Blue Theme
Additional testing done here by chinobino in attempt to see if we could make it disappear from device manager in Win10, no attempted way makes it stay gone like Win7
#68 - through end of thread - [OFFER] EVGA Z370 Classified K BIOS unlocked (5)
Thing is, I am already using Windows 7 and it does not disappear in device manager on Win7 like others say. It shows up in both win7 and win10 regardless. This also happened on gigabyte. I remember back on Z77, setting bcdedit /set useplatformclock yes or no did not in any way reduce the dpc latency, nor did it change the mouse feel. The only time it was truly ‘disabled’ and improved things was when it was disabled in BIOS and disappeared from device manager. I wonder what these modern systems are actually doing when it is disabled in BIOS.
In my testing when disabling in BIOS, it’s disabling it, you can see the result in CPU-z timers in my testing shown above with and without BCD Edit (that was on Z390).
I’ve not tested Win7 and HPET enable/Disable on anything newer than Z87, so I can’t comment for sure on if it also still is removed from device manager in Win7 on boards above Z87, I just assumed it still would be and that was a Win7 thing, but maybe not and it’s more about the board/chipset?
DPC latency I’ve not heard much often being tied to HPET. Often for high latency things like speedstep, EIST, C1E, C3 may affect it, or numerous drivers you install during windows setup and or program installs etc - All this has the largest potential to cause high latency
Of course, sometimes BIOS in general cause also have latency issues between one version to the next
I can test on Z490 Gigabyte I have on test bench right now, but I will have to find time to edit a BIOS first.
I will update with results once I do, I’ll try to get done in next day or two
Don’t worry about it, I’m just really happy you were able to add that feature. Why asus hides this from view I don’t know… But I know for sure I will not be going back on an AMD platform any time soon due to all the issues I had such as PCIE 4.0 audio and usb dropouts, corrupted windows installs, non-functioning XMP memory, non-functioning legacy boot on aorus master, and constant bios updates required. Not to mention 8000Hz mouse polling rate on intel that amd’s usb controller will not support
Asus now added the ability to enable smart access memory on z490 with the latest beta bios at https://dlcdnets.asus.com/pub/ASUS/mb/LG…G-ASUS-1002.ZIP
Do you mind disabling HPET one last time?
This will probably be my last request until 11th gen comes out unless they add something really useful in a newer BIOS. I downloaded MMTool64 and tried to figure out how to do this myself before posting but wow that is complicated. I wish there was an easier way to learn how to do it. I can read and write x86 assembly but have never messed with hardware firmware before, this is beyond me! Thank you once again!!!
@click4dylan - Sure, here you go - http://s000.tinyupload.com/index.php?fil…453193969399349
If you want to try and learn this edit, it can be as simple as editing two bytes if you ONLY want to make HPET visible
I use UEFITool instead of MMTool, ,but you can use MMTool if you wanted. + Universal IFR extractor and Hex editor
https://github.com/LongSoft/UEFITool
Universal IFR extract tools are used to generate IFR text from setup module (to be able to read/search settings, and get variable info)
+ any hex editor you like, I use Hex Editor Neo (paid version), but there is a free version
I use UEFITool version 25.0 for this for all insert/replace functions, newer can sometimes cause certain issues much more often than this version.
I use UEFITool NE Alpha version 51.0 for inspection, extracting modules, so you can test extract and see how to obtain same file I included and it’s default name either way you extract it etc.
Below is example images of how exactly I expand and select a module for extract, replace.
Version 5x and 25.0 looks a little different, you can see snippet of each side by side below in first image.
You can only use 5x versions for inspection/extraction, no edit/inserts, all insert/replace done with 2x versions
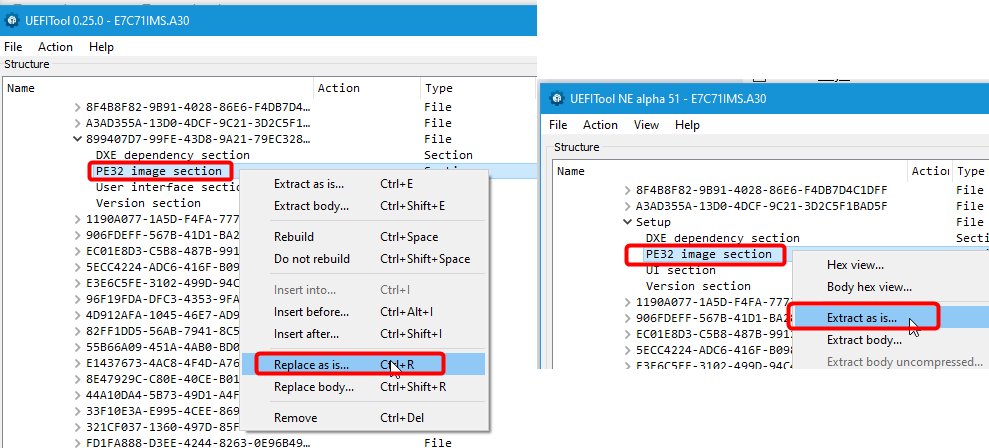
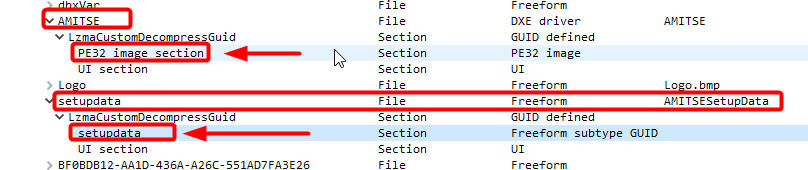
For this edit, only two modules are edited >>
Setup PE32 (As-Is) - To unsuppress HPET Setting
AMITSE/SetupData (BODY) - To change Access Level for HPET, TCO Timer, SPD Write Disable - You can just do edit for HPET only, if that is all you really need (Then only 1 byte in each module to edit )
Either module can be extracted however you want, as a whole as-is or body, expanded down to the inner modules then as-is or body, etc.
The important thing here is to always extract and replace same exact way for each item, get yourself into habit of always doing one thing or another a certain way and then stick to it so you’ll always do same and have less chance for error.
I do both a little differently due to some BIOS or procedures need to use Body of certain things, so I am in habit of always Setup PE32 as-is, AMITSE PE32 BODY, and AMITSE/SetupData BODY
And finally, for reference, here is a few posts I made to explain AMITSE/SetupData Access Level Changes
[Request]Maximus XI Hero - Unlock AMIBCP (Post #4, see last paragraph + image)
msi z490 unify bios mod (3) << Post #44 - New/recent explanation with color coded image and better outline of contents details
And here is example of the sole unsuppress edit done to Setup PE32 for this edit
Before -
Suppress If {0A 82}
True {46 02} << Target to edit - Change 46 to 47
High Precision Timer, VarStoreInfo (VarOffset/VarName): 0x1A, VarStore: 0x17, QuestionId: 0x64F, Size: 1, Min: 0x0, Max 0x1, Step: 0x0 {05 91 BF 0A C0 0A 4F 06 17 00 1A 00 10 10 00 01 00} << Search this string on module via hex, edit (above) will be directly before
After Edit/save - Make new IFR from modified Setup PE32 and you get below -
Suppress If {0A 82}
False {47 02} << Now, High Precision Timer is not suppressed
High Precision Timer
Suppress If {0A 82}
True {46 02} << Target to edit - Change 46 to 47
High Precision Timer, VarStoreInfo (VarOffset/VarName): 0x1A, VarStore: 0x17, QuestionId: 0x64F, Size: 1, Min: 0x0, Max 0x1, Step: 0x0 {05 91 BF 0A C0 0A 4F 06 17 00 1A 00 10 10 00 01 00} << Search this string on module via hex, edit (above) will be directly before
After Edit/save - Make new IFR from modified Setup PE32 and you get below -
Suppress If {0A 82}
False {47 02} << Now, High Precision Timer is not suppressed
High Precision Timer
All modules I edited before/after are included, so you can see what is done, and hopefully teach yourself how to do edits like this, or at least this particular one for yourself in the future!
If you have any questions on any edit, any time, let me know and I can try to help!
*** Ohh! Also, here is how you should do Asus BIOS edit - extracting body of BIOS from capsule BIOS, edit, replace.
In order to edit this BIOS properly for USB Flashback you need to extract body, edit, then put back into signed capsule and name to USB Flashback name once done.
See post #5904 here, this is about doing a NVME mod, but same general thing applies here.
You do this first to get BIOS body (rom/bin) from Capsule, then do any/all editing for step #2, then replace into properly name Capsule once done