Hello there!
I hope I’m at the right section of the forum looking for help.
Here’s what happened last week. I found out that there’s an update 213 over my existing 211 BIOS on my ASUS ROG G751JY system. I downloaded the file with .213 extension from the official asus.com website, also downloaded the Windows BIOS Flash Utility (Version V3.0.1 - 2015/08/14). I ran the Flash Utility as admin, followed the prompts and the computer rebooted. During the flash erase stage, somewhere between 30-40% erased, the computer suddenly powered off. I know, It was plugged in, 100% charged. You know the rest of the story.
I also tried the recovery method with .213 / BIN / .bin files using a FAT32 formatted USB drive with the ctrl+home+powerON method - no dice :(.
At this point I figured my last call is to swap / reprogram the integrated bios chip on the board. Since I’m not comfortable with soldering it, I have ordered a CH341A Programmer + SOIC8 SOP8 Flash Chip IC Test Clip Socket Adapter bundle on eBay. It should come in the next 2 days. In the meantime, I’ve been reading tutorials how to get the process done using flashrom via vmware + unix environment.
I got a little confiused reading around forums about Asus bios files, more particularly:
-Is the G751JYAS.213 bios file capsulated? Can I straight flash using the CH341a programmer?
-Should I download / backup the current partially erased BIOS in case I need some settings / information from it?
-Is the correct order - download (backup old bios) - erase - program - verify - power up?
Please advise and thank you for your help!
Cheers
edit: Updated to SOLVED status!
All credits for help @Lost_N_BIOS
@xkwas - Was your USB device small, 128MB-2GB, and USB 2.0? If not, try again with it partitions down to 1GB sometimes this helps. But generally, older, cheaper, smaller = better.
Also, try AMIBOOT.BIN & AMIBOOT.ROM
G751JY.bin and G751JY.213 are the names in the actual BIOS recovery module for this BIOS, so there is some recovery method intended to function, but that may also require the BIOS to only be messed up in a certain way or only a certain amount/area can be bad and rest needs to be good for it to work properly.
It’s hard to guess just how bad off BIOS can be corrupted/erased etc and that would still function.
First things first… SLOW DOWN!! 
Yes, you want to make a backup of your chips current contents and have someone check that before you do any erase or writes.
This does two things. First it helps you to save if possible your board specific details such as serial, UUID, LAN MAC ID etc. And second, this lets you know what software version works with your CHIP ID etc.
Not all will work properly, and not all chip ID’s should be used as the exact ID when using the program
Yes, this systems BIOS is in a capsule as downloaded from Asus. AND, that is not a complete BIOS provided by Asus either, only the BIOS region is there.
So this cannot be used as-is for programming anyway even once removed from capsule, complete BIOS must be compiled first before you can program it in.
Stop at “Backup chip” and wait, until someone checks your dump, that way if it’s corrupted/bad dump or blank (all FF or 00) we can tell you to try again, use different version software etc, until it’s correct
I mean corrupted from dumped with wrong software, not corrupted as in what happened messed it up, there is a difference and it’s easy to spot in a dumped BIOS.
Here is general CH341A software package, without knowing your chip ID right now I suggest 1.30 or 1.34, but give me your chip ID once you open it up and I will advise more if necessary
http://s000.tinyupload.com/index.php?fil…257455007472602
Here is guide w/ setup images
https://www.bios-mods.com/forum/Thread-G…341A-programmer << Same as one directly below, but with all images expanded/visible at once
[GUIDE] Flash BIOS with CH341A programmer
Thank you very much for your reply!
When I tried the USB recover method I used an old 1GB flash disk formatted to fat32. I placed both files with .bin and .213 extension. I guess since the chip got 30-40 percent erased, the recovery with USB method / hdd root directory is still worth a shot. I’ll have time to disassemble everything, remove the battery and dump the old bios before I proceed in case the USB recovery fails again. Today I received my test clip and the programmer itself. I also have a windows pc with Linux on VMware loaded with the drivers, flashrom and ch341prog (I think that was the name of that little tool from github). Will update when I try again the USB recovery.
You’re welcome. Sounds like USB Stick should probably be good, did you try all USB Slots? Also, did you rename file as I noted above (without the AS in the name)?
Yes, it may have erased too much, or in the spot that is bad for recovery to work etc.
I can’t help with linux or flashrom, I only know windows programs for CH341A, the ones I linked above and ASProgrammer 1.41 here - https://github.com/nofeletru/UsbAsp-flash/releases/
What is your BIOS Chip ID, in case I need to advise you to use non-exact. However, if you go ahead with Linux/Flashrom I can’t help there so hopefully you can sort that out.
Will open the pc on Friday and report the exact bios chip
Thanks!
Update: The USB recovery method didn’t work again (all usb ports, 1GB fat32, rom/bin/.213 extensions tested). Computer still tries to boot from any source, restarts every 40 seconds or so, keyboard backlight is ON, but black screen and no POST.
I’ll read the chip and try to dump the un-erased data from it.
Currently I don’t have a Windows PC, so I tried flashrom and ch341prog tools for linux. I have found both.
Winbond BIOS and vbios chips, (bios one seems to be Winbond 25064fvsig
), however I have a hard time getting the programmer to detect the chip - READ light on the programmer doesn’t come up. Any ideas @Lost_N_BIOS ?
I also have installed usb drivers, the programmer gets detected using lsusb command.
P.S Waiting on a Windows PC to come up and try it as well.
when flashrom somewhat detects a chip (I noticed the programmer at that stage gets hot on its big chip, otherwise it’s cool), it outputs that
Found Generic flash chip “unknown SPI chip (RDID)” (0 kB, SPI) on ch341a_spi.
===
This flash part has status NOT WORKING for operations: PROBE READ ERASE WRITE
The test status of this chip may have been updated in the latest development
version of flashrom. If you are running the latest development version,
please email a report to [email protected] if any of the above operations
work correctly for you with this flash chip. Please include the flashrom log
file for all operations you tested (see the man page for details), and mention
which mainboard or programmer you tested in the subject line.
Read is not working on this chip. Aborting.
Thanks for your help!
For some reason the chip cannot be read. I tried under Windows with all popular versions of Ch341A programmer. I thought I have a bad linux driver, but the same result occurs with the windows dump. I have manually selected the Winbond 25q64fv chip, but reading is still invalid. Auto detect doesn’t find the right chip for some reason.
Note: I had to manually select the correct chip model. Auto detect won’t identify it ![]()
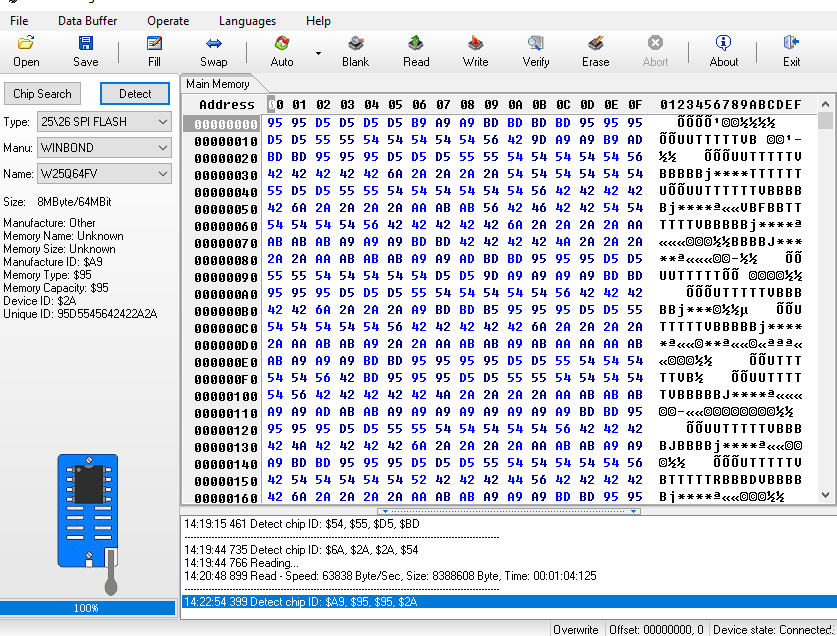
P.S below I also have the corrupted bios dumped via cha341 programmer 1.34
Any help is welcome.
Ended up buying a bios chip from bios depot on ebay. Old bios apparently was corrupt. Everything works fine now. Thanks for your support.
@xkwas - sorry I missed your post and didn’t get a reply to you in time. You need to use 1.30 or 1.34 as you did above, but choose W25Q64BV for that FV chip, otherwise always fails. Could also be you need to connect main battery and power cable, or remove them if already connected.
If you send me your dump I may be able to pull your serial and MAC ID so you can fix those. Glad you are back up and running at least 
@Lost_N_BIOS Oh god I wish I knew about BV instead of FV earlier, I couldn’t find that crucial info on Internet at all! That would make using the heat gun unnecessary. The change in the chip detection worked (v 1.34) and I have finally dumped the partially erased bios (ver .211). I hex looked it up and looks like it does contain the serial, but I’ll leave that procedure to the experts. One more thing to ask is, could you include whatever goods from my old extracted bios and ADD the NVME support driver as per described from that post, pls? ![]() Then I could reflash the new .213 with all info / drivers included.
Then I could reflash the new .213 with all info / drivers included.
One side note to consider with the new chip from ebay, although it worked ‘out of the box’, the keyboard backlight doesn’t work for some reason, even tho I’m pretty sure I have connected all ribbon cables…
Best regards to Lost_N_Bios for his great tutorials and godstyle knowledge!
G751JY.211-Original.zip (3.07 MB)
I’ve said it 100 times here probably, so sorry I didn’t get a reply to you in time  Usually dump will be OK, will verify, but write always fails. Or did you mean it wouldn’t work at all before with FV, and now you tried BV and have it working? If yes, great!
So above file is your dumped, broken BIOS? If yes, Good, I will salvage what details are there and yes, make you new BIOS with NVME Mod. Do you want anything else, like updated microcodes, unlock BIOS menus etc?
Yes, if your NVRAM is OK, your keyboard backlight will come on again too once I make you new BIOS. Hopefully it is OK, if not I will find dump from same model and use it’s NVRAM and get it sorted out for you.
I think I have several anyway from helping others fix and or update this model and or fix backlight too
Thanks for your kind supportive comments, I really appreciate it! Sadly, I have to run in a bit, so may not get this finished for you until tonight.
How did you put on the new BIOS chip you ordered? I planned to unlock FD on this BIOS I would send you, but to get that flashed in you’d have to pinmod or programmer it on (Rest/fixes = BIOS region, we can do with FPT so not a big deal if you don’t have programmer)
* edit, checking now, looks like NVRAM is lost (may be in broken padding file, still digging), but don’t worry we’ll get it sorted out.
LAN MAC ID (Ethernet) is missing from main location, do you have that from your router logs? If not, and it’s not in other areas, then you wont be able to use Ethernet until we can find.
I have replaced my old chip, thinking that it’s broken, with a chip from bios depot from ebay, coming with the latest 213 firmware. I’d love you to add the latest microcodes and bios extras, along with the nvme support driver. Above is my old corrupted 211 bios. Thank you very much and have a good one!
P.S I have a dump from the working ebay bios if you need any info from it, and yes, I have swapped the chips successfully using the heat gun method.
I assumed you did, I wondered if you soldered it in yourself (ie have solder skills, could remove chip and program in unlocked FD one, so you can FPT flash all regions easier). It’s not a big deal if you can, or even if you don’t want to, what we need to fix now can be flashed in via FPT as it’s only BIOS region
No, I don’t need dump from working ebay BIOS, that = stock BIOS same/same minus some checksums and info that would change once you started the system.
I found this, but your NVRAM is gone, we’ll have to rebuild from other dump (to get your backlight working again)
G3N0WU00898513D << Serial
90NB06F1-M06990 << Motherboard ID / P/N#
45502H010085611006D4WU250 <<< Some of this, probably UUID (20 digits, but unsure which parts)
930015366818 << Probably Ethernet MAC ID
211 << BIOS Version
Am I going to be able to just flash using a software tool, or I need the clips and ch341a programmer in action again?
You’ll be able to flash, but I think you need to unlock BIOS + SMI Lock first via grub. I wrote a guide for this, here, you can start at step #6 I’ve done info gather from 1-5 for you
[GUIDE] Grub Fix Intel FPT Error 280 or 368 - BIOS Lock Asus/Other Mod BIOS Flash
Rename .efi file to >> Shellx64.efi
SMI Lock variable to change >> 0xA2
BIOS Lock variable you change >> 0xA3
So at grub prompt you type the following one at a time >>
setup_var 0xA2 0x0
setup_var 0xA3 0x0
Then reboot and you will be ready. Here is what you will be doing once I send you BIOS, you can test now if you want, dump before doing above and then immediately test write back command (to see error)
Then once you do above unlock, do the write again and it should be OK without error
Check BIOS main page and see if ME FW version is shown, if not then download HWINFO64 and on the large window on left side, expand motherboard and find ME area, inside that get the ME Firmware version.
Once you have that, go to this thread and in the section “C” download the matching ME System Tools Package (ie if ME FW version = 10.x get V10 package, if 9.0-9.1 get V9.1 package, if 9.5 or above get V9.5 package etc)
Intel Management Engine: Drivers, Firmware & System Tools
Once downloaded, inside you will find Flash Programming Tool folder, and inside that a Windows or Win/Win32 folder. Select that Win folder, hold shift and press right click, choose open command window here (Not power shell).
At the command prompt type the following command to dump the current BIOS region >> FPTw.exe -bios -d biosreg.bin
Right after you do that, try to write back the BIOS Region dump and see if you get any error, if you do it’s expected 368 or 280 >> FPTw.exe -bios -f biosreg.bin
Additionally, after you do the unlock above, do this again and it should not give you error after you unlock
If you are stuck on Win10 and cannot easily get command prompt, and method I mentioned above does not work for you, here is some links that should help
Or, copy all contents from the Flash Programming Tool \ DOS folder to the root of a USB Bootable disk and do the dump from DOS (FPT.exe -bios -d biosreg.bin)
https://www.windowscentral.com/how-add-c…creators-update
https://www.windowscentral.com/add-open-…menu-windows-10
https://www.laptopmag.com/articles/open-…ator-privileges
Or here is simply registry edit that adds “Open command window here as Administrator” to the right click menu
Double-click to install, reboot after install may be required
http://s000.tinyupload.com/index.php?fil…134606820377175
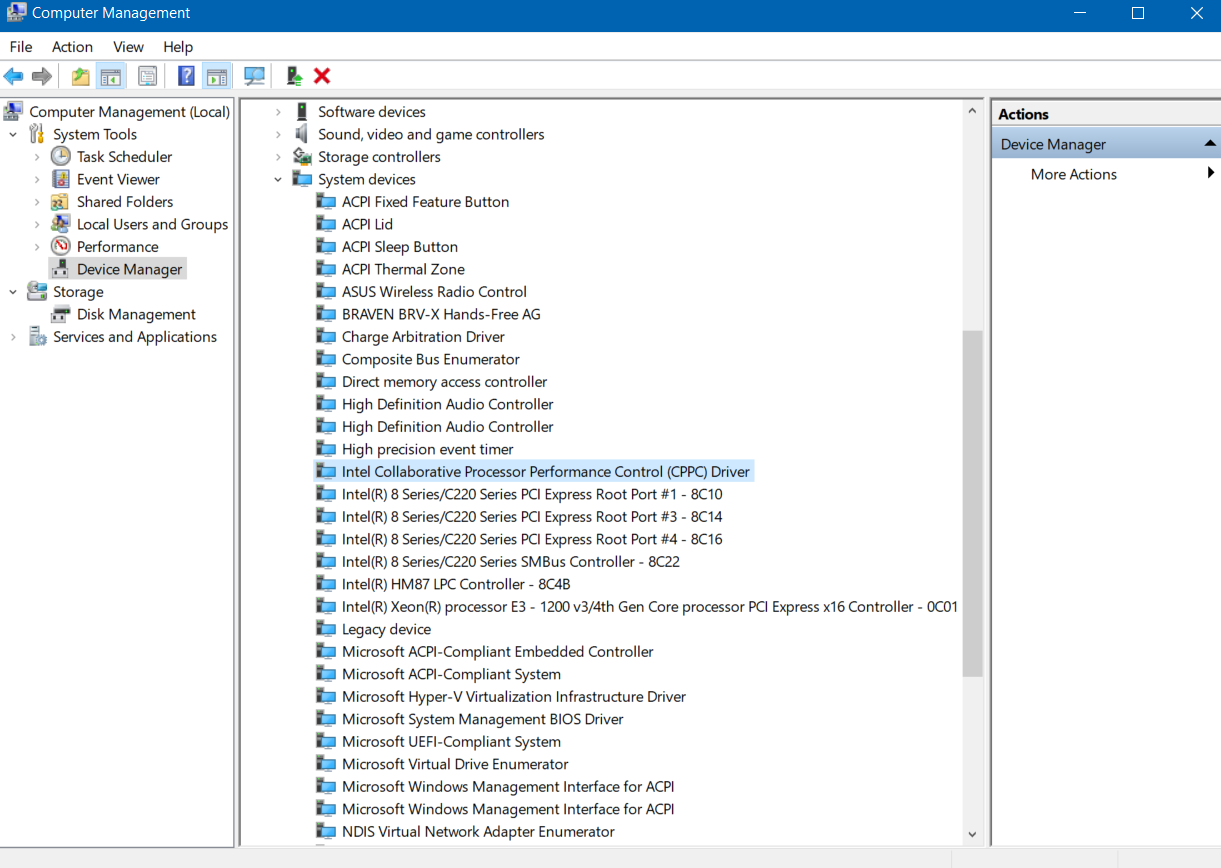
I wasn’t able to find Intel ME section on HWinfo64, nor aida64. I downloaded the official Intel detection tool - no luck.
Here are 2 screenshots from the tool and Device Manager.
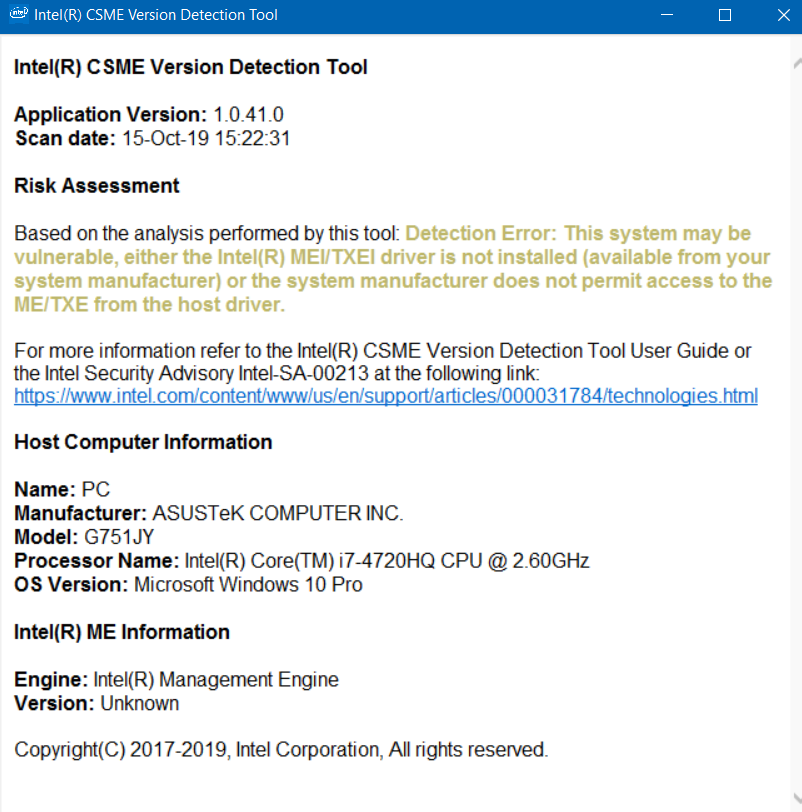
I could not install Intel ME (Error Platform not supported), but I have tried the tools from section C and version 10.0 r7 could successfully dump the bios file. Should I next try to flash the file and see if I get either 368 or 280 error? If I don’t get any of these errors, am I good to go with flashing the modified bios with added extras? Thank you very much!
Yes, ME FW is corrupted. You will have to use FPT from DOS, or get out programmer again to fix ME FW. And, I assume FD will be locked still, so ME FW update is huge hassle with locked FD and corrupted ME FW, so will be easier and quicker to just use programmer.
Before I make you new BIOS, can you confirm your LAN MAC ID from router logs, or did you always use wireless LAN? There is maybe some stickers on the board that would have this, on/under memory or on memory slot maybe
D0:17:C2:AF:9B:40 - that’s my LAN mac according to my router logs (looks like it didn’t change from the old bios)
I can make a bootable DOS USB, doesn’t sound scary to me ![]()
And yes, ME FW version is missing on the main bios information page.