I managed to Flash the BIOS and my System is back in business.
My computer is completly restored, but i dont have any idea how to get into to the BIOS Setup since the F2 Key didnt work anymore.
NVMe Drive is fully recognized and the System Boots much faster now.
Do you have any Idea how to get into the BIOS Menu, since i also wanted to boot Linux from another Drivebay.
Hitting the F2 key after Start Buttom doesnt work.
Thanks in advance
Chris
------------------
Ah yes, KeyboardBacklight switches on at Startup and than switches off and stays off. Also the Control for Brightness and Volume is gone.
----------------------------
Sorry all my FAULT… the keyboard ribbon cable wassnt attached quite right… now all functions are working… very nice. I have to thank you a lot. Even Windows dont need a reactivation. OK Motherboard serial number is standard but doesnt matter. Again many thanks for modding my corrupted bios.
I will give you a donation via paypal. please send me your paypal adress in PM.
Greetings
Chris
-----------------
Is it possible to set the System Configuration SPEED Settings (CPU Multiplier) and other Configs in the BIOS to unlock and access?
I don’t have this option, however I do +200mhz and -60mv undervolt at Intel XTU
@chris_tronic - Great to hear all is back in action and working smoothly, sorry to hear about the struggle with keyboard cable
Serial, UUID etc should all be correct, the BIOS region is your original AFU Dump and nothing was changed or removed other than unrelated stuff in the DXE volume to sort the NVME insert properly. Padding where serial, UUID etc is was not touched.
Some stuff is always standardized (0123456789 etc) in Asus BIOS, depending on what you look at serial/UUID with, but it should show up properly with certain tools and or in BIOS Main page.
You may need to clear CMOS and reload defaults, but even your original NVRAM is in place too. It may also help to now reflash stock BIOS using stock method, and or update to latest BIOS 213
See here below, this is your AFU dump on right and BIOS I sent you on left, area where system info shown in each = same/same
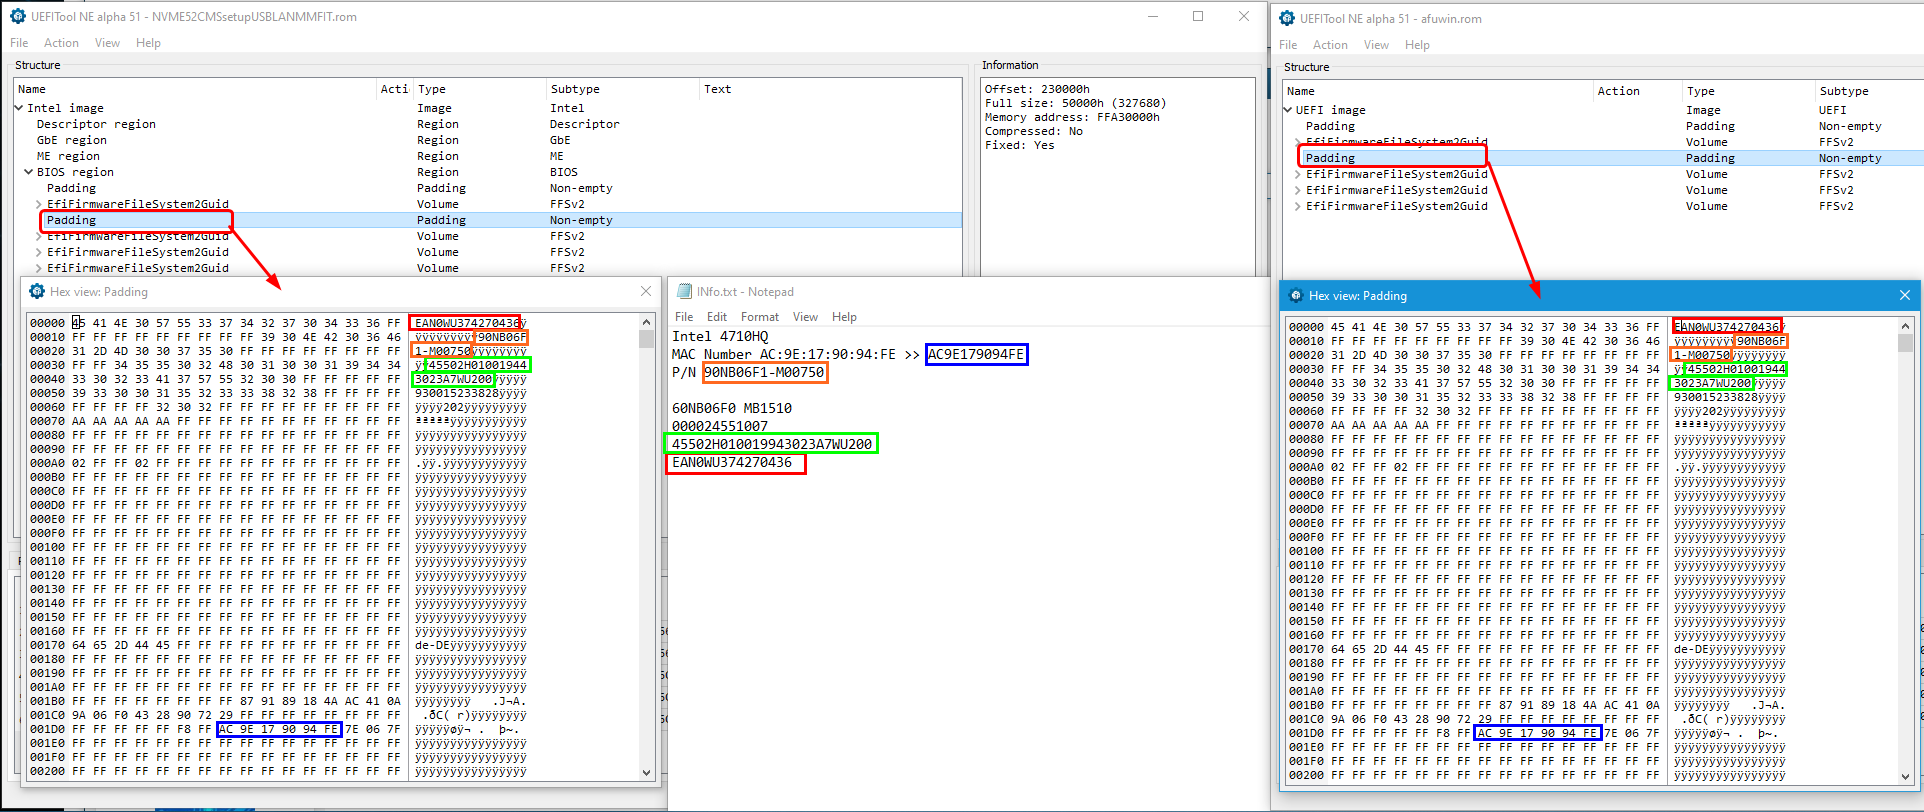
Check BIOS main page, do you see serial properly there? Also, run the commands below, do you get standard info or correct info?
wmic csproduct get name,identifyingnumber,uuid
wmic baseboard get serialnumber,product,Manufacturer,version
wmic bios get name,serialnumber,version
If it’s messed up, we can fix, but I’ll have to figure out where and why it’s not correct - you’ll need to dump BIOS again but now we can use FPT instead of programmer. I can show you how to dump with FPT, if it comes to that, then we can sort it out that way
I’ll send you a PM, thanks for offering to send something my way 

On your last post, do you want unlocked BIOS menu, is that what you mean? If yes, I can unlock menu for you 
Can you see Performance Tuning submenu at Advanced? If not, the following settings are there, we can reveal for you if you need
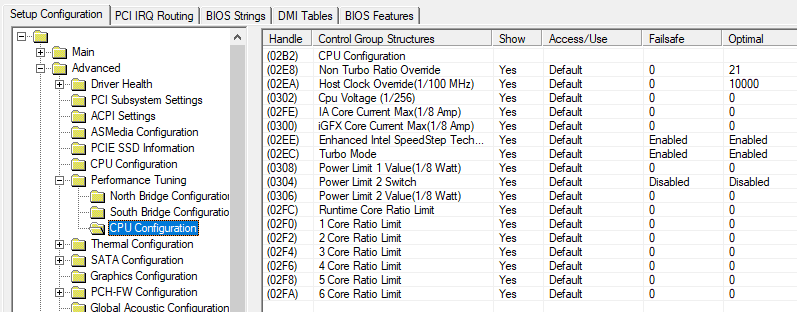
Refresh page to see edit above
Evrything looks pretty nice with the wmic commands… seems to be restored to original again. I can be glad to have made a Bios Dump before bricking and than to have some friend knowing how to fix such complicated things. BIOS programming is not easy stuff, you need to have a lot of experience. As this was my first BIOS Programming with a Cable Programmer I can be lucky to be successful. Also this Asus Mainboard need no extra resistance soldered onto the board to be able to read and write the bios chip as other boards my need. The only thing i recognized was that at least one module of ram must be present for start the notebook otherwise blackscreen…
And the NotebookBattery must be attached in order to program the BIOS otherwise the programmer becomes very hot, maybe it can not deliver the necesssary power…
Its a pity such high quality notebooks doesnt have either a socket for the BIOS to take it out nor a second recovery BIOS chip… Maybe just marketing and source to earn money later… for repair and rma
And yes, I would like to have those extra menus to be able to set my CPU multplier, so i dont need the intel Extreme Utility at startup… would be appriciated.
Thanks again.
Christian

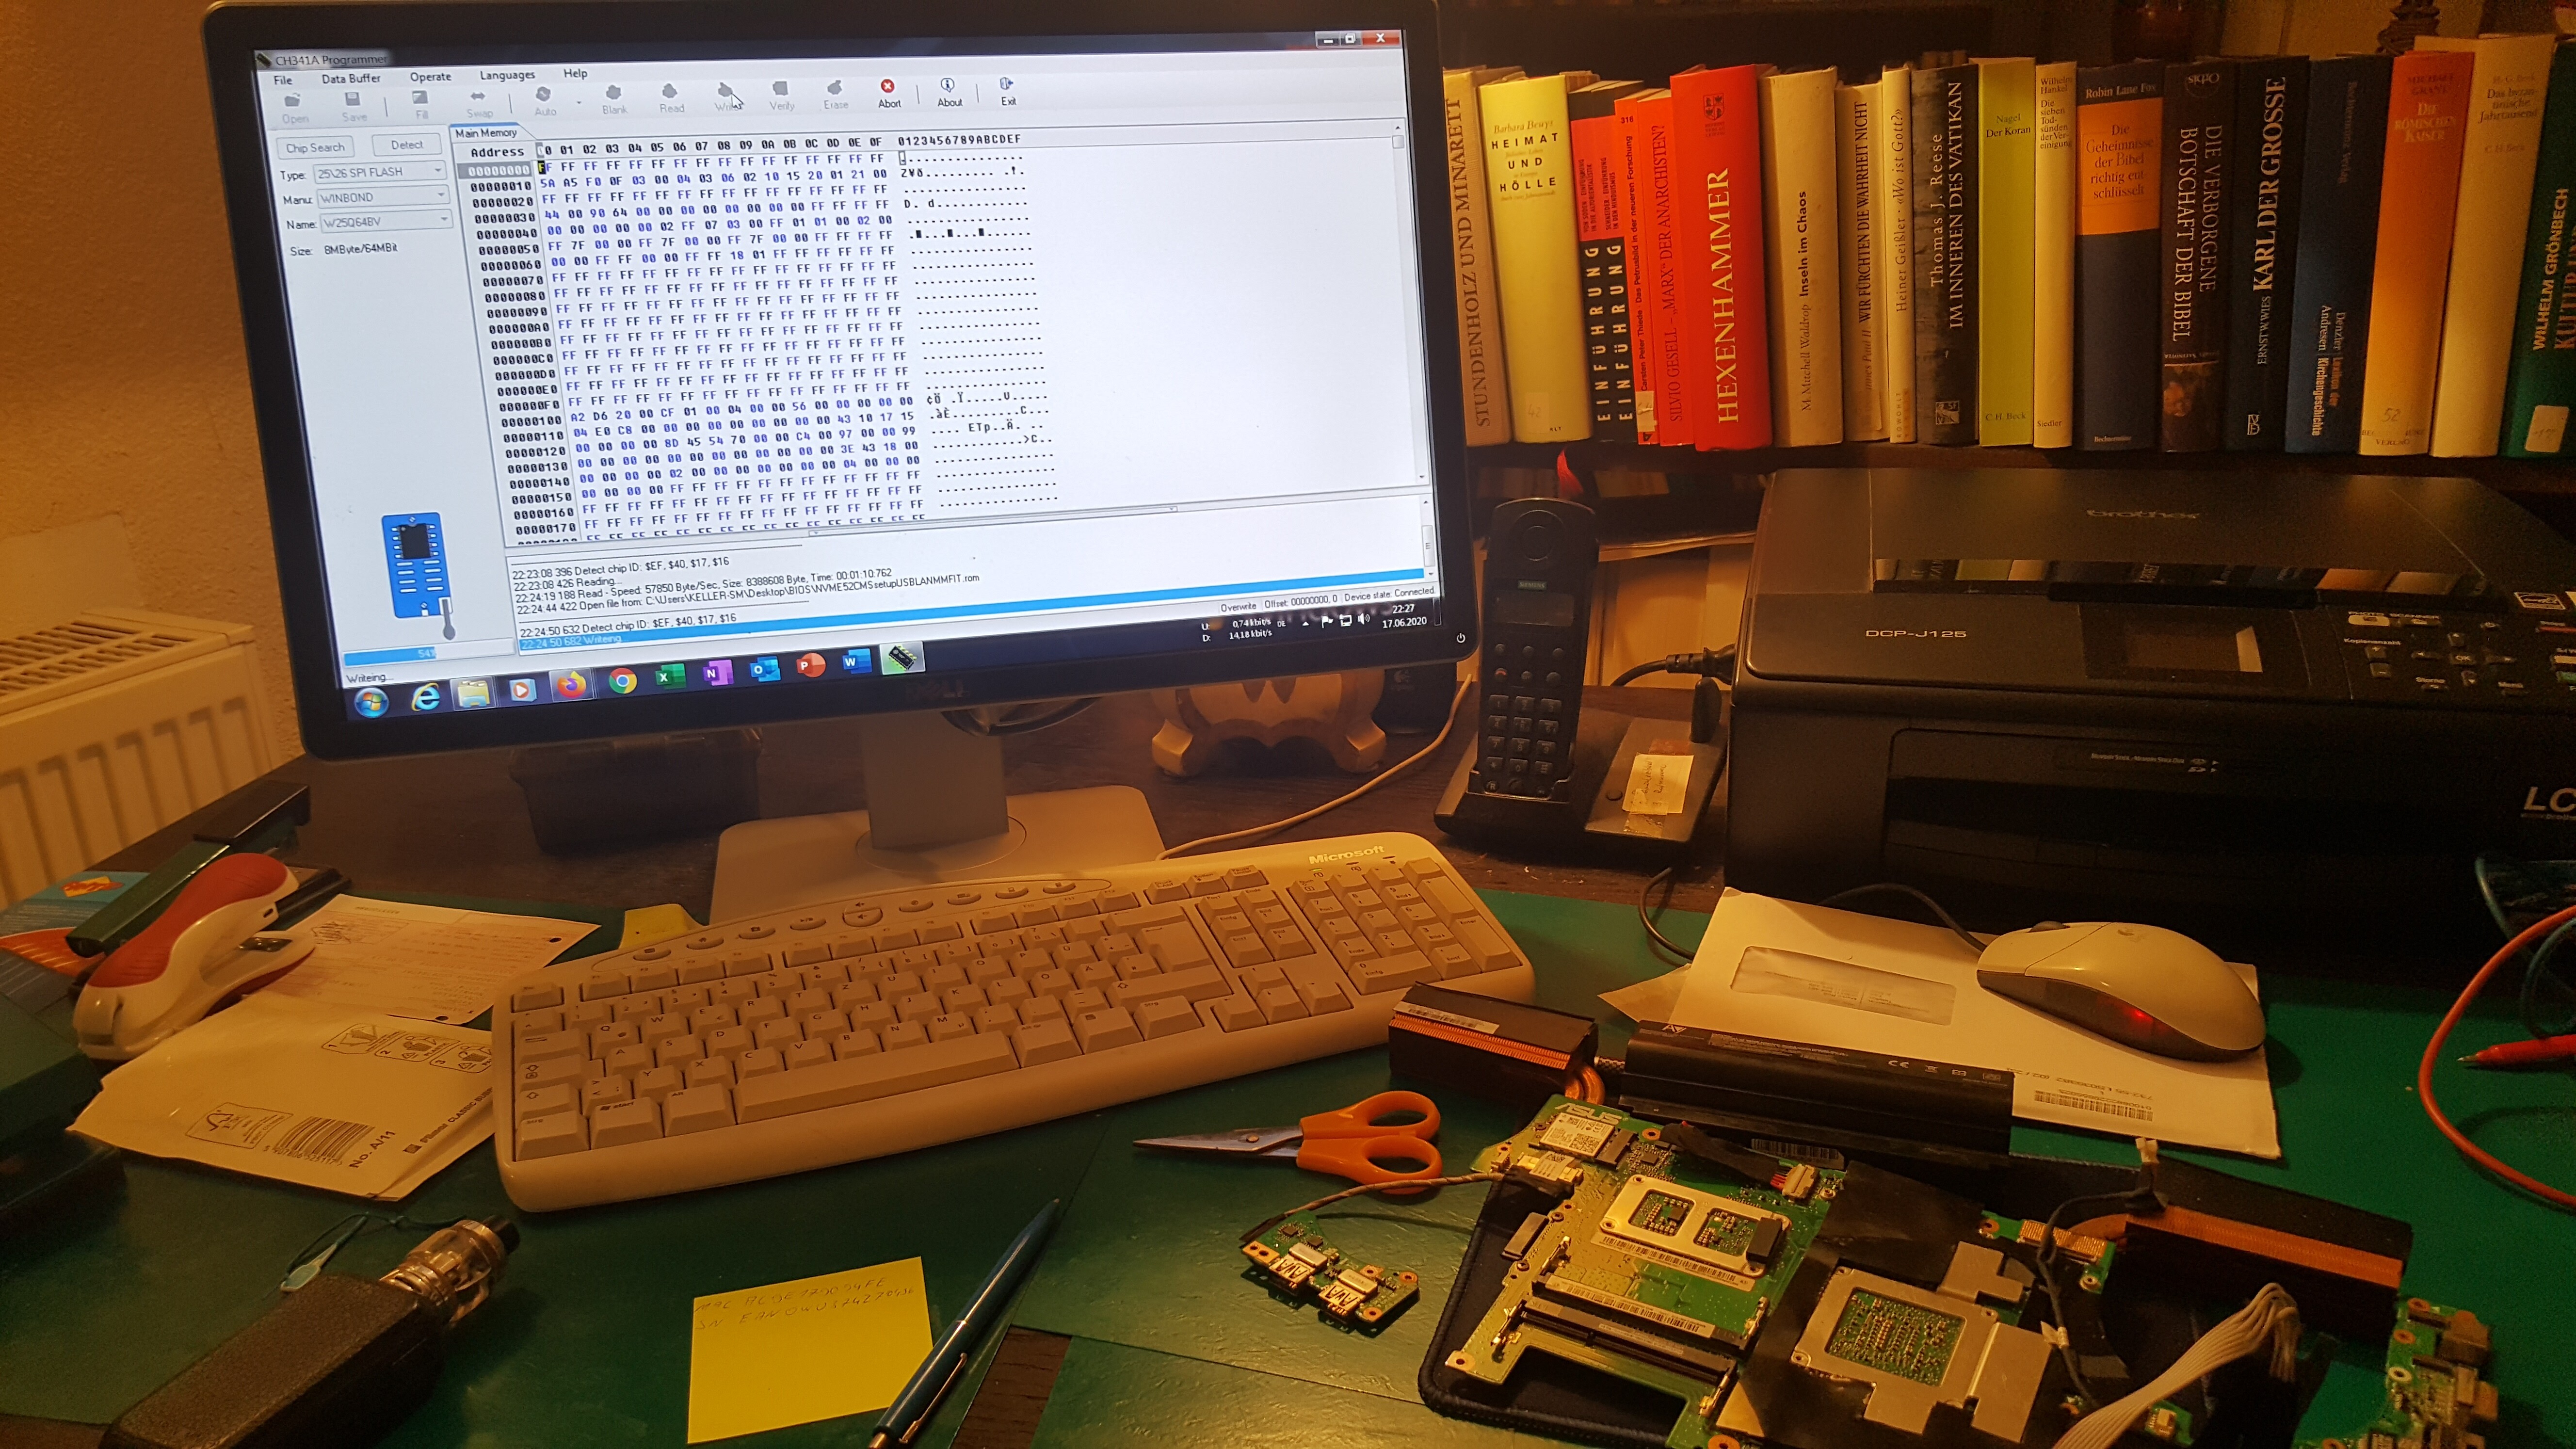
@chris_tronic - You’re welcome!! Refresh page and see my edits above, in case you missed anything I edited in after my initial post
So, all info is correct in WMIC commands then, right? And BIOS main page, serial is correct?
Yes, good thing you had dump from before, that made things easier on my end, but I could have still fixed all properly with sticker info.
Some stuff would have had to been recreated/not-original though, but serial, model, and MAC would have been same as before
BIOS programmer is easy to use, once you use it a few times you’ll get more confident in using. But, best to safe for only when you need, and flash using other tools like FPT when possible
Yes, memory must be installed in all systems, or no boot 
Probably yes, some systems need battery or PSU connected when programming, others need one or both removed. It’s tough to fit socket into laptop, and cheaper to put chip on board too, so that’s why they do that.
For the menu edit, do you want to program again, or do you want me to show you how to use FPT (Intel Flash Programming Tool)? If you want to use programmer, either make a new dump and send to me, or tell me to edit the BIOS I sent you previously.
If you want to learn how to use FPT, info is below, send me BIOS region dump you get at step #1 and tell me what error if any you get at step #2 (error expected, I will help you bypass)
Go to the thread linked below, and in the section “C.2” find and download the V9.1 ME System Tools Package
> DOWNLOAD " ME System Tools " packages HERE <
Once downloaded, inside you will find Flash Programming Tool folder, and then inside that a Windows or Win/Win32 folder (NOT x64).
Highlight that Win/Win32 folder, then hold shift and press right click. Choose “open command window here” (Not power shell! >> * See Registry file below *).
If you get an error, reply to this post with a screenshot of it, OR write down the EXACT command entered and the EXACT error given.
((If “open command window here” does not appear, look for the “Simple Registry Edit” below…))
Step #1
Now you should be at the command prompt.
You are going to BACKUP the factory un-modified firmware, so type the following command:
Command: " FPTw.exe -bios -d biosreg.bin "
>> Attach the saved "biosreg.bin ", placed into a compressed ZIP/RAR file, to your next post!!! <<
Step #2
Right after you do that, try to write back the BIOS Region dump and see if you get any error(s).
Command: " FPTw.exe -bios -f biosreg.bin "
^^ This step is important! Don’t forget! ^^
If you get an error, reply to this post with a screenshot of it, OR write down the EXACT command entered and the EXACT error given.
Here is a SIMPLE REGISTRY EDIT that adds “Open command window here as Administrator” to the right click menu, instead of Power Shell
Double-click downloaded file to install. Reboot after install may be required
> CLICK HERE TO DOWNLOAD CMD PROMPT REGISTRY ENTRY <
If the windows method above does NOT work for you…
Then you may have to copy all contents from the Flash Programming Tool \ DOS folder to the root of a Bootable USB disk and do the dump from DOS
( DOS command: " FPT.exe -bios -d biosreg.bin " )
For Menue edit more better to use FPT, as i dont want to disassamble the notebook again… lot of hassle…
but for now i need e rest… maybe back in 6 hrs…
@chris_tronic - OK, I’d prefer you use FPT too 
No rush at all, we’ll get to it! Can you please, if you’re still here, before you go, send me one image of the root of Advanced BIOS page, so I can see all submenus visible to you there now. You may need to scroll up/down, please put images in a zip, thanks 
here are the pics… not have scroll down option…
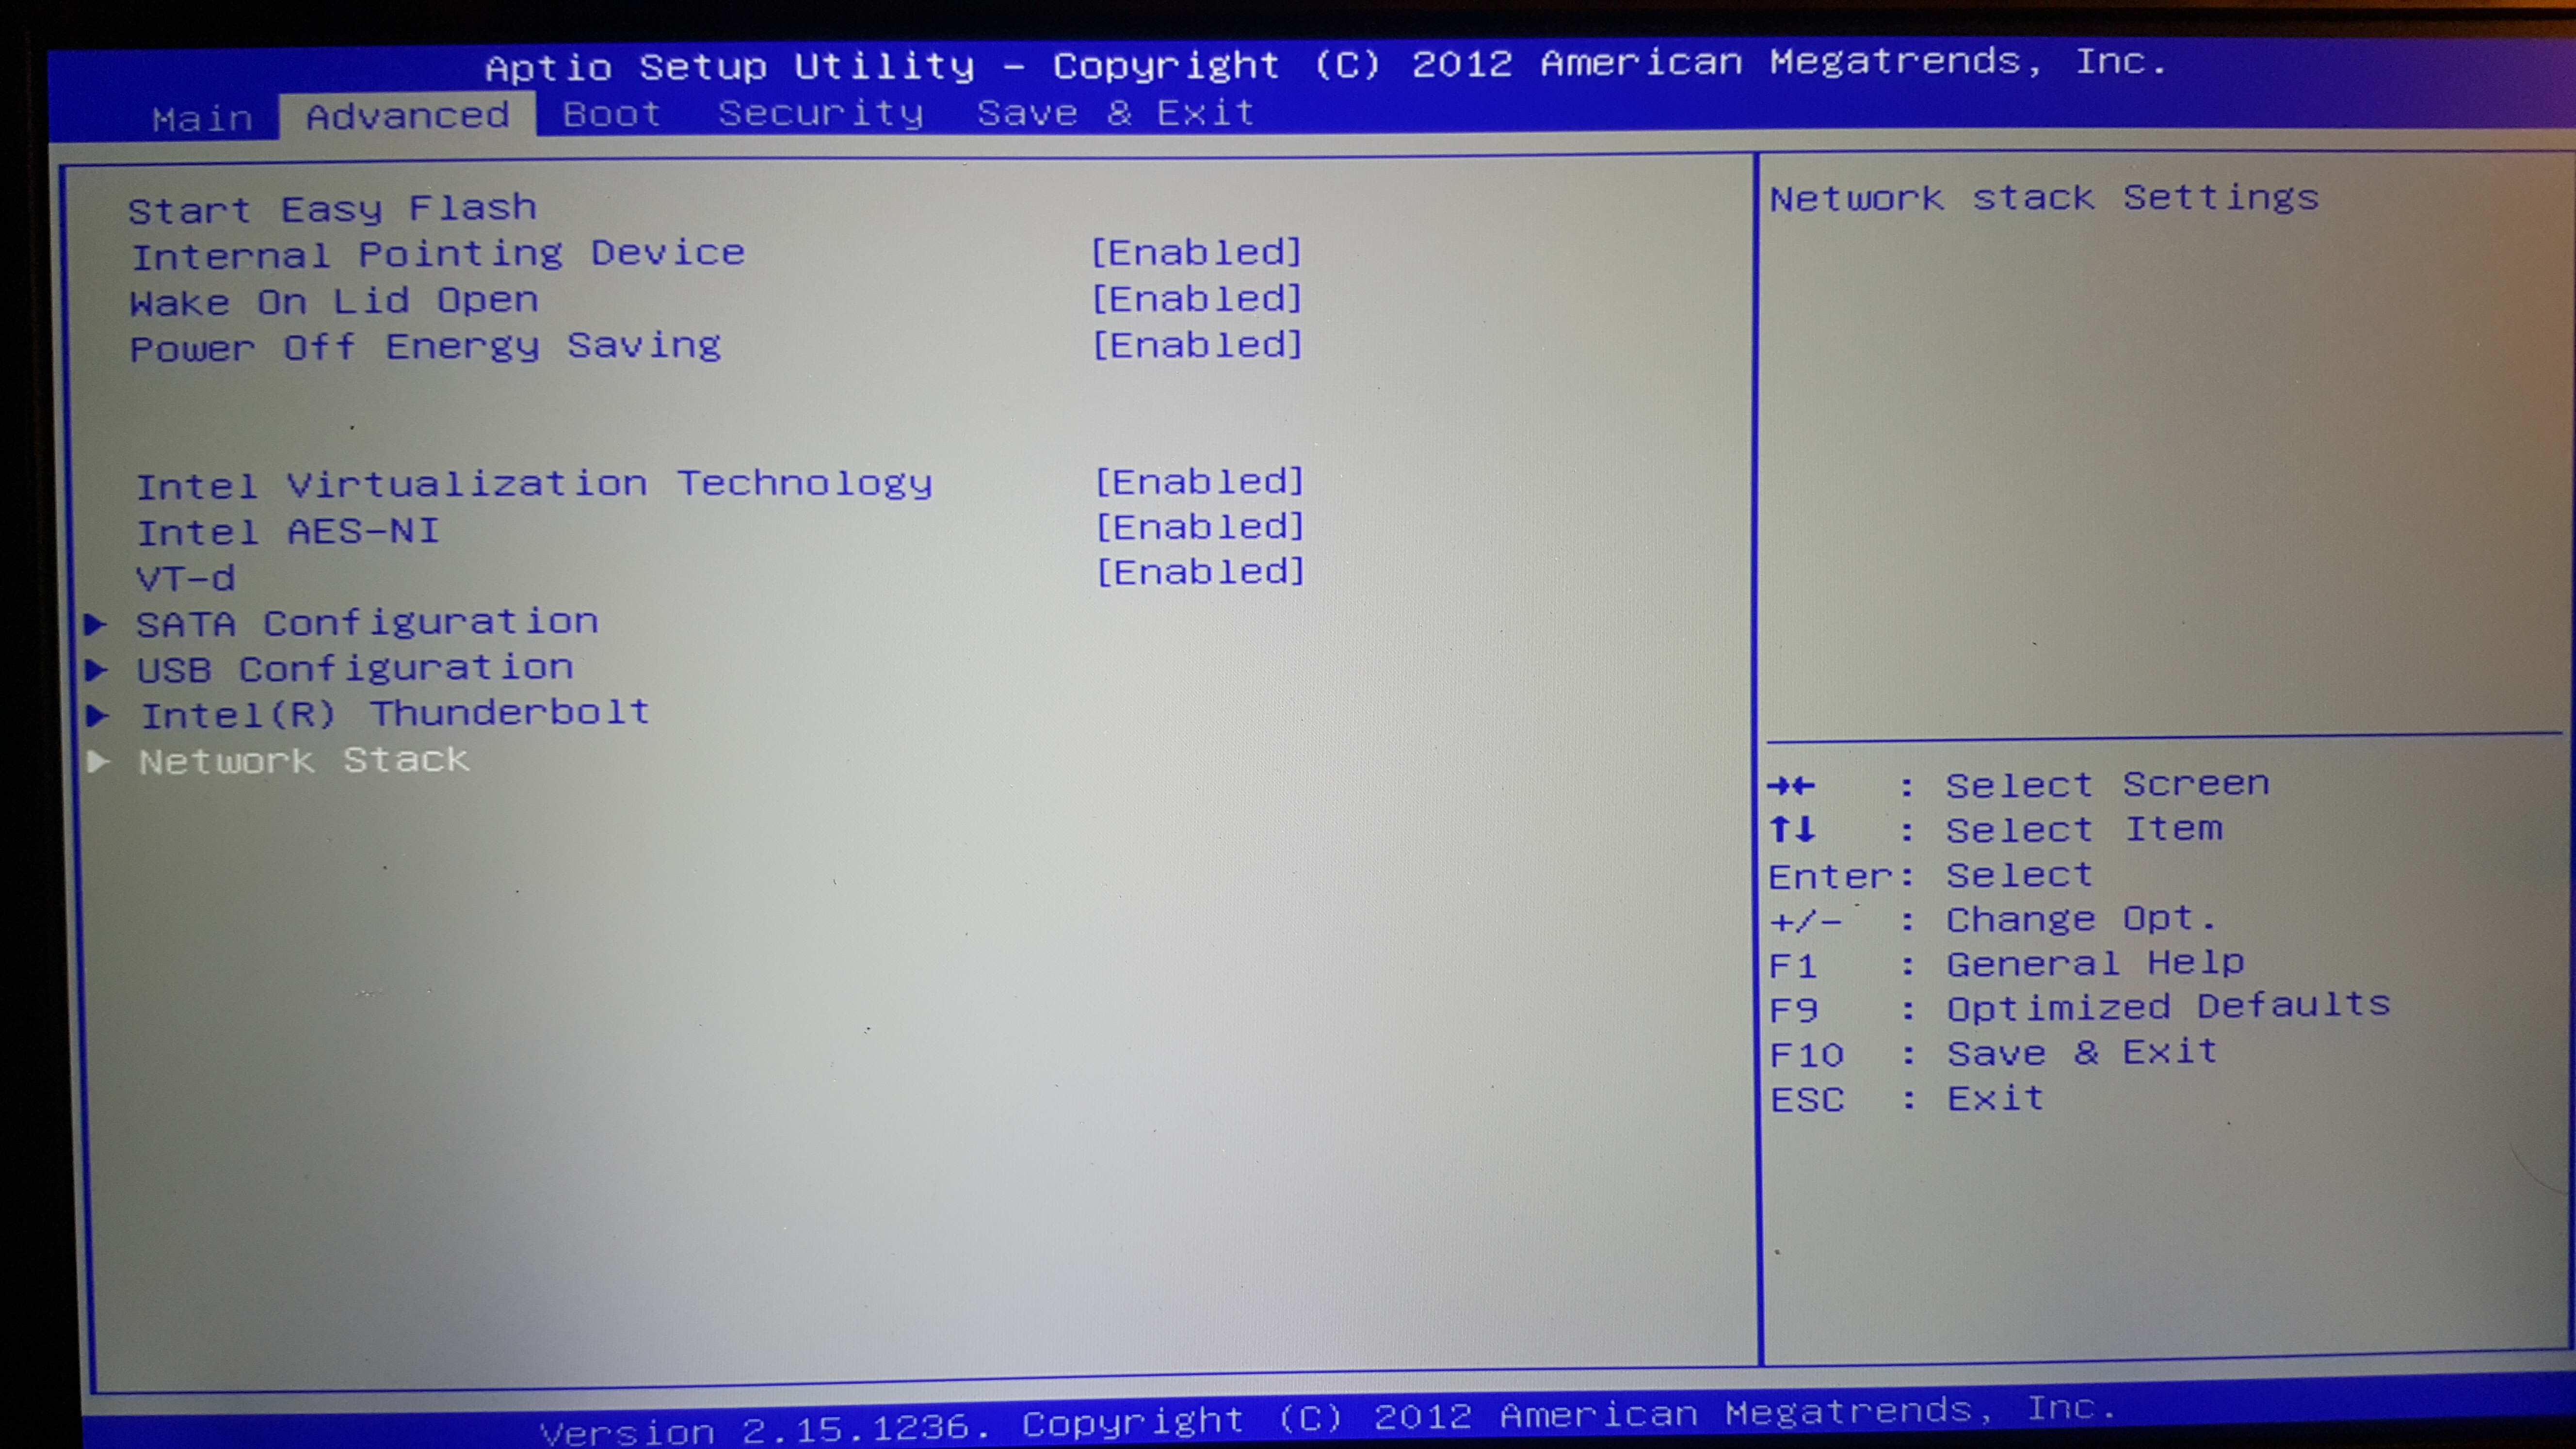
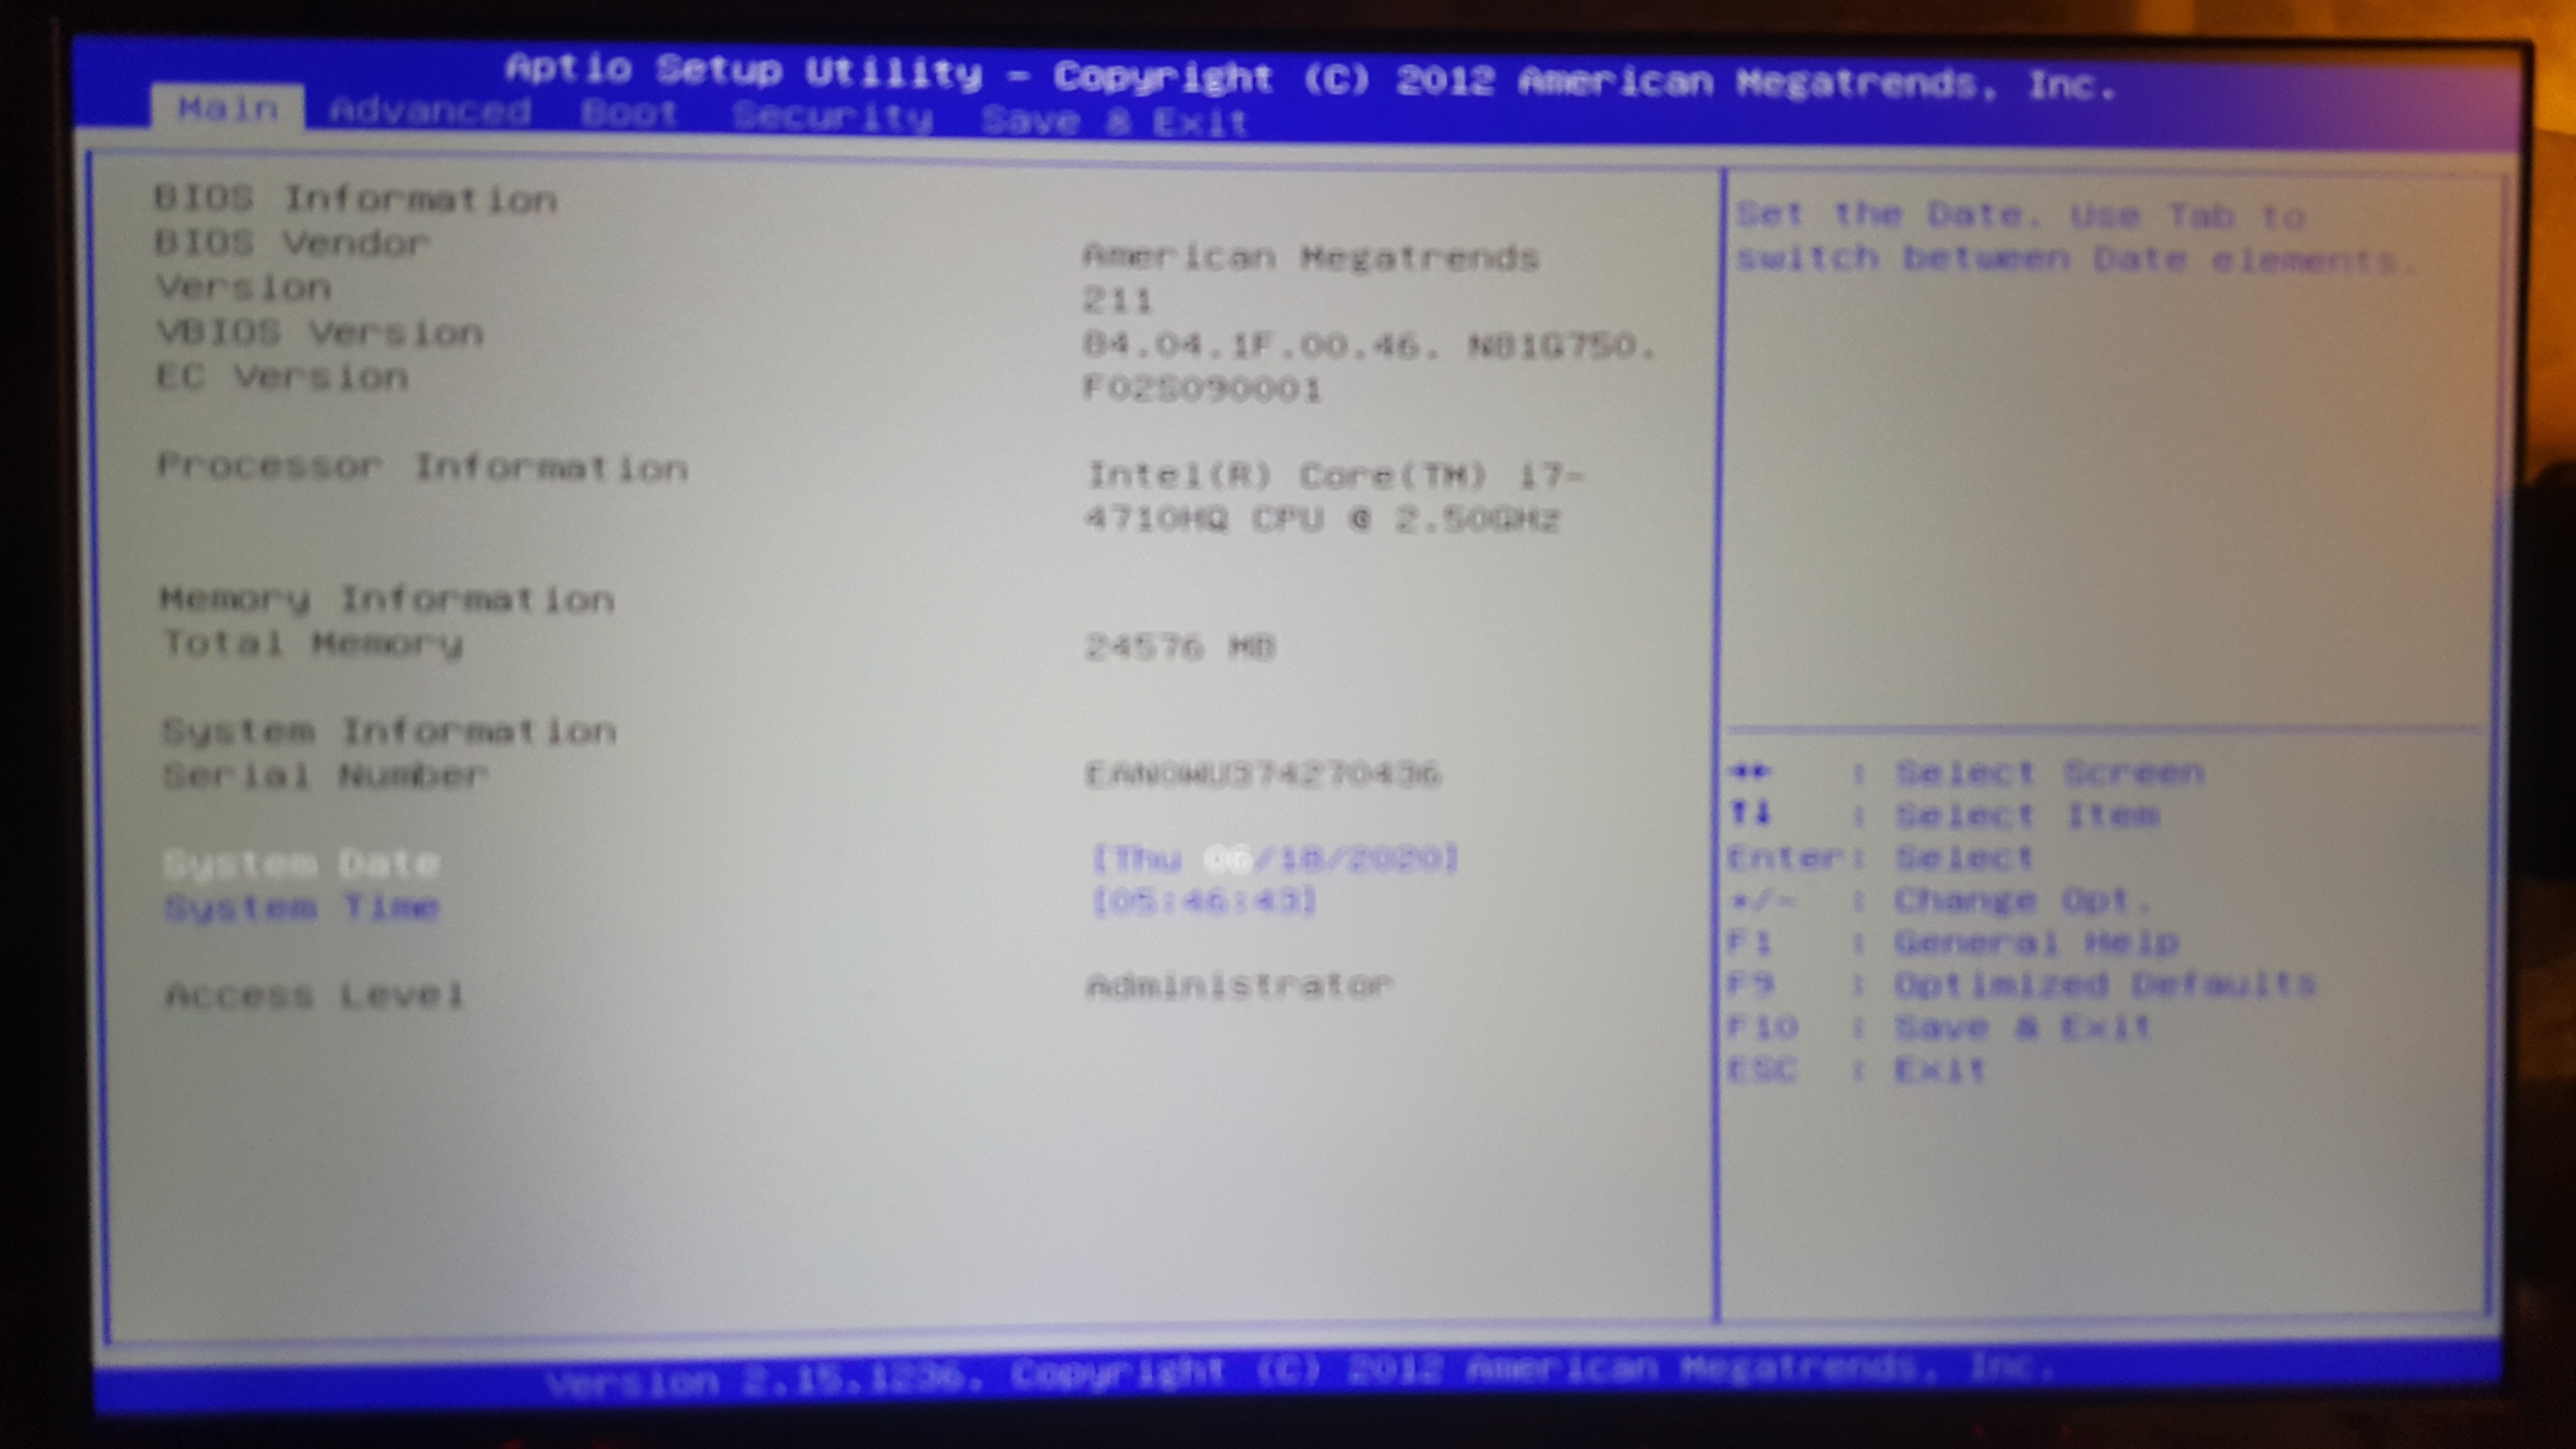
I meant you may need to scroll up/down and take two images, to show me top to bottom at root of advance, but I see lots missing so yeah scrolling not needed there
Thanks
Since I need to repair a Flex Cable locking Clip that broke away ( https://www.mouser.de/datasheet/2/276/1/…ORS-1600700.pdf)
I intend to flash the BIOS directly with the programmer again. So I dont need to hassle around with protected BIOS Regions at all.
Surely I need to take out the Board again and prepair everything for flashing again… but it seems to me the best solution. I just ordered a new Flex Cable Board and try to repair my onboard broken one with it. Its really freaking me, as there are no spare parts in Germany and they must be send around the world for just a little clip of plastic…
These plastic clips are really sensitive and must be carefully handled unless you want to sit oround with a mainbord that is not possible to connect to flex cables anymore… like me now…
I just taped the cable and hope not come loose…
So I think in about 4 weeks I will receive this tiny clip of plastic and than repair my board together with flashing.
Please let me know what files you need to unlock my BIOS Advanced Settings…
Greetings
Chris
---------------------
By the way, is it possible to enable GSYNC for my ASUS G751 JY ?
Maybe by flashing a new Video BIOS?
My board is REV 2.0 and I know the GSYNC Models have REV2.5… but I also read about a leaked driver that enabled GSYNC on the older ASUS G751 without GSYNC… So it must be a softwore issue i guess… Since those GSYNC Modules are not build into the Notebook but using maybe modified EDP Standards…
Greets
Chris
@chris_tronic - Hopefully your tape will hold
GSYNC - I’m not sure, I assume for laptop it’s done on GFX chip, WIKI says by shader instead of other chip like on desktop boards/monitors etc
So yes, maybe some software, or it could be in vBIOS
Here, please test, show me Advanced root page now, and let me know if you can see Chipset menu or not. May need follow up edit, so leave system apart if possible
http://s000.tinyupload.com/index.php?fil…772298496314837
* Edit - Sorry, I forgot, and just realized!! I will have to do major menu edit to make “Performance Tuning” visible to you. I will have to swap for some other submenu you don’t use/care about, please pick one that you don’t need…
Actually, I think there is a few I left hidden because useless or no real setting inside, so I can use one of those. So, once you show me new image of ADV and Chipset if present, I will get to work on this submenu replacement
So i have the Asus G751JY (4710HQ, 980M) laptop. My bios did brick after flashing 213 bios update. I already have the ch341a programmer and i did backup the original bios. My bios is: Winbond 25x40cln1g (4MB)
I wanted to flash a new bios from Asus site, but the size of those are 6MB and my bios is only 4MB. Is it somehow possible to shrink the size of bios? Somehow the backup bios is 512kb i think it’s corrupted and it looks weird when looking with hex editor.
@Chuck6 - BIOS for this board is 8MB chip, so your dumped 4Mbit chip contents above cannot be the BIOS, that is only 512KB
Please locate other chip, W25X40CL is 4Mbit = 512kb chip (as you can see by the file size) << The contents of your dump say Prema-mod, were you trying to flash in some non-official (not Asus) BIOS/EC FW package?
If yes ^^, you may have problems using other BIOS with that EC FW in there, you’ll have to send me entire Prema BIOS/EC FW package so I can create you proper full BIOS. It may be OK to use the Asus official one with that in EC FW chip, I am not sure, we’ll have to see.
BIOS chip will be 8MB, so will have “64” in the ID for 64Mbit/8MB - Once you locate, let me know the BIOS ID, so I can tell you what software/version to use, not all software can read or write to all chips properly
I have already helped many users recover this model, so I’m moving your post to that main thread 

4mb is the vbios?
I had problems reading the main bios chip (8mb) until I connected the big battery connector to the motherboard and then readings were legit.
@xkwas - I don’t know what is vBIOS here, I don’t think anyone has dumped any vBIOS and sent to me, so I can’t say for sure. What I mentioned above was not 4MB (32Mbit) though, it was 4Mbit (512KB) chip he dumped that I was replying about.
I doubt any 4MB chip is vBIOS, that is too big for vBIOS chip generally.
Thanks for heads up on the main battery needing to be connected for programmer 
@Lost_N_BIOS Oops my bad that was actually vbios 
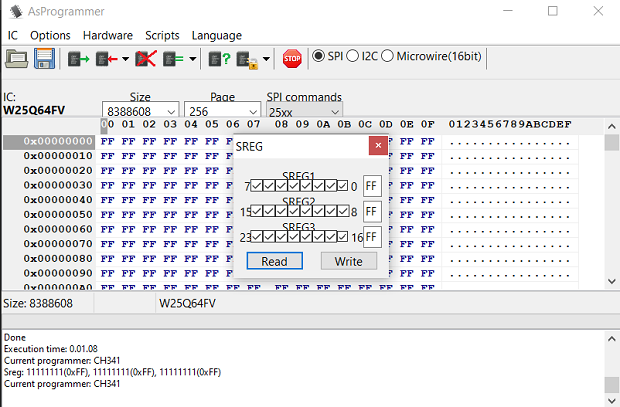
Connect the laptops main battery. Then with the ch341a reader’s clip push all the way down to the motherboard, and then release the clips to lock in slowly. It’s a little tricky. As far as I remember there is a solid LED light when all 8 pins are connected. Otherwise the light is not as bright and it flickers. Make sure you also have installed the drivers, it’s pretty easy under windows. I’ve tried Linux with success too, you have a better output of the connection there, but windows overall is easier.
Edit: I also remember with the widows software, the chip might not have been selected to **FV, but another one for successful readings.
@Chuck6 - It’s not vBIOS either
For W25Q64FV use 1.30 and W25Q64BV ID - But, the above image shows incorrectly connected chip (need reclamped, or you need to connect main battery or PSU etc)
http://s000.tinyupload.com/index.php?fil…213094641136166
@Lost_N_BIOS Thanks for helping me! Can you make me a new bios? I managed to get the bios from that chip finally! It says a "enter password" when trying to boot up the pc, so i wanna get rid of that.
g751jy original bios dumb.rar (3.17 MB)
@Chuck6 - You’re welcome! So, you have it booting now? if yes, great! So, about the password, was this not your laptop originally?
If password is stored in BIOS, I can help you to remove it by editing your system details into a stock BIOS, but if it’s not stored in BIOS this will not work and password will remain.
Is the above dump your BIOS, meaning this has your correct serial, UUID, MAC ID etc?