ok. soo what to do next time not to losse all ?
yup. serial number also got wiped.
its a noob question. do i need the serial number ? for whatever reason ? mainboard doesn’t have any warranty.
thanks alot.
@filip1404 - As expected  Serial and UUID are only used “Sometimes” for warranty purposes (usually they use sticker, so no issue there) and “Sometimes” for certain software activations
Next time you need to transfer this data yourself into the stock BIOS you modified. Do you have ANY dump or backup of your BIOS from BEFORE you did any of these recent flashings of mod BIOS in non-standard way?
It can be made with any software or method, at any time in the past, just needs to be before you flashed in this mod BIOS with /GAN
Then I can show you location of this data and how to transfer it into your current BIOS
no…very stupid from me. i didn’t do any backup of the original bios. i saw gan is a force way to flash,but didnt know that can wipe all info like mac and serial. ![]()
@filip1404 - So, no backup ever? If not, it’s OK, we can still fix, but only with newly generated UUID.
Serial and MAC you can give me, via images of all stickers on your board (don’t miss ones on side of 24 pin, and top/bottom sides of PCI/PCIE slots), and the long white one on the PCB. Please put in max compressed zip
Then send me your mod BIOS, and I will edit in all info into proper areas, and then you reflash it again with AFU /GAN.
Or, better method would be as you see at post #2 here, if you are on BIOS 1302 - [Request] Asus PRIME Z270-A Biosmod
Do that, send me file from Step #1, and do the following step and send me that file as well >> FPTw.exe -gbe -d gbe.bin
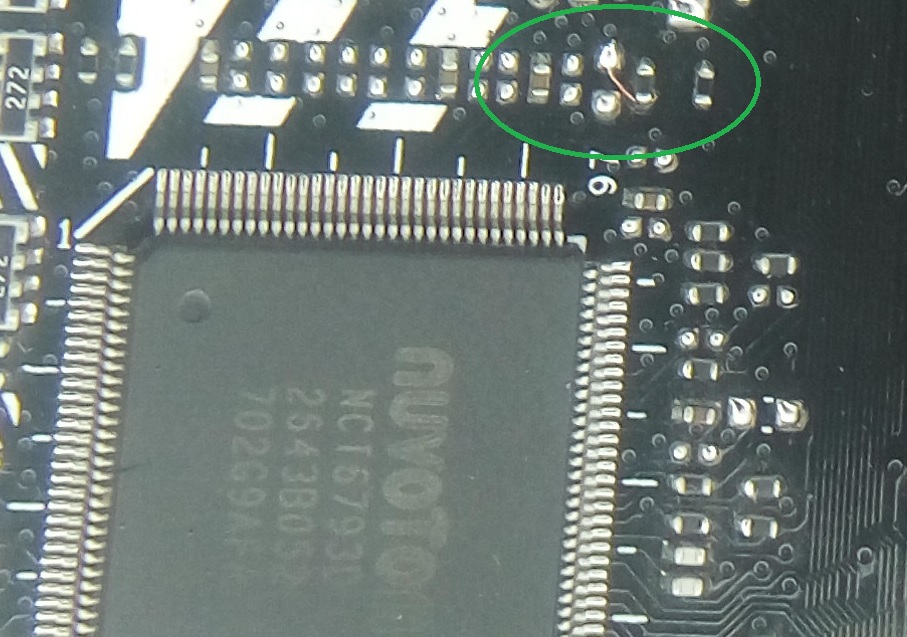
@Lost_N_BIOS - yes i mean connect two green pad .
Where is SKTOCC usually?
And how can I find boardview my motherboard? Dump from BIOS?
@MrCjxer - SKTOCC can be anywhere on the board, front or back, it could even be under heatsinks if there is large heatsinks on there. It may not be labelled at all, so you may never find.
You have to do this, OR connect two green pads on CPU, it’s a must or board will never know CPU is installed in socket (SKTOCC = Socket Occupied)
Boardview is only found in google, or if you can talk BioStar into giving you one. Good thinking, I will look around for you
No luck, for boardview or schematic, not even on paid sites 
@Lost_N_BIOS - 1 ** if i don’t connect two green pads or SKTOCC connect to ground, PC/board never turns on ? or turns on but turns off after a few seconds ?
it is biostar … always you CAN NOT find details …( boardview or schematic)
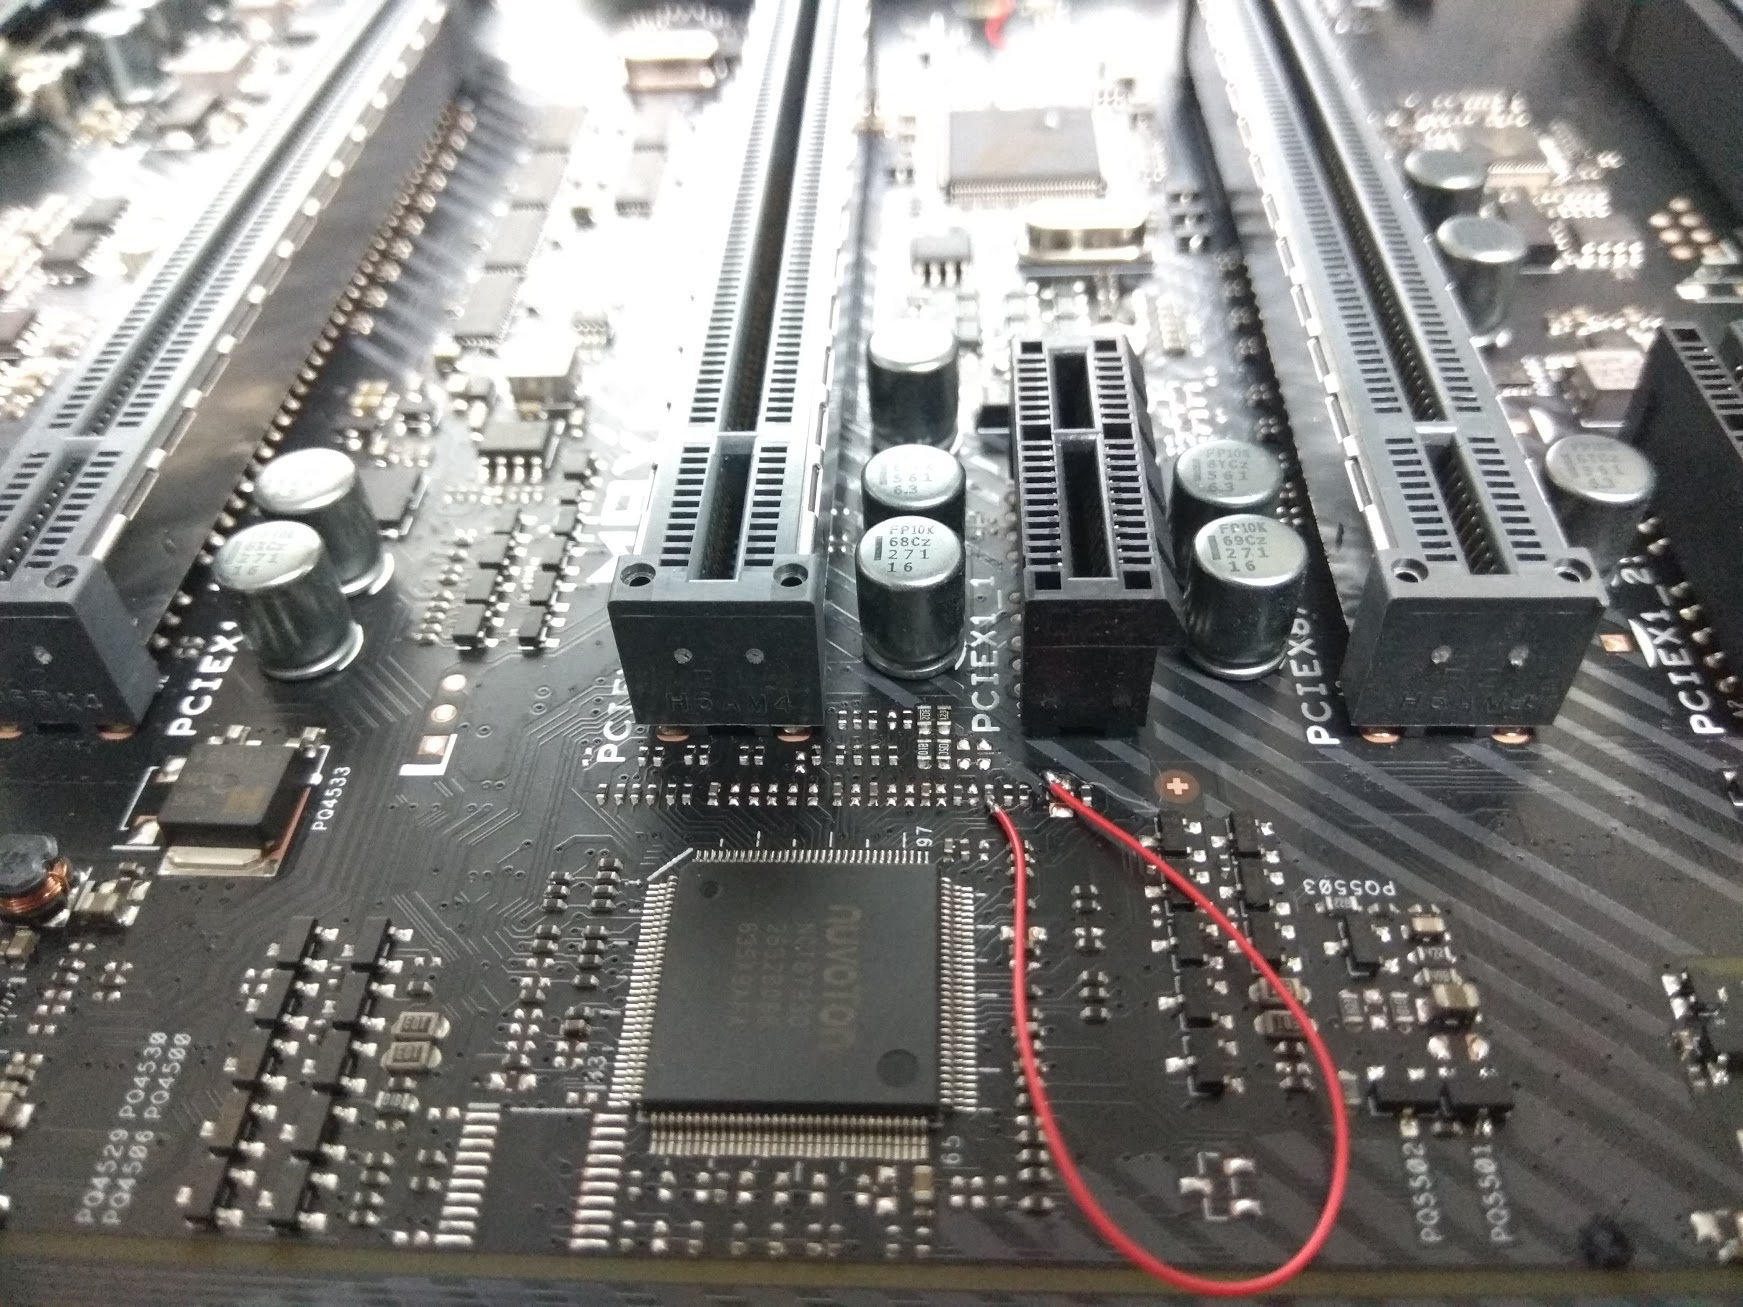
i think my SKTOCC it looks like these two . Next to the graphics card socket . but it is harder than connect two green pads
@MrCjxer - Yes, if you do not find SKTOCC to mod, and you do not connect pads properly, system will not start.
It will act/function in same way as it does it you start it without any CPU installed - test that, if you need to see how your board acts, they all do not act same, some run/start with no CPU, others wont
That is Asus board in second image, what is first image from? You can’t use other brands or models, you have to find your exact model hard mod image for this.
Maybe some BioStar would be same/similar, but it would not be anything like Asus mod location. And yes, if you cannot solder, then SKTOCC mod may be harder for you than connect the pads on CPU.
@filippos96 - You didn’t answer my question, same as I asked you last time, what do you need done there? If you need unlocked BIOS menu, then you need to follow the FPT guide I gave you at the original post and give me your BIOS region
Ohh, sorry! I see forgot to add the FPT copy/paste in that last post Sorry! You still need to answer me, what do you need?
If you have already modified the BIOS in ANY way, you will need to re-flash it back to factory defaults using factory method (NOT FPT)!!!
Additionally, please remove all BIOS passwords, disable secure boot, and disable TPM or Encryption if you have enabled. Do this before moving on to below
If you do not have Intel ME drivers installed, install them now from your system driver download page, then start over here after reboot.
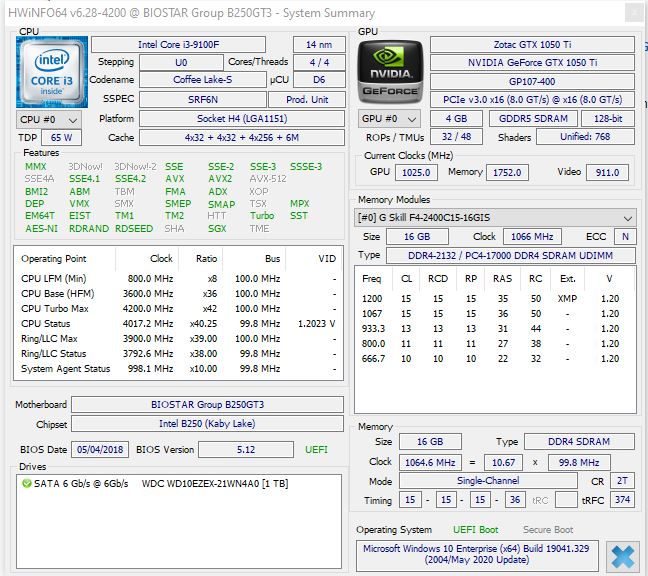
Check your BIOS’ main page and see if ME FW version is shown. If not then > DOWNLOAD HWINFO64 HERE <
Once HWINFO is open, look at the large window on the left side, expand motherboard, and find the ME area.
Inside that section is the ME Firmware version. Take note of the version. (ie. write it down or get a screenshot)
Once you have that, go to the thread linked below, and in the section “C.2” find and download the matching ME System Tools Package for your system.
(ie if ME FW version = 10.x get V10 package, if 9.0-9.1 get V9.1 package, if 9.5 or above get V9.5 package etc)
> DOWNLOAD " ME System Tools " packages HERE <
Once downloaded, inside you will find Flash Programming Tool folder, and then inside that a Windows or Win/Win32 folder (NOT x64).
Highlight that Win/Win32 folder, then hold shift and press right click. Choose “open command window here” (Not power shell! >> * See Registry file below *).
If you get an error, reply to this post with a screenshot of it, OR write down the EXACT command entered and the EXACT error given.
((If “open command window here” does not appear, look for the “Simple Registry Edit” below…))
Step #1
Now you should be at the command prompt.
You are going to BACKUP the factory un-modified firmware, so type the following command:
Command: " FPTw.exe -bios -d biosreg.bin "
>> Attach the saved "biosreg.bin ", placed into a compressed ZIP/RAR file, to your next post!!! <<
Step #2
Right after you do that, try to write back the BIOS Region dump and see if you get any error(s).
Command: " FPTw.exe -bios -f biosreg.bin "
^^ This step is important! Don’t forget! ^^
If you get an error, reply to this post with a screenshot of it, OR write down the EXACT command entered and the EXACT error given.
Here is a SIMPLE REGISTRY EDIT that adds “Open command window here as Administrator” to the right click menu, instead of Power Shell
Double-click downloaded file to install. Reboot after install may be required
> CLICK HERE TO DOWNLOAD CMD PROMPT REGISTRY ENTRY <
If the windows method above does NOT work for you…
Then you may have to copy all contents from the Flash Programming Tool \ DOS folder to the root of a Bootable USB disk and do the dump from DOS
( DOS command: " FPT.exe -bios -d biosreg.bin " )
Additionally, please remove all BIOS passwords, disable secure boot, and disable TPM or Encryption if you have enabled. Do this before moving on to below
If you do not have Intel ME drivers installed, install them now from your system driver download page, then start over here after reboot.
Check your BIOS’ main page and see if ME FW version is shown. If not then > DOWNLOAD HWINFO64 HERE <
Once HWINFO is open, look at the large window on the left side, expand motherboard, and find the ME area.
Inside that section is the ME Firmware version. Take note of the version. (ie. write it down or get a screenshot)
Once you have that, go to the thread linked below, and in the section “C.2” find and download the matching ME System Tools Package for your system.
(ie if ME FW version = 10.x get V10 package, if 9.0-9.1 get V9.1 package, if 9.5 or above get V9.5 package etc)
> DOWNLOAD " ME System Tools " packages HERE <
Once downloaded, inside you will find Flash Programming Tool folder, and then inside that a Windows or Win/Win32 folder (NOT x64).
Highlight that Win/Win32 folder, then hold shift and press right click. Choose “open command window here” (Not power shell! >> * See Registry file below *).
If you get an error, reply to this post with a screenshot of it, OR write down the EXACT command entered and the EXACT error given.
((If “open command window here” does not appear, look for the “Simple Registry Edit” below…))
Step #1
Now you should be at the command prompt.
You are going to BACKUP the factory un-modified firmware, so type the following command:
Command: " FPTw.exe -bios -d biosreg.bin "
>> Attach the saved "biosreg.bin ", placed into a compressed ZIP/RAR file, to your next post!!! <<
Step #2
Right after you do that, try to write back the BIOS Region dump and see if you get any error(s).
Command: " FPTw.exe -bios -f biosreg.bin "
^^ This step is important! Don’t forget! ^^
If you get an error, reply to this post with a screenshot of it, OR write down the EXACT command entered and the EXACT error given.
Here is a SIMPLE REGISTRY EDIT that adds “Open command window here as Administrator” to the right click menu, instead of Power Shell
Double-click downloaded file to install. Reboot after install may be required
> CLICK HERE TO DOWNLOAD CMD PROMPT REGISTRY ENTRY <
If the windows method above does NOT work for you…
Then you may have to copy all contents from the Flash Programming Tool \ DOS folder to the root of a Bootable USB disk and do the dump from DOS
( DOS command: " FPT.exe -bios -d biosreg.bin " )
@Lost_N_BIOS
[TOOL] Easy automated Mod tool for Coffee Lake bios (80)
Last time i tried with wrong BIOS and without connect two pad , PC did start but did turn off after a few seconds .
Maybe it say " i can work without connect two pad " or it say " i just can start for a few seconds without CPU " . Right ?
I should test it
I just searched in google . But i think This should be to the left of the motherboard .
I have the ability to solder, but I want to keep the CPU healthy. I may want to sell next year and the buyer may be shocked ![]()
It is difficult to remove the solder from the back of the CPU . Do you understand me ?
@MrCjxer the SKTOCC pin is connected to that Nuvoton Super IO chip, that’s right. But you have to measure it with a connection check (multimeter). You can not expect the pin somewhere on the base of another mainboard, except it is the exact same model.
When you have verified the location then you can connect it to ground.
I observed when there are no components like small ceramic capacitors or resistors on that Nuvoton SKTOCC pin, then that signal is not used and no shorting to ground is needed. Because SKTOCC is a low active signal ( 0V represents socket occupied ) there is a pull up resistor pulling that signal to a voltage level. Another mod could be to remove that resistor. Soldering skills or someone who can do this for you recommended.
In general there is no need to modify the socket. A simple check where the pin is connected to, makes it way easier to modify. Nearly every mainboard does have a SIO chip, only there SKTOCC is connected.
@reactive - That is not his board, those are Asus motherboard images of Asus SKTOCC mod. If you noticed that, OK
That’s what I kept tell him, he has to find on his board or images of his exact model someone posted this mod for (or possibly some other Biostar, maybe). I looked and could not find anything for any BioStar
@MrCjxer - test board without CPU, how does it function and act? Then test with Coffee CPU, if it acts same, then your pads are not connected enough.
CPU solder is no problem to remove once you are done and want to sell CPU, flux chip, wipe off solder connection with clean solder tip (Wedge) and then clean with ALC and you’ll never be able to tell it was soldered.
@filippos96 - No CMOS? I doubt that, did you check, it may just need replaced?!?!
Bclk is ME FW controlled, unless your BIOS has option to adjust it, if so then maybe you can get close to 100, but it’s generally fluctuating a bit in modern systems.
Your posting here is a confusing, ongoing mess, this is Coffee Mod BIOS thread, do you need Coffee Mod AND unlocked menus?
If you need Coffee mod, tell me your old CPU model and your new CPU SSPEC off top of CPU.
Sorry, that image you linked, I have no idea what you’re showing me that for?
If you need some defaults changed also, please give me exact name of settings and what you want them set to, in a list not an image.
@reactive - thank you for your help
@Lost_N_BIOS - thank you too but its done now 

and so so so thaaaaank you for help me …I could not do this without you 
@MrCjxer - Awesome to see it’s working now!! 
Which BIOS did you use, so I can mark it tested/confirmed OK, if it’s one I made you.
You’re welcome!!!
yeeaah thanks you .
yes i use your mod .
[TOOL] Easy automated Mod tool for Coffee Lake bios (82)
You’re welcome! And thanks for confirmation, I’ll put a note in that BIOS folder, and on thread for others
Using a modified BIOS image (for non-OEM Windows UEFI-boot) with an MSI Z270-a Pro, the main tool-chain and the resulting BIOS work fine, however x.SyncAllCoreRatio gives me:
1
2
3
4
5
2
3
4
5
SiInit:
Header checksum: 31h, valid
Data checksum: CAh, invalid, should be CEh
Patching successful
Press any key to continue . . .
I haven't tried to flash this BIOS (I've only used the one the rest of the chain created) due to the questionable state of the data (as it notes invalid checksum) and resultingly cannot OC the CPU; would this be of concern/would it be safe to flash the BIOS despite that? And/or is there any way to fix that?
@wqco510 - drop BIOS in UEFITool 51-57+ and see if you see same error in parser section at bottom, in the finished mod BIOS. Even if not there, this could still be invalid, I would redo the mod with different tool, or same tool and see if outcome = same error.
I would not use that BIOS as-is now without lots of checking stuff.
With UEFITool A57:
Original unmodified BIOS and the UEFI-modified one both had:
1
2
3
4
5
2
3
4
5
parseIntelMicrocodeHeader: invalid microcode checksum 0BC9B013h, should be 0BC9AEFDh
parsePadFileBody: non-UEFI data found in pad-file
findFitRecursive: FIT table candidate found, but not referenced from the last VTF
findFitRecursive: real FIT table found at physical address FFDF0100h
parseFptRegion: FPT partition is located inside another FPT partition, skipped
The UEFI-modified one through the tool-chain (one I've been using fine so far, except CPU OC fails to apply; perhaps noteworthy that I'm using the R0 stepping/generated it as such), as well as the one additionally passed through x.SyncAllCoreRatio (which gave the checksum mismatch report upon generating it), only give:
1
2
3
2
3
findFitRecursive: FIT table candidate found, but not referenced from the last VTF
findFitRecursive: real FIT table found at physical address FFDF0100h
parseFptRegion: FPT partition is located inside another FPT partition, skipped
Admittedly, I don't really know my way around the actual BIOS structure, etc .. so --
What exactly is x.SyncAllCoreRatio comparing/referring to when it claims the mismatch anyway? Or which part of the BIOS should I take a look at to verify the changes it makes (and what should it look like/could I reasonably change it manually)?
@wqco510 - Sorry, Please compare again side by side with version 51, I forgot 57 shows some odd things, and shows things different, that we don’t need to look at here.
And, your post above is confusing anyway, you say top part applies to both, then bottom part only to mod, it looks confusing, show me side by side image of stock and mod with parser tab selected
Also, mention what tool you used to do the CoffeeMod, never heard of “tool-chain” If that is a real tool, give me a link to where you downloaded it and it’s support/discussion thread, thanks.
Please tell me your old CPU model, and your new CPU SSPEC/Model and I will make you a BIOS myself using latest BIOS and see if I run into any issues
I do CoffeeTime manually/advanced mode, one by one, DO NOT do microcodes in there - I do that myself manually/outside of tool, then fix FIT as needed.
SyncAllCoreRatio is just as it sounds, make all cores same/same
@Lost_N_BIOS
Sorry for the confusion; in the top one, when I said “UEFI-modified”, I meant it had been modified to support the UEFI-boot-OS install (unrelated to the CPU-support thing that I’ve been applying on top of it now). So for both the original BIOS from the manufacturer and the one with this OS-boot-related mod the output was the top one.
By “tool-chain” I was referring to the chain of tools this thread is about (since it looks like they go in order from 0mecheck.exe to 7Cpu-patch.exe, each passing the intermediary result to the next one, I assume … so a literal chain of tools).
The bottom output was for the resulting BIOS from AllinOne.exe (no errors while it was doing that), as well as that one passed to x.SyncAllCoreRatio.exe (same UEFITool parsing output for both BIOSes with A57).
With A51:
Top to bottom: unmodified, OS-boot-modded, AllinOne.exe, x.SyncAllCoreRatio.exe
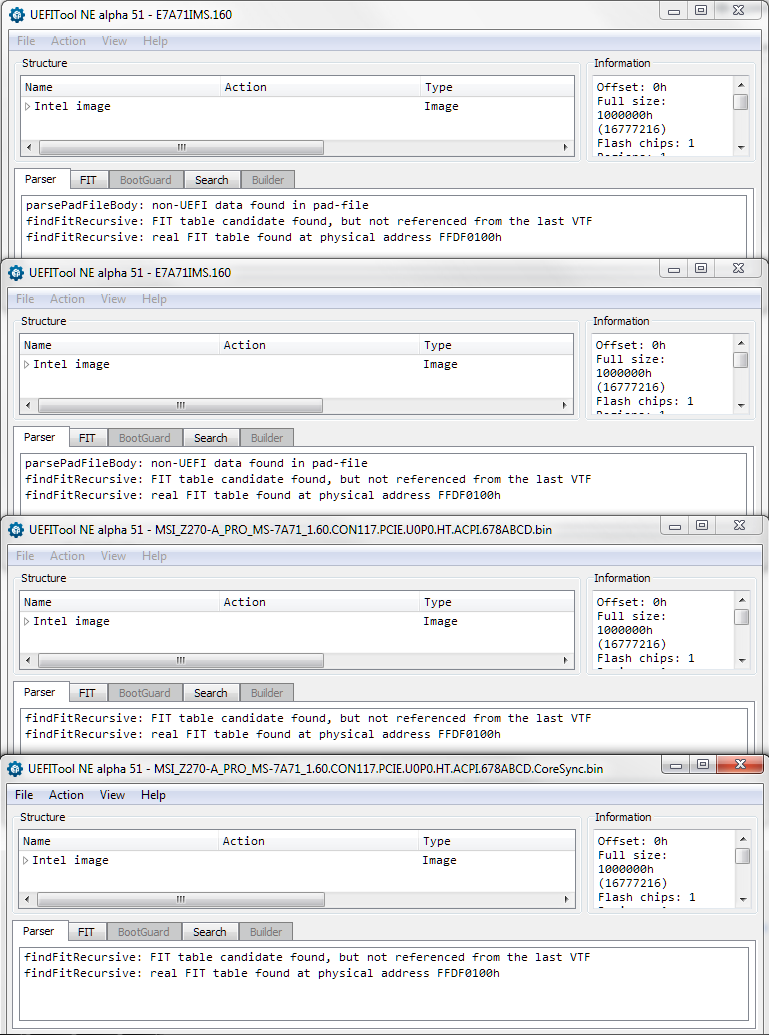
So, similar to A57, but less verbose
—
Hmm, I’m not sure if this sync would help with the type of OC I’m trying to do – a mild base-clock boost (rather than the multiplier), as it’s a non-K (9700F (R0)); anything other than exactly 100, fails to apply (boots at 100 instead, however, any DRAM settings and voltages (including CPU) are still applied though). The previous CPU (7700), also got this problem, once using this BIOS (it applied a slight boost (up to 102.69) fine prior to applying the AllinOne).