Preliminary Notes:
- Before you start with the BIOS modding procedure, it is strongle recommended to read carefully the separately published chapter “BIOS Modding: Introduction and Preparations” (>Link<).
- For users of a Gigabyte mainboard with an Award BIOS I recommend to have an additional look into >this< thread.
How to update PCI ROM modules
here: Award/Phoenix BIOSes
A. Opening a Phoenix/Award BIOS
This is what you should do:
- Open the Command Prompt (CMD.EXE) as administrator and navigate by using the special commands like “CD” into the processing folder you have created (e.g. C:\test).
- Execute the following command (without the angular brackets, but with the complete name of the mainboard BIOS file, using capital or small letters doesn’t matter):
If the BIOS file and the CBROM tool are matching, you now will see the content of the mainboard BIOS and even the names of the currently inserted RAID ROM module (e.g. ICHARAID.BIN). By the way: If you want to replace it by another RAID ROM version, you should customize the name of your prepared RAID ROM file. Only PCI ROM files with the exact similar name will be completely replaced.1
CBROM.EXE <name of the mainboard BIOS file> /D
- Example:
This is a screenshot after having opened the mainboard BIOS named X58AUD3R.FH of the GIGABYTE mainboard GA-X58A-UD3R by using the tool CBROM: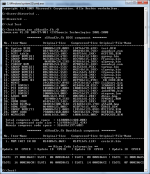
In this case the Intel AHCI ROM module is listed within line 14 (recognizable by the name on the right side), has the internal PCI ROM module letter "A", an uncompressed size of 16,00 KB, a compressed size of 10,82 KB and is named ICHAAHCI.BIN.
The Intel RAID ROM module can be found in line 15, is named RAIDRST5.BIN, has the internal PCI ROM letter "B" and an uncompressed size of 119 KB. - Special case:
If you should be able to open the BIOS by using the above mentioned CBROM command, but cannot see the complete list of the included modules (incl. the PCI ROM ones), you may find >here< a guide about how to show (and to modify) the related BIOS components.

B. Extraction of a PCI ROM module from a Phoenix/Award BIOS
General informations:
- The extraction process will not remove anything from the mainboard BIOS file. Everything remains untouched.
- If you want to know the PCI ROM version of any Phoenix/Award mainboard BIOS, you have to extract the related PCI ROM from the BIOS file.
Here is the description of the extraction procedure:
- This is the CBROM command to extract any PCI ROM module from any Phoenix/Award mainboard BIOS file (without the angular brackets, but with the complete name of the mainboard BIOS file):
1
CBROM.EXE <name of the mainboard BIOS file> /PCI extract
- After having executed the command, nothing will be extracted at this moment.
Usually there are more than 1 PCI ROM module within the BIOS. That is why the tool CBROM now lists all available PCI ROM modules of the BIOS and asks, which one of them shall be extracted.
Now you just have to edit the shown letter of the desired PCI ROM module (example: B) and then to hit "Enter".
This is what you will see: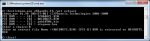
- After having done everything correctly the extracted PCI ROM file with its original name (here: RAIDRST5.BIN) can be found within the CBROM processing folder (C:\test).
- If you want to know the version of the extracted PCI ROM module, you have to open it with a Hex Editor like HxD (>Link<). After having done it, you usually will see the name and the version of the PCI ROM module on the top right side of the Editor window:
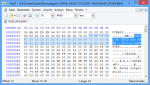
This picture shows, that the extracted PCI ROM module has been the Intel MSM RAID ROM v8.0.0.1038, when I have done the tests for this guide. - The EXTRACT command can be used not only for the PCI ROMs, but also for all other BIOS modules, which are listed by CBROM (except the sensitive modules "System BIOS" and "NCPUCODE"). The only difference is, that you have to replace the word "PCI" within the EXTRACT command by the short name of the related module you see on the left side of the BIOS structure overview shown by CBROM (XGROUP, ACPI, GROUP, SETUP0, TSEG0, YGROUP, OEM3, LOGO1, OEM0, GV3, MINIT, HTINIT, 2PE32 etc.). Even the modules of the different "HOLES" can be extracted this way.
Here are some command examples:1
CBROM.EXE <name of the mainboard BIOS file> /TSG0 extract
1
CBROM.EXE <name of the mainboard BIOS file> /HOLE1 extract
Hitting the "Enter" button will not yet execute the extraction. CBROM will ask you to enter the exact file name of the related module you want to extract. You can find the file name within the BIOS structure overview on the right side of the line.
After having hit the "Enter" button, you will see the extracted file within the CBROM processing folder (C:\test).
Note: An extraction of several PCI and non-PCI modules may be necessary to recreate the original BIOS structure after having updated any PCI ROM module (see below).


C. Removal of a PCI ROM module from a Phoenix/Award BIOS
General informations:
- Contrary to the extraction procedure the BIOS file will be altered by the release command.
- Furthermore the removed module will not be stored within the CBROM processing folder.
Here is the description of the removal procedure:
- Execute the following command (without the angular brackets, but with the complete name of the mainboard BIOS file):
1
CBROM.EXE <name of the mainboard BIOS file> /PCI release
- After having done that the tool will present - as shown within the previous chapter - a list of all available PCI ROM modules and ask you, which of them you want to remove.
- Edit just the shown letter of the PCI ROM module you want to be removed and hit the "Enter" button of your keyboard.
D. Integration or Replacement of a PCI ROM module
General informations:
- The CBROM command for the integration and for the replacement of a PCI ROM module is exactly the same.
- According to my knowledge it is not only easier but safer too, if the PCI ROM modules are simply replaced within the mainboard BIOS file and not removed and inserted in different steps.
Simple reason: Only this way the user can be sure, that the location of the new PCI ROM module within the BIOS structure will remain the same as it was with the old PCI ROM module. - Important: To prevent any problem during the PCI ROM module replacement you have to make sure, that the new PCI ROM file has exactly the same name as the old one, which has been within the BIOS file before.
- Within a certain bandwidth it is possible to replace a smaller sized PCI ROM module by a bigger one. The tool CBROM will compensate the size difference by its dynamic compression ability.
If the the new PCI ROM module is too big and there is not enough place within the BIOS file, you will get an adequate CBROM message.
Tip: Maybe you can create the needed space by removing an unneeded module like the OEM LOGO before you restart the PCI ROM replacement procedure.
This is what to do, if you want to insert or replace a PCI ROM module:
- Run the tool CBROM and enter the following command (without the angular brackets, but with the complete names of the mainboard BIOS and PCI ROM files):
1
CBROM.EXE <name of the mainboard BIOS file> /PCI <name of the PCI ROM file>
- Then you will see a picture like this one:

Don’t worry about the shown percentage number lower than 100%, the file will be totally replaced. - If everything worked correctly, you will now find the “modded” BIOS file with the updated PCI ROM module within your processing folder (C:\test). The modded BIOS file should have exactly the same size and name as the original BIOS file, but an actual date.
- Before you are going to flash the “modded” BIOS into your mainboard BIOS chip, you should verify, that the new desired PCI ROM has been properly inserted:
- Open the modded mainboard BIOS file as written above.
The content of the “modded” mainboard BIOS will be shown like this example:
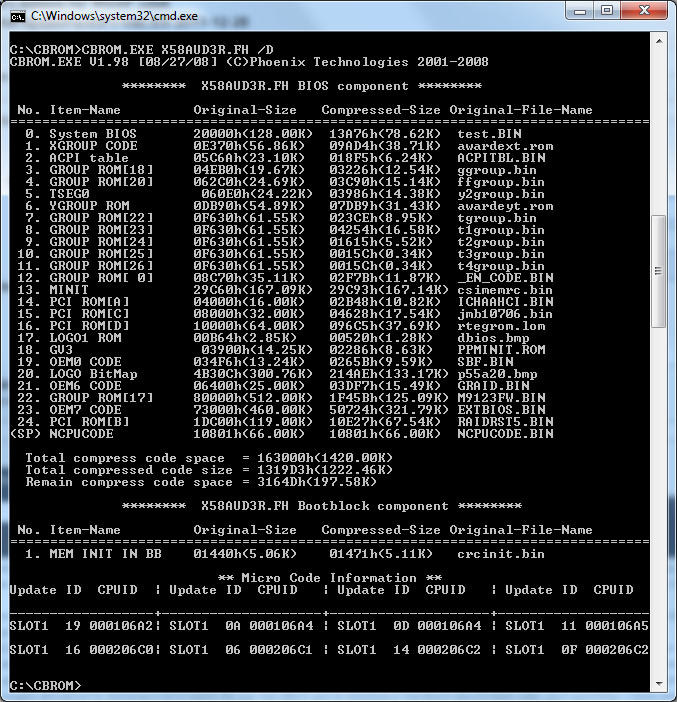
If you compare it with the content of the original BIOS file, you may realize, that the PCI ROM module now is listed somewhere else than before (example: now line 24 instead of line 15). Usually this is nothing to worry about. Important will be, that the related new PCI ROM module is only listed once, has the same internal name (here: RAIDRST5.BIN) and the same internal letter (here: B) as before.
- A problem may occur by the checksum error sensitive module MINIT (file name: MEMINIT.BIN), if such module is present within the BIOS structure and the PCI ROM module you want to update is within any line above the MINIT module.
Although the tool CBROM32_198 will remove and reinsert the checksum sensitive BIOS modules (MEMINIT.BIN, HT.DLL and HT32GATE.BIN) automaticly in this case, you should make sure, that this procedure has been done correctly. Most important is the exact offset position of the “MEMINITENTRYPOINT”, which should be the same as within the original BIOS file.
That is why I recommend to open the “modded” and the original BIOS file simultaneously by a hex editor and to compare the offset data of the “MEMINITENTRYPOINT”. If it should not be identical, it has to be corrected, but without touching the checksum of the complete BIOS file. - As I mentioned above, the tool CBROM is not able to replace any module without changing the internal BIOS structure. Each reinserted or replaced module will be shown at the bottom of the BIOS structure with the last=highest line number.
Until now I am not sure, if this has any negative impact on the later BIOS flashing process, but it may be a good idea to completely recreate the previous BIOS structure by using the tool CBROM32_198. You just have to extract and to reinsert step-by-step all listed BIOS modules beginning with the updated PCI ROM going down the structure list until you got the original module order again. Check it with the cbrom <mainboard file> /D command!
Flashing the modded BIOS into the mainboard BIOS chip
It is strongly recommended to follow the following advices:
- Before you are going to flash the new BIOS, you should make a complete backup of your entire system and boot partitions or at least of all important data. After having done that, enter the BIOS and list all your special settings. Before you leave the BIOS, choose and save the DEFAULT settings.
- Since the BIOS file name usually is layed down by the mainboard manufacturer within the BIOS itself, the “modded” BIOS file should not be renamed unless the new name is “in the line” with BIOS files, which were previously released by the manufacturer.
- Users with an ASUS mainboard, who get a “Security Verification” warning while trying to flash a modified BIOS, should redo it by using the “USB BIOS Flashback” method (for details look into the mainboard manual, not all ASUS mainboards do support it). Important: The BIOS has to be renamed a special way according to the ASUS PDF files, if you use the ASUS “USB BIOS Flashback” method!
Users with an ASUS P8xxx mainboard, which doesn’t support the “USB BIOS Flashback” feature, may get the modified BIOS successfully flashed by following >this< guide layed down by CodeRush at [H]ard|Forum (thanks to Maikl for the tip). - After having flashed the new BIOS, you have to redo your previous BIOS settings.
Safest way (found >here<):
After flash is complete, shut down fully and switch off PSU, wait one minute and clear CMOS. Then turn on, boot to BIOS, load optimized, set the SATA Controller to the appropriate mode (AHCI/RAID) and save/apply/reboot back to the BIOS. Once in the BIOS again recover the previous boot settings (boot device and HDD boot order). If you have updated the Marvell 91xx AHCI/RAID ROM module, set the Marvell Firmware mode to “Force”, then save/apply/reboot and let it load through to windows, before that happens Marvell Firmware will update and board will reboot. - Before you restart with your usual PC work, you should verify the full function of the updated PCI ROM module. If you have inserted a new RAID ROM version into the BIOS, you have to make sure, that the “RAID” mode of the on-board SATA Controller is enabled, and then you should run the RAID Configuration Utility by hitting CTRL+I, F10 or similar (look into your mainboard manual). Everything will be fine, if you can enter and use the RAID Configuration Utility without any problem (Don’t modify anything, if you don’t want it to be changed!).
Advice for users with a non-RAID system:
Users, who are running their SATA Controllers in AHCI or IDE mode, should check the function of the freshly updated RAID ROM module the same way. After having temporarily enabled the “RAID” mode of the on-board SATA Controller they should run the RAID Configuration Utility and look, if everything seems to be fine (but don’t create a RAID array!). Then they can close the Utility and reset the SATA Controller to the usual setting (AHCI/IDE mode). The data of their AHCI/IDE system will not be altered or destroyed by this procedure.
Any feedback is much appreciated. Most important is a short report about the success or failure of flashing the “modded” BIOS into the BIOS chip of your mainboard. Don’t forget to mention the vendor and the name of your mainboard and the sort and version of the flashed PCI ROM module.
Good luck!
Fernando