[GUIDE] Fixing HT for Coffee Lake CPUs on Skylake and Kaby Lake motherboards (Z170, Z270)

After successfully modding Z170, Z270 BIOS for Coffee Lake, following the guide:

[GUIDE] Coffee Lake CPUs on Skylake and Kaby Lake motherboards

The Hyper-threading (HT) might not work with 6-cores CPUs (i7-8700K). The problem is that the the BIOS of the boards is configured to support maximum of 8 (logical) CPUs. This guide will show you how to change/increase the maximum value of supported CPUs in your BIOS from 8 to 16. We use BIOS of Asus Maximus VIII Impact (M8I) as an example but these steps should work for BIOSes of other Z170, Z270 boards as well. Basic knowledge of UEFITool, hex editor/disassembler is required.

Two steps are required to (fully) support 16 CPUs:

1. patching PEI module CpuMpPei
2. modifying ACPI tables

According to dsanke, it looks like on some boards/BIOS variants additional module(s) needs to be patched (we have no solution for this):


1. patching PEI module CpuMpPei

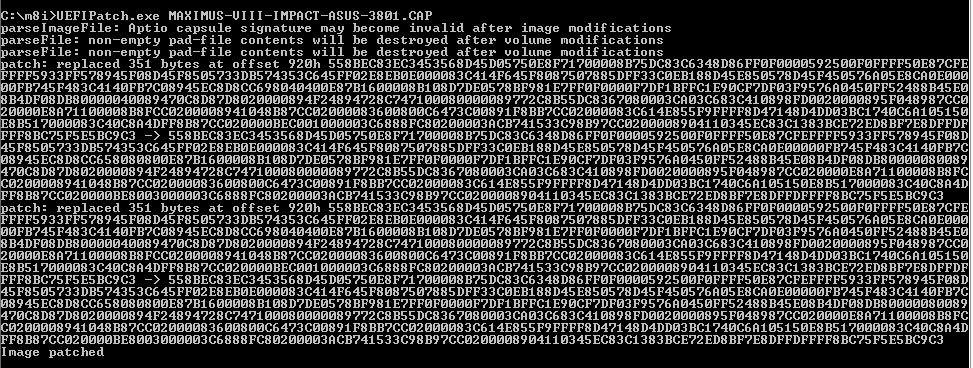
Download UEFIPatch. Place UEFIPatch, extracted patches.txt from the attachment and the BIOS file in the same folder. Run UEFIPatch on the BIOS file:


If the file was patched (at one or two locations) skip to step 2 - modifying ACPI tables. If nothing was patched, please write a post with a link to your BIOS file, we can update patches.txt file. Alternatively, follow the guide:

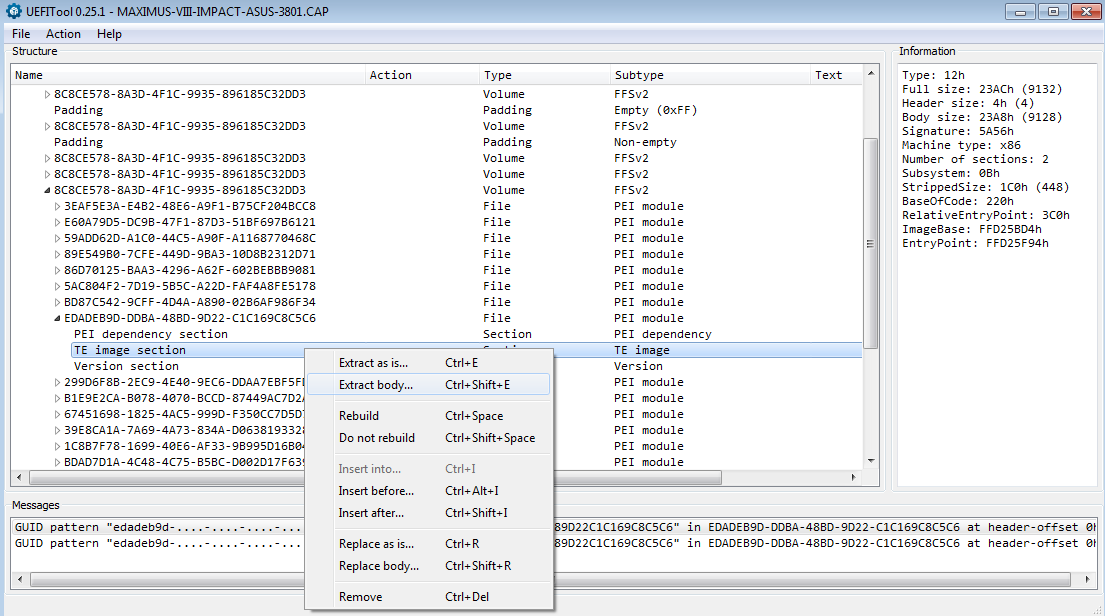
Locate and extract TE image section of PEI module CpuMpPei (GUID: EDADEB9D-DDBA-48BD-9D22-C1C169C8C5C6)


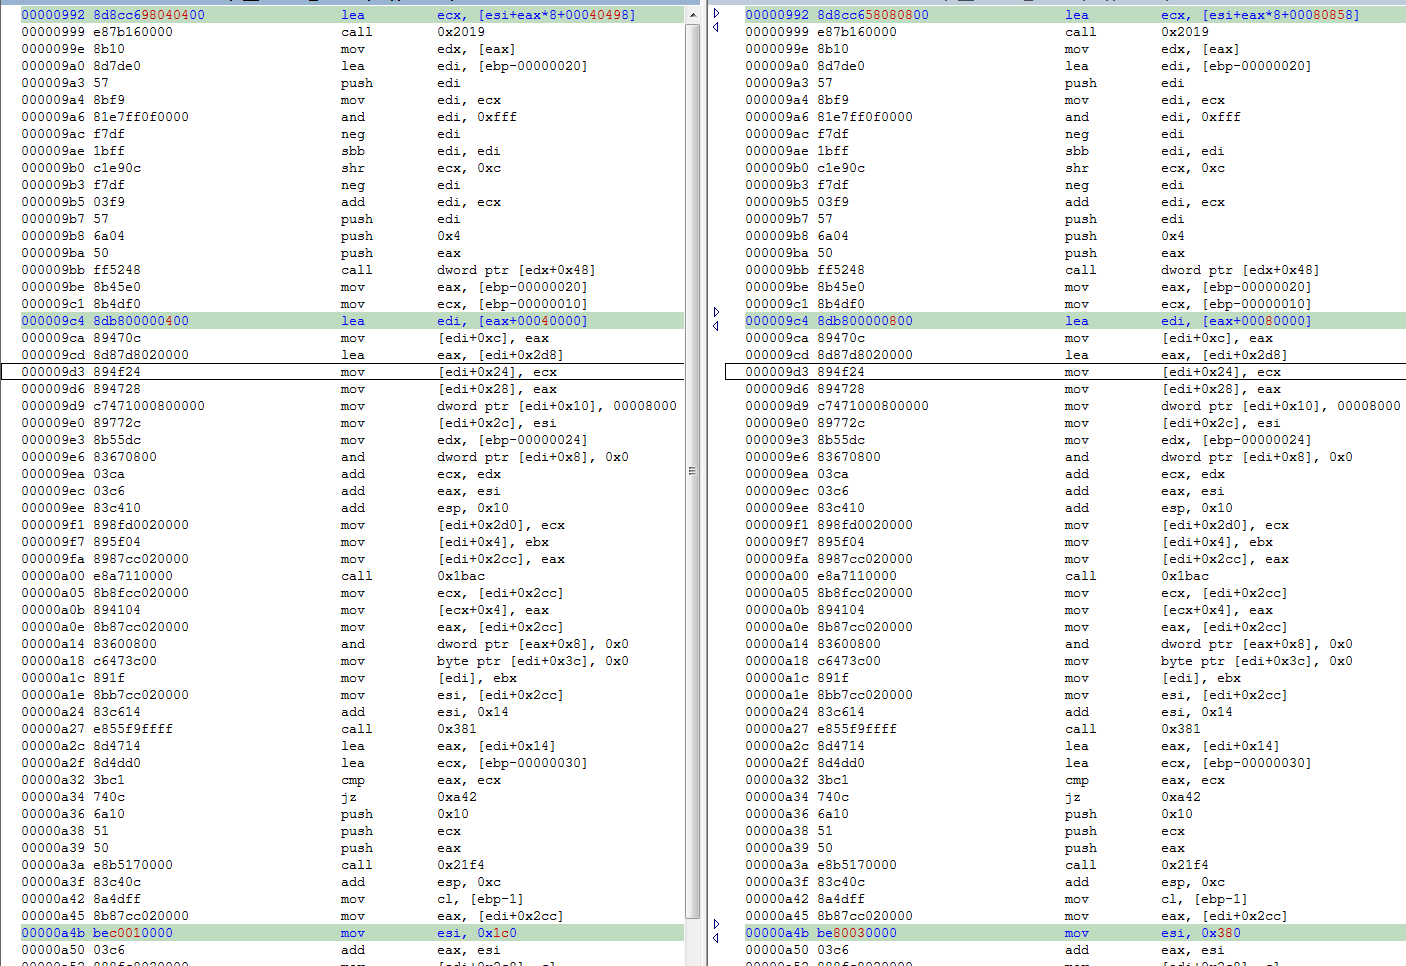
Open the extracted file in disassembler. The fix consist of patching 3 lines of code. The code, that is responsible for allocating and initializing some CPU structures. We need to replace:

1
2
3
4
5
6
 
file offset   hex                            asm
00000992 8d8cc698040400 lea ecx, [esi+eax*8+00040498]
...
000009c4 8db800000400 lea edi, [eax+00040000]
...
00000a4b bec0010000 mov esi, 0x1c0


with:

1
2
3
4
5
6
 
file offset   hex                            asm
00000992 8d8cc658080800 lea ecx, [esi+eax*8+00080858]
...
000009c4 8db800000800 lea edi, [eax+00080000]
...
00000a4b be80030000 mov esi, 0x380


At file offset 0x992 (this location may/will be different for different version of BIOS), there is a code responsible for allocating space/memory for some structures describing CPUs.
Some technical details/math here - assuming:

"n" is the count of maximum supported CPUs
"m" is largest monitor-line size in bytes, stored in eax
"k" is some constant stored in esi


The total memory that needs to be allocated is:
    n * (0x8000 + 0x38 + m) + 0x2d8 + k

For n = 8, we get:
    8 * (0x8000 + 0x38 + m) + 0x2d8 + k = k + m *8 + 40498

It is exactly what is at offset 0x992. Now for n = 16 or 0x10 hex:
    10 * (0x8000 + 0x38 + m) + 0x2d8 + k = k + m * 10 + 80658

As we can't write instruction:
    lea         ecx, [esi+eax*10+00080658]

And we know that "m" (value stored in eax) is 64 or 0x40 hex for our CPU (we can get this value via cpuid instruction - cpuid(5):ebx[15:0]), we can replace it with:
    lea         ecx, [esi+eax*8+00080858]

Changes at offsets 9c4, a4b follow the same principle - we are doubling the amount of CPUs, thus we need to double the numbers:
    40000 -> 80000
1c0 -> 380

In the end, we only need to patch/modify 6 bytes:


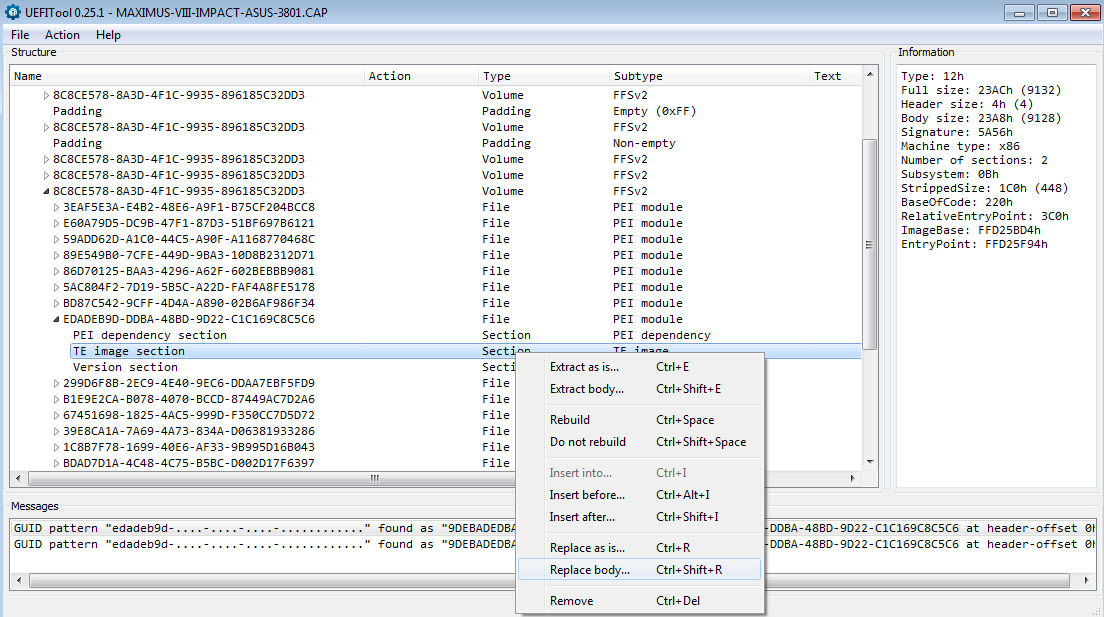
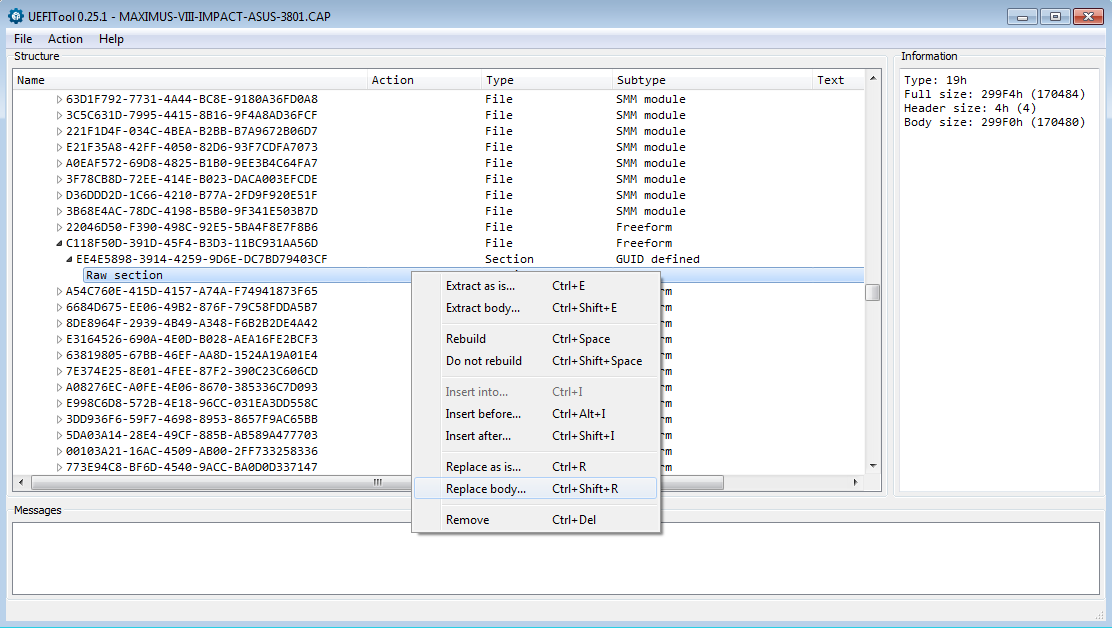
Save changes, replace body using UEFITool (note that this module is located at two locations in BIOS, we better replace both):


After this change (and flashing modified BIOS) we should be able to successfully boot with 6C/12T active (on 8700K). For proper operation (power management in operating system) we need to modify ACPI tables now.

patches.txt.zip (732 Bytes)
2. modifying ACPI tables

We need to make these steps to fix ACPI tables:

1. locate and extract ACPI tables from BIOS
2. disassemble ACPI tables
3. increase number of supported CPUs in ACPI tables
4. compile modified tables
5. replace/insert modified tables to BIOS

For reading BIOS we will use UEFITool NE alpha (it has integrated hex view), this version cannot save/modify BIOS, use older version for this. For decompiling/recompiling ACPI tables we will use iASL tool from ACPICA.org

2.1 locate and extract ACPI tables from BIOS

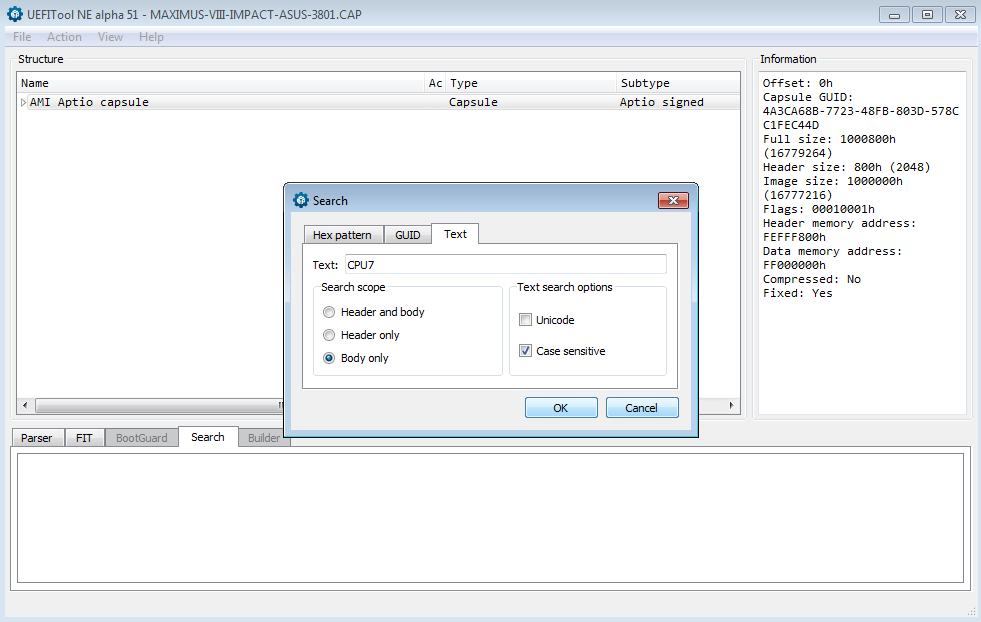
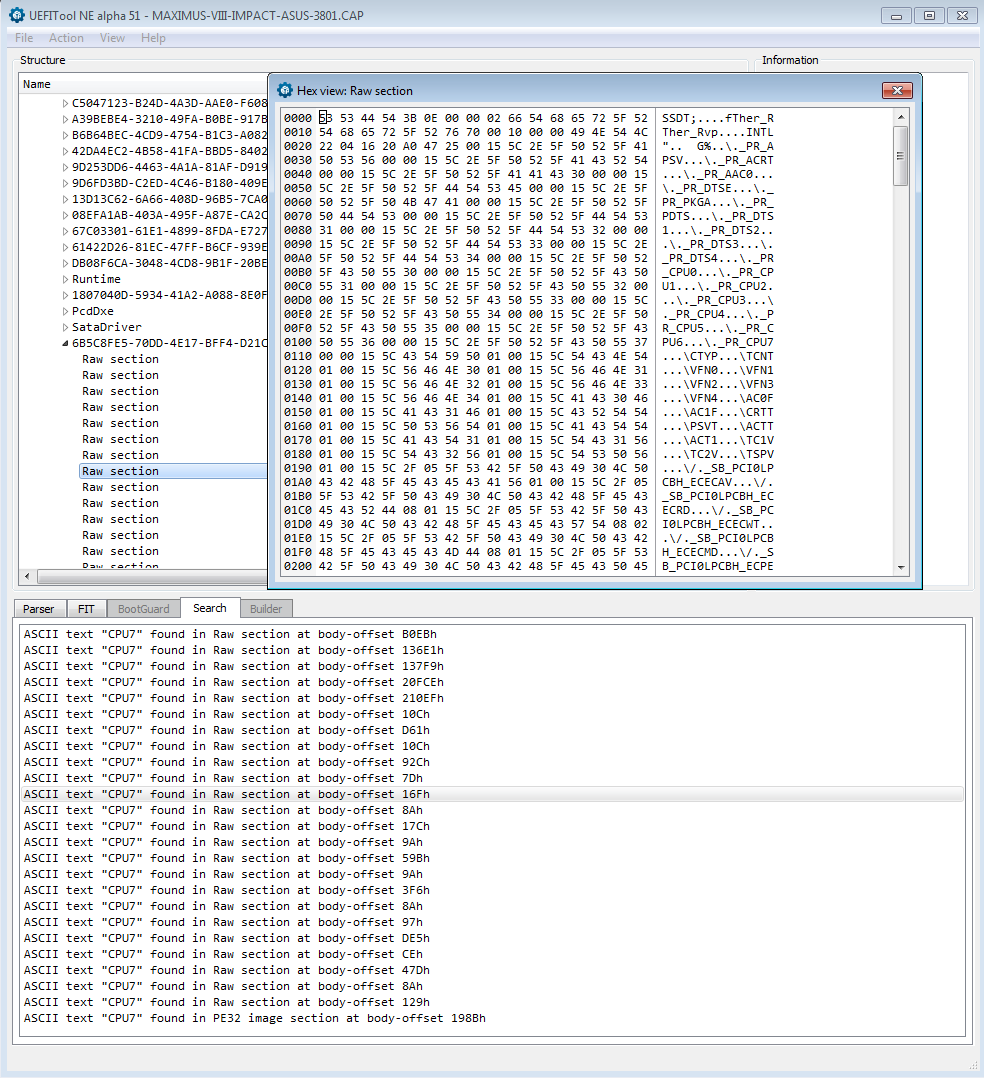
The simple way - assuming that BIOS device name for CPU number 8 is “_PR.CPU7” - we start by searching string/text “CPU7” in the body of our BIOS using UEFITool:

1.png


This string is located in couple of Raw sections and one PE32 image section. Each Raw section is actually a (compiled) ACPI table:

2.png


We will ignore the PE32 image (there is no need to patch this file) and extract only Raw sections that contain our string. We also write down the order/location of the extracted section(s) (under specific GUID) so we know exactly what section we are replacing in step 2.5.

2.2 disassemble ACPI tables

Now we execute iASL tool on files extracted in step 2.1:

3.png


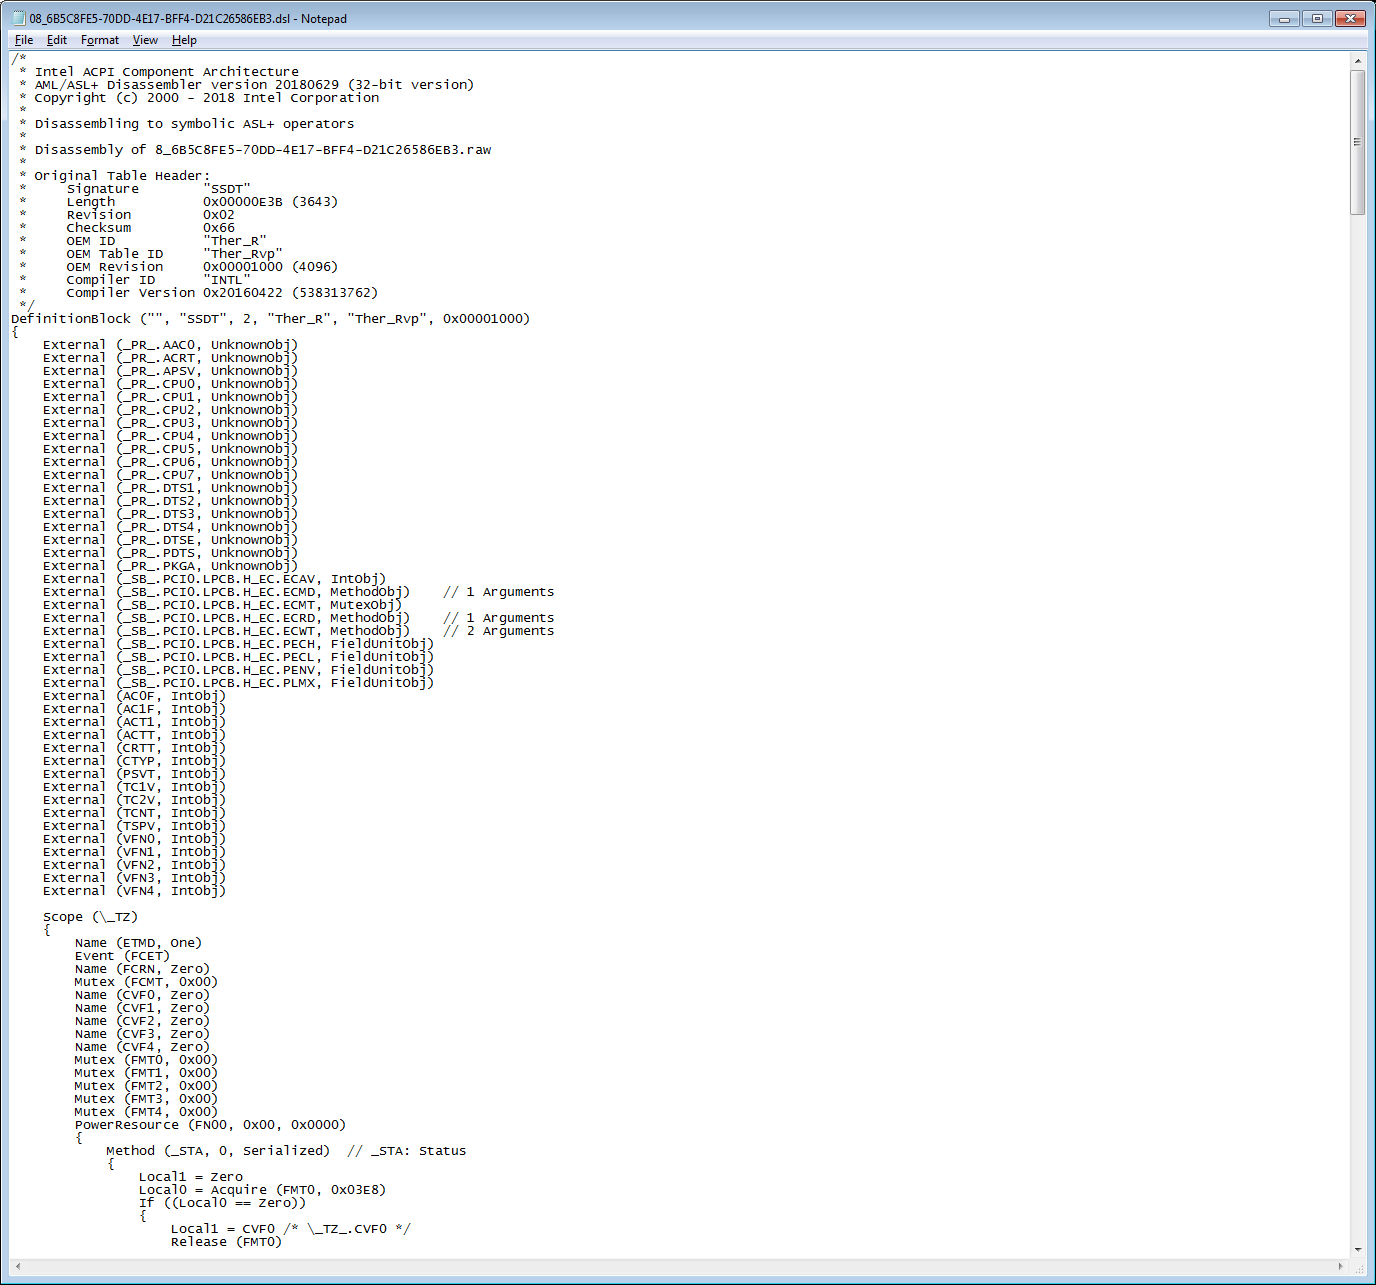
We get human readable/decompiled text file with extension ".dsl" that we can read/edit with notepad:

4_notepad.png


Using iASL tool we have decompiled these ACPI tables:

/6B5C8FE5-70DD-4E17-BFF4-D21C26586EB3/
|__ 08_6B5C8FE5-70DD-4E17-BFF4-D21C26586EB3.raw "Ther_Rvp"
|__ 09_6B5C8FE5-70DD-4E17-BFF4-D21C26586EB3.raw "Ther_Sds"

/C118F50D-391D-45F4-B3D3-11BC931AA56D/
|__ 01_C118F50D-391D-45F4-B3D3-11BC931AA56D.raw "A M I "

/C38FB0E2-0C43-49C9-B544-9B17AA4DCBA3/
|__ 01_C38FB0E2-0C43-49C9-B544-9B17AA4DCBA3.raw "ApCst"
|__ 02_C38FB0E2-0C43-49C9-B544-9B17AA4DCBA3.raw "ApHwp"
|__ 03_C38FB0E2-0C43-49C9-B544-9B17AA4DCBA3.raw "ApIst"
|__ 04_C38FB0E2-0C43-49C9-B544-9B17AA4DCBA3.raw "ApTst"
|__ 06_C38FB0E2-0C43-49C9-B544-9B17AA4DCBA3.raw "Cpu0Hwp"
|__ 09_C38FB0E2-0C43-49C9-B544-9B17AA4DCBA3.raw "CpuSsdt"
|__ 10_C38FB0E2-0C43-49C9-B544-9B17AA4DCBA3.raw "CtdpB"
|__ 11_C38FB0E2-0C43-49C9-B544-9B17AA4DCBA3.raw "HwpLvt"


2.3 increase number of supported CPUs in ACPI tables

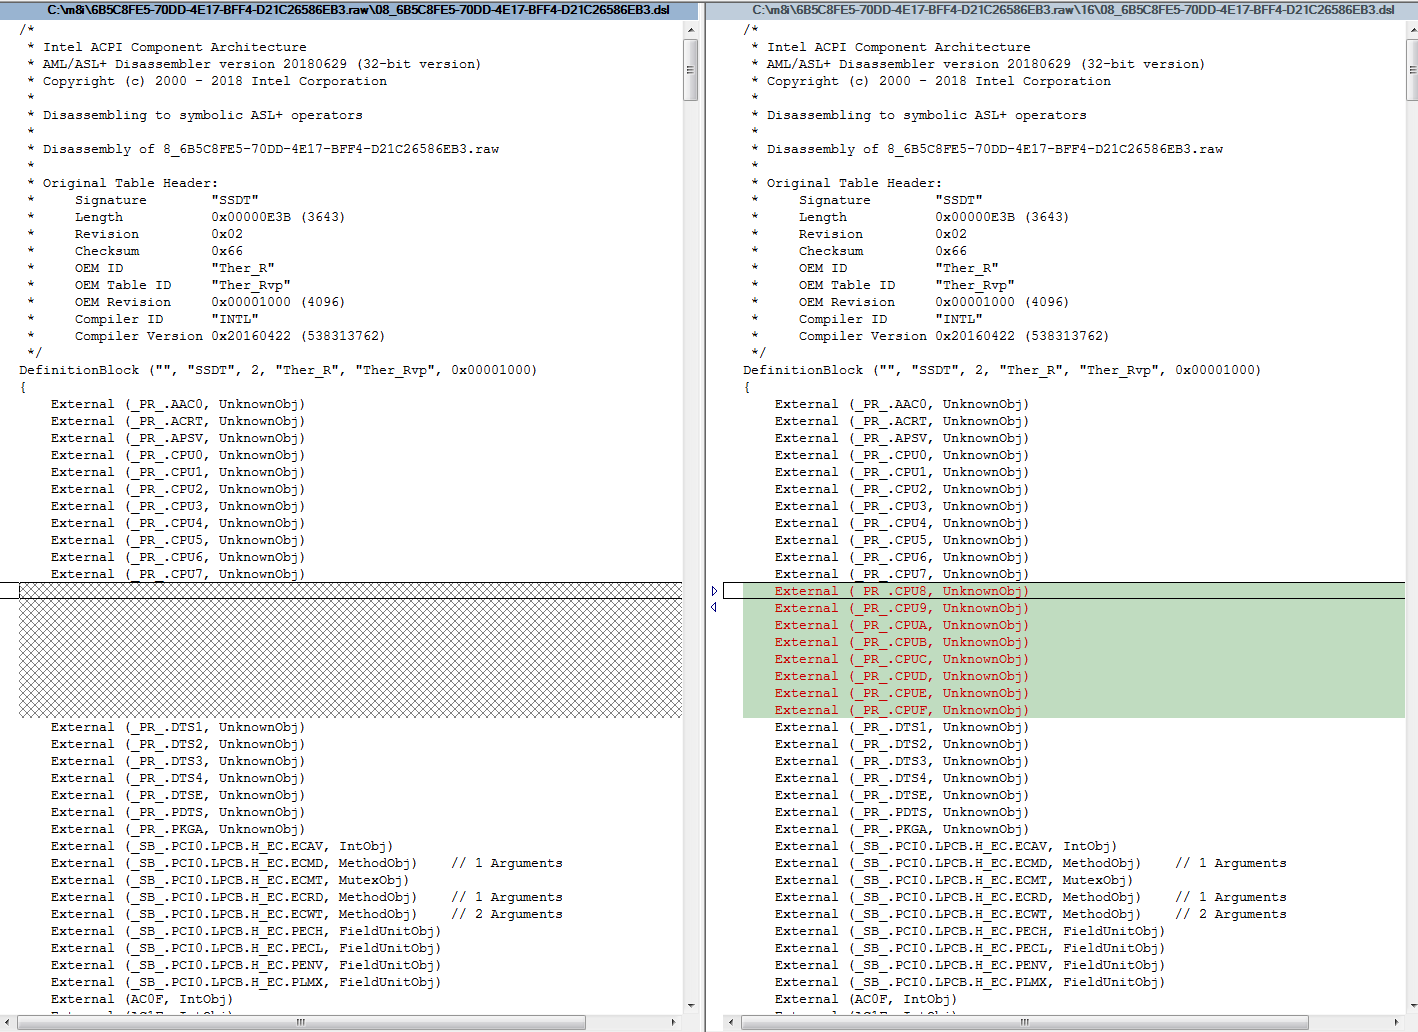
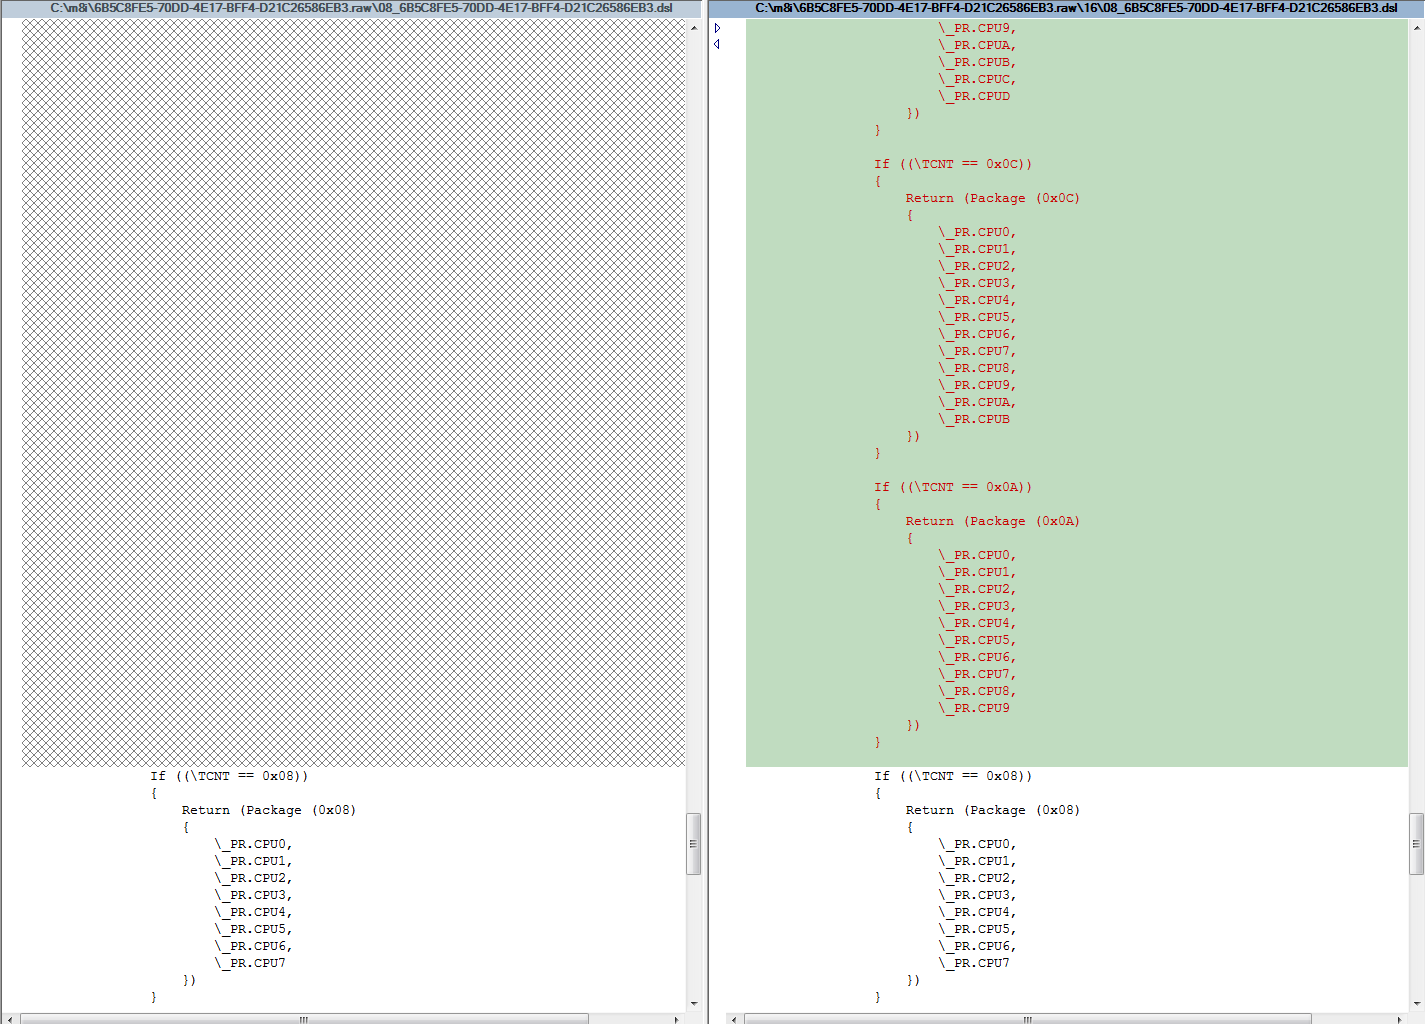
Now we modify/add entries to the ACPI tables using "common sense" (with help of corresponding tables from some official Coffee Lake (Z370) BIOS). Start by searching for string "CPU7", add new entries accordingly:

5_cmp1.png


6_cmp2.png


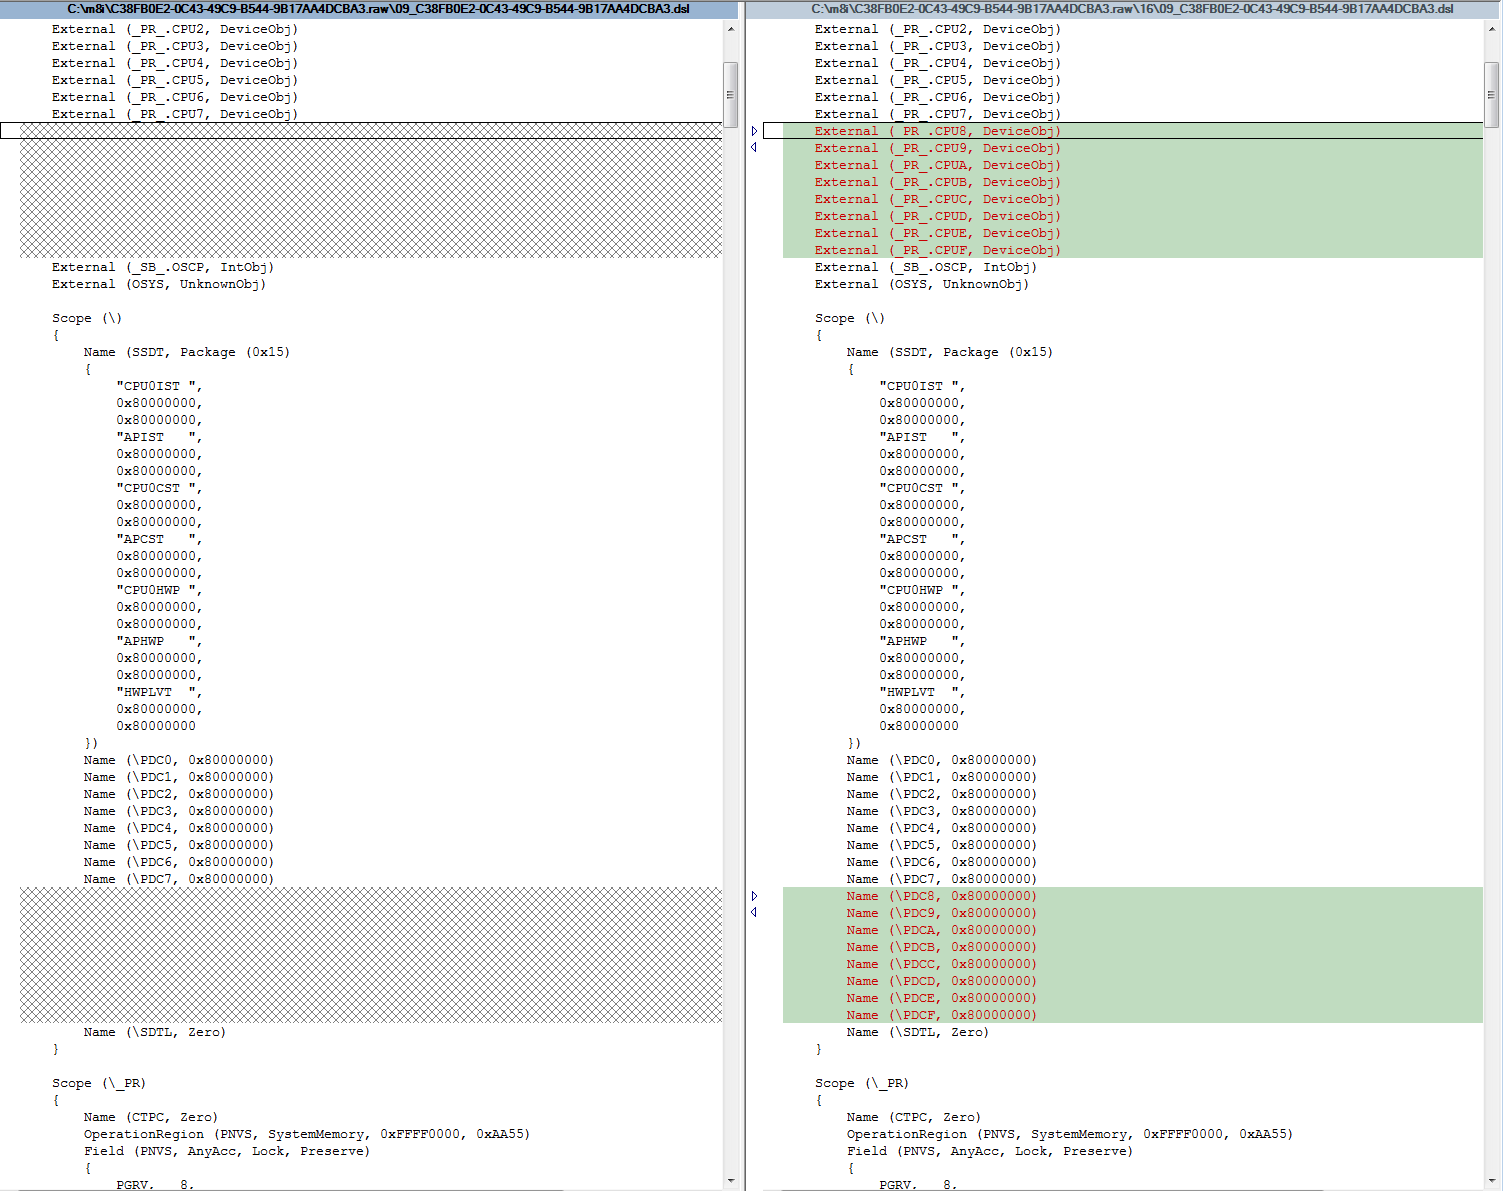
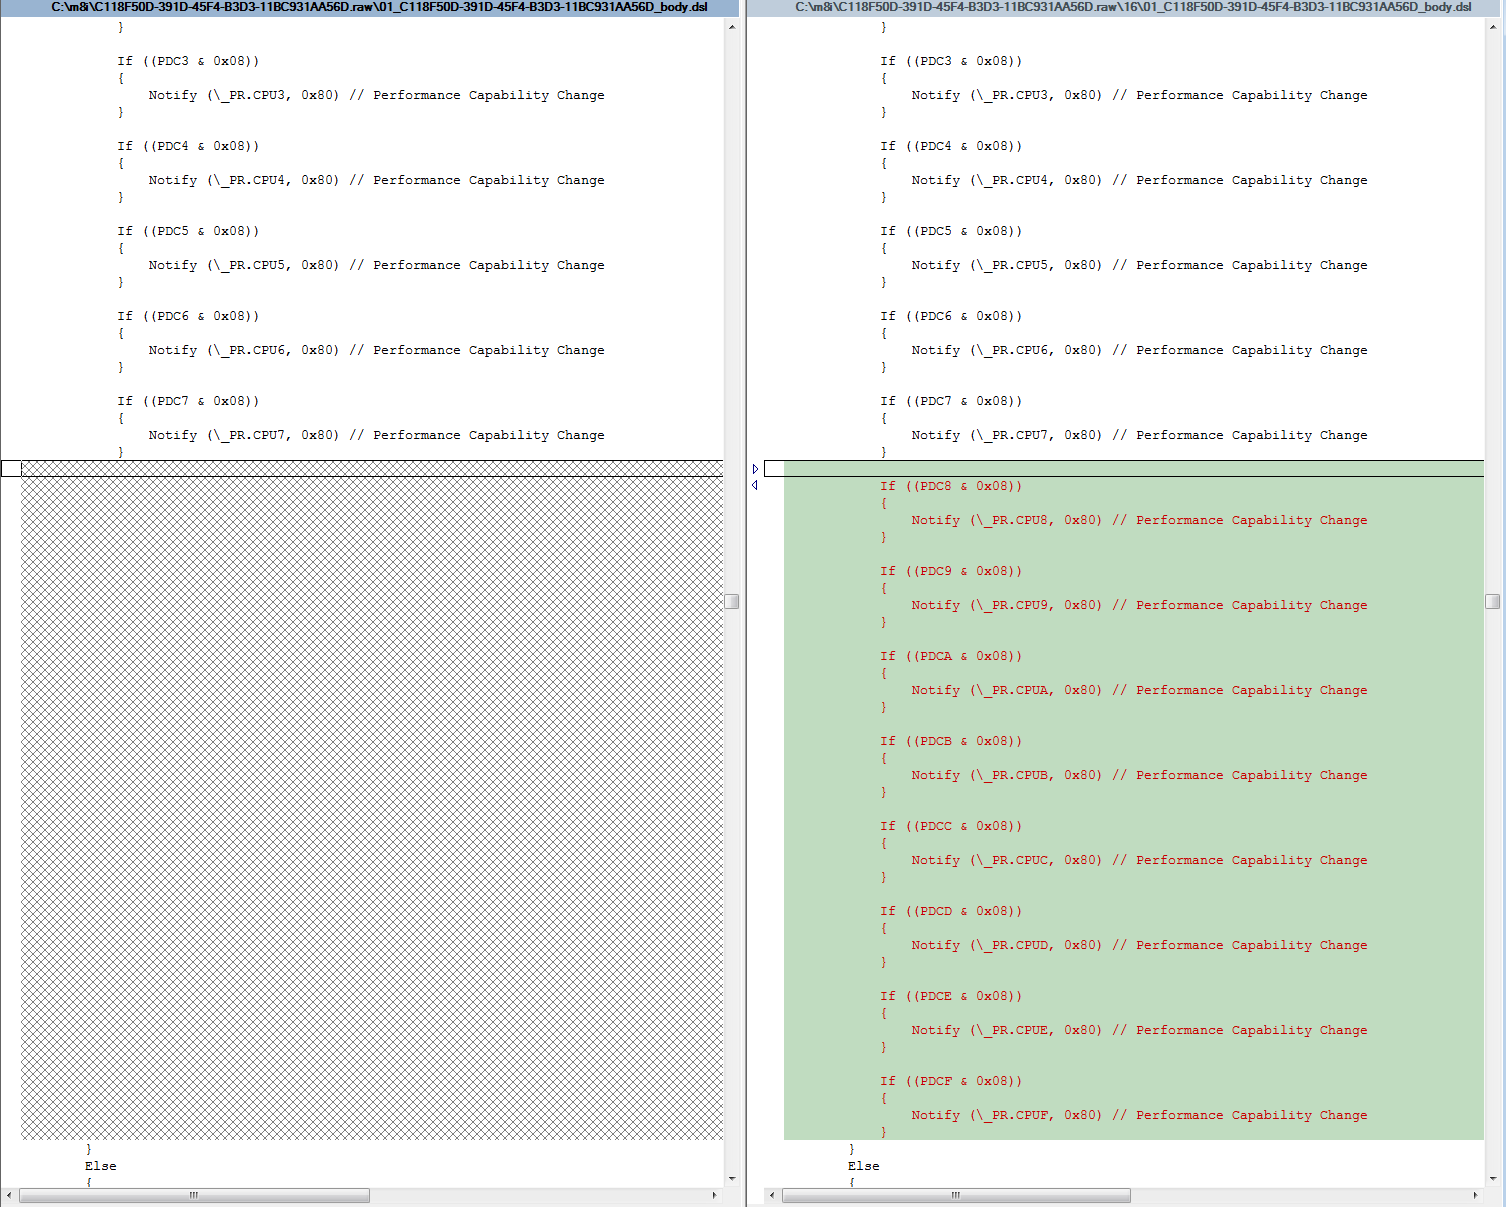
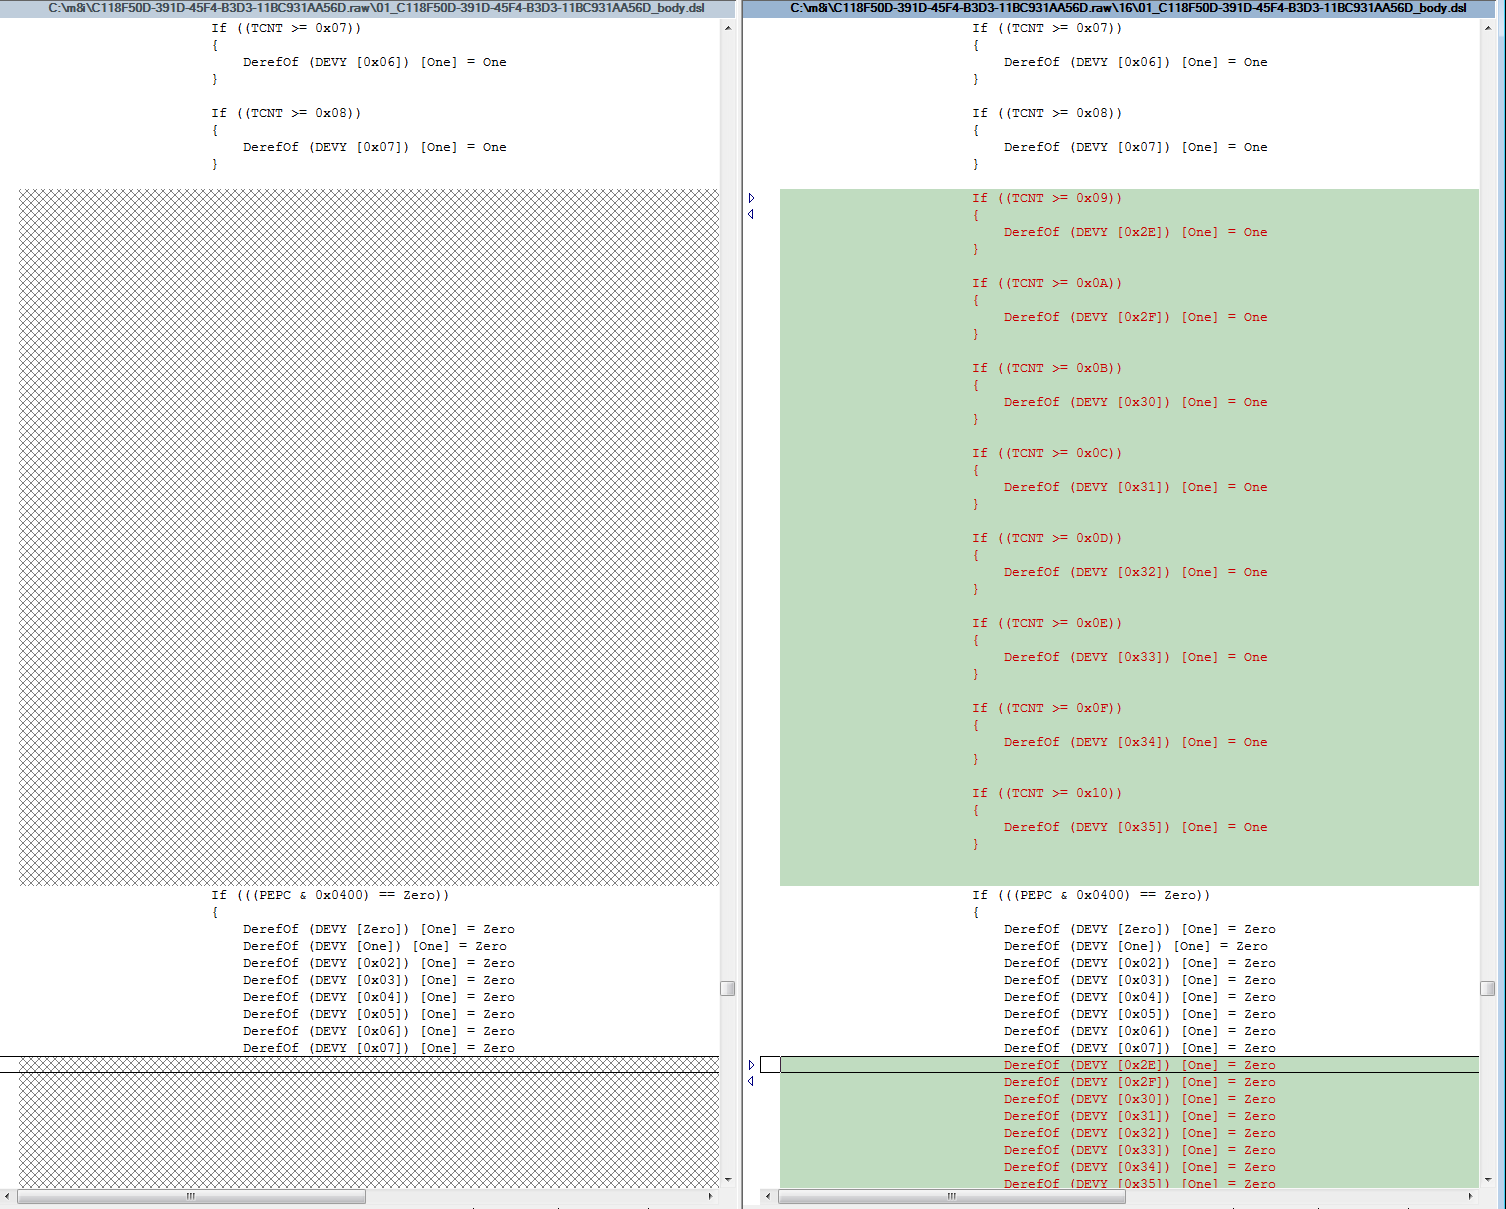
The changes are pretty straightforward. When we see block of code with "CPU0", "CPU1" .. "CPU7" we simply create/append new block that will contain "CPU8", "CPU9" .. "CPUF". All modified files, for Maximus VIII Impact (M8I), are attached. Opening original and modified file (from subfolder "16"), in file compare tool, will help to understand what changes need to be done. Notice, that we also need to make changes to all references/objects/variables that are related to CPUs:

7_pdc1.png


8_pdc2.png


On M8I, these new names/variables are defined:

CPU8 .. CPUF
STS8 .. STSF
PDC8 .. PDCF
CAPA .. CAPF


Special care should be taken with "A M I " table. There is a code:

1
2
3
4
5
6
7
8
9
10
11
12
13
14
15
16
17
18
19
20
 
Name (DEVY, Package (0x2E)
{
Package (0x03)
{
"\\_PR.CPU0",
Zero,
Package (0x02)
{
Zero,
Package (0x02)
{
0xFF,
Zero
}
}
},
 
Package (0x03)
{
"\\_PR.CPU1",


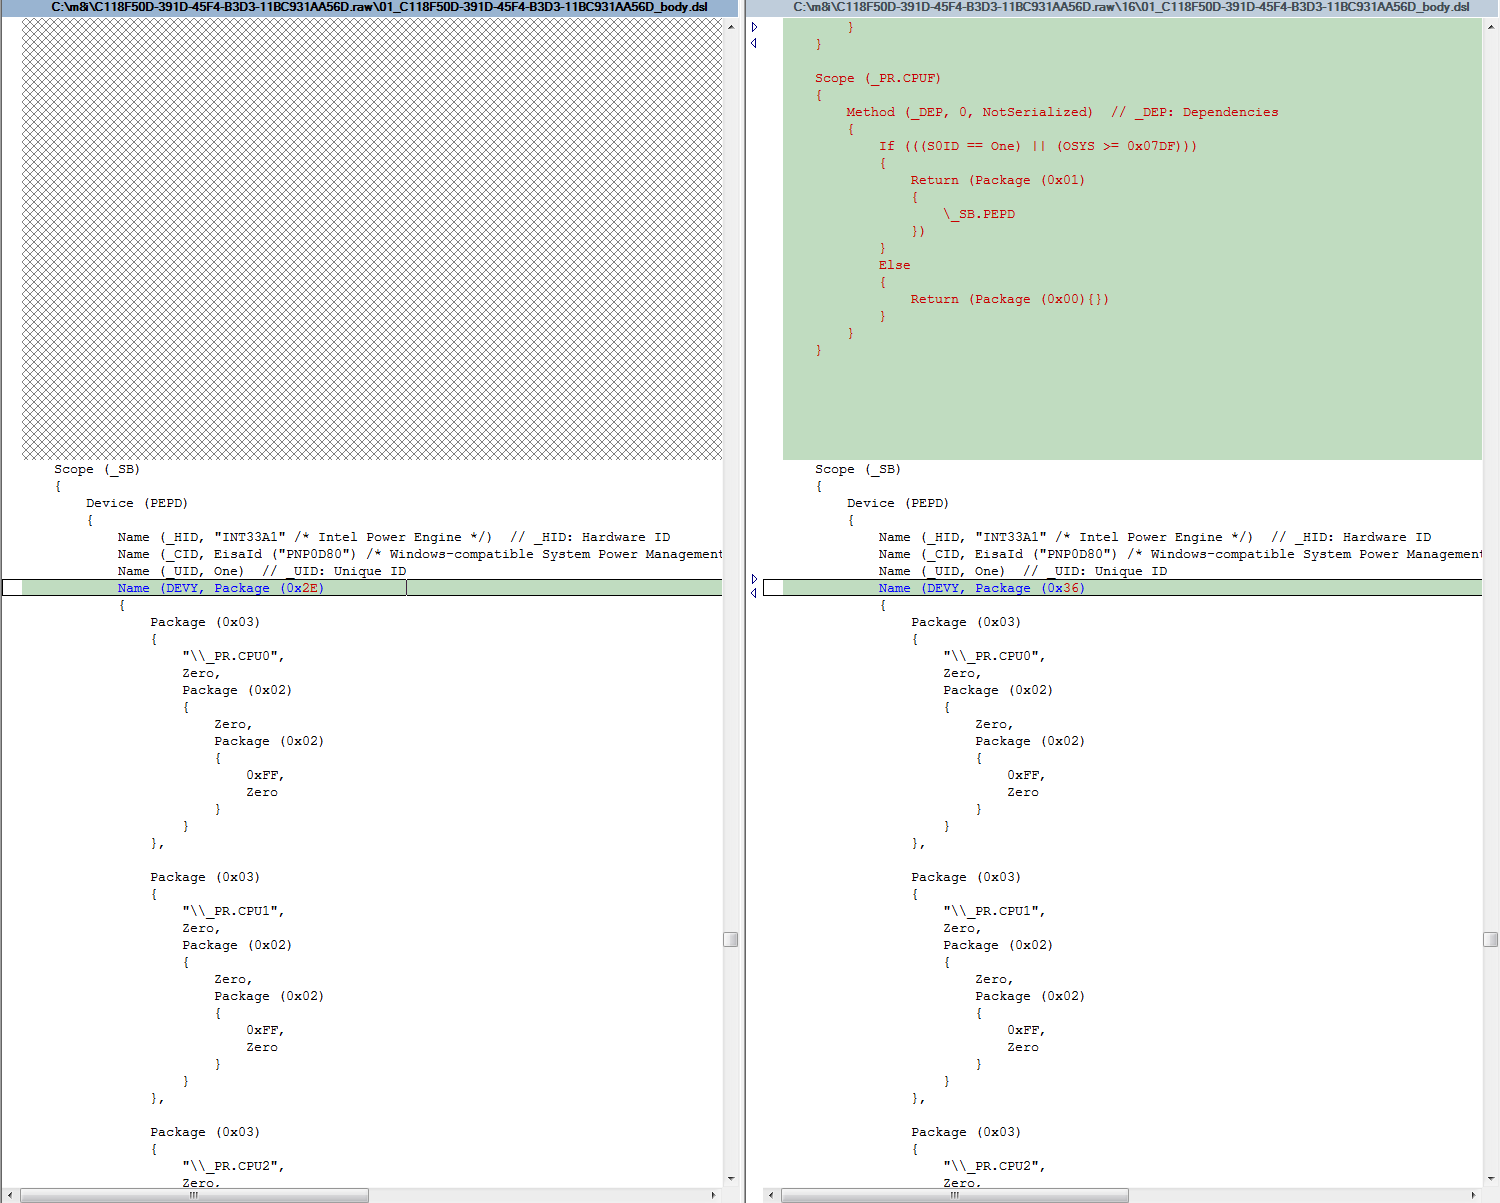
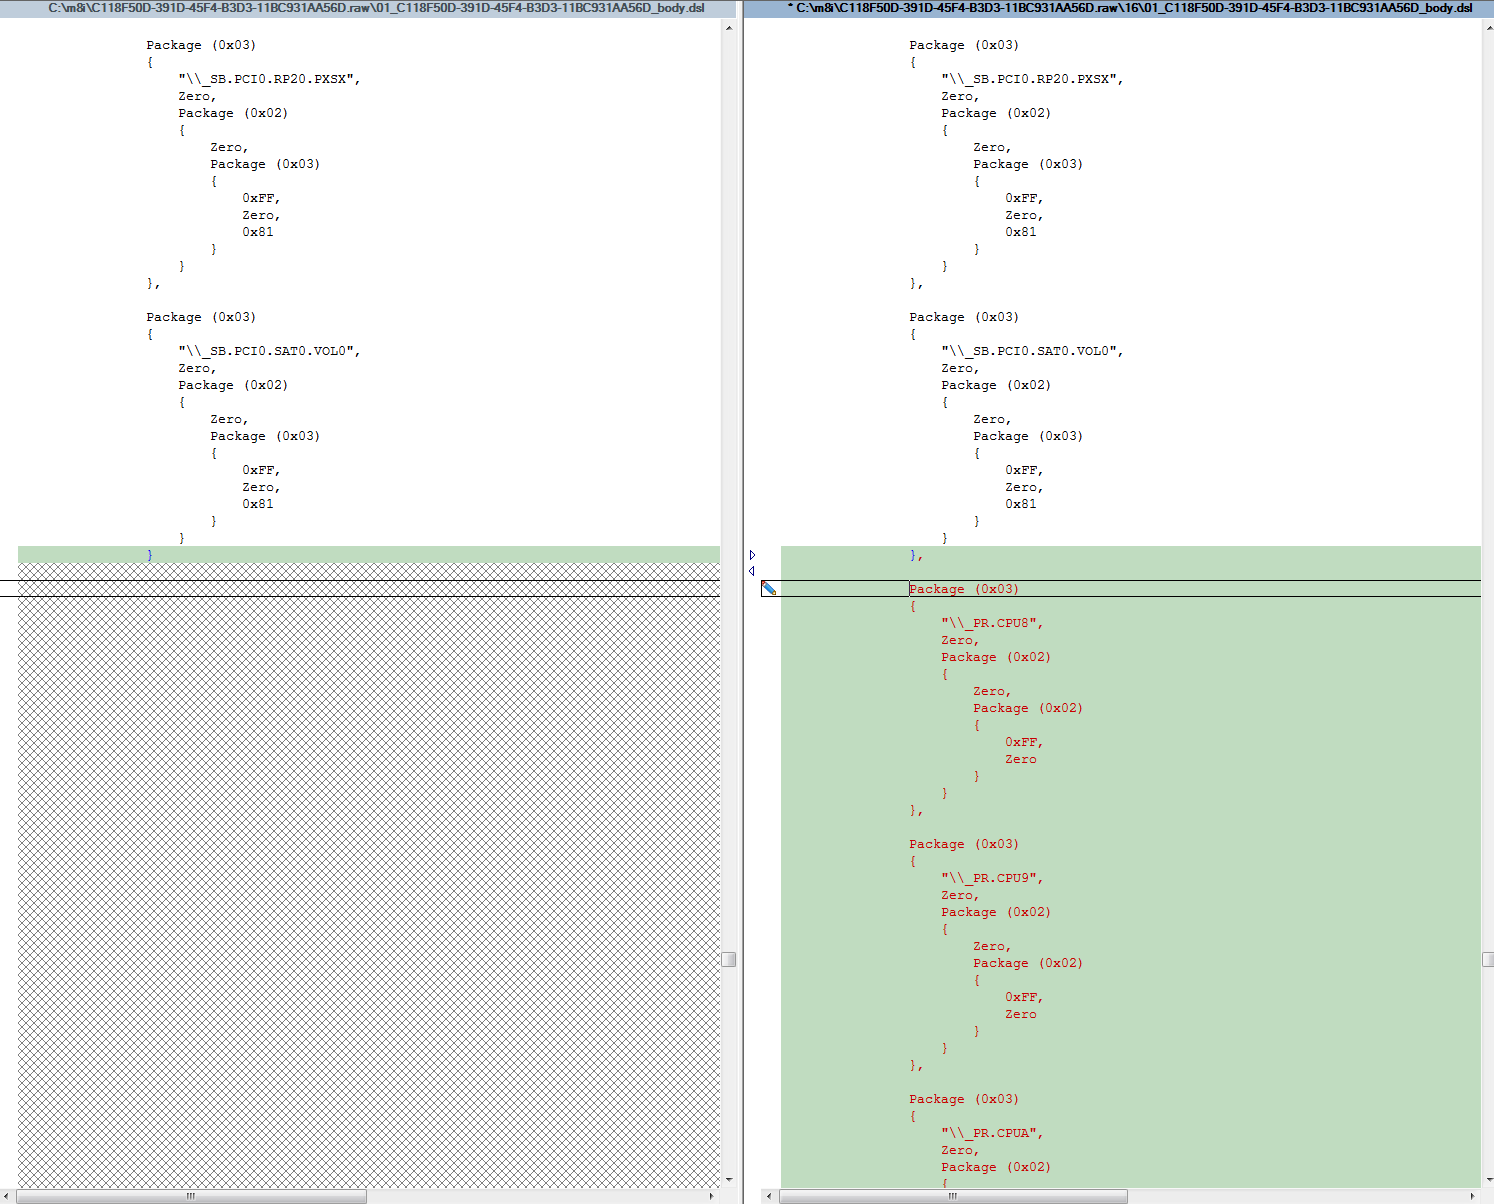
We need to add 8 new packages (for "CPU8" .. "CPUF") into this "DEVY" package. In this case, we do not want to insert the new packages for "CPU8" .. "CPUF" right after packages for "CPU1" .. "CPU7". If we do this, we will change the order of all remaining entries of the "DEVY" package, and we would need to change/modify all references to items in the "DEVY" package. Better solution is to add new packages (for "CPU8" .. "CPUF") at the end of the list. Using file compare tool on original and modified file should make this clear:

9_devy1.png


10_devy2.png


Notice, that we need to increase the number 0x2e (count of items in "DEVY" package) to 0x36 (we are adding 8 new items). We are inserting new items (into "DEVY" package) at position 0x2e .. 0x35 (for "CPU8" .. "CPUF"), so the location/reference to these items is DEVY[0x2e] .. DEVY[0x35]. We will remember this location when adding code:

11_devy3.png


2.4 compile modified tables

We execute iASL tool on the modifed tables (.dsl files) to get compiled version of the tables (.aml files):

12_compile.png


2.5 replace/insert modified tables to BIOS

Using UEFITool, we replace Raw sections/original ACPI tables (from step 2.1) from the BIOS file, with our new modified tables (.aml files):

13_replace.png


Save the BIOS file and flash. Software flash method (ASUS Flashback) is sufficient, hardware/SPI flashing is not required.

Power management in operating system (Windows) should work now. If we get BSOD, after resuming from standby, or the CPU multiplier is locked to base frequency (no Turbo mode) - in load, then we probaly made some error in fixing ACPI tables.

m8i.zip (214 KB)

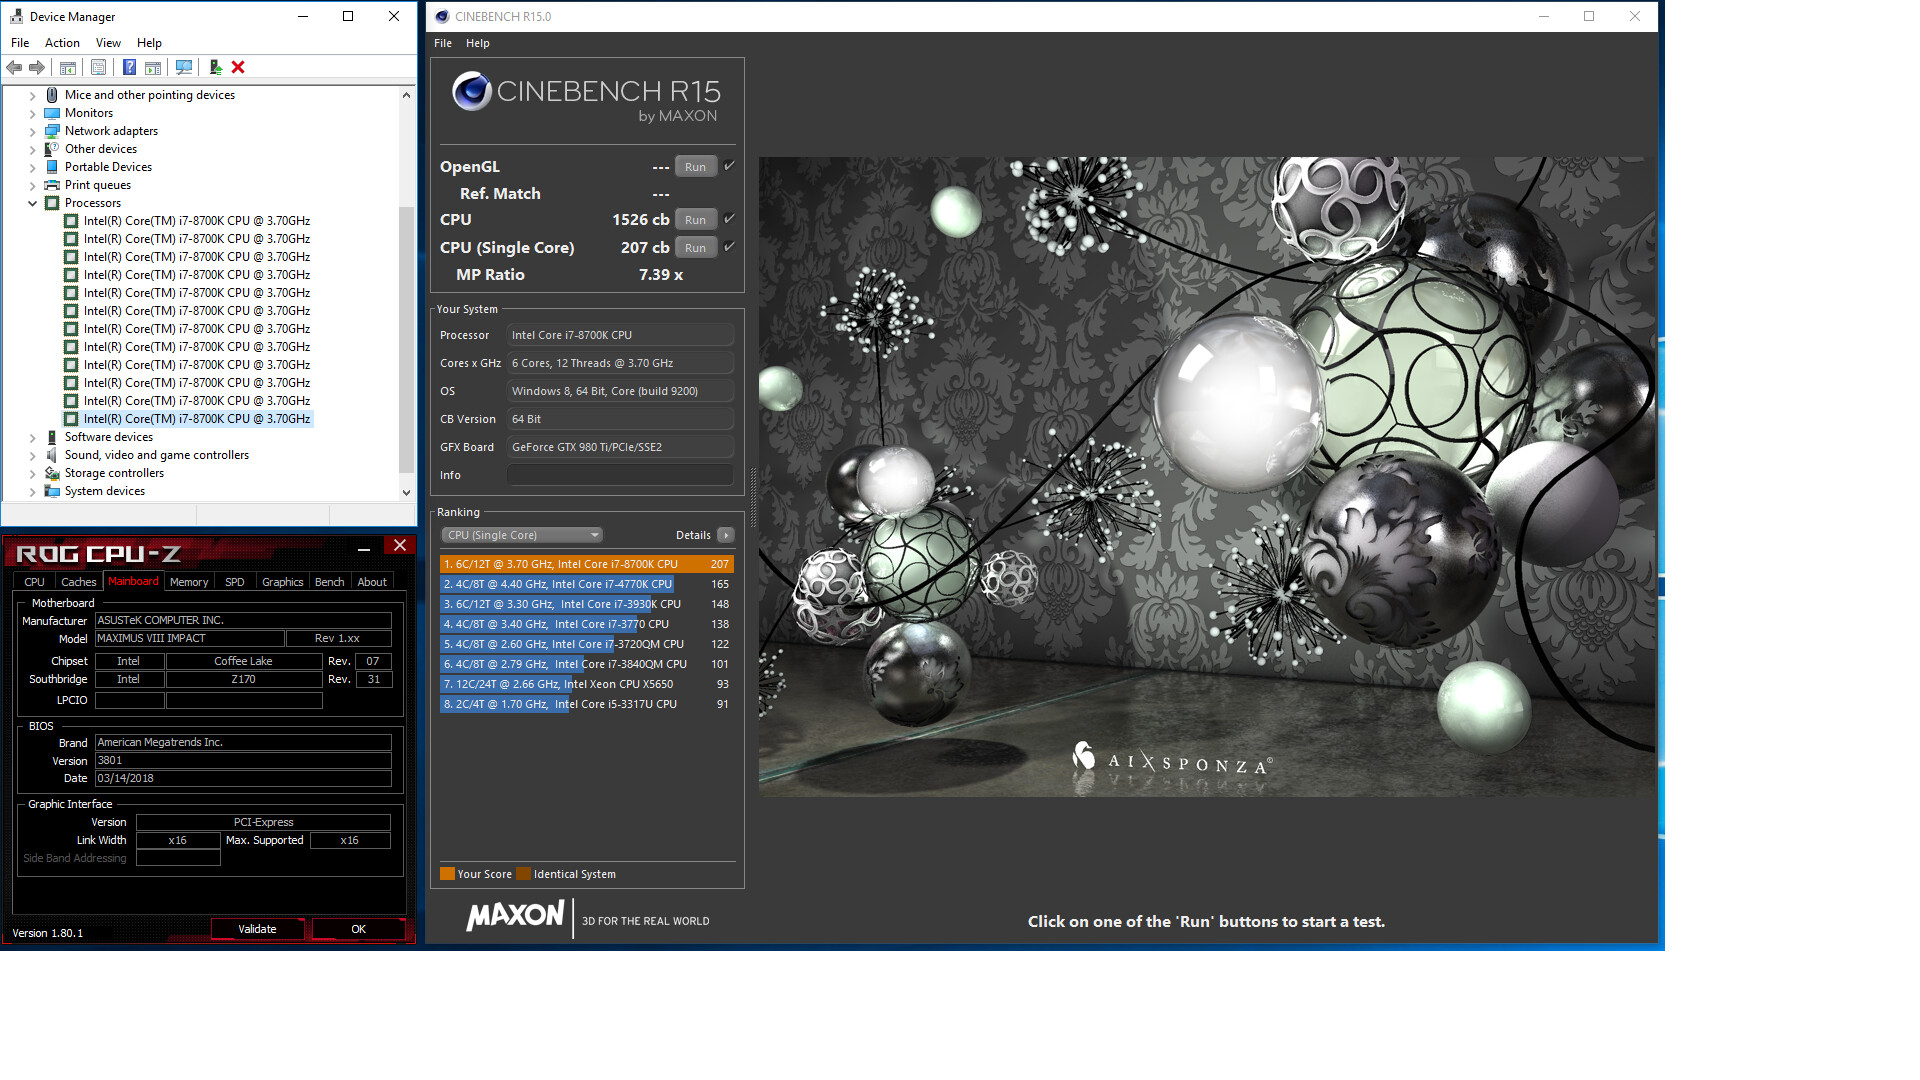
Maximus VIII Impact + i7-8700K with multiplier of 47:

1.jpg


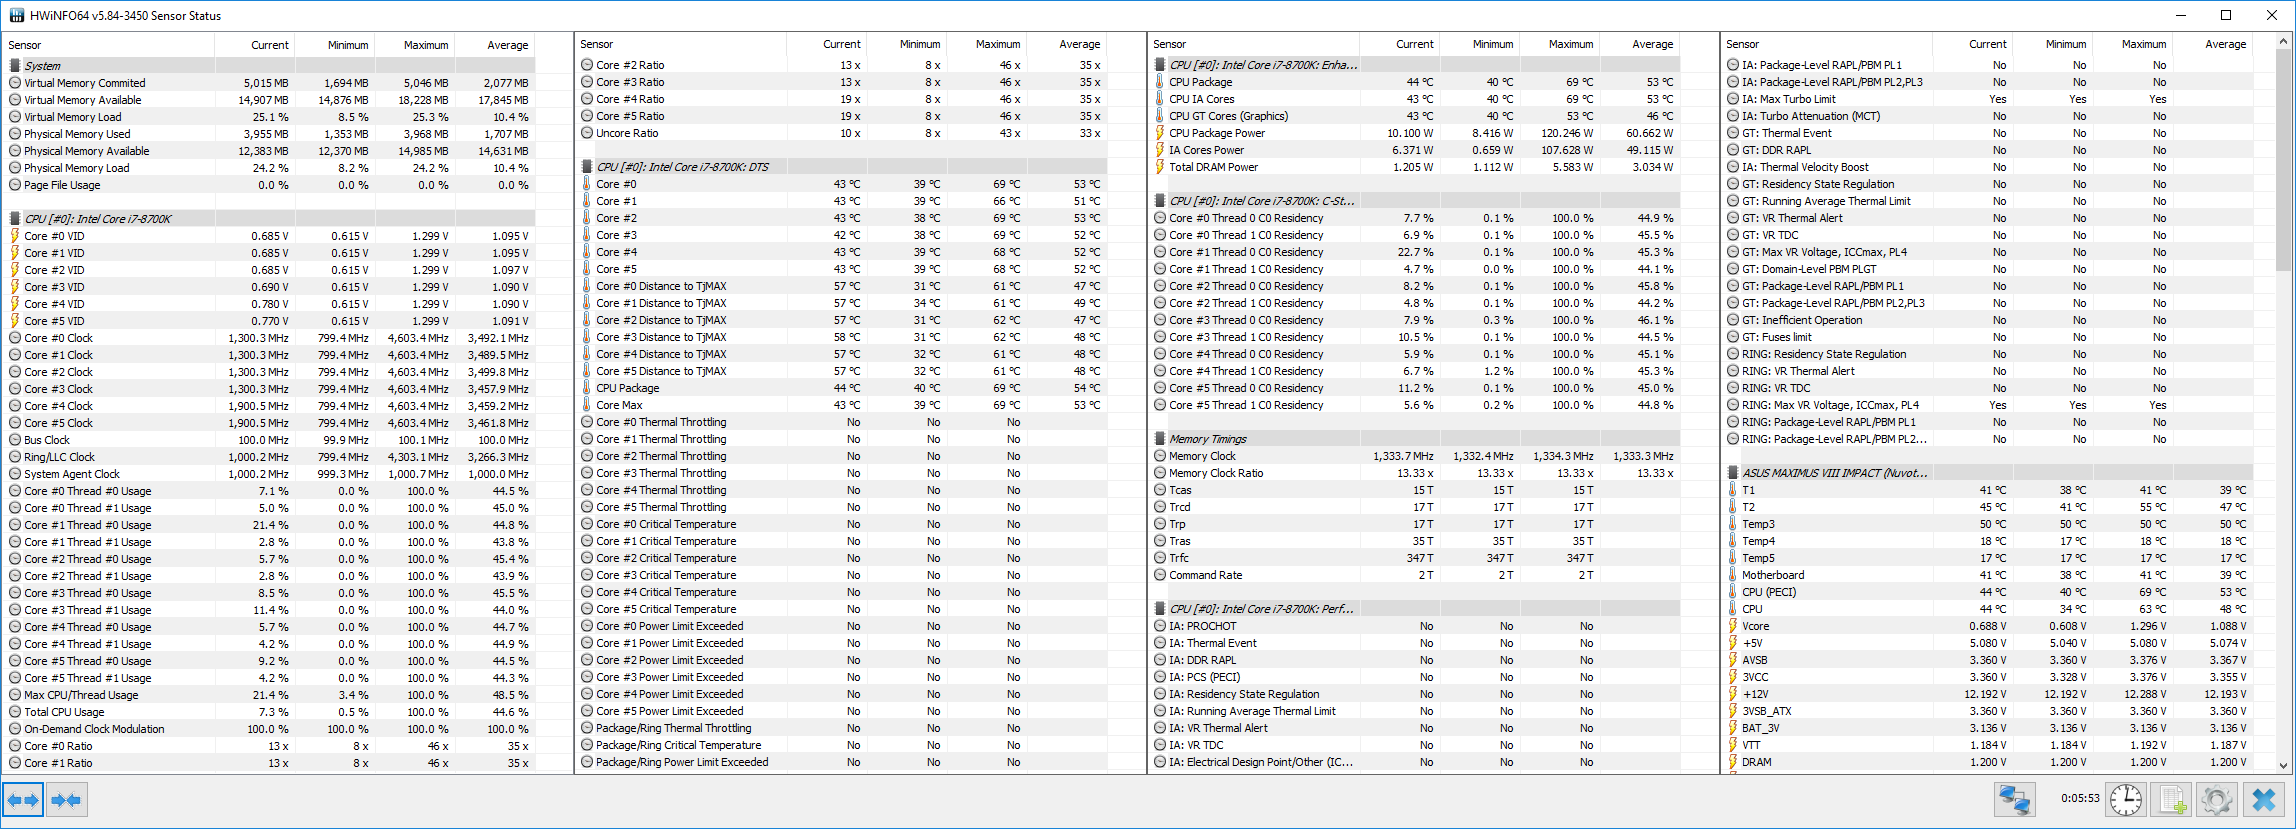
Power management - downclocking/downvolting is also working (with 8700K it can save you cca 10W when idle):

2.png

Updated in May 18th 2021:
I got the way to fully unlock 16 threads on all these mainboards:
[GUIDE] Additional for fully unlock 16 threads for 22nm PCH Intel 100/200/300s mainboards.

Great thanks to @s.napi !
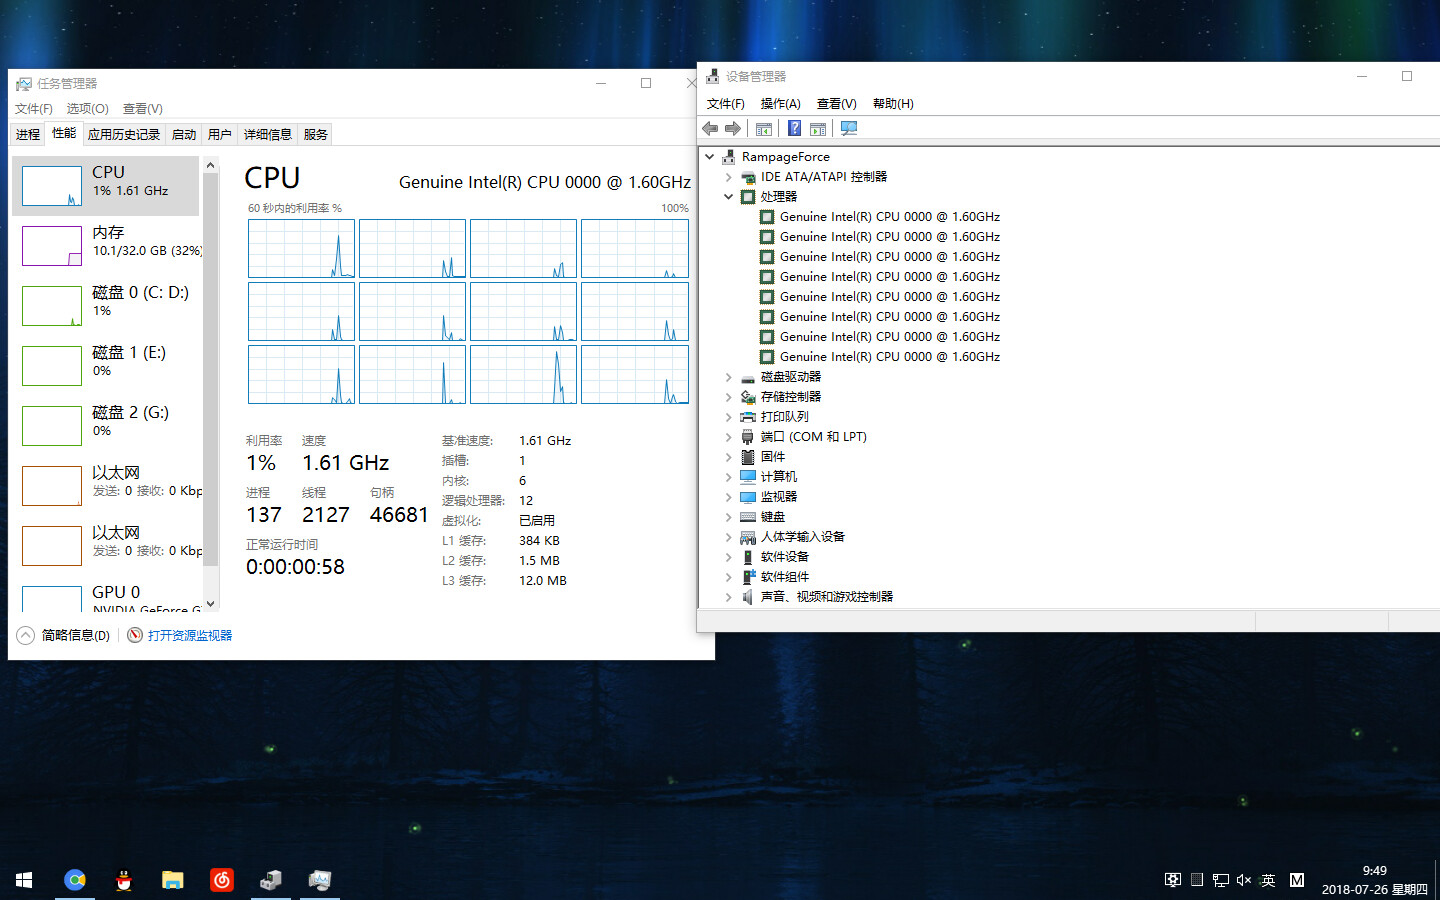
Succeed in fixing my Gigabyte B150M DS3H DDR3 .
I didn’t do the DSDT fix , so the CPU numbers in Device Manager is abnormal.

Success.jpg

Can you get the CPU to other frequencies/is turbo mode working? Any problems with system stability (BSOD after resume from sleep)?


In this Gigabyte motherboard , no stability problems at all. And CPU Turbo is normal , just shows in Task Manager abnormally.

In other manufacturer motherboard , turbo boost is lost .But if I set Boot performance mode to Turbo Performance , and turbo boost will resume work.
No BSOD after resume from sleep too.

Now I found other problems : Freq showed in Task Manager always Non-Turbo freq , and it wont change . So Windows Task Manager will calculate CPU load incorrectly .And the uncore ratio is locked to highest 28x.(When I use BIOS port from Z370 , it can become 31x, my CPU is QN8J , it support single turbo to 36x and hexa core turbo to 31x.)
I don’t know whehter they are related to ACPI tables , I will fix my ACPI tables and check again.

Update : After fix 13 ACPI tables , the freq in Windows Task Manager is correct.
Uncore ratio is still 28x.

congratulations. very impressive what you did.

€dit: can you name a dissasembler tool for windows? only tool that I can found, and able to use it, was an online dissasembler.

Congratulations, very impressive work!
One question - after the mod, are the core ratio multiplier settings for core 5 and 6 now visible in bios? Or is it the case that just as before only 4 cores are adjustable, however syncing all cores syncs the set multiplier speed also on cores 5 and 6?
Can you also upload you ready modded bios?
I also have M8I but with i5-8600k and would love to give it a try.

@mtothaj no those are bios specific options. Sync all cores will still only apply up to 4c. It’s easiest to just use 125bclk though. With the 8x fclk multiplier, it’ll still run at 1000mhz. Would allow up to 5375 for 8700k and 5125 for 8600k. Otherwise, 133bclk works fine as well (slightly overclocked fclk at 1066) if you need higher clocks.

@ziddey would it be possible to insert a module from another mainboard to get the core adjustment for all 6 cores working? For the asrock z170 mocf there is a patched bios out with the possibility to change all 6 cores. I didn´t know how it´s coded into the bios, so maybe my question is stupid.

@mtothaj , @oldirdey , @ziddey
Actually, there is also fix for sync all cores (for M8I). You can’t choose ratio for 4,5,6 cores individually, in BIOS, but if you choose “Sync All Cores”, all cores will be synced now. It will work from one up to eight cores. One byte patch in module C654E340-2DB5-4896-BBC4-6EA45CFEB434. Here is a link to patched (16 cpu Coffee Lake compatible) M8I (v3801) BIOS capsule. Use Flashback method. Presence of Coffee Lake compatible BIOS (or at least ME region) is required - Flashback will not flash ME region.

@s.napi many thanks for this. I have just tried to flash via bios flashback using a number of different usb drives but no luck - the flashback light flashes for a few moments but then just stays lit. This is more or less my experience with bios flashback when trying to flash the 6C / Z370 SKU bios mod via bios flashback - never got it to work and always had to use SPI programmer.
I will need to disassemble the machine and try to flash via SPI programmer, first extracting bin from .cap and adding my board data and will report back.


EDIT: Finally I succeeded using bios flashback - for some reason ‘problem’ was with pendrive - the branded ones like Adata or Kingston did not want to work (tried 4 different ones from reputable brands) but the cheapest, nastiest one I had ended up working fine.
Bios works great with i5-8600k - All core enhancement syncs all 6 cores so no more need to use XTU. Many thanks for this :slight_smile:

I understand that in future it will be necessary to add new microcode of the 9 gen CPU’s like i9-9900k etc assuming there will be no new hurdles / obstacles stoping them from working on older boards.

I had the same problem a time ago. But I can’t remember what the cause was now (usb disk in wrong port, bad format of cap file…). Anyway, you can use any other software flash method (afudos, afuwin…). In case of SPI flashing, dont forget to replace BIOS header/ME region of posted BIOS file.

@s.napi awesome thank you. I compared the ocmr_pei modules and see that you’ve changed one byte from F4 to F0. I found the same pattern in my bios (asus z170 pro gaming/aura) and will give it a change as well. Can you explain what’s actually going on here?

Thanks to @s.napi again ,you have saved ASUS old motherboards.
Could you please help me have a look at other manufacturer’s motherboard and BIOS?
I can’t find such module like ASUS.

Update : Found mov ecx,1ADh wrmsr in SiInit PEI module too.

Thank you very much for s.napi !

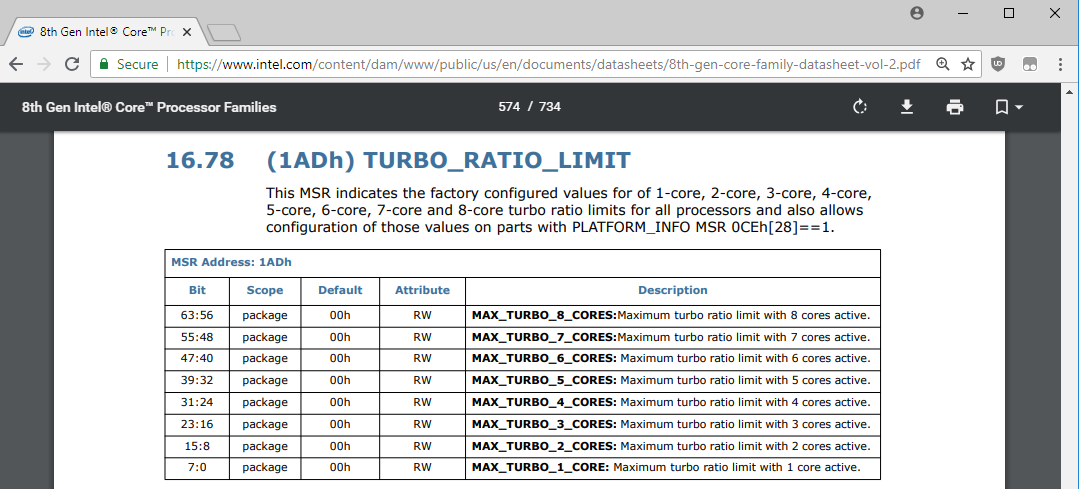
Setting turbo ratio is done via writing to model specific register (wrmsr 1ad). Intel specification:

intel.png


Original Asus code (probably manufacturer specific):

0000f1ef  8b55f4          mov         edx, [ebp-0000000c]
0000f1f2 8b45f0 mov eax, [ebp-00000010]
0000f1f5 b9ad010000 mov ecx, 0x1ad
0000f1fa 0f30 wrmsr

Z170 BIOS knows only 4 cores CPUs so it sets only bits 0…31 (eax). Bits 32…63 (edx) will be 0 (or previous values read from CPU). We can move to edx the same value that is being moved to eax ([ebp-00000010]):
0000f1ef 8b55f0           mov         edx, [ebp-00000010]
0000f1f2 8b45f0 mov eax, [ebp-00000010]
0000f1f5 b9ad010000 mov ecx, 0x1ad
0000f1fa 0f30 wrmsr

If we set "Sync All Cores", ratio 50 in BIOS setup, then in eax is four bytes with value 50, this is copied also into edx and on 6 (8) core CPU we are setting ratio 50 for 5,6 (7,8) active cores.

Thanks to @s.napi again and again , I finally got sync all core ratio work on BIOSTAR motherboard and MSI laptop.

I succeeded using your guide @s.napi and modded the coffeelake bios provided by mtothaj. Still need to test the coffee lake cpu but I think it will work like the celeron I am using now for testing the bios.

But how did you get the .raw file, that you mentioned in Point 2.1 / 2.2 of your Guide, extracted? I was not able to extract them in that specific format so I used your attached files for compiling them in Point 2.4 of your Guide.

Use uefitool for extracting. If you have M8I board, and already compatible ME region flashed, you can use already modded bios from post #11.