Firstly, apologies for asking some novice question here, never done this sort of thing before. I’ve had a read of a number of post of similar question but I feel I’m missing some basic information as I’m not getting very far.
What have I got.
Dell Optiplex 7070 with AMT enabled in the BIOS and I can boot and press CTRL P to enter the ME options.
Runnng Windows 10. Within I can run ‘Intel Management and Security Status’ and it reports that PC is running Standard Manageability Technology.
Using MechCommander I can connect to the PC via AMT, power cycle it etc but not KVM to it, this is the goal of this excersize. To do this I understand I need to update the ME to full vPro
Looking in Device Manager in Win10 it reports the ‘Intel Management Engine Interface’ as using the driver 1914.12.0.1256
What have I tried:
I have gone to Intel Management Engine: Drivers, Firmware & System Tools and got a little confused as to what I need to download. It seems I need to run MEinfo to find out what ME I’ve got. I’ve downloaded Intel ME System Tools v10.0 r7 - (2018-08-08) and r6, unpacked, ran \Intel ME System Tools v9.5 r[6 7]\MEInfo\WIN64\MEInfoWin64.exe and got back and error:
Error 9460: Unknown or unsupported hardware platform
I assume I’ve downloaded the wrong package, how do I know what is the correct MEInfo version to run?
From the same downloaded package I’ve tried to run Intel ME System Tools v9.5 r[6 7]\Flash Programming Tool\WIN64\fptw64.exe -i, again another error
Error 201: [FPTw64.exe] cannot be run on the current platform.
It feels like just not getting the basic steps here, I’ve not even got to working out how to enable vPro.
Can anyone guide me to get started please?
Many thanks in advance.
Chris
OK, some progress.
I rebooted the PC into the MEBx settings, from there I could see I needed v12 of Intel CSME System Tools. Downloaded and unpacked. I ran MEInfoWin64.exe and FPTW64.exe -i with the following results. I’ve also run FPTW64.exe -D e:\amtdell.bin -me and attached the output.
Where do I go from here to enable full vPro?
Thanks
2
3
4
5
6
7
8
9
10
11
12
13
14
15
16
17
18
19
20
21
22
23
24
25
26
27
28
29
30
31
32
33
34
35
36
37
38
39
40
41
42
43
44
45
46
47
48
49
50
51
52
53
54
55
56
57
58
59
60
61
62
63
64
65
66
67
68
69
70
71
72
73
74
75
76
77
78
79
80
81
82
83
84
85
86
87
88
89
90
91
92
93
94
95
96
97
98
99
100
101
102
103
104
105
106
107
108
109
110
111
112
113
114
115
116
117
118
119
120
121
122
123
124
Intel (R) MEInfo Version: 12.0.64.1551
Copyright (C) 2005 - 2020, Intel Corporation. All rights reserved.

General FW Information

    Platform Type                              Desktop
    FW Type                                    Production
    Last ME Reset Reason                       Global system reset
    BIOS boot State                            Post Boot
    Slot 1 Board Manufacturer                  0x00001028
    Slot 2 System Assembler                    0x00000000
    Slot 3 Reserved                            0x00000000
    Capability Licensing Service               Enabled
    Local FWUpdate                             Enabled
    OEM ID                                     68853622-EED3-4E83-8A86-6CDE315F6B78
    Integrated Sensor Hub Initial Power State  Disabled
    Intel(R) PTT Supported                     Yes
    Intel(R) PTT initial power-up state        Disabled
    OEM Tag                                    0x00
    TLS                                        Enabled

Intel(R) ME code versions:
    BIOS Version                               1.3.1
    MEBx Version                               12.0.0.0010
    Vendor ID                                  8086
    FW Version                                 12.0.49.1556 H Corporate
    LMS Version                                1946.12.0.1327
    MEI Driver Version                         1914.12.0.1256
    Wireless Hardware Version                  Not Available
    Wireless Driver Version                    Not Available

IUPs Information
    PMC FW Version                             300.2.11.1024
    LOCL FW Version                            12.0.49.1556
    WCOD FW Version                            12.0.49.1556

PCH Information
    PCH Version                                12
    PCH Device ID                              A306
    PCH Step Data                              B2
    PCH SKU Type                               Production PRQ Revenue
    PCH Replacement State                      Disabled
    PCH Replacement Counter                    0
    PCH Unlocked State                         Disabled

Flash Information
    SPI Flash ID 1                             Not Available
    SPI Flash ID 2                             Not Available
    Host Read Access to ME                     Not Available
    Host Write Access to ME                    Not Available
    Host Read Access to EC                     Not Available
    Host Write Access to EC                    Not Available

FW Capabilities                                0x79329146
    Intel(R) Standard Manageability - PRESENT/ENABLED
    Protect Audio Video Path - PRESENT/ENABLED
    Intel(R) Dynamic Application Loader - PRESENT/ENABLED
    Intel(R) Platform Trust Technology - PRESENT/DISABLED
    Service Advertisement & Discovery - PRESENT/ENABLED
    Persistent RTC and Memory - PRESENT/ENABLED

End Of Manufacturing
    Post Manufacturing NVAR Config Enabled     No
    HW Binding                                 Enabled
    End of Manufacturing Enable                Yes

Intel(R) Active Management Technology -
    Intel(R) AMT State                         Disabled
    IPv6 Enablement                            Disabled
    Configuration State                        Completed
    Provisioning Mode                          PKI
    M3 Autotest                                Enabled
    Link Status                                Link Up
    Localized Language                         English
    C-link Status                              Enabled
    System UUID                                4c4c4544-0035-4e10-8032-cac04f303333
    Wireless Micro-code Mismatch               No
    AMT Global State                           Enabled
    Intel(R) Standard Manageability State      Enabled
    Privacy/Security Level                     Default

Intel(R) Protected Audio Video Path
    Keybox                                     Not Provisioned
    Attestation KeyBox                         Not Available
    EPID Group ID                              0x28F0
    Re-key needed                              False
    PAVP Supported                             Yes

Security Version Numbers
    Minimum Allowed Anti Rollback SVN          1
    Image Anti Rollback SVN                    8
    Trusted Computing Base SVN                 1

FW Supported FPFs
                                               FPF         UEP         ME FW
                                               *In Use
                                               ---         ---         -----
Enforcement Policy                             0x03        0x03        0x03
EK Revoke State                                Not Revoked Not Revoked Not Revoked
PTT                                            Enabled     Enabled     Enabled
OEM ID                                         0x00        0x00        0x00
OEM Key Manifest Present                       Not Present Not Present Not Present
OEM Platform ID                                0x00        0x00        0x00
OEM Secure Boot Policy                         0x3F9       0x3F9       0x3F9
CPU Debugging                                  Enabled     Enabled     Enabled
BSP Initialization                             Enabled     Enabled     Enabled
Protect BIOS Environment                       Enabled     Enabled     Enabled
Measured Boot                                  Enabled     Enabled     Enabled
Verified Boot                                  Enabled     Enabled     Enabled
Key Manifest ID                                0x0F        0x0F        0x0F
Persistent PRTC Backup Power                   Enabled     Enabled     Enabled
RPMB Migration Done                            Disabled    Disabled    Disabled
SOC Config Lock                                Done        Not Done    Done
SPI Boot Source                                Enabled     Enabled     Enabled
TXT Supported                                  Disabled    Disabled    Disabled

ACM SVN FPF                                    0x02
BSMM SVN FPF                                   0x00
KM SVN FPF                                     0x00
OEM Public Key Hash FPF                      69602F34CC9D121ECB7785F4F5CA4153ADC35633FF13A76B914FB2FE2835F691
OEM Public Key Hash UEP                      69602F34CC9D121ECB7785F4F5CA4153ADC35633FF13A76B914FB2FE2835F691
OEM Public Key Hash ME FW                    69602F34CC9D121ECB7785F4F5CA4153ADC35633FF13A76B914FB2FE2835F691
PTT Lockout Override Counter FPF               0x00
2
3
4
5
6
7
8
9
10
11
12
13
14
15
16
17
18
19
20
21
22
23
24
25
26
27
28
29
30
31
Intel (R) Flash Programming Tool Version: 12.0.49.1536
Copyright (C) 2005 - 2019, Intel Corporation. All rights reserved.

Reading HSFSTS register... Flash Descriptor: Valid

    --- Flash Devices Found ---
    W25Q256FV    ID:0xEF4019    Size: 32768KB (262144Kb)

    --- Flash Image Information --
    Signature: VALID
    Number of Flash Components: 1
        Component 1 - 32768KB (262144Kb)
    Regions:
        DESC     - Base: 0x00000000, Limit: 0x00000FFF
        BIOS     - Base: 0x01000000, Limit: 0x01FFFFFF
        CSME     - Base: 0x00003000, Limit: 0x00FFFFFF
        GbE      - Base: 0x00001000, Limit: 0x00002FFF
        PDR      - NOT PRESENT
        EC       - NOT PRESENT
    Master Region Access:
        BIOS     - ID: Read: 0x000F, Write: 0x000A
        CSME     - ID: Read: 0x000D, Write: 0x0004
        GbE      - ID: Read: 0x0009, Write: 0x0008
        EC       - ID: Read: 0x0101, Write: 0x0100

Total Accessible SPI Memory: 32768KB, Total Installed SPI Memory: 32768KB

FPT Operation Successful.
At this point I re-read the first page on Intel Management Engine: Drivers, Firmware & System Tools noting that v12 seems to apply to me. I downloaded:
- Intel CSME 12.0 Corporate PCH-H B,A Firmware v12.0.67.1579 (MEInfo reported 'FW Version 12.0.49.1556 H Corporate' and 'PCH Step Data B2')
- Intel PMC CNP PCH-H B Firmware v300.2.11.1025
- Intel PCHC CMP PCH-H/LP Firmware v14.0.0.7001
* I then start Flash Image Tool (after making sure the dir only contains fit.exe and vsccommn.bin). Load the CSME bin file (12.0.67.1579_COR_H_BA_PRD_EXTR-Y.bin).
* Follow the 'How to use CSME v12 FWUpdate Tool' on Intel Management Engine: Drivers, Firmware & System Tools setting "Number of Flash Components" to "0" and "Integrated Sensor Hub Supported" to "No".
* Create "cse_image_FWU_Base.bin"
* FWUpdate tool to flash the "cse_image_FWU_Base.bin" image -> \FWUpdate\Win64\FWUpdlcl64.exe -f c:\tmp\cse_image_FWU_Base.bin. This gave an error as the OEM string was missing. Grabbing the OEM Tag from MEInfo I added to the FWUpdlcl64.exe command line '-OEMID 68853622-EED3-4E83-8A86-6CDE315F6B78'. This reported a success and that a reboot was needed to apply.
* Reboot done. Looking in the MEBx bios settings, it's still saying it using Standard Manageability - why!!!!!!! I was expecting it to be full vPro. Are some AMT chips not vPro capably?
Help :(
amtdell.zip (4.27 MB)

(ME firmware included in latest Dell 7070 bios update opened in Intel (R) Flash Image Tool. Version: 12.0.49.1536)
Your dump can’t be opened in Fit
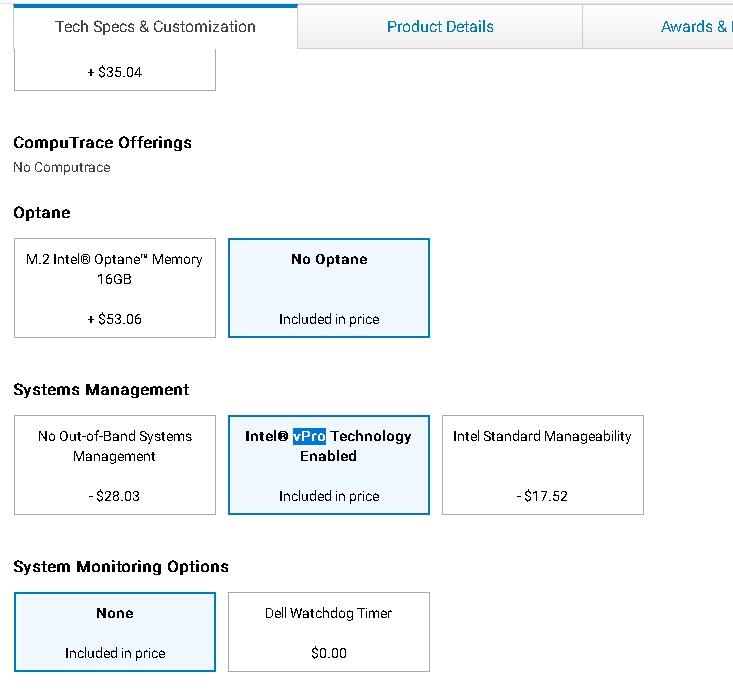
For a 7070 I found two configurations that allow for changing to “Standard managebility” saving $ 17.52… Unclear if this means disabling vPro in ME or maybe different hardware/ chipset.
Otherwise a change to a non- vPro- capable processor would change the sytem to "Standard managebility", for example. Lacking information about your system (Chipset/ processor).
I updated the BIOS today from 1.31 to the latest, 1.4.4. Reran MEInfo, results below:
2
3
4
5
6
7
8
9
10
11
12
13
14
15
16
17
18
19
20
21
22
23
24
25
26
27
28
29
30
31
32
33
34
35
36
37
38
39
40
41
42
43
44
45
46
47
48
49
50
51
52
53
54
55
56
57
58
59
60
61
62
63
64
65
66
67
68
69
70
71
72
73
74
75
76
77
78
79
80
81
82
83
84
85
86
87
88
89
90
91
92
93
94
95
96
97
98
99
100
101
102
103
104
105
106
107
108
109
110
111
112
113
114
115
116
117
118
119
120
121
122
123
124
125
Intel (R) MEInfo Version: 12.0.64.1551
Copyright (C) 2005 - 2020, Intel Corporation. All rights reserved.

General FW Information

    Platform Type                              Desktop
    FW Type                                    Production
    Last ME Reset Reason                       Global system reset
    BIOS boot State                            Post Boot
    Slot 1 Board Manufacturer                  0x00001028
    Slot 2 System Assembler                    0x00000000
    Slot 3 Reserved                            0x00000000
    Capability Licensing Service               Enabled
    Local FWUpdate                             Enabled
    OEM ID                                     68853622-EED3-4E83-8A86-6CDE315F6B78
    Integrated Sensor Hub Initial Power State  Disabled
    Intel(R) PTT Supported                     Yes
    Intel(R) PTT initial power-up state        Disabled
    OEM Tag                                    0x00
    TLS                                        Enabled

Intel(R) ME code versions:
    BIOS Version                               1.4.4
    MEBx Version                               12.0.0.0010
    GbE Version                                0.5
    Vendor ID                                  8086
    FW Version                                 12.0.67.1579 H Corporate
    LMS Version                                1946.12.0.1327
    MEI Driver Version                         1914.12.0.1256
    Wireless Hardware Version                  Not Available
    Wireless Driver Version                    Not Available

IUPs Information
    PMC FW Version                             300.2.11.1025
    LOCL FW Version                            12.0.67.1579
    WCOD FW Version                            12.0.67.1579

PCH Information
    PCH Version                                12
    PCH Device ID                              A306
    PCH Step Data                              B2
    PCH SKU Type                               Production PRQ Revenue
    PCH Replacement State                      Disabled
    PCH Replacement Counter                    0
    PCH Unlocked State                         Disabled

Flash Information
    SPI Flash ID 1                             EF4019
    SPI Flash ID 2                             Not Available
    Host Read Access to ME                     Enabled
    Host Write Access to ME                    Disabled
    Host Read Access to EC                     Disabled
    Host Write Access to EC                    Disabled

FW Capabilities                                0x79329146
    Intel(R) Standard Manageability - PRESENT/ENABLED
    Protect Audio Video Path - PRESENT/ENABLED
    Intel(R) Dynamic Application Loader - PRESENT/ENABLED
    Intel(R) Platform Trust Technology - PRESENT/DISABLED
    Service Advertisement & Discovery - PRESENT/ENABLED
    Persistent RTC and Memory - PRESENT/ENABLED

End Of Manufacturing
    Post Manufacturing NVAR Config Enabled     No
    HW Binding                                 Enabled
    End of Manufacturing Enable                Yes

Intel(R) Active Management Technology -
    Intel(R) AMT State                         Disabled
    IPv6 Enablement                            Disabled
    Configuration State                        Completed
    Provisioning Mode                          PKI
    M3 Autotest                                Enabled
    Link Status                                Link Up
    Localized Language                         English
    C-link Status                              Enabled
    System UUID                                4c4c4544-0035-4e10-8032-cac04f303333
    Wireless Micro-code Mismatch               No
    AMT Global State                           Enabled
    Intel(R) Standard Manageability State      Enabled
    Privacy/Security Level                     Default

Intel(R) Protected Audio Video Path
    Keybox                                     Not Provisioned
    Attestation KeyBox                         Not Available
    EPID Group ID                              0x28F0
    Re-key needed                              False
    PAVP Supported                             Yes

Security Version Numbers
    Minimum Allowed Anti Rollback SVN          1
    Image Anti Rollback SVN                    9
    Trusted Computing Base SVN                 1

FW Supported FPFs
                                               FPF         UEP         ME FW
                                               *In Use
                                               ---         ---         -----
Enforcement Policy                             0x03        0x03        0x03
EK Revoke State                                Not Revoked Not Revoked Not Revoked
PTT                                            Enabled     Enabled     Enabled
OEM ID                                         0x00        0x00        0x00
OEM Key Manifest Present                       Not Present Not Present Not Present
OEM Platform ID                                0x00        0x00        0x00
OEM Secure Boot Policy                         0x3F9       0x3F9       0x3F9
CPU Debugging                                  Enabled     Enabled     Enabled
BSP Initialization                             Enabled     Enabled     Enabled
Protect BIOS Environment                       Enabled     Enabled     Enabled
Measured Boot                                  Enabled     Enabled     Enabled
Verified Boot                                  Enabled     Enabled     Enabled
Key Manifest ID                                0x0F        0x0F        0x0F
Persistent PRTC Backup Power                   Enabled     Enabled     Enabled
RPMB Migration Done                            Disabled    Disabled    Disabled
SOC Config Lock                                Done        Not Done    Done
SPI Boot Source                                Enabled     Enabled     Enabled
TXT Supported                                  Disabled    Disabled    Disabled

ACM SVN FPF                                    0x02
BSMM SVN FPF                                   0x00
KM SVN FPF                                     0x00
OEM Public Key Hash FPF                      69602F34CC9D121ECB7785F4F5CA4153ADC35633FF13A76B914FB2FE2835F691
OEM Public Key Hash UEP                      69602F34CC9D121ECB7785F4F5CA4153ADC35633FF13A76B914FB2FE2835F691
OEM Public Key Hash ME FW                    69602F34CC9D121ECB7785F4F5CA4153ADC35633FF13A76B914FB2FE2835F691
PTT Lockout Override Counter FPF               0x00
Interestingly, when I ran the BIOS update it was reporting ME has having a version of 12.0.49.1556, the BIOS update would update ME to 12.0.67.1579, I though I manually done that successfully (according to the output of FWUpdlcl64.exe) a few days ago, did it 'not stick' or something. Anyway, long story cut short, I've still only got Standard Manageability and not full vPro.
Spec of the PC is:
2
3
4
5
6
7
8
9
10
11
12
13
14
15
16
17
18
19
20
21
22
23
24
25
26
27
28
29
30
31
32
33
34
35
36
37
38
39
40
41
42
43
44
45
46
47
48
49
50
51
General Information

Computer Model :
OptiPlex 7070
BIOS Vendor :
Dell Inc.
BIOS Version :
1.4.4
BIOS Date :
6/10/20
Processor

Processor :
Intel(R) Core(TM) i5-9500 CPU @ 3.00GHz
Clock Speed :
3Ghz
L2 Cache Size :
1536
Memory

Available Memory :
67.57%
Page File Size :
18,597.9MB
Available Page File :
100.00%
Virtual Memory :
18,597.9MB
Available Virtual Memory :
68.08%
DIMM1 :
16,384.0MB
Network controller


Hardware

Disk Drives
SanDisk Cruzer Blade USB Device
KBG40ZNS256G NVMe KIOXIA 256GB
Display Adapters
Intel(R) UHD Graphics 630
Keyboards, Mice & Pointing Devices
USB Input Device
Monitors
Generic PnP Monitor
Sound Devices
Intel(R) Display Audio
Realtek Audio
USB Controllers
Intel(R) USB 3.1 eXtensible Host Controller - 1.10 (Microsoft)
It now seems that after I performed the BIOS upgrade to 1.4.4 I now am unable to run fwtw64.exe to dump the current config:
2
3
4
5
6
7
8
fptw64.exe -me -d c:\tmp\amtdell2.bin

Error 189: File does not exist

Error 64: Failed to initialize SPI interface

FTP Operation Failed.
I thought I'd then find the service pins on the motherboard, found them, nicely labelled up. Placed a jump across then, power up the machine, saw the expected boot messages. OS loaded, fptw64.exe gave the same error so the jumpers didn't help :(
Any help progressing from here?
thanks in advance.
Remove all power from the system (AC + any batteries) for 1 minute and press the power button a few times in between. Set the service jumper which allows dumping the SPI chip, boot the system, download the latest CSME v12 System Tools package and run Flash Programming Tool with "fptw64 -d spi.bin" parameter. Try the EFI variant of FPT as well if you have issues with the WIN64 one. Afterwards, compress and attach (or link to) the output "spi.bin" image.
Thank you plutomaniac for your reply.
I ran fptw64 -d spi.bin. Output was:
2
3
4
5
6
7
8
9
10
11
12
13
14
15
Chris@AMTDELL c:\tmp\Intel CSME System Tools v12 r24\Flash Programming Tool\WIN64
# FPTW64.exe -d spi.bin
Intel (R) Flash Programming Tool Version: 12.0.49.1536
Copyright (C) 2005 - 2019, Intel Corporation. All rights reserved.

Reading HSFSTS register... Flash Descriptor: Valid

    --- Flash Devices Found ---
    W25Q256FV    ID:0xEF4019    Size: 32768KB (262144Kb)


- Reading Flash [0x2000000] 32768KB of 32768KB - 100 percent complete.
Writing flash contents to file "spi.bin"...
Memory Dump Complete
FPT Operation Successful.
spi.zip was larger than 6MB (11MB) therefore I wasn't able to attach it. I've placed a copy of it HERE
Thank you.
Here is a temporary link to the SPI dump with CSME firmware cleaned & AMT enabled. Flash it via “fptw64 -f spi_fix.bin”, reset the jumper to its original location and run “fptw64 -greset”. After the reboot, AMT should be configurable in MEBx.
Wow, thank you, that worked, thank you. The question is what did you do - unless it’s a secret? I’d like to learn what’s involved.
Cheers
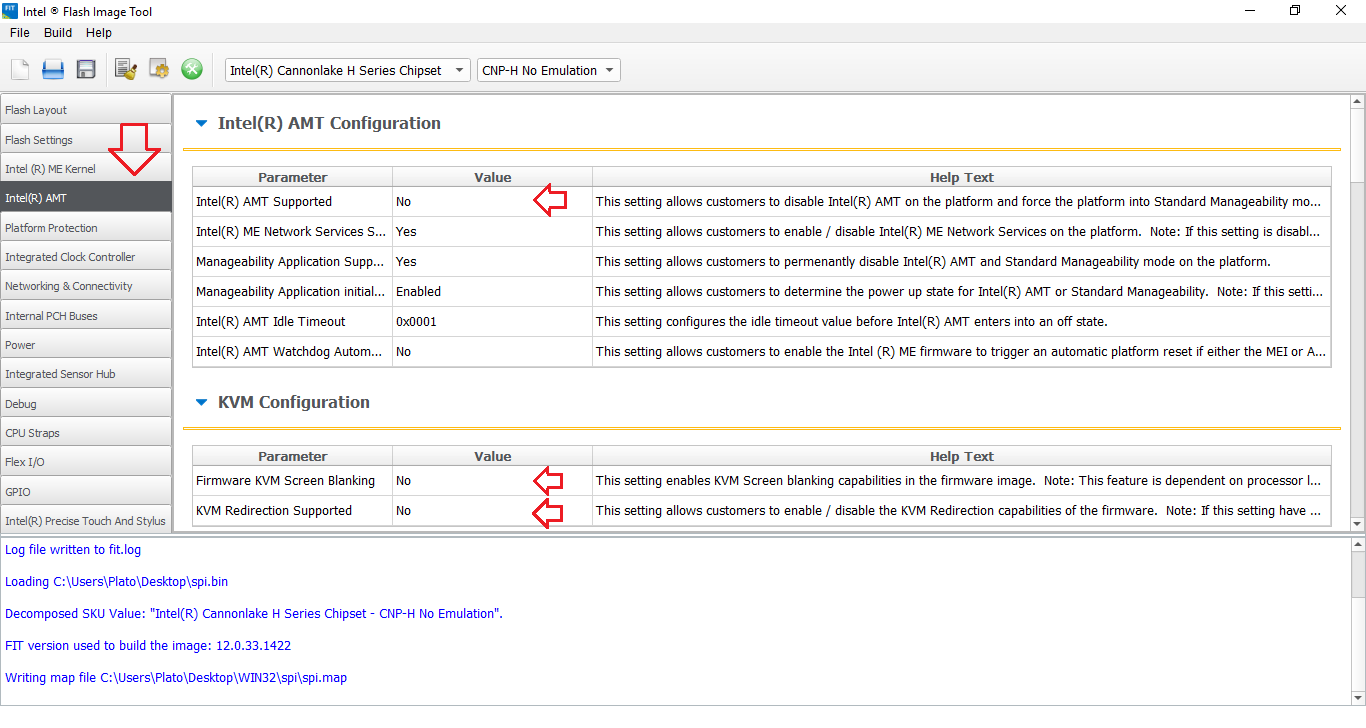
Oh, I can see those settings were set to ‘No’ now I’ve loaded my dumped spi.bin file into FIT. So you changed the three ‘NO’ to ‘YES’ and then ran Build menu -> Build Image? The windows that prompts ‘Boot Guard Profile - Boot Guard Profile Configuration is set to Boot Guard Profile 5. Do you want to continue’, what’s that about? OK as Profile 5?
This makes a file spi\Decomp\ME Sub Partition.bin, is this what you rename spi_fix.bin and sent to me?
I’ve been reading the page about ‘Clean Dumped Intel Engine’, I guess for me, today, as we were using the same PC to dump the BIOS and reload the new modified .bin file, I guess we didn’t need to worry about cleaning it. If we were making a new .bin file to install on other Dell 7700’s then we’d need to clean it as well, am I correct saying this?
I must admit I have got stuck with the process on cleaning an image, choosing the correct version of .bin file in ‘Intel CSME 12.0 Firmware Repository r21’. Is this something you can help me with if I list the processes I’ve done? I’m thinking that I may need to make a generic Dell 7700 .bin file with AMT enabled.
Many thanks
Yes
Yes but I also followed the CleanUp Guide for good measure. File "ME Sub Partition.bin" is an intermediate one and in no way a replacement for the CSME region itself or the full 32MB SPI image.
Correct, it wasn’t really needed in your case because you were using your own dump.
Sure, you would need the last COR H RGN image. Admittedly, I used the latest EXTR one because I upload them with a cleaned (Unconfigured) File System State nowadays so it doesn’t really matter if you use EXTR instead of RGN but for the purposes of the guide, I still recommend to always pick a stock RGN firmware for cleaning. Sure, the RGN might be older but you can use FWUpdate tool afterwards.
Not needed for your own system. To build it for others, you could clean/configure your own dump but then the others would need to take the CSME region only from the full 32MB SPI image and replace it so that they keep their own BIOS/NVRAM region.
Sure, you would need the last COR H RGN image. Admittedly, I used the latest EXTR one because I upload them with a cleaned (Unconfigured) File System State nowadays so it doesn’t really matter if you use EXTR instead of RGN but for the purposes of the guide, I still recommend to always pick a stock RGN firmware for cleaning. Sure, the RGN might be older but you can use FWUpdate tool afterwards.
These are the steps I’ve done and where I get confused/stuck. Hopefully it’s verbose enough.
1. Make a dump of what I’ve currently got
fptw64.exe -d spi.bin
2. Run ME Analyzer on spi.bin. Important data is:
2
3
Family = CSE ME
Version = 12.0.67.1579
SKU = Coporate H
3. Download a clean Repository pack, for me this was Intel CSME 12.0 Firmware Repository r21 - (2020-07-06).
4. Unpack the .rar file. The closest RGN .bin file I found for 12, COR, H and RGN was 12.0.47.1524_COR_H_BA_PRD_RGN.bin. This was extracted and saved as "ME Sub Partition.bin"
5. IN ME Analyzer I opened my original dump spi.bin, File System State is reported as "Initialized"
6. fit.exe. Drag & dropped the dumped spi.bin image. Go to "Build > Build Settings", select "No" at the option to "Generate Intermediate Files"
7. The last part of your step 6 on your webpage says 'If you are working on a CSME 11 - 14 Engine region (Flash Partition Table format) and not a SPI/BIOS image...', I guess I'm working on the Flash Partition Table format??? Assuming I was I set "Number of Flash Components" to "0".
Then you say "Flash Layout > Intel(R) ME Region > Intel (R) Trace Hub Binary", I didn't have "Intel(R) ME Region", I have "Ifwi: Intel(R) Me and Pmc Region" so I ignored this, correct?
Within this section (or any other section) I didn't see "Intel (R) Trace Hub Binary" so I skipped this bit, correct?
You also say "Integrated Sensor Hub > ISH Data > PDT Binary File", I don't have "PDT Binary File" so again, I ignored, correct?
8. Your step 7 talks about "Platform Protection" and check if "Platform Integrity" exists, I don't have "Platform Integrity" so skipped section 7.
9. Your section 8, I created "config.xml", closed FIT. Within my newly created folder \sip there is another folder \Decomp along with the file "ME Sub Partition.bin" (I don't have "ME Region.bin" or "TXE Region.bin" or "TXE Sub Partition.bin". I then copied "ME Sub Partition.bin" (12.0.47.1524_COR_H_BA_PRD_RGN.bin) into \Decomp overwriting "ME Sub Partition.bin".
Now I get stuck. You then say 'If you are working on an Engine region (Flash Partition Table format) only and not full SPI/BIOS image, take the previous "ME/TXE Region.bin" or "ME/TXE Sub Partition.bin" file you saved at step 4, rename it exactly the same as the input file (Engine region) and copy it where the current input file is, effectively replacing it' Am I working on the Engine region or the SPI/BIOS?
I understand I need to copy "ME Sub Partition.bin" (12.0.47.1524_COR_H_BA_PRD_RGN.bin) again but I don't understand what you mean by 'rename it exactly the same as the input file (Engine region) and copy it where the current input file is, effectively replacing it'.
At this point I stopped as I didn't know what to do.
Your step 10,11,12,14 and 15 look straight forward enough, I don't see any problem there. I guess I omit step 13 as I skipped your step 7.
I think I'm nearly there, very nearly there, it's just my lack of understanding or some terminology I think.
I then use the newly created outimage.bin with 'fptw64 -f'.
[quote="plutomaniac, post:12, topic:35318"] Not needed for your own system. To build it for others, you could clean/configure your own dump but then the others would need to take the CSME region only from the full 32MB SPI image and replace it so that they keep their own BIOS/NVRAM region. [/quote]
So if I understand this correctly, for my own system, the one Dell 7700 I don't need to do all the above. I'd do:
1. Load the dumped image in FIT
2. Disable "Generate Intermediate Files"
3. Select YES to the three AMT options
4. "Build > Build Image"
5. Set the motherboard jumper. Flash the BIOS with
fptw64 -f outimage.bin
6.
fptw64 -greset
But if I wanted to flash a batch of 7700's what do I do? I guess you'd only flash one of the files in my \spi\Decomp folder? Do you use "fptw64" for this?
Apologies for such a long post (it's taken a lot longer to write it than to read it :) ). I really appreciate your help and time.
Cheers
Your own steps 1-6 are correct. Admittedly, CleanUp Guide > D4 > Steps 6,9,15 were not clearly written so I have now adjusted them with accurate information. They apply to CSME 11, when working with Engine regions only (extracted via Flash Programming Tool with “-me” parameter or via UEFITool > ME region > Extract as is…) and you are working with a full SPI/BIOS image (Flash Descriptor + Engine + BIOS) so it’s irrelevant in this case either way. You correctly skipped Steps 7 & 13. I think the rest should work out now that you don’t follow the wrong instructions. Try it again.
As for your system/case, you don’t need to disable “Generate Intermediate Files” for enabling AMT. It’s more of a CleanUp Guide step. The rest are correct.
Thank you.
Thanks, useful to know.
It sounds like I’m understand things, I’m pleased about that ![]()
I’ll rephrase this, it wasn’t very clear, sorry. If I wanted to enable the full AMT on a batch of 7700’s I guess I’d use "fptw64" with one of the files in \spi\Decomp, is this correct? the "ME Sub Partition.bin" file maybe (guessing here)?
What would happen if I applied the output.bin file from my system to other 7700’s?
Thanks again.
Ah, for that you can enable AMT once on a full SPI/BIOS image (dump), extract the CSE region via UEFITool > ME region > Extract as is… and use Flash Programming Tool with "fptw64 -me -f csme.bin" followed by "fptw64 -greset" on each system. Of course, you would need to set the jumper temporarily for the fptw64 operation. Technically, you need the "CSE Region" (or whatever it’s called, not "ME Sub Partition") from the Decomp folder to do this without extracting the CSE Region from the full SPI/BIOS image via UEFITool. However, it is best to extract it from UEFITool so that the padding at the end of the CSE Region of the SPI/BIOS chip image is the same and you thus re-write the entire CSE Region, to be on the safe side.
Thanks, I’ll have a look at that tomorrow, the UEFITool looks new to me.
So I’ve just been running through the Clean process on my spi.bin file, built “outimage.bin”, it’s smaller in size than my dumped image, 7664K instead of 32768K, expected? Is this because it’s been cleaned of data?
Step 15 on your Clean instructions says ‘once your new cleaned+configured SPI/BIOS dump or Engine region is flashed on the target system…’, can I check that the command you’d run would be
fptw64 -f outimage.bin
Thanks again.
No, you’ve done something wrong. The resulting size should be 32MB in your case. I assume you have wrongfully enabled Number of Components to 0 or similar. The guide never says to set that when working with full SPI/BIOS images.
Zitat von osk866 im Beitrag #17
Step 15 on your Clean instructions says ‘once your new cleaned+configured SPI/BIOS dump or Engine region is flashed on the target system…’, can I check that the command you’d run would befollowed by shutdown, remove the jumper, boot then run "fptw64 -greset"1
fptw64 -f outimage.bin
Sure. You could also restore the jumper while the system is working (before running fptw64 -f followed by fptw64 -greset) as its action/unlock happens when the system boots (POSTs), not afterwards.
No, you’ve done something wrong. The resulting size should be 32MB in your case. I assume you have wrongfully enabled Number of Components to 0 or similar. The guide never says to set that when working with full SPI/BIOS images.
You were right, I’d set Number of Components to 0. Not doing this resulted in a 32MB file that flashed fine.
Thank you for everything you’ve done, not just helping me with my post but for the collation of the downloadable bin files, tools and your guides. I for one very much appreciate your time and effort, thank you.
You’re welcome. Something I have to mention: great work on your end doing proper research beforehand and actually caring to learn. Users such as you are rare and I highly appreciate that dedication. 