Determine configurable aperture size from BIOS file

My use case is using Intel mediated passthrough https://github.com/intel/gvt-linux/wiki/…#1-introduction . According to https://github.com/intel/gvt-linux/issue…mment-498549927, there’s a need for a larger aperture size.

Even in the post above they recommend Supermicro, I’am planning to use it also for GPU Passthrough, and according to https://passthroughpo.st/vfio-increments/ and https://www.reddit.com/r/VFIO/search/?q=…e&restrict_sr=1, GigaByte is the rockstar.

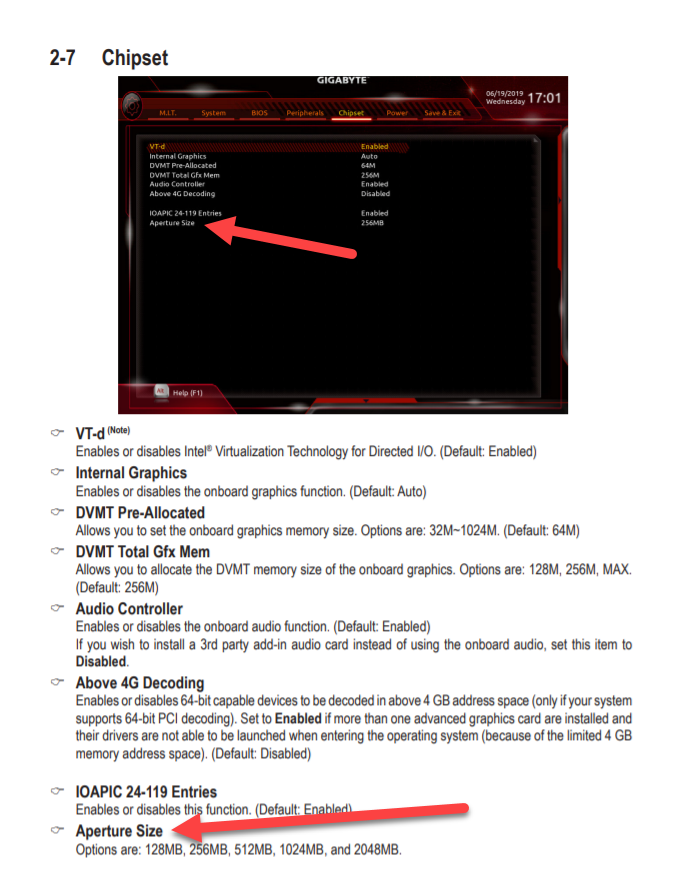
Checking all the listed motherboards https://www.gigabyte.com/Motherboard/Intel-Z390, only z390D has “Aperture Size Options are: 128MB, 256MB, 512MB, 1024MB, and 2048MB.” see printscreen attached Aperture size Gigabyte Z390 D.png, from manual http://download.gigabyte.eu/FileList/Man…al_z390-d_e.pdf .

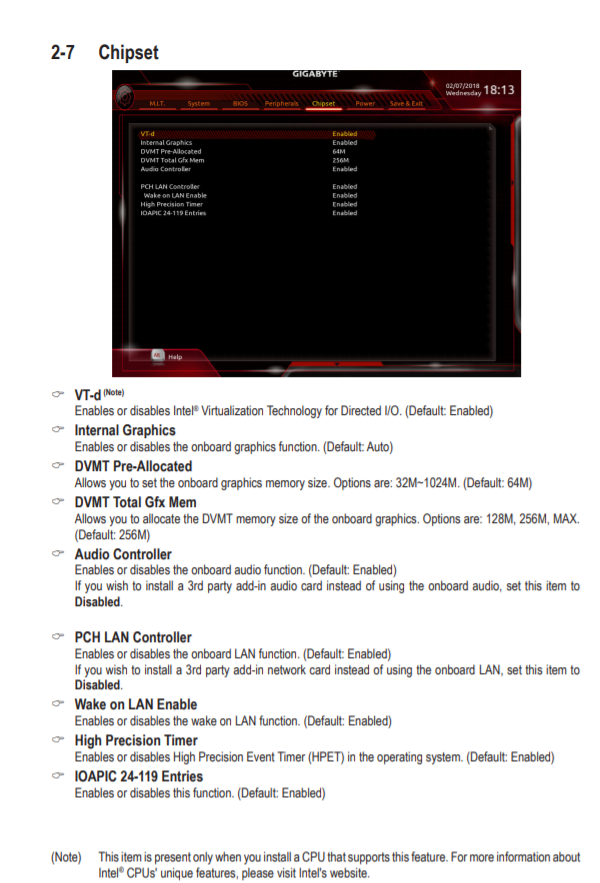
On the other hand, I prefer either Z390 AORUS MASTER, Z390 M, Z390-M-GAMING, Z390 I AORUS PRO WIFI, Z390 DESIGNARE, that have more than 1 Hdmi port at onboard graphics and more pcie, (see attached Lack of aperture size Gigabyte.png, from their manual documentation).

But, it’s possible that this aperture size feature was added later on, after the initial launch of the motherboard, so it isn’t present in the official manual. “Have you run into any problems with F8g? Any new features? I haven’t. I know it fixes uncore ratio not being reset to 43 when you change from a custom value back to auto, and adds an AGP aperture setting for the iGPU.” http://forum.gigabyte.us/thread/5363/z390-beta-bios-thread?page=6

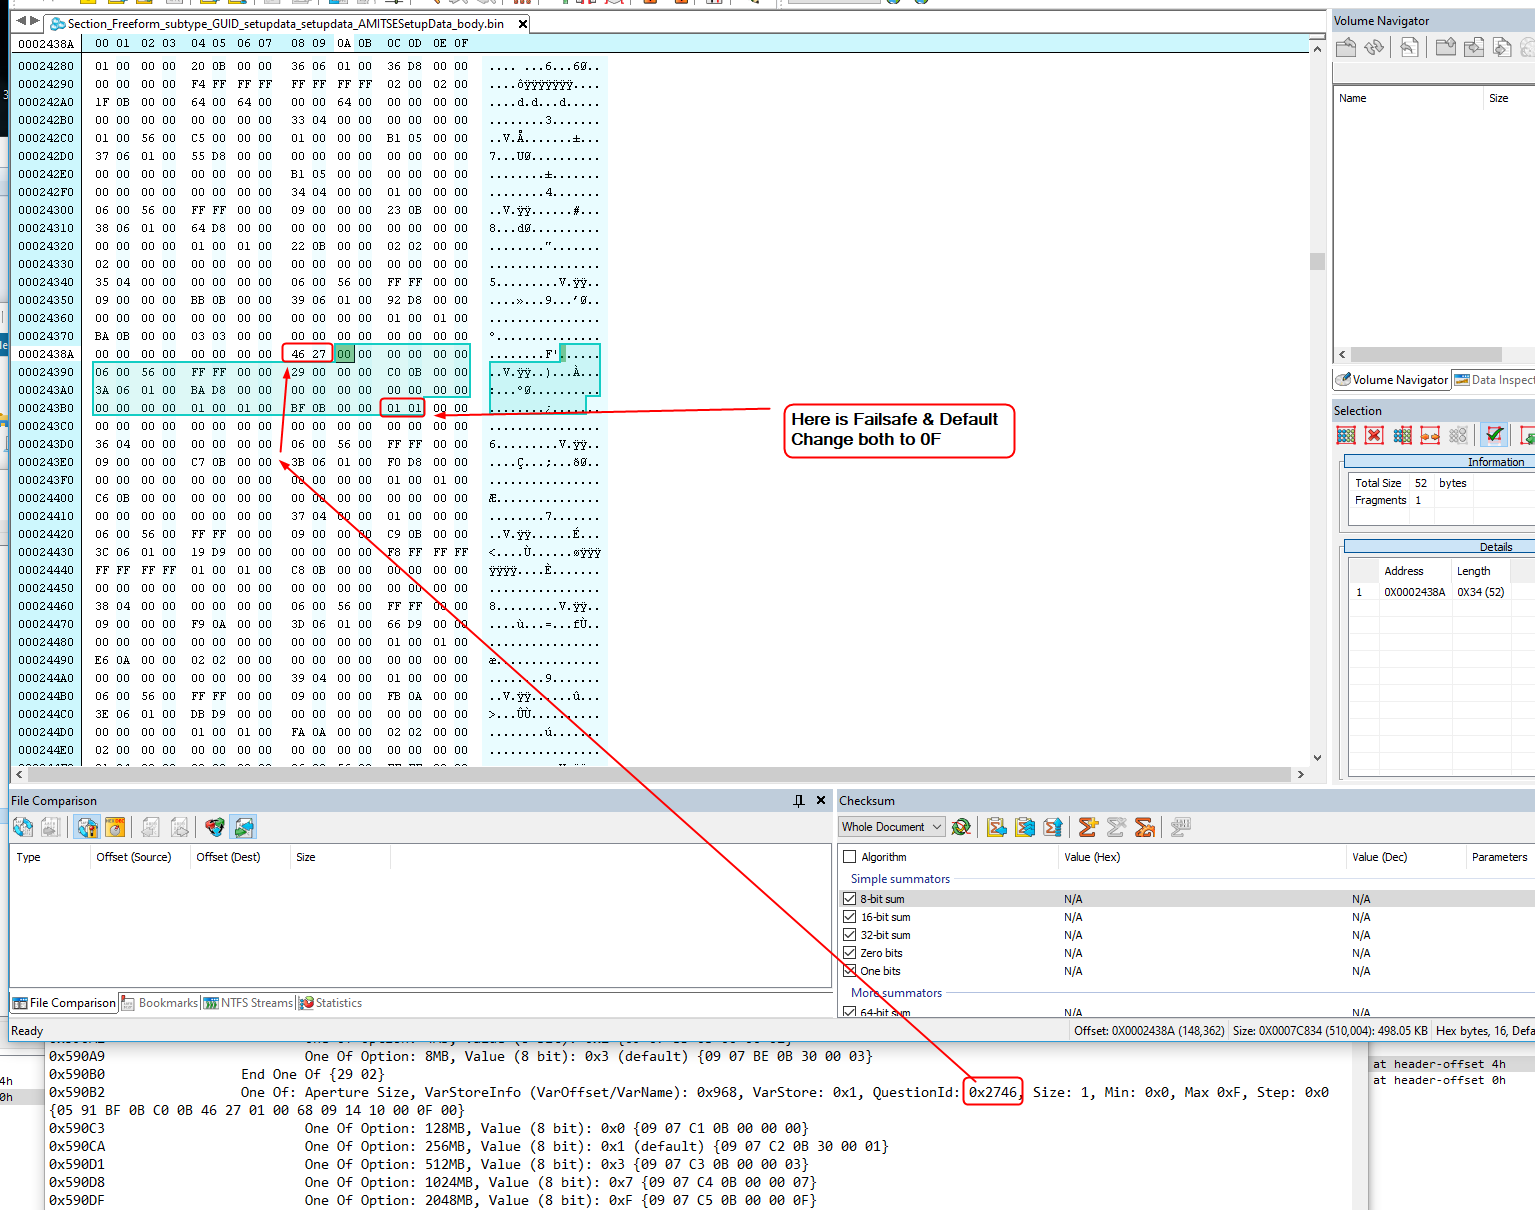
In order to be sure, I’ve tried using the latest https://github.com/LongSoft/UEFITool, searching for test Unicode ( header and body) value “aperture” , comparing:

1) Latest bios of https://download.gigabyte.com/FileList/B…_z390-d_f3a.zip, z390D that I know for sure that has a configurable aperture size.
The search result was: Unicode text “aperture” found in PE32 image section at header-offset 9ABB2h

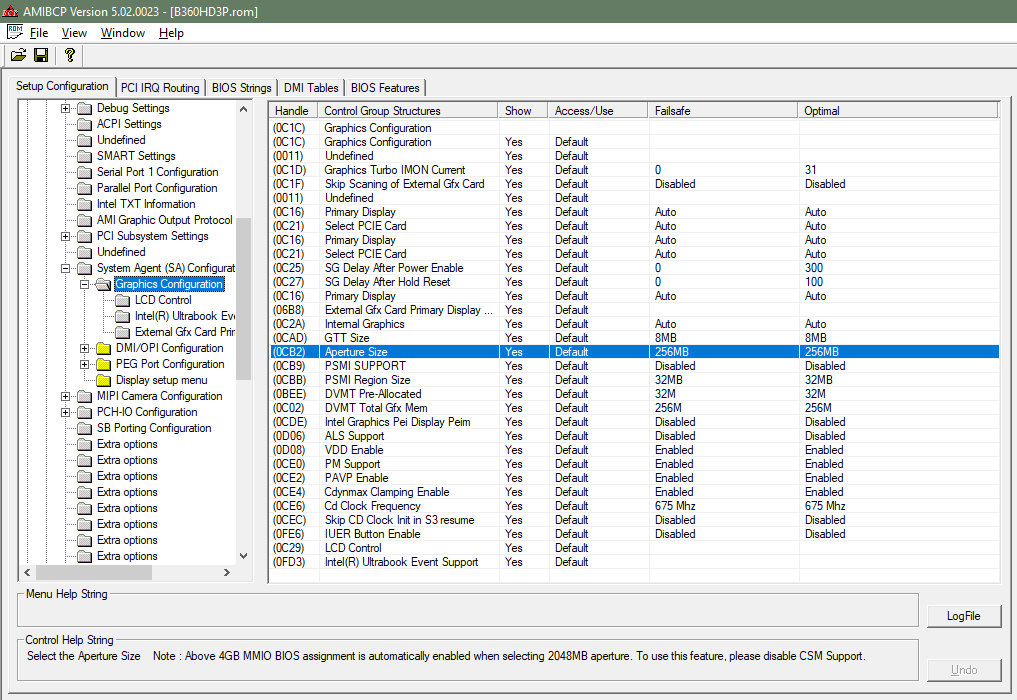
2) Initial bios of B360-HD3P https://download.gigabyte.com/FileList/B…360-hd3p_f2.zip. I’ve tested with https://www.hetzner.com/dedicated-rootserver/ex62-nvme, and I know for a fact that it hasn’t a configurable aperture size.

The search result was
Unicode text “aperture” found in PE32 image section at header-offset 941F6h
Unicode text “aperture” found in PE32 image section at header-offset 942C2h
Unicode text “aperture” found in PE32 image section at header-offset 98338h


It’s doable to modify according to https://www.bios-mods.com/forum/Thread-R…y-Aperture-Size , but I prefer a built-in configurable to 2048MB( with modified bios can reach max 1024)

After finding that values, according to [Guide] How to extract/insert/replace EFI BIOS modules by using the UEFITool, “Right-click onto the “PE32 Image Section” of the related DXE driver and choose the option “Extract body…”. And analyzing later on HxD, couldn’t find any “aperture” values. Also tried exporting the result as .sct file, failing to open with any kind of program.

QUESTION:

How can I determine, from bios file, that the motherboard has a configurable aperture size ( eg: for B360-HD3P there are search results for “aperture”, even if they aren’t configurable, probably the default read-only values. Same goes for other Asus motherboard bios.)

Thank you!

ApertureSizeGigabyteZ390D.png

Lack of aperture size Gigabyte B360 HD3P.png

1 Like

In theory…you open the BIOS file with AMIBCP and look for what’s shown in the pic below(from the B360 BIOS linked above).

Aperture.PNG


The problem with that being…you’re not going to be able to easily open some BIOS files(like that Z390 BIOS linked above) with AMIBCP. Due to the error discussed here.

Anywho…good luck with that! It’s, most likely, a little more than I’m willing/able to help you with.

@eurodomenii - I can change BIOS settings for you that AMIBCP can’t open, so if you end up needing mod BIOS that you can’t open in AMIBCP let me know.
Often such setting is either not visible to you in BIOS (hidden), or just not shown in manual in general. I checked Z390D BIOS you linked, and you can set any of the following

0x4625B One Of: Aperture Size, VarStoreInfo (VarOffset/VarName): 0x831, VarStore: 0x1, QuestionId: 0x57E, Size: 1, Min: 0x0, Max 0xF, Step: 0x0 {05 91 45 0D 46 0D 7E 05 01 00 31 08 14 10 00 0F 00}
0x4626C One Of Option: 128MB, Value (8 bit): 0x0 {09 07 47 0D 00 00 00}
0x46273 One Of Option: 256MB, Value (8 bit): 0x1 (default) {09 07 48 0D 30 00 01}
0x4627A One Of Option: 512MB, Value (8 bit): 0x3 {09 07 49 0D 00 00 03}
0x46281 One Of Option: 1024MB, Value (8 bit): 0x7 {09 07 4A 0D 00 00 07}
0x46288 One Of Option: 2048MB, Value (8 bit): 0xF {09 07 4B 0D 00 00 0F}

If you cannot see this BIOS Option in actual BIOS, I can make it visible for you
All BIOS, if this option is there, is configurable, either by making the setting visible to user, or editing in place (leaving hidden, but still change setting).
No BIOS that has this option, would you not be able to change the values.

To inspect BIOS settings if you can’t use AMIBCP, open BIOS with UEFITool, extract Setup PE32 then dump IFR from that with Universal IFR editor, then search through IFR outputted text settings.
Here’s two IFR extractors below, sometimes one doesn’t work on some BIOS, then use other
http://s000.tinyupload.com/index.php?fil…610995146442606

@Lost_N_BIOS , thanks for the missing piece… I succesfully used https://github.com/LongSoft/Universal-IFR-Extractor.

Before buying the new mobo, I have for 30 trial https://www.msi.com/Motherboard/MAG-Z390M-MORTAR with i5-9600K. So, I’ve tried to apply the concept.

I’ve used your trick from RE:Gigabyte Z390 Master - Enable SPD Write ( replace 30 with 00 and reverse, in order to modify the default value), in HxD, searching hexa strings like 09 07 C2 0B 30 00 01

1) Initial

0x590AE One Of: Aperture Size, VarStoreInfo (VarOffset/VarName): 0x968, VarStore: 0x1, QuestionId: 0x2746, Size: 1, Min: 0x0, Max 0xF, Step: 0x0 {05 91 BF 0B C0 0B 46 27 01 00 68 09 14 10 00 0F 00}
0x590BF One Of Option: 128MB, Value (8 bit): 0x0 {09 07 C1 0B 00 00 00}
0x590C6 One Of Option: 256MB, Value (8 bit): 0x1 (default) {09 07 C2 0B 30 00 01}
0x590CD One Of Option: 512MB, Value (8 bit): 0x3 {09 07 C3 0B 00 00 03}
0x590D4 One Of Option: 1024MB, Value (8 bit): 0x7 {09 07 C4 0B 00 00 07}
0x590DB One Of Option: 2048MB, Value (8 bit): 0xF {09 07 C5 0B 00 00 0F}
0x590E2 End One Of {29 02}


2) Modified

0x590AE One Of: Aperture Size, VarStoreInfo (VarOffset/VarName): 0x968, VarStore: 0x1, QuestionId: 0x2746, Size: 1, Min: 0x0, Max 0xF, Step: 0x0 {05 91 BF 0B C0 0B 46 27 01 00 68 09 14 10 00 0F 00}
0x590BF One Of Option: 128MB, Value (8 bit): 0x0 {09 07 C1 0B 00 00 00}
0x590C6 One Of Option: 256MB, Value (8 bit): 0x1 {09 07 C2 0B 00 00 01}
0x590CD One Of Option: 512MB, Value (8 bit): 0x3 {09 07 C3 0B 00 00 03}
0x590D4 One Of Option: 1024MB, Value (8 bit): 0x7 {09 07 C4 0B 00 00 07}
0x590DB One Of Option: 2048MB, Value (8 bit): 0xF (default) {09 07 C5 0B 30 00 0F}
0x590E2 End One Of {29 02}


Afterwards, I’ve even verified the built, comparing in HxD , according to section [Optional] Verification:, of C. Replacement/Update of a “pure” EFI module Core [Guide] How to extract/insert/replace EFI BIOS modules by using the UEFITool

The original flash is here, https://download.msi.com/bos_exe/mb/7C00v15.zip, the modified one is here https://drive.google.com/file/d/1LruMPow…iew?usp=sharing


Unfortunately, the result is unchanged.

According to https://github.com/intel/gvt-linux/issue…mment-353817255, the prefetchable value is the indicator.

lspci -v | less

00:02.0 VGA compatible controller: Intel Corporation UHD Graphics 630 (Desktop 9 Series) (rev 02) (prog-if 00 [VGA controller])
DeviceName: Onboard - Video
Subsystem: Gigabyte Technology Co., Ltd UHD Graphics 630 (Desktop 9 Series)
Flags: bus master, fast devsel, latency 0, IRQ 11
Memory at 50000000 (64-bit, non-prefetchable) [size=16M]
Memory at 40000000 (64-bit, prefetchable) [size=256M]
I/O ports at 3000 [size=64]
[virtual] Expansion ROM at 000c0000 [disabled] [size=128K]
Capabilities: [40] Vendor Specific Information: Len=0c <?>
Capabilities: [70] Express Root Complex Integrated Endpoint, MSI 00
Capabilities: [ac] MSI: Enable- Count=1/1 Maskable- 64bit-
Capabilities: [d0] Power Management version 2
Capabilities: [100] Process Address Space ID (PASID)
Capabilities: [200] Address Translation Service (ATS)
Capabilities: [300] Page Request Interface (PRI)
Kernel modules: i915


Another test is. So, in 256M, only this types can be built.

ls /sys/bus/pci/devices/0000:00:02.0/mdev_supported_types/
i915-GVTg_V5_4/ i915-GVTg_V5_8/

Am I missing something? Because, this should work.
Thanks!

@eurodomenii - I will check and make sure you did the edit you mentioned correctly, but from what you posted above, and you already flashed it and it didn’t brick, I assume all was done correctly and this just needs changed somewhere else (which I can do for you still ) - I checked, all OK
There is three ways a BIOS can pull a default setting value, in Setup which you changed above and apparently that’s not being used on this model, or AMITSE/SetupData, or NVRAM.
I can show you how to do an AMITE/SetupData edit, but NVRAM is much more difficult to show and I haven’t written out any guides or extended info on that.

Here is how to edit AMITSE/SetupData (what AMIBCP Changes when you change a default value), see end of post - [Request]Maximus XI Hero - Unlock AMIBCP

Go to AMITSE/SetupData (GUID FE612B72-203C-47B1-8560-A66D946EB371 >> Expand to SubGUID >> FE612B72-203C-47B1-8560-A66D946EB371 (Extract “BODY” so that locations will match what I give below in info and what’s shown in image below, be sure to replace body when you put it back)
Go to 0x243BCh (this byte and next is fail safe + Optimal default), change both 01’s to 0F instead. Save, reinsert back into BIOS and reflash
Here’s how that looks for your exact file in hex.

AMITSE-SetupData-Edit-Aperture.png


Also, I just noticed, this may need changed as well, if you didn’t already >> DVMT Total Gfx Mem = Default 256MB too, change it to MAX instead
Maybe try adjust that in setup by itself first too, along with your previous edit, and test again. Just to be sure this one in setup isn’t causing that 256MB too.
Then you can change both in AMITSE/SetupData using above info, then if still same, do below and I will change it in NVRAM for you

If you’d rather I do it, let me know and send me FPT dump per below. I prefer this method over M-Flash, due to NVRAM edits and not sure if M-Flash will push NVRAM edit in over what’s there currently.
And to save hassles, I would do NVRAM edits + AMITSE/SetupData both at once (this way all three possible method would be set to max and no way it’s anything less than)


Check BIOS main page and see if ME FW version is shown, if not then download HWINFO64
Then on the large window on left side, expand motherboard and find ME area, inside that get the ME Firmware version.
Once you have that, go to this thread and in the section “C” download the matching ME System Tools Package
(ie if ME FW version = 10.x get V10 package, if 9.0-9.1 get V9.1 package, if 9.5 or above get V9.5 package etc)
Intel Management Engine: Drivers, Firmware & System Tools

Once downloaded, inside you will find Flash Programming Tool folder, and inside that a Windows or Win/Win32 folder.
Select that Win folder, hold shift and press right click, choose open command window here (Not power shell).
At the command prompt type the following command and send me the created file to modify >> FPTw.exe -bios -d biosreg.bin

Right after you do that, try to write back the BIOS Region dump and see if you get any error >> FPTw.exe -bios -f biosreg.bin
If you do get error, show me image of the command entered and the error given
^^ This is important step, don’t forget ^^


If you are stuck on Win10 and cannot easily get command prompt, and method I mentioned above does not work for you, here is some links that should help
Or, copy all contents from the Flash Programming Tool \ DOS folder to the root of a USB Bootable disk and do the dump from DOS (FPT.exe -bios -d biosreg.bin)
https://www.windowscentral.com/how-add-c…creators-update
https://www.windowscentral.com/add-open-…menu-windows-10
https://www.laptopmag.com/articles/open-…ator-privileges

Or here is simply registry edit that adds “Open command window here as Administrator” to the right click menu
Double-click to install, reboot after install may be required
http://s000.tinyupload.com/index.php?fil…134606820377175

The build with AMITSE/SetupData hacked booted ok, but failed to change the aperture size value.

I didn’t try with DVMT, since they say expressly, “In BIOS the option named “aperture size” but not “Intel DVMT”. https://github.com/intel/gvt-linux/issue…mment-498549927

Here is the FTP dump https://drive.google.com/file/d/1H1Zptd4…iew?usp=sharing ( already includes the 2048 MB default and AMITSE/Setupdata modification, I didn’t flash it back to stock anymore).

Mine Intel ME Version: 12.0, Build 1310, Hot Fix 22

C:\Kit\Intel CSME System Tools v12 r19\Intel CSME System Tools v12 r19\Flash Programming Tool\WIN64>FPTW64.exe -bios -d biosreg.bin
Intel (R) Flash Programming Tool Version: 12.0.40.1433
Copyright (C) 2005 - 2019, Intel Corporation. All rights reserved.

Reading HSFSTS register… Flash Descriptor: Valid

— Flash Devices Found —
MX25L12875F ID:0xC22018 Size: 16384KB (131072Kb)


- Reading Flash [0x1000000] 13312KB of 13312KB - 100 percent complete.
Writing flash contents to file “biosreg.bin”…
Memory Dump Complete
FPT Operation Successful.


C:\Kit\Intel CSME System Tools v12 r19\Intel CSME System Tools v12 r19\Flash Programming Tool\WIN64>FPTW64.exe -bios -f biosreg.bin
Intel (R) Flash Programming Tool Version: 12.0.40.1433
Copyright (C) 2005 - 2019, Intel Corporation. All rights reserved.

Reading HSFSTS register… Flash Descriptor: Valid

— Flash Devices Found —
MX25L12875F ID:0xC22018 Size: 16384KB (131072Kb)


- Processed memory blocks 3327 from 3327.
RESULT: The data is identical.13312KB of 13312KB - 100 percent complete.

FPT Operation Successful.


Thanks!

@eurodomenii - I checked both your edits again, just to be sure for you, all good
So, here’s the mess you requested

And, due to seeing these hidden NVRAM areas, if I had looked before I would have been able to tell you without a doubt the BIOS was using these instead, since there is not only one but two in this BIOS.
All other edits are fine to leave in place, that wont hurt anything, in case you were wondering.

http://s000.tinyupload.com/index.php?fil…693061459424327

If this fails, there is one additional byte that may need corrected after main NVRAM replacement, it’s “state” (Update or not status) may need set back to original I can’t remember if that’s a must or not.
So, if still doesn’t change, let me know and I will add in that info - this would be a straight hex edit correction to the NVRAM State and then checksum fix at same location

Info below included in file, along with the files edited, adding this out here in the ether for anyone to find and absorb later


Aperture Size, VarStoreInfo (VarOffset/VarName): 0x968, VarStore: 0x1, QuestionId: 0x2746, Size: 1, Min: 0x0, Max 0xF, Step: 0x0 {05 91 BF 0B C0 0B 46 27 01 00 68 09 14 10 00 0F 00}
One Of Option: 128MB, Value (8 bit): 0x0 {09 07 C1 0B 00 00 00}
One Of Option: 256MB, Value (8 bit): 0x1 {09 07 C2 0B 00 00 01}
One Of Option: 512MB, Value (8 bit): 0x3 {09 07 C3 0B 00 00 03}
One Of Option: 1024MB, Value (8 bit): 0x7 {09 07 C4 0B 00 00 07}
One Of Option: 2048MB, Value (8 bit): 0xF (default) {09 07 C5 0B 30 00 0F} << Goal

Target >> Aperture Size, VarStoreInfo (VarOffset/VarName): 0x968 << This byte at NVRAM Body, in VarStore: 0x1
Both main NVRAM (And any Std/MFG defaults there too)at top of BIOS, and internal NVRAM in main DXE volume - “stdDefaults” >> 11 modules above AMITSE/SetupData must be edited
As well as any shadow/hidden NVRAM outside of these areas (will make note of this if found) << Yes, found at last PEI volume 77D3DC50-D42B-4916-AC80-8F469035D150 & other copy also hidden in second "padding"

VarStoreId: 0x1 [EC87D643-EBA4-4BB5-A1E5-3F3E36B20DA9], Size: 0x16F0, Name: Setup {24 1C 43 D6 87 EC A4 EB B5 4B A1 E5 3F 3E 36 B2 0D A9 01 00 F0 16 53 65 74 75 70 00}

Sorry, this will sound and may look convoluted, and likely hard to follow, it’s a pretty unorthodox editing process and even harder to explain without making a huge guide.

This means we’re looking for Larger “Setup Full or DATA” (Not Link) in NVRAM (Body) << this important so correct byte found/header not counted etc.

Using UEFITool 51, extract each of these individually in all the NVRAM areas, find the bytes needed to edit, and then select same range of bytes leading up to that last byte you want to change
Then make a note of that as you’ll see below. It must be done this way for each individual entry, in case any vary.

Then toss all those files you extracted to gather this data from, because you have to edit the NVRAM modules as a more whole file, due to UEFITool 25 can only expand these areas so far, unlike UEFITool 51-56. For example, the Main NVRAM at top, UEFITool 25 can only expand one click, so you must extract NVRAM at that one click point with UEFITool 51-56 in order to edit it and be able to replace same way you extracted. Same applies for the NVRAM/StdDefaults above AMITSE, UEFITool can only expand that volume 2 clicks.

So, after having gathered all your planned edit strings, you extract these modules in the same way you know you can only replace in UEFITool 25.
For the actual edit process, I extract as-is, replace as-is, because there you do not need to use body as you already have your exact edit strings/info.
Then do the edits, changing the last byte of each string you found, which is the desired default value change per any given settings VarOffset/VarName byte

The shadow/hidden NVRAM (GUID 77D3DC50-D42B-4916-AC80-8F469035D150 in this case), in the last PEI volume, you edit this directly in-place at file in hex editor
Then if necessary correct checksum for that entire volume (UEFITool will let you know post edit if checksum is wrong and what it should be if so too)

In each “Setup” entry you extracted, you are looking to find the byte at 0x968 to edit, well to make your string below, to then edit later on the larger overall extracted modules.

Here we go!

02 02 00 00 00 00 00 00 00 00 00 00 00 00 00 00 00 00 00 00 00 00 00 00 00 00 00 00 00 00 00 00 00 00 00 00 00 00 00 00 00 00 00 00 00 00 00 00 00 00 00 00 00 01 02 00 03 00 03 01 << last byte = Target

02 02 00 00 00 00 00 00 00 00 00 00 00 00 00 00 00 00 00 00 00 00 00 00 00 00 00 00 00 00 00 00 00 00 00 00 00 00 00 00 00 00 00 00 00 00 00 00 00 00 00 00 00 01 02 00 03 00 03 01 << Hmm, all proving to be same in all areas
(This third time I’ve gathered string, and found same, deleted etc), so dupe… This may be only string we need to find and edit

02 02 00 00 00 00 00 00 00 00 00 00 00 00 00 00 00 00 00 00 00 00 00 00 00 00 00 00 00 00 00 00 00 00 00 00 00 00 00 00 00 00 00 00 00 00 00 00 00 00 00 00 00 01 02 00 03 00 03 01 <<< Yes, all same/same in each module/entry

We’ll replace with

02 02 00 00 00 00 00 00 00 00 00 00 00 00 00 00 00 00 00 00 00 00 00 00 00 00 00 00 00 00 00 00 00 00 00 00 00 00 00 00 00 00 00 00 00 00 00 00 00 00 00 00 00 01 02 00 03 00 03 0F

So, at our two extracted modules, we’ll search the above string, and change that last byte to 0F, and then do same to last GUID as mentioned via straight hex.
Do the straight hex edit one last, after you’ve already edited and replaced everything else, so a straight hex search in hex editor will only find that entry

Findings -

@ Main NVRAM (Top of BIOS, first volume) we find our string x15 times (replace as edited string with 0F at end, or go to each and edit that last 01 to 0F)
@ StdDefaults inside Main BIOS DXE volume (above AMITSE) we find string x1
@ GUID - 77D3DC50-D42B-4916-AC80-8F469035D150 we find string x1 (Straight hex edit last, after all other edits done and replaced into mod BIOS)
@ Second “padding” we find string x2

So total of 19 bytes need edited from 01 to 0F

Hope you can learn a little from that mess, sorry it’s the way it is, I really need to make out a guide about this!
I think it would look less confusing and messy with a lot of images as the flow progressed, make more sense as you see it done kind of thing.

Files and mod BIOS included in above link

Thanks for sharing the outline of nvram editing know-how. I didn’t have time to dive in, but the mini-guide has very good tips. Anyway, nvram editing looks like something from “Don’t try this at home” series

At the moment, flashing with the linked bios led to non booting blank screen with a white dash ( connected to the onboard Intel Graphics) .

msi igpu error.jpg


Connected to a discrete GPU, at first I managed to enter bios, but afterwards fails with “ ERROR: Insufficient PCI Resources Detected”.

msi gpu error.jpg


Removing the battery and shorting the jumper, didn’t fix the issue. Now, I’m leaving the battery out for a few hours, hoping to solve the issue.

@eurodomenii - Yes, that is part of the “Don’t try this at home” series, unless you have a flash programmer and know how to recover and are ready in advance
Very sorry to see the above!!! This may be due to the byte I mentioned may need changed still, but I expected it would just load the other hidden NVRAM backup if the one we edited failed to load due to that byte, that is how it generally works.
I didn’t expect brick like that, or I would have went ahead and set it before I sent and included that info as well

Can you enter M-Flash from there? If yes, reflash stock BIOS for now. And, if you want to try again let me know and I will edit that byte I mentioned and you can try again.
Other than that, the only thing I can think of is sometimes that PEI volume edit needs done differently Generally how I mentioned is fine, so that is why I gave that method.
I suppose it could also be the padding edit, since that is a general backup of current applied data, but since we edit all at once I think this one doesn’t matter. I bet it’s either the byte I mentioned (NVRAM State), or the PEI volume edit needs done other way.

If you can’t get into M-Flash, see if you can boot to DOS on USB. If you can, then copy all contents from DOS FPT folder to root of your DOS bootable USB and then flash your original FPT BIOS region dump via >> FPT.exe -bios -f biosreg.bin

Also, it may help with the PCI resources error to use a cheap/small PCIE card instead, or a PCI graphics card if you have

Fortunately, I got this working again.
MFlash didn’t work in the first place, I used to from DOS USB bootable stick AMI Firmware Update Utility 2.38.

With modded Bios onboard Graphics failed, and only one time manage to boot from external GPU, before “ ERROR: Insufficient PCI Resources Detected” reappeared.

After resetting bios again, boot from USB and rebuild stock bios. Now working again Onboard Graphics. I realized that, even after the very first modded bios, only with default values, IGD wasn’t working. After the latest hack, even with GU failed.

@eurodomenii - Nice!!

I just replied to your PM, before I noticed you replied here! I’m glad you were able to get it back going again!

I will redo the mod tonight with less edits, IF this one fails too. Here is same BIOS as I sent before, but with that NVRAM State change I mentioned
http://s000.tinyupload.com/index.php?fil…785432314955162

What? Where do you say integrated graphics started failing? Maybe I shouldn’t have built on top of your previous edits then??? Are you using UEFITool 25, or 26?

Anyway, if this fails too, recover and then I will go back and redo all edits myself on stock BIOS. For this, please flash stock BIOS (or how you are now I guess), and make me a new stock dump with FPT, that way I have untouched stock BIOS as my base.
Then I will make you a BIOS with this disabled in all areas + one with less of the NVRAM changes too, to see if maybe some of that is causing issue (as I mentioned, maybe that padding one, or method used on last GUID one)

I have to run now, will be back in about 7-8 hours

I’ve worked with UEFi Tool 26. Now I’am away from comp, cannot do ftp. But the last stock BIOS, fully working, is https://download.msi.com/bos_exe/mb/7C00v15.zip . I guess you can start from there.

V26 may be part of the issue here, may also be why one of your previous edits didn’t work too. Sorry, I just assumed you were using v25, and didn’t check the stock BIOS vs the mods you sent me.
Let me know if you test the BIOS above and it fails too, then I will work on this more. No rush from me, whenever you are back near this system.

Please send me your original FPT dumped BIOSregion file, before you edited anything. With this I can check everything (and now, due to below comments, I will also remake your first two edits myself, so you can test and reconfirm those edits do not make the change)

@eurodomenii ** Edit, I checked vs stock, and already not a good sign, lucky for you that your first two edits didn’t brick, but a non-UEFI padding file at end of BIOS has been removed in both edits you sent (due to v26 edit)
That may or may not be why your first two edits failed, but I would redo those tests again with proper edited BIOS. (all edits I did now need redone as well, at least with this last volume replaced and then re-edited again)
Sorry I didn’t check this before!

*** Edit 2 - @eurodomenii - Here, please test this BIOS, flash using M-Flash only (DO NOT FPT flash this)
This is stock BIOS with setup edit and AMITSE/SetupData edit only. This has stock BIOS name.extension, leave that way and put on USB then go to M-Flash and select this file (don’t get it mixed up with stock BIOS)
http://s000.tinyupload.com/index.php?fil…672786129837301

After flash, clear CMOS, then boot to BIOS and load optimized defaults, then save/exit and reboot back to BIOS to make any other changes you need, then boot to OS and check aperture size

If that fails, instead of risking testing the NVRAM changes again, since it would require really 2-4 more test and possible some messed up BIOS during those test, this may be better solution
I could just modify the BIOS for you to make the section containing this setting visible, then direct change of setting in BIOS would be properly and easily applied by you directly.

I’ve followed the exact steps flashing with bios from #13 ( including cmos clearing) . This time, it was a clean flash, without any issues with onboard graphics or dedicated gpu. But, aperture size didn’t change. It seems that nvrams edits are still required.

@eurodomenii - Thanks, good to see no issues at least. MSI is such a pain! I hoped M-Flash would clear NVRAM and only use what the now new defaults were, but I guess not.
Here, now please test this one, same way, after M-Flash, shut down and clear CMOS, then boot to BIOS and load optimal defaults, save and reboot back to BIOS to make any other changes you need, then boot to OS and check aperture.
This has previous changes + Main NVRAM edited + internal NVRAM above AMITSE, these are only ones that do not carry risk of causing issue like you ran into on first NVRAM edit we did.
http://s000.tinyupload.com/index.php?fil…879892503123866

If these does not work, I will just make you BIOS with “Chipset” menu added inside of the OC section at top, replacing a currently invisible to you informational submenu (Memory PatchID, just gives info about memory’s stored details)
I replace this exact item often for users, usually with the hidden Advanced menu instead, and am currently doing same for another user right here with MSI Z390 too - MSI Z390 MEG ACE BIOS REQUEST
Both of you guys BIOS I am doing same edit for and will wrap up tonight.

Ohh! There is also this method, if above BIOS fails, do this and it should work 100% I forgot, we usually use this to unlock BIOS Lock or SMI lock to reflash BIOS via FPT, but you can change any setting as long as variable # isn’t too high
Read this guide I made, you can start at step #6, because Ive gathered info you need and will note it out below
[GUIDE] Grub Fix Intel FPT Error 280 or 368 - BIOS Lock Asus/Other Mod BIOS Flash

Rename your .efi file to >> Shell.efi (please confirm this, by going to your exit page, and highlighting the UEFI: Built in EFI Shell and it should tell you name of file in help text)
Or, you may need to do it this way, since Shell it probably launches is not grub which we want - Alt boot to grub when no exit to EFI on exit page - [Help needed] Hidden Advanced menu Bios HP Z1 J52_0274.BIN (2)
Grub is not same as Shell, you need to use and boot to the .efi file in the guide above (there will be no white+yellow text, that is shell, grub will say grub at top and all text is white)

Variable to change (Aperture) >> 0x968 (Hmmm, that is a high number, this method may not work )

At grub prompt, type the following followed by enter (case sensitive) >> setup_var 0x968 0xF
It will spit back 0x0F once it changes it, but that is OK/Same.
Then reboot to OS and check aperture


M-Flash is not working ( I already mentioned before : " MFlash didn’t work in the first place, I used to from DOS USB bootable stick AMI Firmware Update Utility 2.38." ). Refuses to see USB, just fails in the first place. I read other users stories about this. So, it’s possible that the modified bios would be ok, but there are legacy nvram values… Also, i recall that this utility clear nvram entries. I should recheck when I run it again.


Unfortunately, this fails with “ ERROR: Insufficient PCI Resources Detected”.

Ahh!!! No good! Did you miss this? >> "flash using M-Flash only (DO NOT FPT flash this)"
As I mentioned at post #13 ONLY flash those BIOS with M-Flash, why did you not stop there and tell me again??? At least you didn’t use FPT, so there’s that

Please explain, why M-Flash isn’t working, do you mean you can’t even use M-Flash with stock BIOS on USB?
If not, then something in your process is flawed probably. USB should be MBR initialized, FAT32 formatted, and BIOS should be named as stock and on root of USB (not in any folders).
Also, smaller USB the better, and should probably be only 2.0 too, but not sure if there is issues with 3.0 USB w/ M-Flash or not

Thanks for test result though, this means one of those NVRAM edits is the culprit of this issue (or a conflict with the others we didn’t edit this time), I’ll go back and recheck those and see if I can find any issue.
Here, one more similar to test, since your not using M-Flash, this is previous setup/Amitse/Setupdata edit + full stock NVRAM in both areas (edited) instead of your dumped NVRAM
If this fails with PCI resource error too, then one of those others must also need edited (but possibly not all, not worth more time trying to test to find out one by one, will just put time toward BIOS edit that I know will work instead)
http://s000.tinyupload.com/index.php?fil…742392664147821

See if you can get the boot to grub going, if you can then you can likely change there. If not, and above BIOS fails too, then wait and I will wrap up that proper BIOS menu edit I mentioned.

* Edit - Sorry, I forgot to ask, where did you get this AMI Firmware Update tool 2.38? Is this AFU, and 2.38? If yes, that is VERY VERY old version and should not be used at all for flashing BIOS on modern motherboards.
I assume it can’t be that, I don’t think AFU 2.x would work on BIOS like this. Current AFU would be 5.x

** Edit 2 - @eurodomenii - You know what, I just thought of something! Maybe the choice of setting value we used here is the issue (all along and recently #15 BIOS too) and first edit methods I gave you with all those NVRAM edits is actually OK edit just that we can’t use 2048MB?
Maybe we need to use 1024MB only? I guess we’ll find out once I make you BIOS with full menu access for that section. If that is the case, then hopefully 1024MB will work for you still.

Watching this thread with interest, I have a Asus prime z370-a II that has the same limitation that I’d like to get past for the same reason. (GVT-g).

The 1024MB limit might be real, from this thread discussing citrix using GVT-g virtual GPUs:
https://discussions.citrix.com/topic/382…-graphics-p580/

"Setting the Aperture size higher than 1024MB is not supported and it does not increase the number of VMs which can be started on a host."

Not sure how accurate that is but its apparently written in the citrix docs. I know the other memory setting (DVMT) for the iGPU on my motherboard only goes up to 1024MB.

@BroccoliCheddar - I can make you unlocked BIOS easy, please make a thread and I will get an unlocked BIOS menu made for you. Or, can you already see the setting, just not choose amount you want? I see yours offers up to 4096MB
** And!! I see this note in you BIOS help string file for that setting >> Note : Above 4GB MMIO BIOS assignment is automatically enabled when selecting 2048MB aperture. To use this feature, please disable CSM Support.
So, maybe to use 2048, MMIO need changed too, on this board? At least now we know it’s related - I checked, and it’s disabled by default on this MSI board.
And for your board, if you can see and adjust it already, try again with CSM disabled and 2048 or 4096 selected.

I checked your BIOS and I can do menu unlock for you and just give you full access to the hidden advanced, then you can set directly and test

Thank you very much for the 1024MB notes, I do wonder if that is it! I think we shall soon find out, either if he’s able to change it with above info, or when I give him menu mod BIOS
DVMT I see sometimes is artificially limited by BIOS supression, but I do think too sometimes CPU can be deciding factor as well but I’m not 100% certain on that because majority of people I run into never use onboard GFX

I found this mod BIOS thread for a H170 board, once unlocked so user could choose 2048MB, it auto-reset back to 1024MB.
He also couldn’t even set 1024 or 512 and get into system, but I doubt that is limits on Z390, but we’ll never know until we know the actual cause of the limitation and can look it up (@ Intel CPU or chipset I assume)
https://www.bios-mods.com/forum/Thread-R…D-Aperture-Size

Seems like Here at second reply on Intel forum, this may also be tied to amount of system memory installed
https://forums.intel.com/s/question/0D50…?language=en_US

That wouldn’t be possible with the way we’re locking in 2048MB, so I can see how if this is a limitation due to CPU, chipset or whatever that it would fail and cause error when locked above the limit.
So this may indeed be the real issue from the jump on our first edits that showed the PCI resource error in BIOS.

@eurodomenii - I have mod BIOS ready, but would prefer you M-Flash the BIOS, otherwise I will walk you through making a FPT BIOS region dump and send me that, then I edit it instead and send it back for you to FPT flash.
Can you please try again using M-Flash as I mentioned above with stock BIOS, until you figure it out

Meantime, since you’ve already been flashing this kind of edit in a way you are familiar with, here is that same BIOS from #15, but with edits changed to 1024MB instead of 2048MB
http://s000.tinyupload.com/index.php?fil…308615130454335

@eurodomenii - Since this is all time sensitive stuff due to try-before-you-buy, here, in case you don’t want to mess with all I mentioned above. I’d prefer this get flashed via M-Flash, but it’s your board (trial)
This has full chipset menu now at top of OC section, so you can now set Aperture directly - https://ufile.io/ha6mpjrl