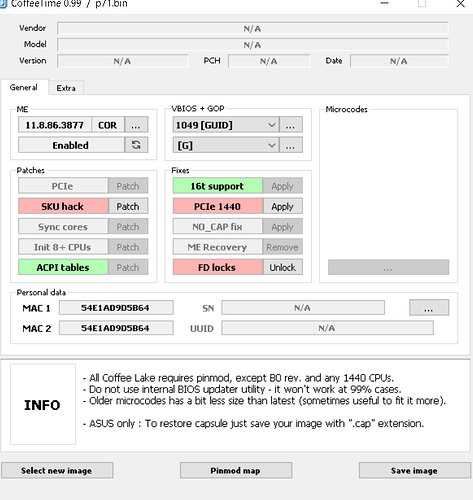
[TOOL] Easy automated Mod tool for Coffee Lake bios

@90Ninety Hi, glad to hear it all works.

It does depend how you flash the modified BIOS, if you use Gigabyte tools (Q-flash or EFIflash) then the MAC address will not be overwritten, if you use Intel FPT or a hardware programmer then it will erase the MAC. I didn’t have time to make that disitinction initially but it matters not as you have flashed succeessfully. Enjoy your new CPU. :slight_smile:

@chinobino

The gigabyte ‘@Bios’ flash tool will not work with modded bios , it typically detects modifications .
Interestingly I flashed with Intel FPT , but MAC addresses must be intact , since both Ethernet ports work. I spent so much time concerned about this but , it seemed no way to write them other than AMI’s ‘DMIEdit’ which writes edits straight to the chip , rather than a .bin file , hence why I flashed a downloaded rom without editing the MAC

@90Ninety What command did you use with FPT? Did you flash the entire EEPROM?

I have used FPT v12.x to erase/overwrite the MAC address on my Gigabyte Z390 Pro WIFI, I am wondering if something is different with Z170.

@chinobino Hey everyone, I’m not sure if this will fit in here but I already tried to get an answer in other threads regarding this issue (apparently they are all dead lol).
I tried to run a Xeon Skylake (E3 1270v5) on my Asus H110T. However, I wasn’t able to do so with the modified BIOS. CPU-Fan spins very briefly when pressing the power button, but nothing else happens. Can someone help me out?

@lucagiolu Hi, I think you may have more luck using CoffeeTime v0.99 which has a GUI.

You will need to use the Corporate v11.8.77.3664 ME firmware version that comes with CoffeeTime or you can also try using the newer version modified by dsanke:

11.8.94.4494_COR_H_DA_PRD_RGN_Cut.rar

OR

11.8.95.4551_COR_H_DA_PRD_RGN_Cut.bin.zip

From this thread:

Which ME version for Socket 1151 Xeon CPUs on 100-/200-Series?

I actually already used the coffetime utility but in the guide only the Me Recovery Module needed to be removed. So thats the only thing I did. Turns out, I only need to carefully read the documentation and readme to achieve my goal. Replaced the ME firmware with the corporate version you already mentioned. After that, I set the ME state to “disable” (as described in the documentation to get xeons working) and also unlocked the FD locks.
And would you look at that, it boots!
Next step is to get an i9-9900 installed and working lol

2 Likes

@lucagiolu Well done! I hope that board has a decent VRM for the i9-9900.

1 Like

Hey guys!

I’m new to this forum so be nice please :slight_smile: - Or throw rocks at me, i will try to dodge!

Long story short: I dont want to update my whole System as i am happy with as it is, except for the CPU. I’ve seen online, that there a bios mods which allow us to use a newer CPU on old Motherboards. This is my Setup ATM (Just the important stuff):

i7 6700k
Asus Maximus Extreme 8
760 Watt Corsair AX760

Was anyone able to make this kind of combination work? Or maybe has a good idea on what to do? So far i’ve only found guides for AsRock or MSI Boards and many different statements on which CPU will work and which won’t.

Looking forward for a Pro to help me…thanks in advance!

@NeroTheDawn Hi and welcome to Win-Raid forums.

The Asus Maximus Extreme 8 appears to have a very good 8-phase VRM - which is a good start if you are thinking of running a 6 or 8 core CPU.

Asus motherboards usually have protection against flashing a modified BIOS so it is highly recommended to purchase a hardware programmer (such as the ch341a) to flash the BIOS EEPROM and to be able to recover from a potential brick.

You should also make sure you have a complete backup of your BIOS chip that contains the motherboard serial number and ethernet MAC address for the Intel Gigabit ethernet adapter.

You will need to modify a BIOS that has Kaby Lake support, so you will need BIOS 2202 or later.

You can use CoffeeTime v0.99 to easily modify the BIOS as it has a nice GUI and there are fields to insert the serial number and MAC address.

You will need to make sure that the ME FW is version downgraded to 11.7.1xxx (or 11.6.xxxx) and swap the relevant CPU microcodes depending on which Coffee Lake CPU you buy. Make sure to leave the microcode for your Skylake (506E3) or Kaby Lake (906E9) CPU for testing.

Coffee Lake CPUID:
906EA = 6 core
906EB = 2 or 4 core
906EC = 8 core
906ED = 8 core

If you need help with CoffeeTime or have any questions just ask.

Once you have backed up your current BIOS and made the modified BIOS you are ready to flash it to the motherboard. Note that using software to do this is extremely difficult on Asus boards as the Flash Descriptor is often locked and difficult to bypas (read this) so a hardware programmer is highly recommended.

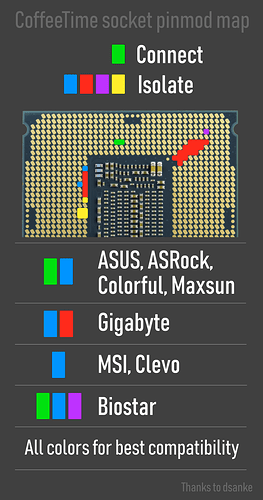
Once the modified BIOS has been flashed you need to test it with your Skylake/Kabylake CPU first and then insulate the motherboard pins before inserting any 6 or 8 core Coffee Lake CPU. There is a diagram of the pins you need to insulate in the CoffeeTime folders (CoffeeTime_0.99\data\info). It is easiest/best to insulate the pads on the back of the CPU with Kapton tape.

You will also need to connect the 2 pins that tell the motherboard that the CPU socket is occupied, for which a car rear window defogger repair kit can be used (although you can use graphite from a lead pencil for initial testing).

@chinobino

I tried to find a ch134a programmer, but when i google it, i only find the ch341a - will this one work as well? Is there anything i have to be aware of when buying one? I am currently looking for a i9 9900k as it seems to be the most powerful version that i can find which should work.

Thanks by the way for the REALLY informative answer, it really helped me and i will surely give it a try!

@NeroTheDawn Hi, yes I made a mistake - I should have said ch341a, my apologies.

Here are some good guides for the ch341a in case you are interested:

[GUIDE] Flash BIOS with CH341A programmer

[Guide] How to Use a CH341A SPI Programmer/Flasher (with Pictures!)

I can’t say for sure that your motheroard will be able to run the 9900K with all core boost @ 5GHz, as it will depend on the ability of the VRM circuitry and the heatsink to keep it cool, however if there is any Z170 board to try it on yours would be at the top of my list (as the VRM and cooling looks very good).

Hey. Just tried using CoffeeTime 0.99 and the most important options are greyed out. What’s up?

what is PCIE patches?what is that on coffeetime?

It’s been a while since visited here last time. Anyway I got bored and found an Asus board (H110M-K) board from my stocks. Although the board has a weak VRM-section it’s probably fine with stuff like i5 8400/8500 as long as everything is kept at stock speeds.

I used Coffeetime 0.99 to mod the latest official bios update with ME 11.6.10.1196 (mod.rom) and added board specific data (SN,UUID etc.) to mod.rom by using F4DD editor.

I unlocked FD/ME write protection according to this guide. Then I flashed mod.rom to SPI by using AFUWIN 3.05.04 with /GAN command as I did years ago with another Asus board. After that I dumped the newly flashed image file (dump.rom) by /O command and this is what I got

So it looks like that either AFUWIN is incapable to rewrite the FD-region or Asus bioses have separate lock for descriptor. I highlight that ME itself has been changed (originally it was 11.8XXXXX).

I am pretty sure that the mod works fine with B0-revision CPUs but since SKU-modification is not present in the dumped image the system won’t boot with U0 rev. stuff. To be fair, I haven’t yet tested the system with any new CPU.

Other possibilities are to use Intel’s FPT to rewrite FD-region or flash mod.rom with a CH341A -programmer. For the latter option the bios chip is socketed (Winbond 25Q128FV) and I have a programmer but not sure if it’s safe to use. Data lines draw 5V and instead of CH341A it has marking CH341B on the controller chip.

EDIT: As I suspected FD is locked separately. FPTw64 was able to re-flash ME-area but not FD

Error 451: The host CPU does not have write access to the target flash area. To enable write access for this operation you must modify the descriptor settings to give host access to this region.
FPT Operation Failed.

Apparently launching GRUB from efi.shell and then off-setting the re-flash variable only unlocks ME-area in this case.

Hi, not sure if you will reply to this post but i will get a dell micro 3050 soon, it has a i5 7500T and i want to know if it would be possible to modify the bios with coffeetime to support 8/9th gen and ES processors.

Hi, i will get a dell micro 3050 with a i5 7500T desktop cpu soon (B250 Chipset), and i want to upgrade the processor in the future with the QTJ1 but i want to confirm if it’s possible. I always used Coffeetime and to make this work i would need to add the ‘906ED’ microcode and disable ME. Do you have exoerience with this model or similar ones?

A little update on my previous post. Couldn’t figure out how to unlock FD region without an external programmer and almost bricked the board in the process. So I ended up flashing the SPI using the “bad” programmer with AsProgrammer and eventually it worked. In the case of AsProgrammer, pay attention to which version of you are using. For some reason certain older version couldn’t flash the image properly (verification failures).

1 Like

Hello, Im new to this this forum and the topic of BIOS hacking/mods…

Is there any way to make a 8th/9th gen CPU to work on my motherboard?

I currently have a G4560 and i want to upgrade to an 8th/9th gen CPU, MSI website says it only supports 7th/6th.

I seen people with modified bios running 8th/9th gen on H100 or H200 motherboards and i wonder if i can get mine to work aswell.

Try this: E7A15IMS Mod.rar (5.5 MB)

.1C1 = ME 11.7 Enabled, no xeon or mutant bga 1440 support
.1C2 = ME 11.8 Disabled, Any LGA 1151 cpu supported (except skylake/kabylake engineering sample)

Added support for Rebar if Rebar option in the bios is not available but Above 4G Decoding/Cryptocurrency is available in the bios (works for turing gpus too).

Also here is the pin shorting guide for 8-9th gen on LGA 1151:

Hi people! I tried to make a i5-8500 work on a MS-B9071 motherboard. It is not working.

I moded the original bios i got from the website of MSI. I used Allinone_tool because CoffeTime said that my motherboard was not suported. Allinone_tool moded the bios without a problem. I flashed the BIOS using FPT and that went well as well.

I moded the cpu pins for MSI first to try it. It wouldn’t get power because #SKTOCC wasn’t shorted so I applied the pinmod for ASUS.

Now what happens is that the pc tries to boot. It runs for a second and turns off. I checked the rams, no problem. Tried to run it without GPU to see if the power was the issue but no. It boots up fine when I put the old CPU back in.

Does anybody know why this is? Can anybody help?

EDIT: Turns out it was tottaly my fault. I disabled windows defender but it quaranteened some Allinone_tool files anyway and that was the reason thait it didn’t work.

For anybody with a MS-B9071 motherboard; you have to use Allinone_tool and you have to do the ASUS pinmod. Even tho it is a MSI motherboard you still need to short SKTOCC.

1 Like

Hey, I’m having an issue with an i7 8700k on an ASRock Fatal1ty Z170 Gaming K4/D3 and was hoping people here might be able to help.

Basically, the CPU temperature is very high and I feel like it might not be using the correct sensors for it.

In the BIOS, the temperature rapidly rises after boot until it stabilizes at around 60°C. When booting an OS (Windows 10 and Linux Mint tested), the temperature rises even further until it hits the 90-100°C range and starts throttling to stay there. After idling in the OS for a few minutes (at least Windows, I haven’t double-checked it on Linux yet), the core clocks and voltages go down to idle state, so around 800 MHz, and the temperature goes back down to “stable” 60°C.

This is obviously not correct and how this CPU should run. I initially only covered the pads with kapton tape on the left inner edge, the recommended reversed “L”-shape, as well as the 2 additional pads underneath for safety, however I re-applied the mod and covered all pads shown here, but without luck: https://imgur.com/uEoK5lx

I tried to re-mount the cooler multiple times. I also de-lidded the CPU, but I only used normal thermal paste on the inside for now, since the liquid metal I ordered hasn’t arrived yet. I also have a small 120mm liquid cooler on the way, just to rule out the possibility that somehow my air cooler isn’t making any contact whatsoever, despite it squishing the thermal paste nicely (yes there is no plastic film on it).

Regardless though, none of that changed the issue even a bit. I also tried to disable all but 2 cores, limited the CPU to 3 GHz and reduced the voltage, but even all of those changes at once still didn’t change anything and the behaviour is exactly the same, with the CPU temperature rising to +90°C in the OS right away.

I tried it with and without a dedicated GPU too. No change.

I am using CoffeeTime for this, since the AIO tool in this post doesn’t seem to work for me. Despite the temperature issue however, the system and mod seem to be working. I did try to re-do the BIOS mod multiple times and I always enabled all the patches that mentioned being required for more than 8 threads or coffee lake CPUs. I’m using the latest BIOS version and it seems like BIOS versions 1.x or 2.x don’t work at all. I haven’t tried any other 7.x versions.

I made some screenshots of HWInfo64 for reference. This is with only 2 cores, 3 GHz limit and reduced core voltage (the last picture is after a few minutes at idle): https://imgur.com/a/dxC0TXv

Any idea? Could it be that it’s missing a patch or two that haven’t been necessary on other boards?

Thanks!