OverPowered TONGFANG CyberPower Machrevo MACHENIKE - Unlocked BIOS Guide W/ Files
For now, this guide covers all the models you see below, but I have a feeling more will be added as time goes on, because it seems there is many similar models and BIOS out there.
Many models can be interchangeably flashed it from what I see on some threads about these, but I advise you do not mix and match the modified files between versions due to file sizes and setting differences etc.
If you want to flash some other BIOS that is fine, provided you’ve read it’s OK and already been tested by others, but if you want to use it’s unlocked BIOS please flash the stock one first, then dump and modify per the guide below.
Avell A52-5 BS - GJ5CN6E >> BIOS N.1.10
CyberPower NB-408-109 - GJ5CN6E >> BIOS_N.1.04
MACHENIKE F117-B1/2 - GK5CN5Z >> BIOS_N.1.09
Machenike T90 GJ5CN6A >> N.1.03 + N.1.05
Mechrevo - GK5CN6Z >> BIOS_N.1.16
MECHREVO - GI5KN5E Avell - Deep Sea Titan X1 >> BIOS_N.1.03
MECHREVO - X1 GJ5KN6A >> BIOS N.1.05
MechRevo Z2 Series GK5CN4Z/GK5CN5Z (GK5CN4X5X) >> BIOS N.1.07
Medion Erazer X17805 - GK7CP7S >> BIOS N.1.53
OverPowered - GK5CN6Z >> BIOS_N.1.05
TONGFANG OP-LP3 - GK7CN6S >> BIOS_N.1.08 (Here is stock 1.08 package for everyone on 1.04)
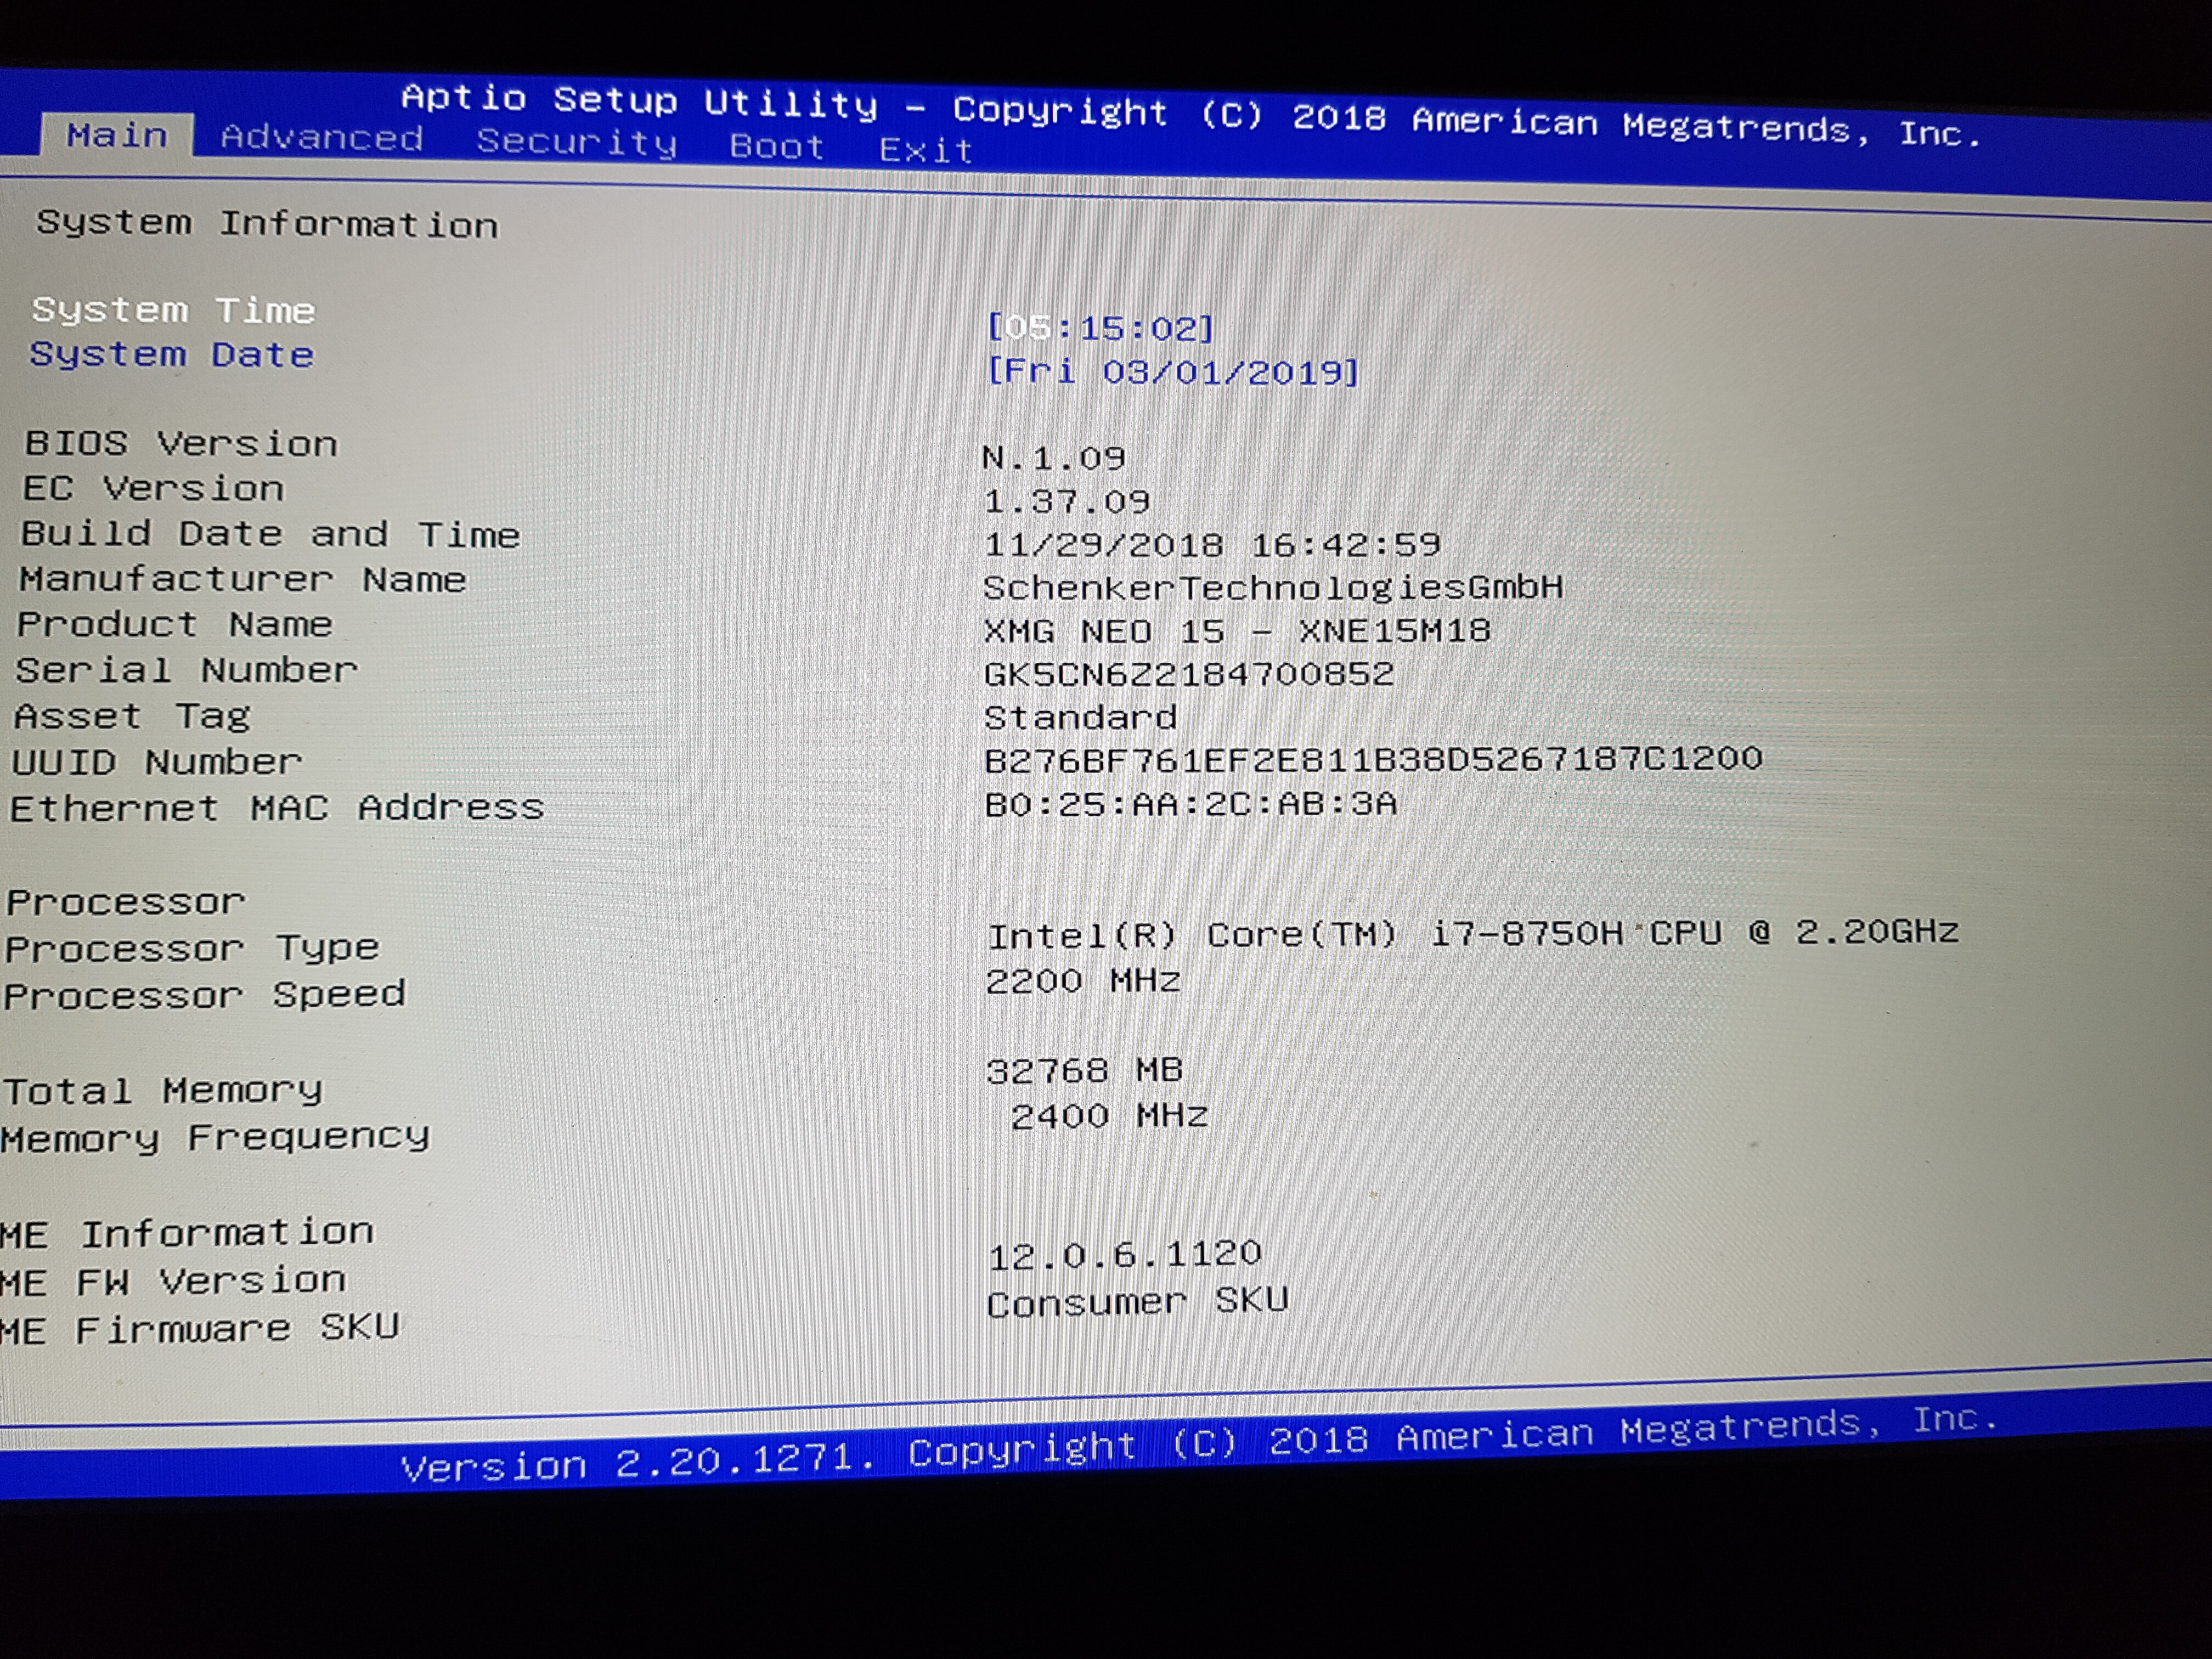
XMG NEO 15 M18 - XNE15M18 - GK5CN6X >> BIOS N.1.09
Using the attached and linked files below and following the guide will give you fully unlocked BIOS, with all hidden sections revealed, like you see below.

During testing and discovery, we discussed the menu duplicates and decided this was best method, instead of hiding the originals, since each original has settings that the
hidden ones did not, so in order to have access to all settings this seemed to be best way. Original exit is hidden, original security is left as-is.
Due to the built in security capsule in some of these systems BIOS, flashing mod BIOS via AFU is not possible/easy (maybe on Win7 with 5.05 /GAN, untested)
Thus we cannot pass around a modified stock BIOS for users to flash, and flashing someone else modified dump will make you loose your serial/UUID/LAN ID
Due to this, we decided this method is the best way to easily share this unlocked BIOS mod. Modifications to a FPT backup BIOS file are required at end users location.
If you cannot follow the guide, don’t guess/try this or that etc, please ask someone to help you and/or provide your FPT BIOS region backup - or you will brick your system!
This FPT BIOS region backup will be required, so you have to at least get that far in the guide before someone can do the mod for you.
Please only use same version mod files for your currently matching BIOS region dump, do not mix and match files/BIOS!
If your model is not listed, please add a link to download your stock BIOS package (not a 10GB Download please!), and I will update/add your model to the list and update the mod files package to include your model.
Programs Required:
UEFITool Regular (26.0) + UEFITool NE Alpha (A54) (if you want easier searching/locating, shows more GUID Names)
Intel FPT - You must find your ME FW version (BIOS Main page, or via HWINFO64 in large window/motherboard section) and download matching ME System Tools package from this thread in section "C"
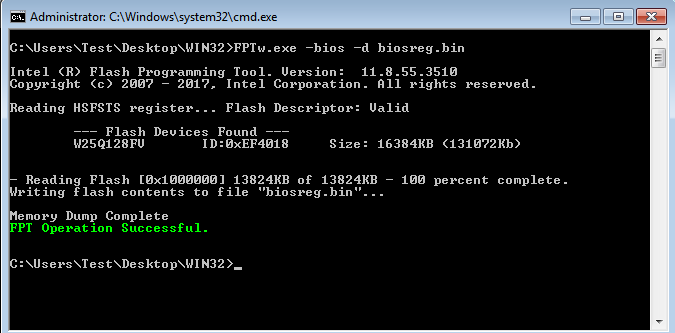
1. Inside the Intel ME System Tools Package, go into Flash Programming Tool folder, inside that locate and select Windows/Win/Win32 folder.
Hold shift and press right click, choose open command window here (Not power shell) >> FPT MUST be ran from Admin CMD Prompt (Admin Account, is irrelevant, you must be sure FPT window says Admin in upper left corner)

1a. If you are stuck on Win10 and cannot easily get command prompt, and method I mentioned above does not work for you, here is some links that should help
Or, copy all contents from the Flash Programming Tool \ DOS folder to the root of a USB Bootable disk and do the dump from DOS (FPT.exe -bios -d biosreg.bin)
https://www.windowscentral.com/how-add-c…creators-update
https://www.windowscentral.com/add-open-…menu-windows-10
https://www.laptopmag.com/articles/open-…ator-privileges
Or here is simply registry edit that adds "Open command window here as Administrator" to the right click menu
Double-click to install, reboot after install may be required
http://s000.tinyupload.com/index.php?fil…134606820377175
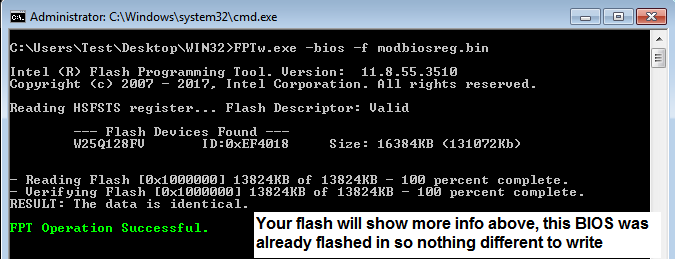
2. From the command prompt window make a BIOS region backup with following command >> FPTw.exe -bios -d biosreg.bin
3. Make a copy of the newly created biosreg.bin and store it somewhere else on your system, safe and away from the modification area, this way you always have safe backup copy stored away.
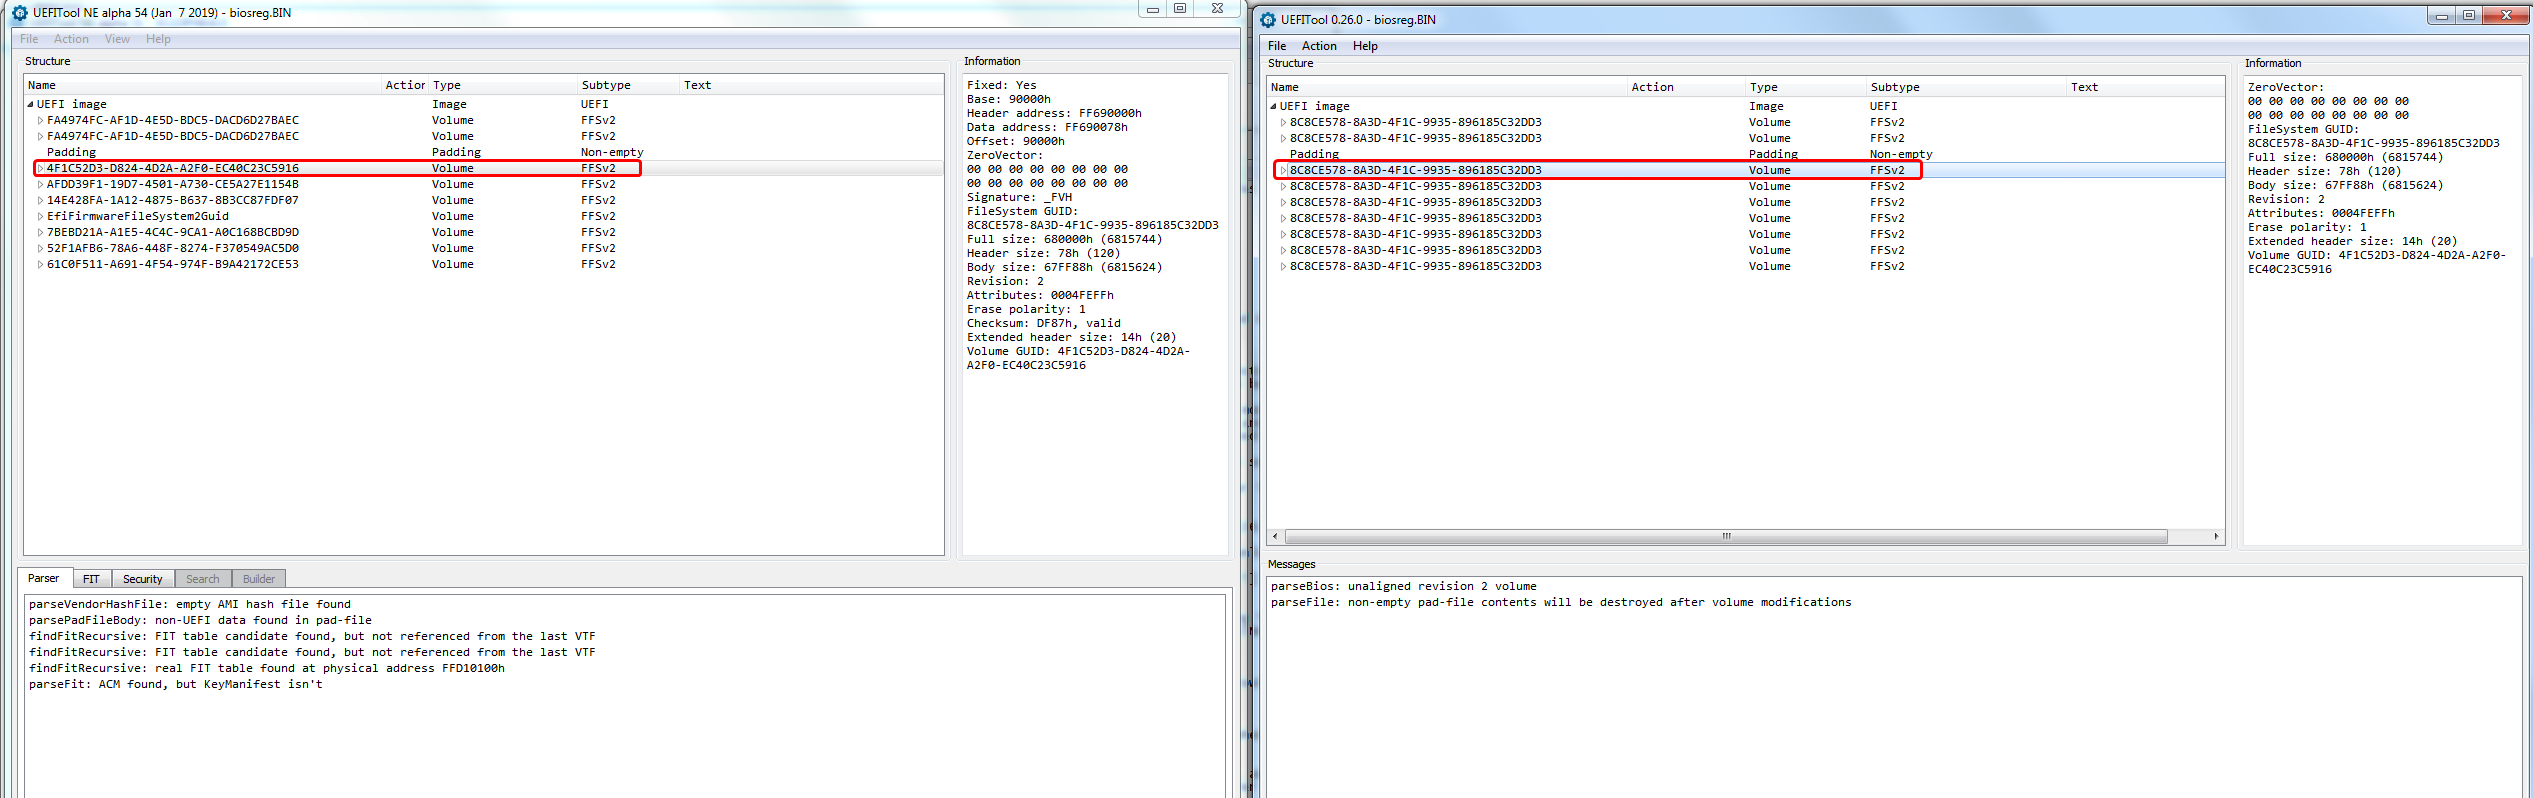
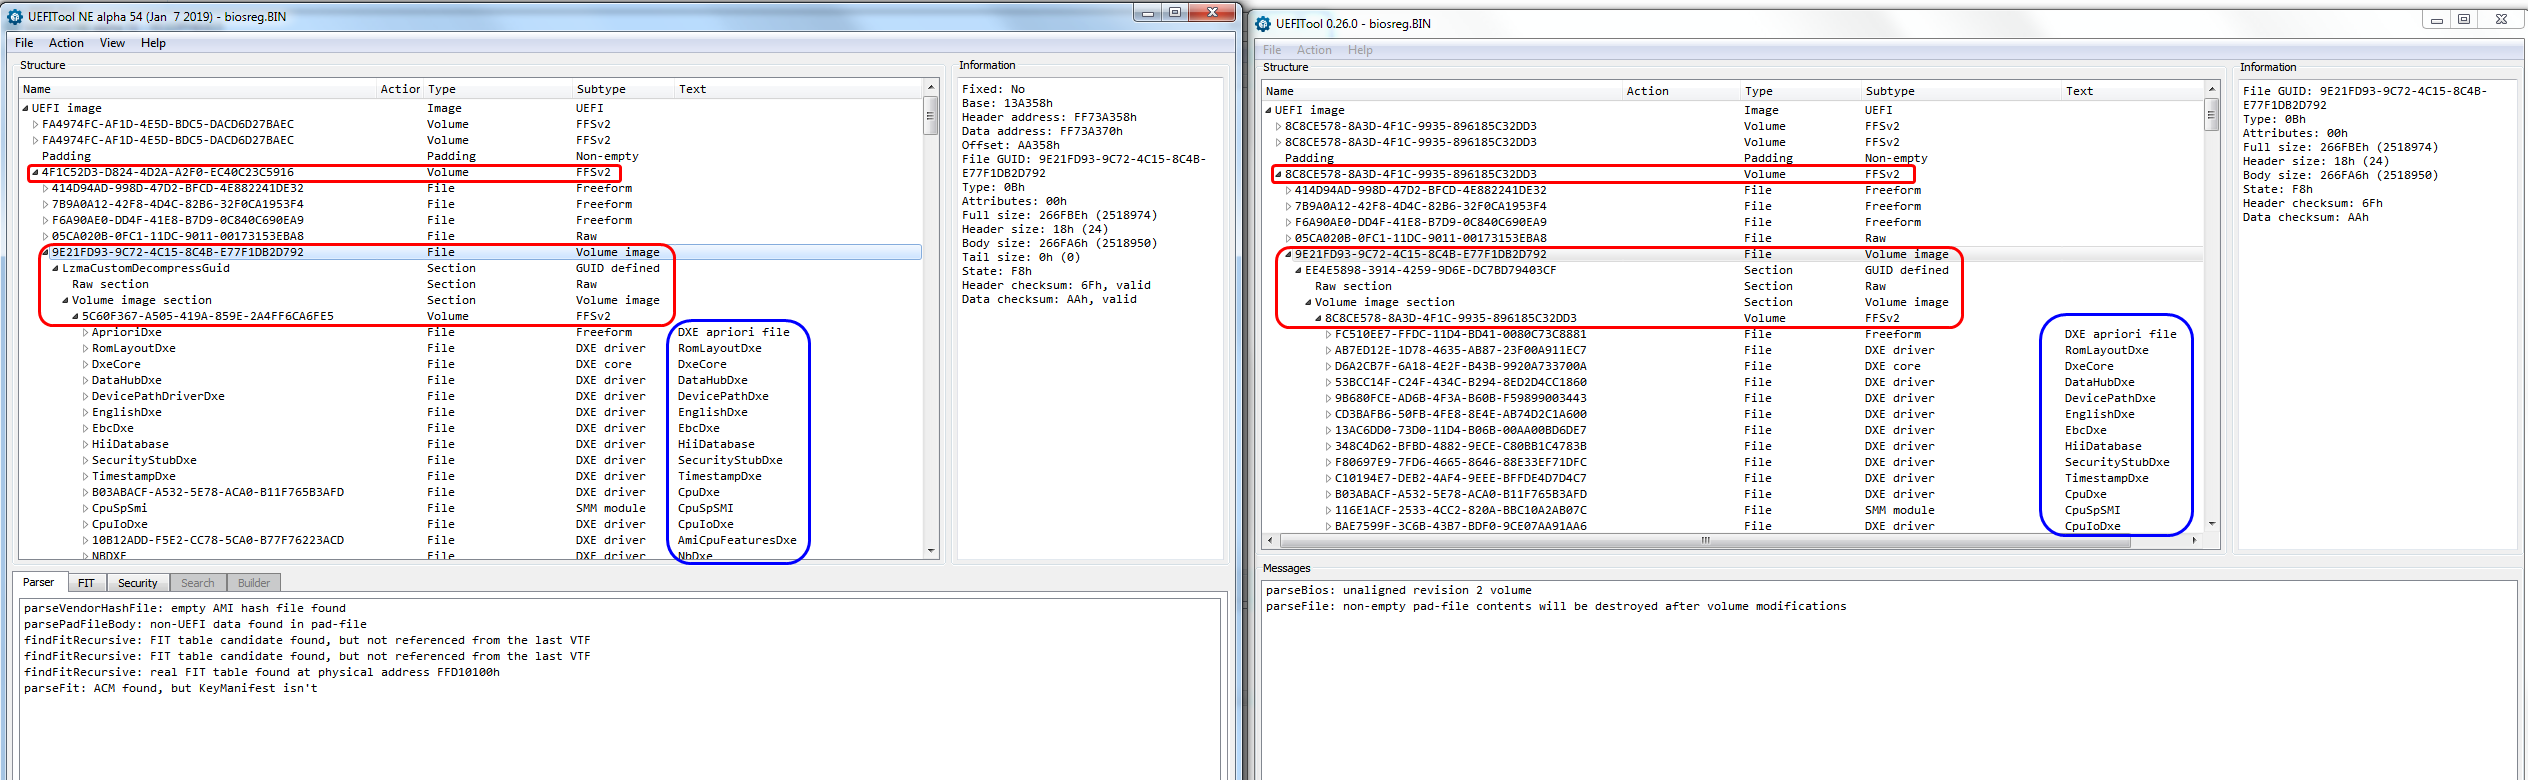
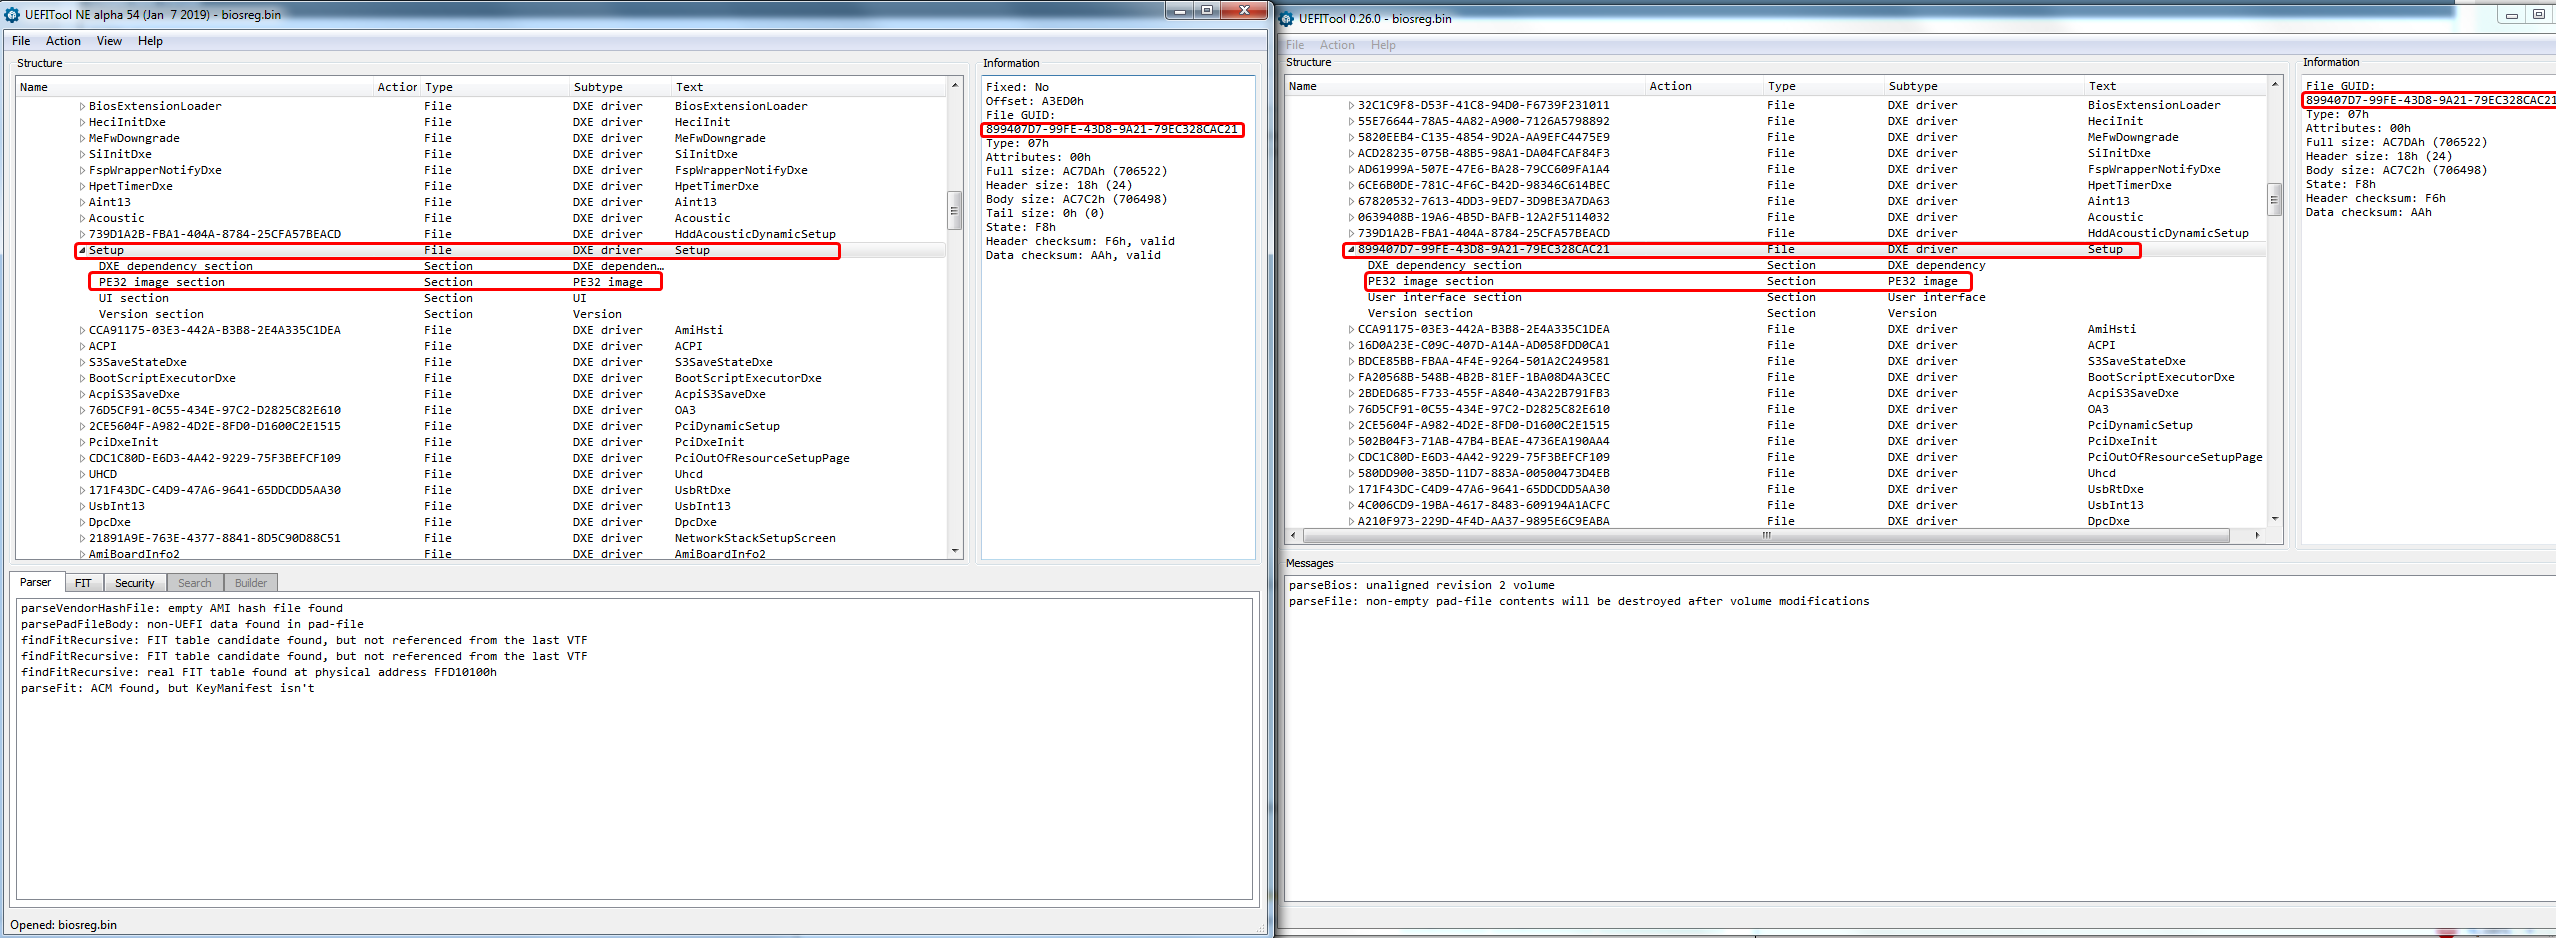
4. Open BIOSreg.bin in UEFITool NE and UEFITool regular side by side, and expand "UEFI Image",
Opening side by side like this makes locating the correct module easier for everyone. The Main Volume we will edit within is circled in red
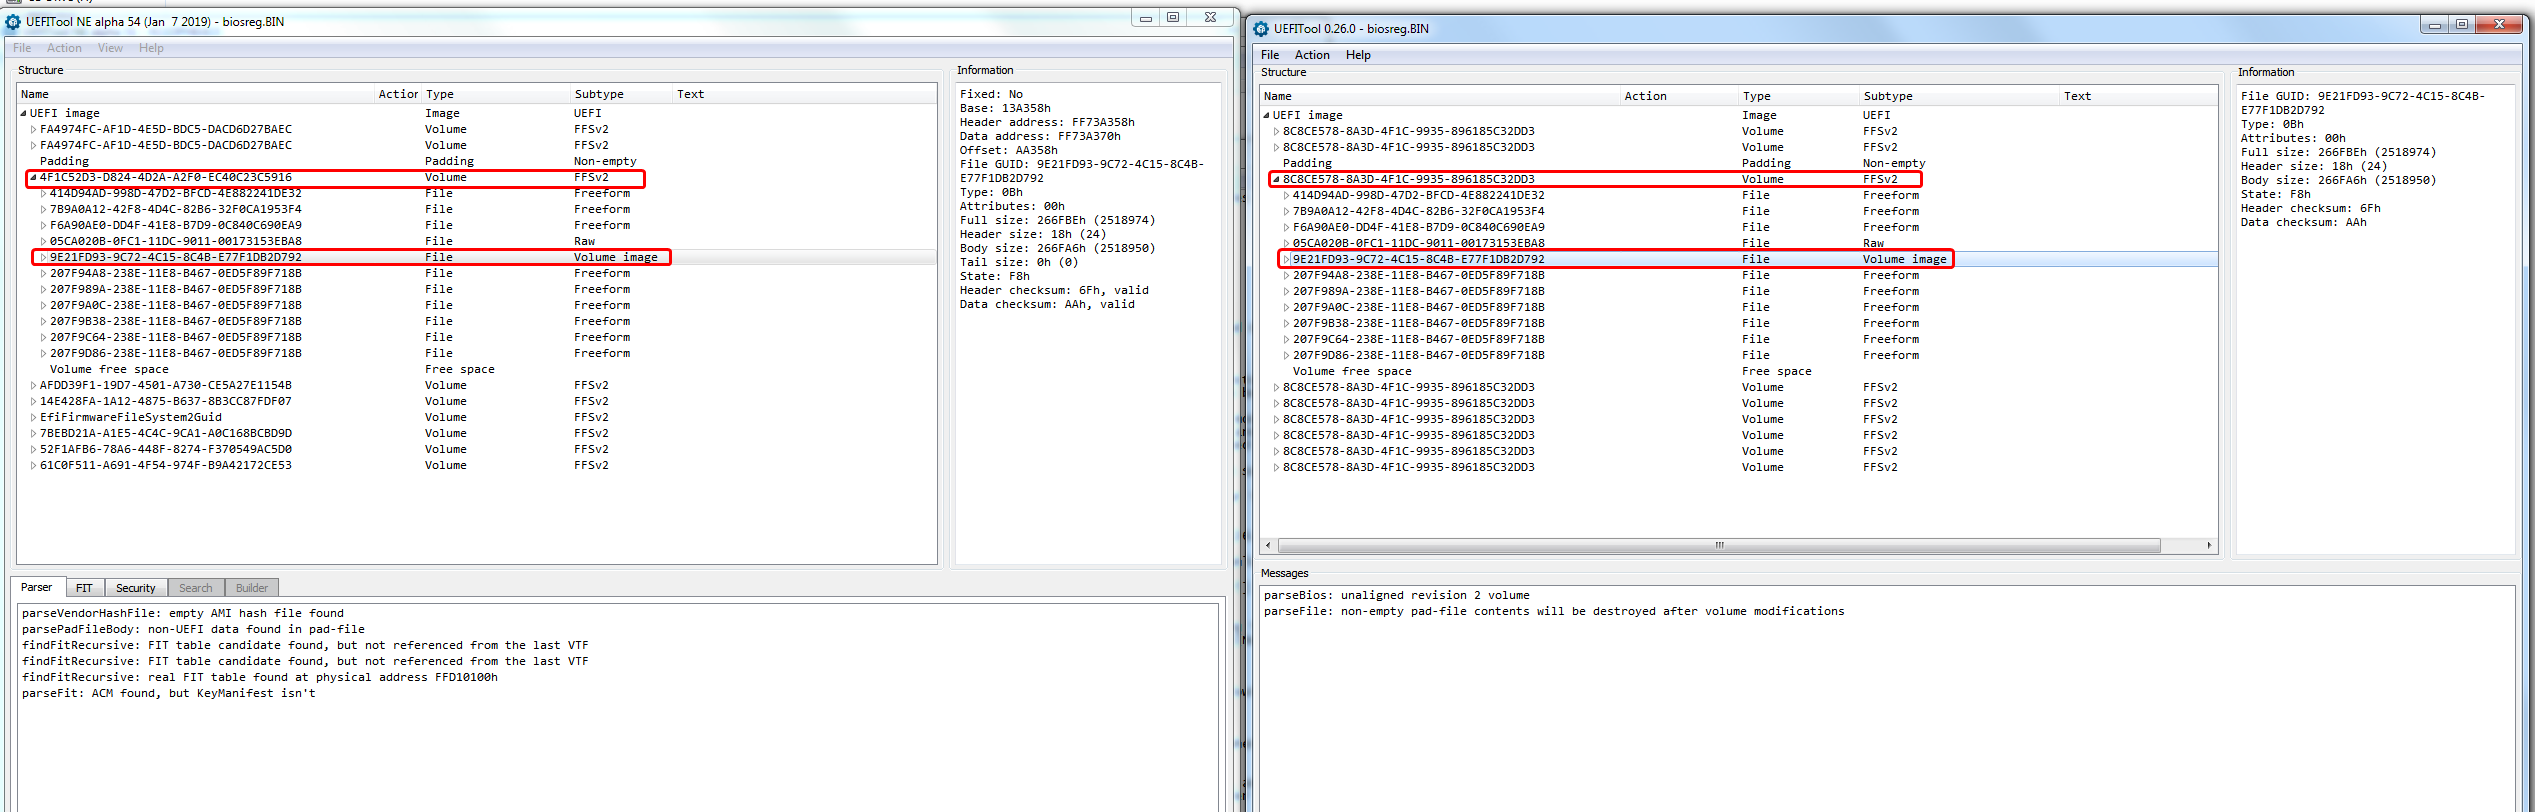
5. Expand that Main Volume shown circled above, so it looks like below, and in this image the sub-volume we’ll edit in is now additionally circled
6. Expand that sub-volume 4 times (x4) so you now can see modules within the volume as shown below, and notice the modules names now start to appear, circled in blue
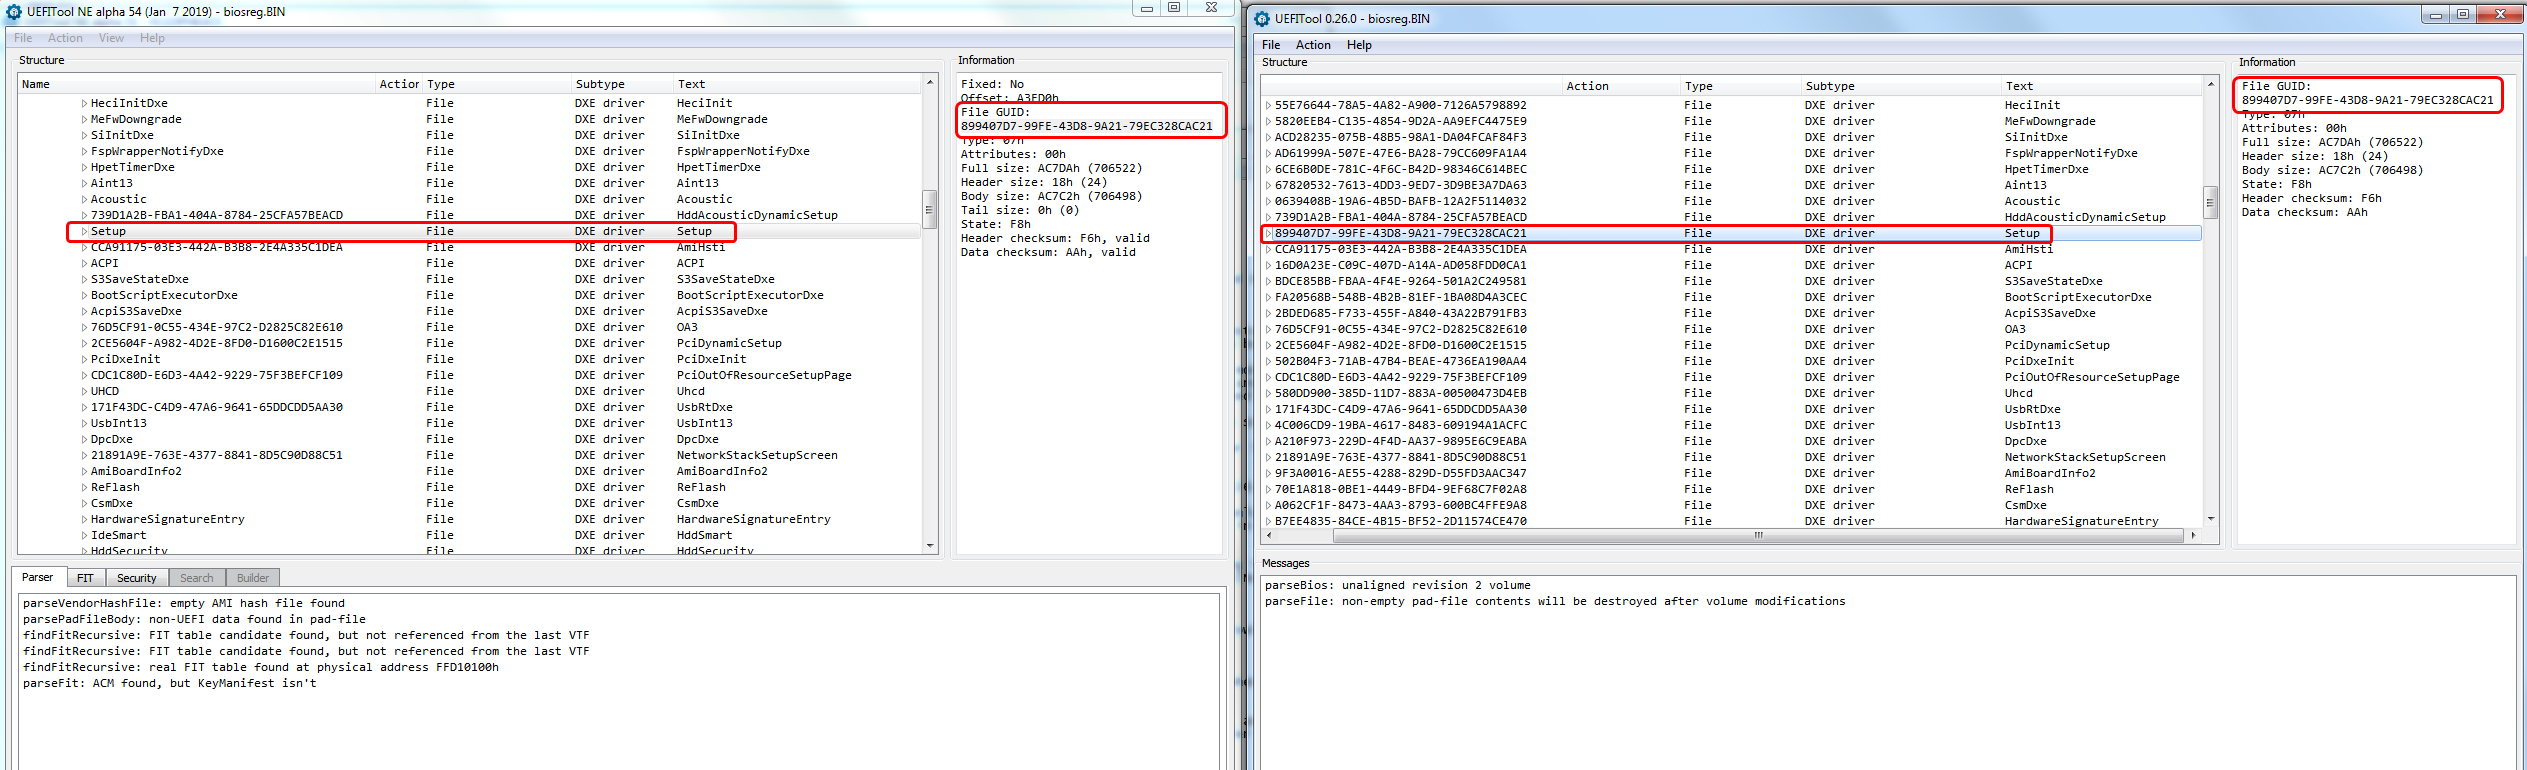
7. Scroll down about 65-70 entries, and you will find Setup @ GUID 899407D7-99FE-43D8-9A21-79EC328CAC21. Or you can search by GUID and find that way as well -
Or, see below #7 for quicker method to locate Setup Module.
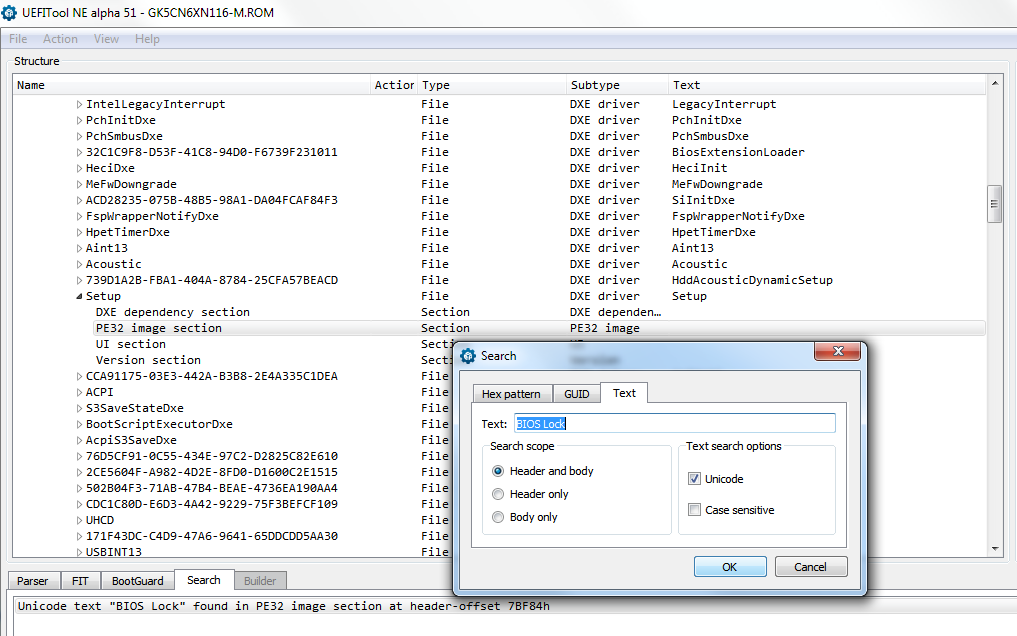
7.a Or, see images here, you can also search for a term that you know is in setup module via Unicode search
In these examples I’ve used "BIOS Lock" as my search term because I know this setting is within This will take you directly to the Setup PE32 Module.
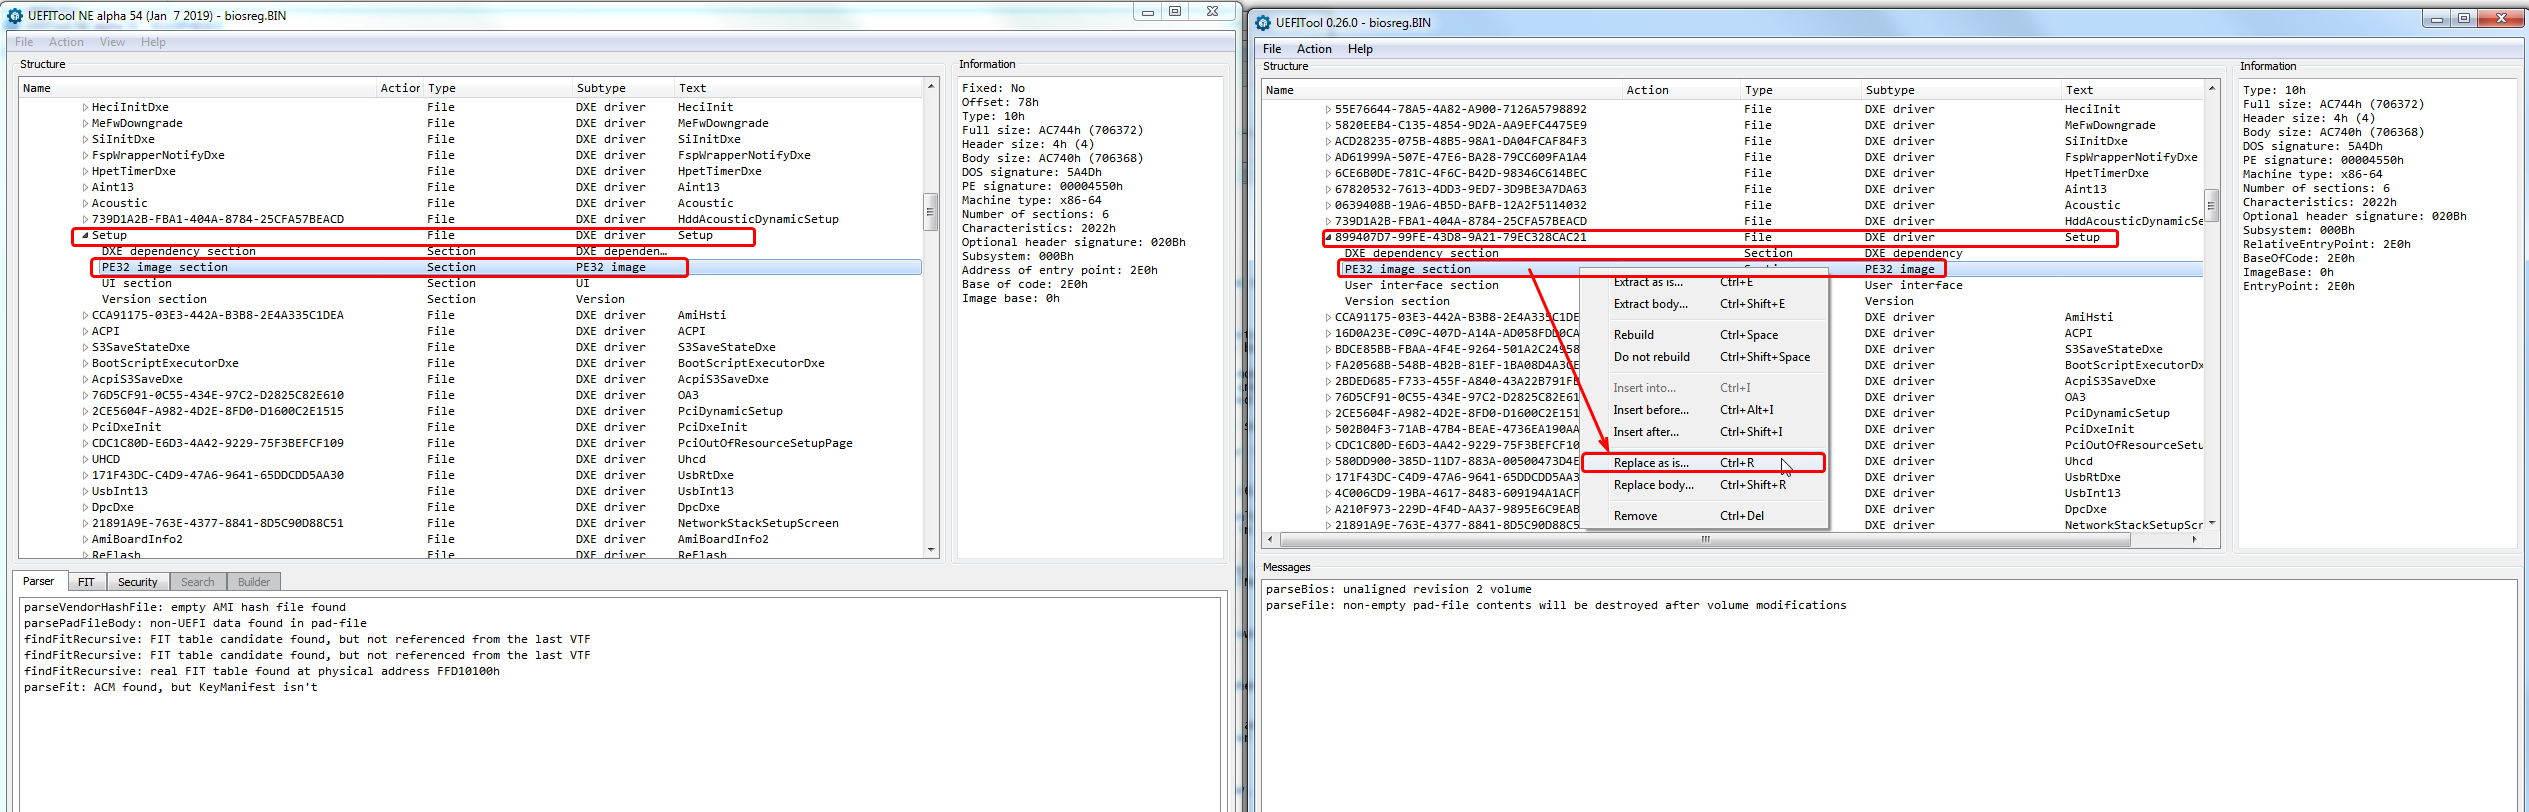
8. Expand Setup Module and you will find PE32 Image Section inside, this is what you will replace.
9. Using UEFITool Regular version, right click this PE32 Image Section, and choose "Replace As-Is" and select the Setup PE32 file included for your versions modified files in the linked package below
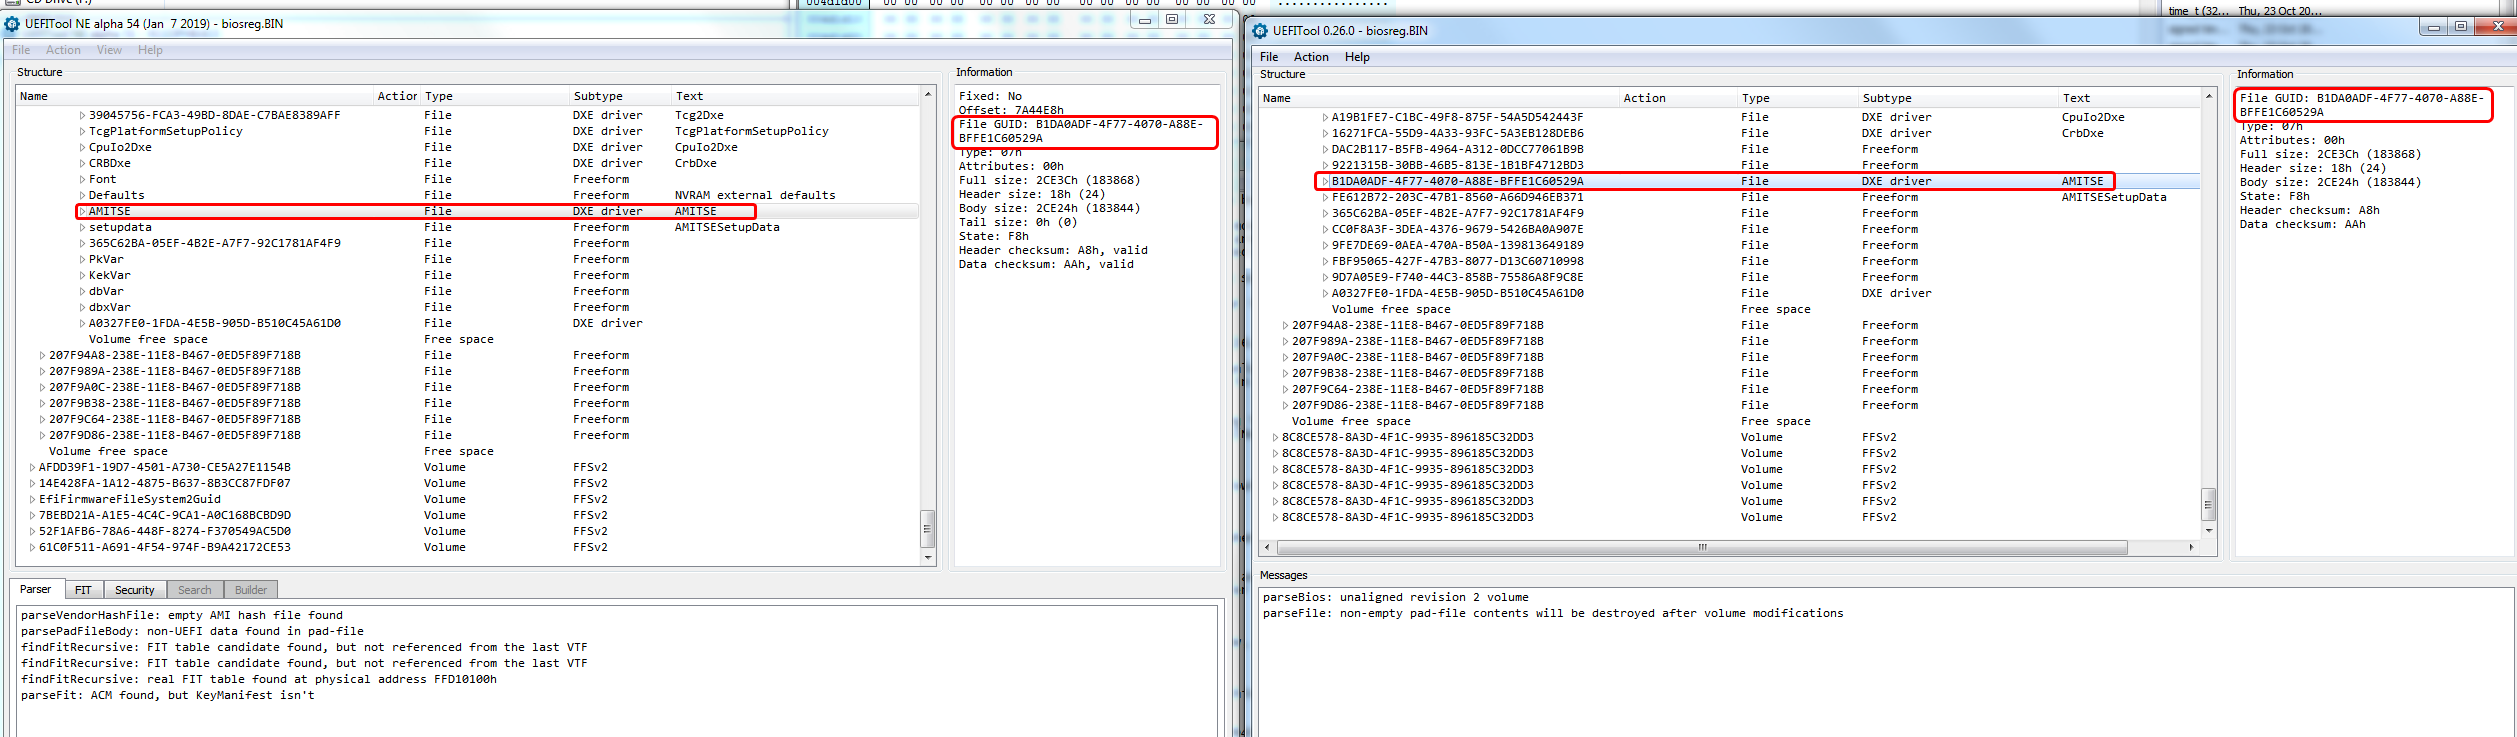
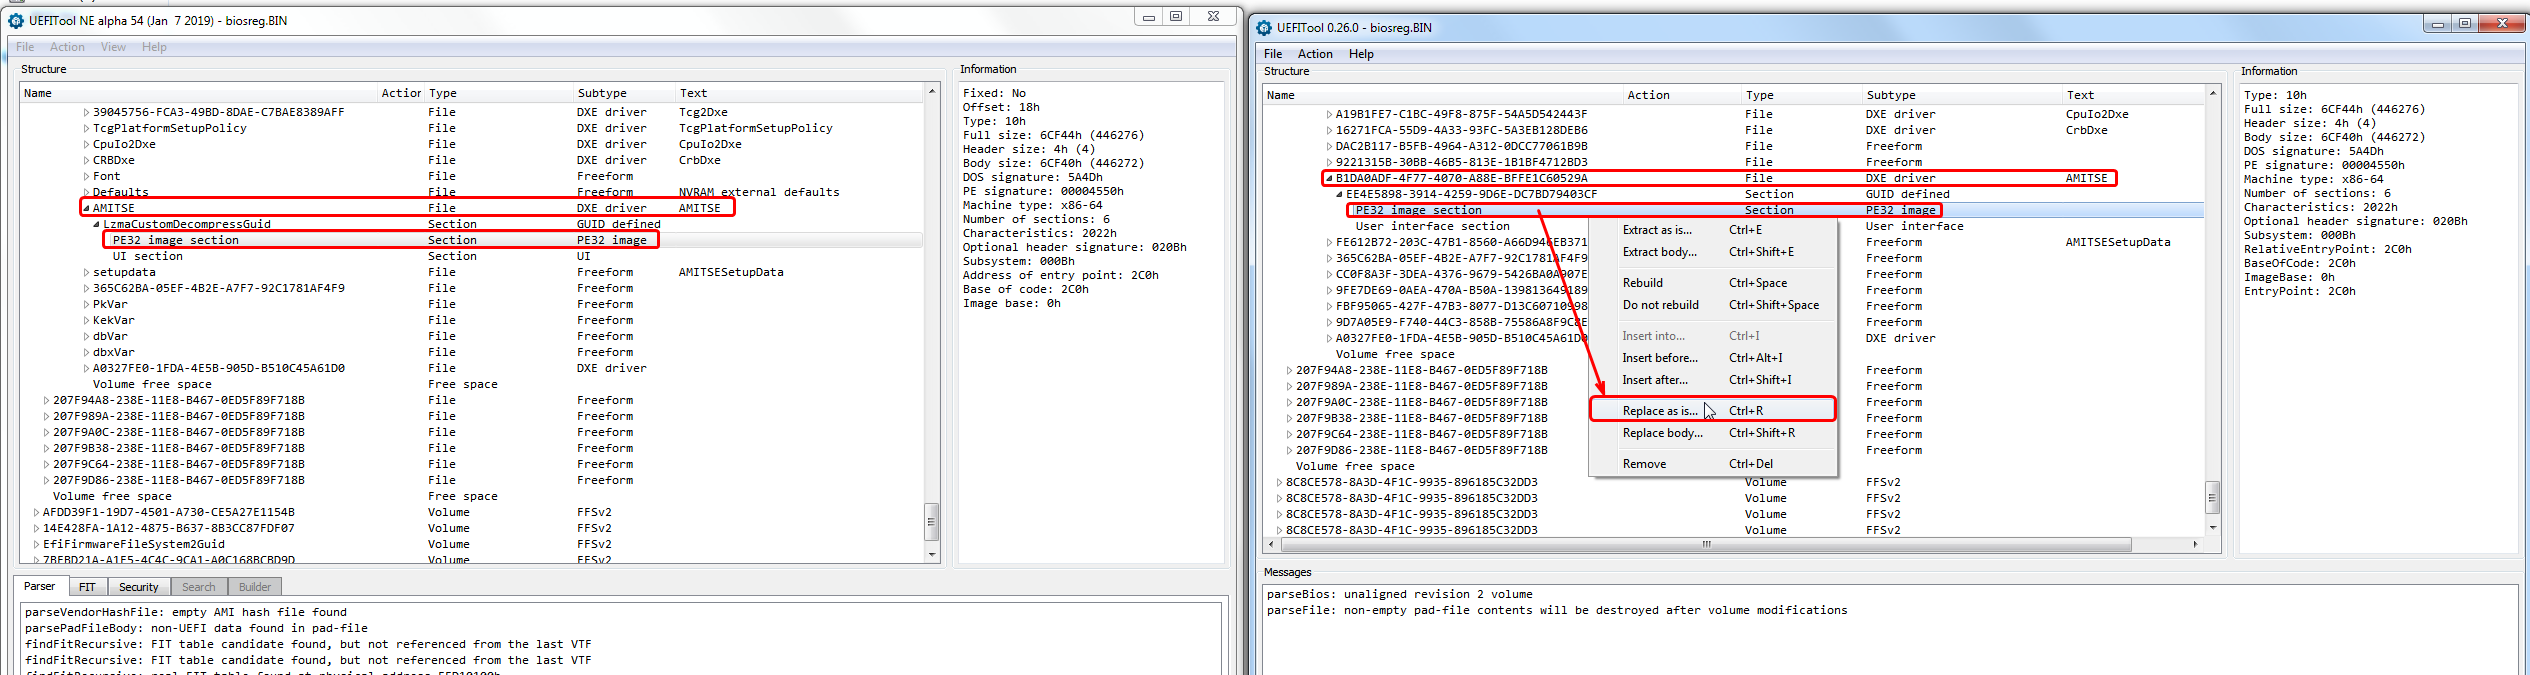
10. We’ll now do the same as above for next module - AMITSE PE32. To Find AMITSE scroll all the way to the bottom of this volume
or search GUID B1DA0ADF-4F77-4070-A88E-BFFE1C60529A. Please notice, there is two modules here with AMITSE in there name, and we will be editing both, don’t get them confused!
11. Expand AMITSE Module twice, until you can see the PE32 Image Section, this is what you’ll replace next, same way as above in step #9
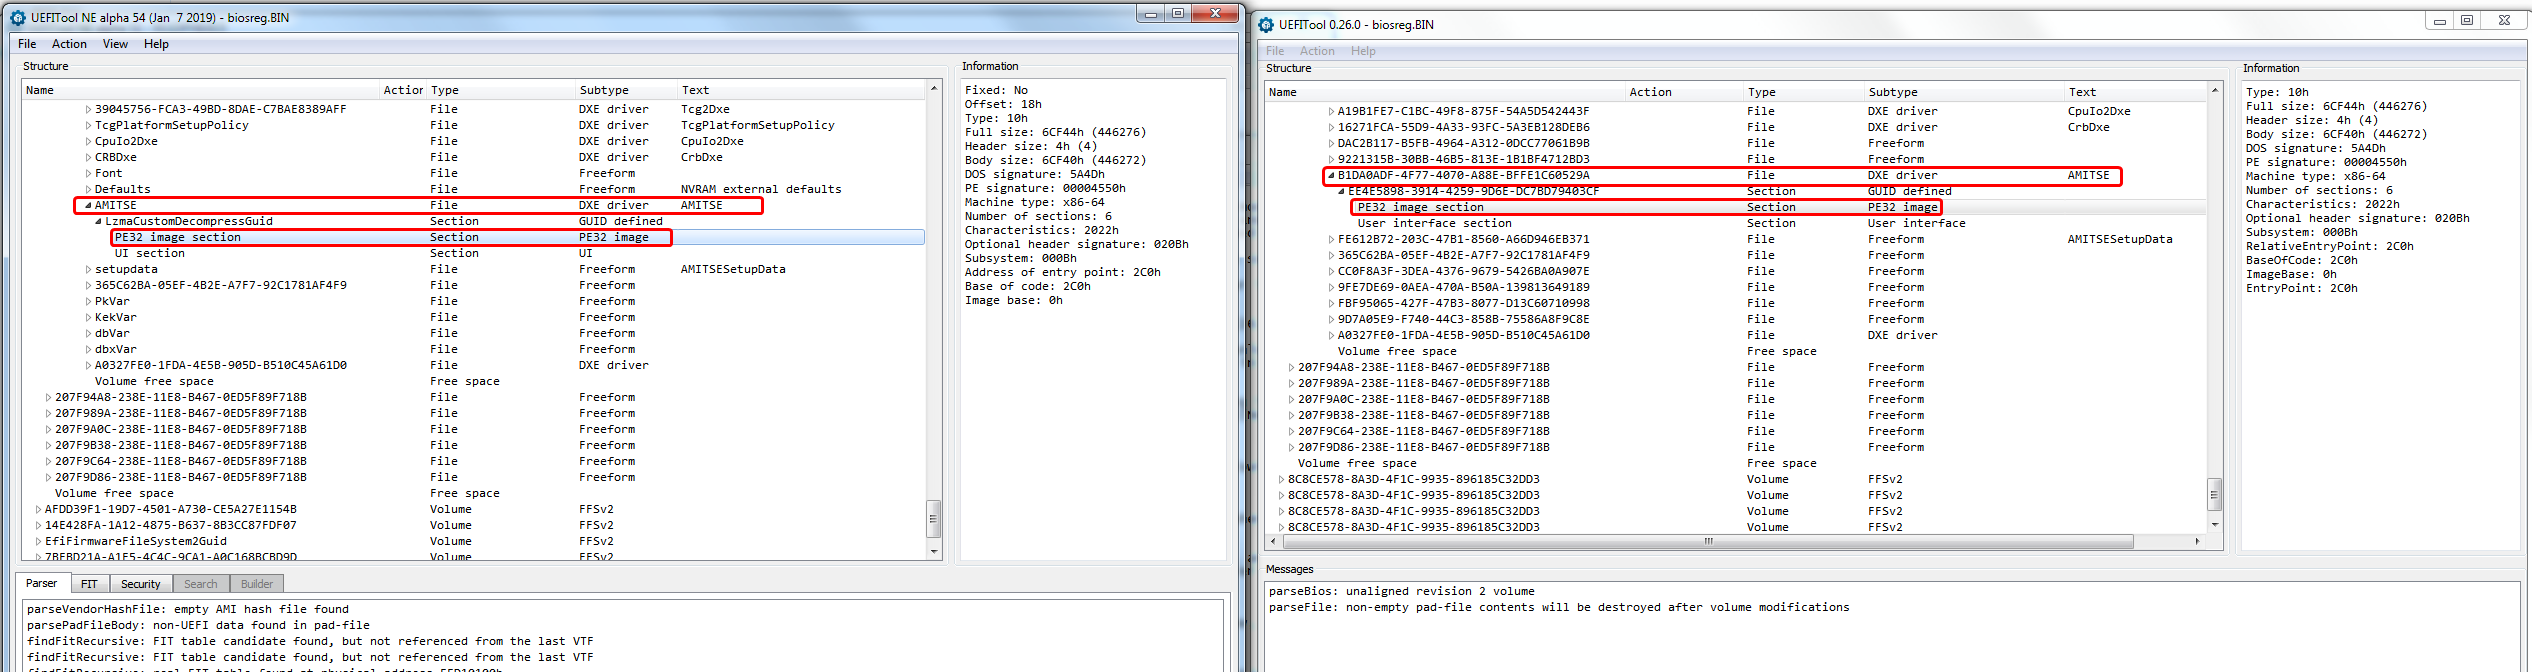
12. Right click PE32 Module within AMITSE subsection, and choose "Replace As-Is" and select the PE32 AMITSE file included for your versions modified files in the linked package below
* Please note * If your mod BIOS package below contains an AMITSE file with .EFI extension, please be sure to replace body. If your mod BIOS package below contains an AMITSE file with .SCT extension, please replace "as-is"
This applies to all the mod-BIOS-files as well, some I included AMITSE As-Is=SCT and some have AMITSE Body=EFI
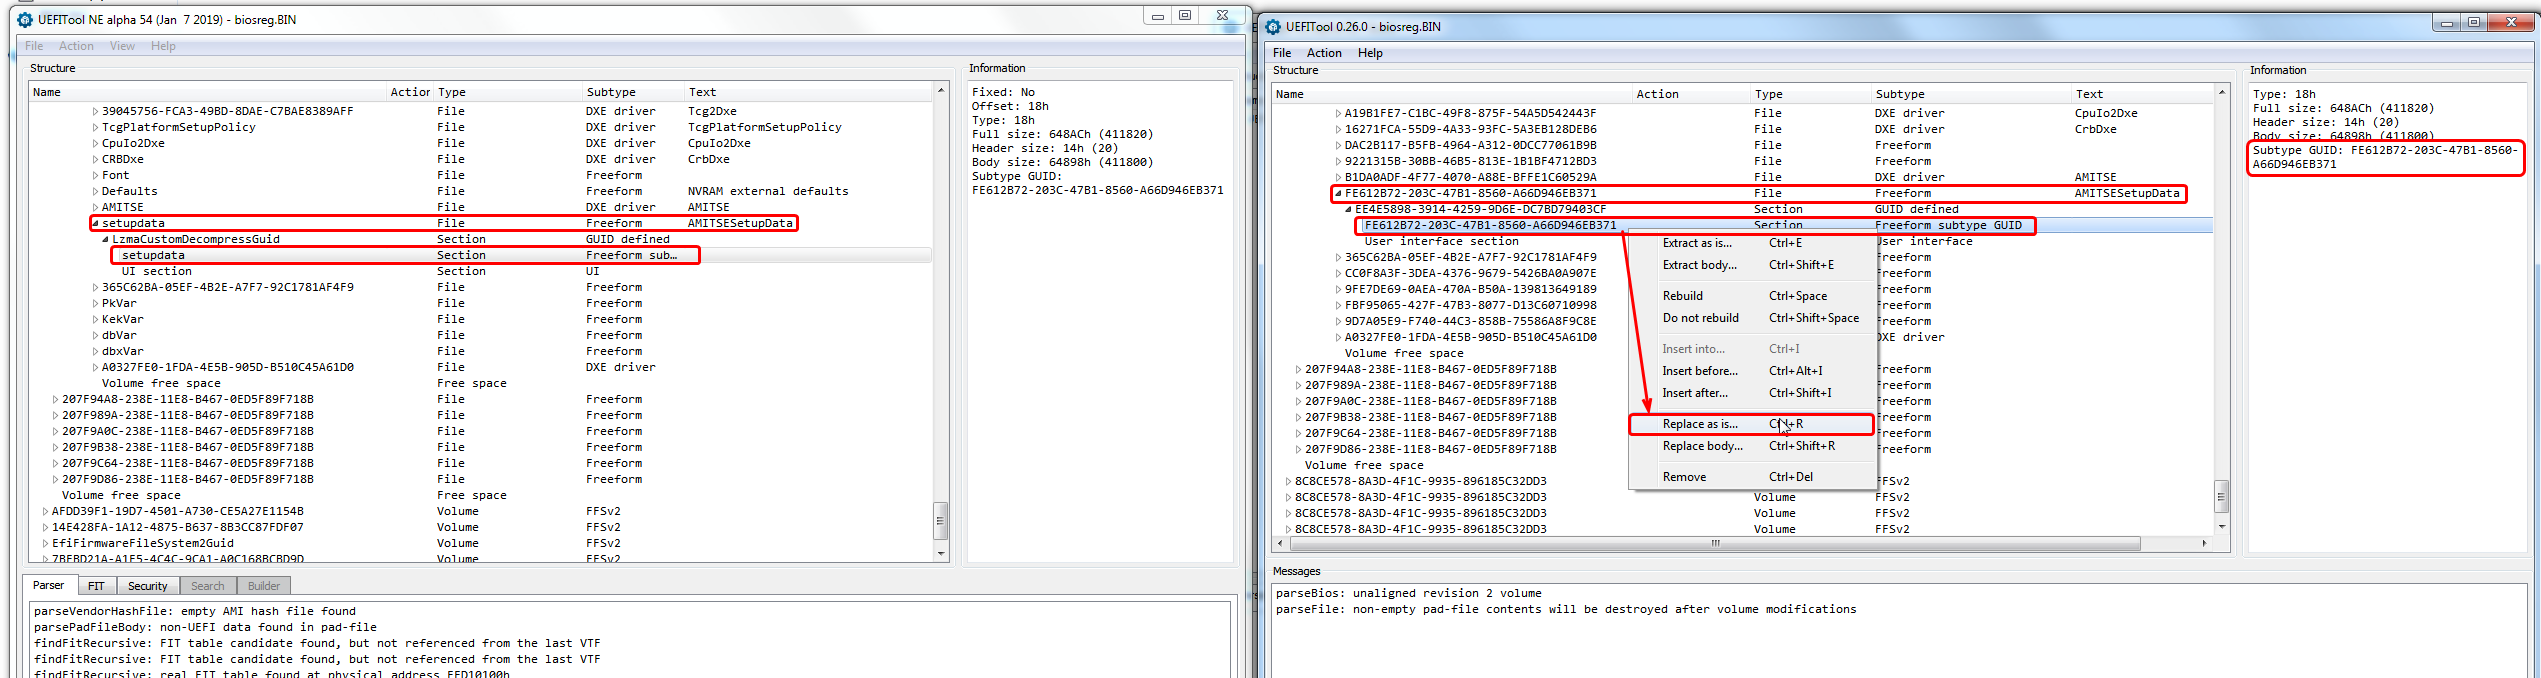
13. Next, we will edit AMITSESetupData directly below main AMITSE Module, expand this twice until you see "SetupData" module in UEFITool NE, as seen in the image below
Or SubGUID FE612B72-203C-47B1-8560-A66D946EB371 in regular UEFITool (in this example, it may not always be same GUID). Pay close attention on this one, since regular UEFITool does not give you the name
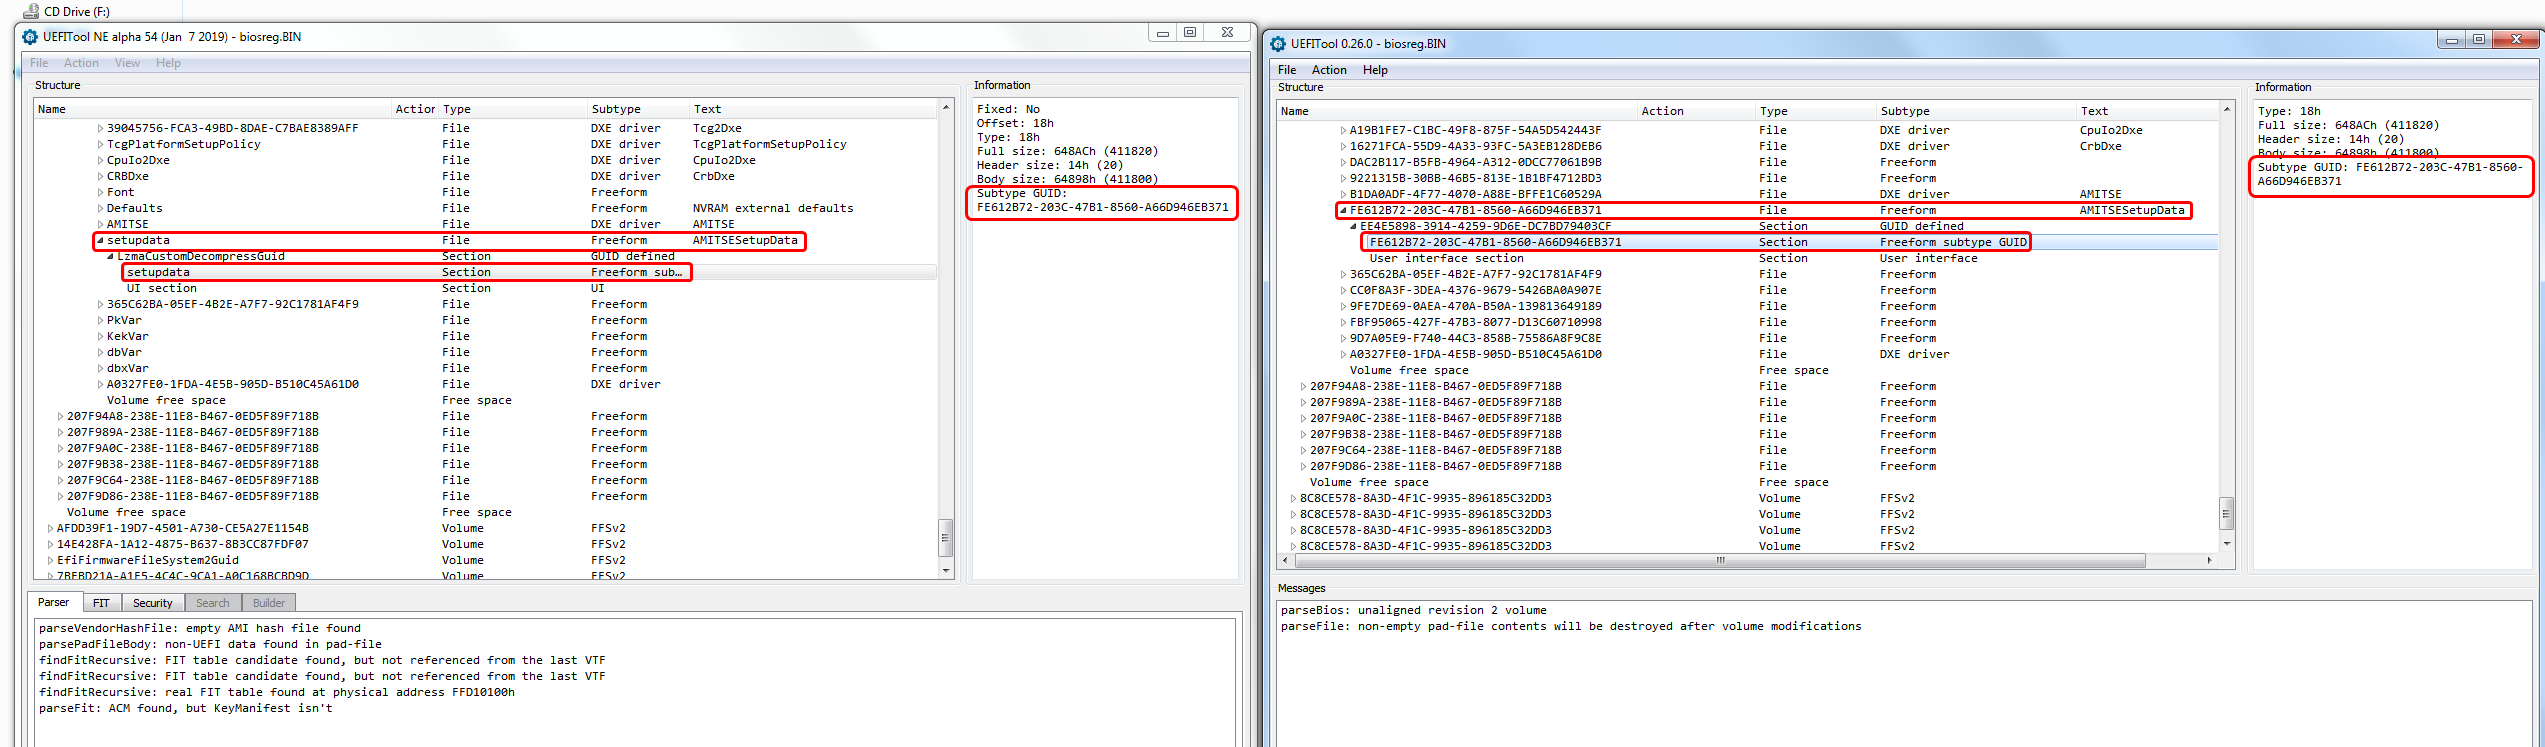
14. Right click "SetupData/FE612B72-203C-47B1-8560-A66D946EB371" Module within AMITSESetupData subsection, and choose "Replace As-Is" and select the AMITSE-SetupData file included for your versions modified files in the linked package below
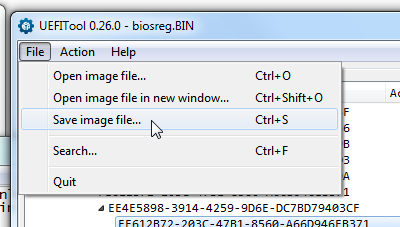
15. Done, save BIOS Image and give it a mod name you will know is the mod BIOS
16. Flash modified BIOS region using FPT, open command window same way as above if not still open, then flash using this command >> FPTw.exe -bios -f modbiosreg.bin
17. Reboot, load optimal defaults in the BIOS and set your SATA settings along with anything else you need to change.
18. Final step - Good work making it this far, now enjoy your new unlocked BIOS! [thumbs-up]
Thanks and appreciation to @nimaim and @pcfr33k for all their testing during the discovery and multiple modification testing rounds
If anyone sees anything I’ve missed, or should add, please let me know and I will update/add-in!
*** BIOS recovery method, from black screen due to incorrect graphics settings applied
[SOLVED] How to unlock BIOS options of rebranded TONGFANG chassis systems? (20)
See this post (#241) and this post (#279), for graphic settings that can be used
For the Pro’s and those who know (BIOS Editing) - General Aptio V Mod Guide ***
If you want to do this mod on your own, or attempt to learn how to do it, here’s how it’s done in general since all systems are little different.
I will try to provide good detail here in text, but much less images and or walk through, because as mentioned this is mainly for "Those who know"
This type of modifications, apply to many AMI Aptio V BIOS, some are more involved than this, others less, but this is the general idea/method for Aptio V
If you are in the "wanting to learn" category, please do not attempt this without a CH341A flash programmer + SOIC8 test clip cable, for BIOS recovery
Everyone should own a set of these tools anyway, there’s no excuse they cost less than $6 total shipped. Order now and wait 3-5 weeks for delivery.
Or pay more and get them shipped faster, or from local sellers, and hopefully they’ll arrive long before you ever need them!
For this example, I will be using Mechrevo GK5CN6Z BIOS
1. Open BIOS region in UEFITool NE, Extract AMITSE (PE32 Module) As-Is & Setup (PE32 Module) As-Is
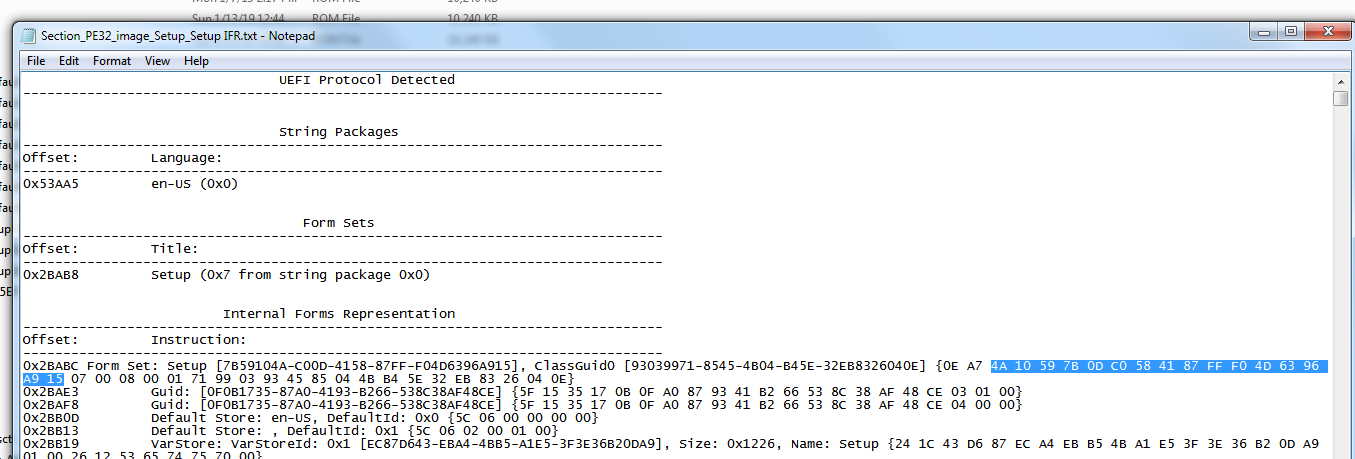
2. Using Universal IFR Extractor attached below, open the setup PE32 module and click extract, this is the Setup IFR output (Human legible text output of the BIOS settings and it’s variables)
3. Open the IFR in notepad and copy the highlighted portion of the Form Set ID as shown in the image below, paste this into a saved notepad file you’ll add menu info into on next step. This will be our main Form Set ID, how we locate the majority of the menu entries in AMITSE module.
4. Create a new menu.txt file in your work folder. Open and past that ID from step #3 as "Form Set ID"
5. Back to the IFR txt, search and find each menu ID, Main, Advanced, Chipset and so on, there will be duplicates of most, some 3-4 (Boot usually). Using search term "Form: Chipset" for example will help you quickly locate everything. Copy each one and shorten down into manageable and useful info for this mod like you see in my example below. You only need the name of each, and it’s form ID, so you will be copying and pasting, then cutting out unnecessary info. Near the top of the IFR, you’ll find a set of menu names (Setup, Main, Advanced, Chipset etc) This is the list of the main hidden ones in these BIOS, and this is also the list of menus you see at root of setup module in AMIBCP (So you know later, those are ones to edit in AMIBCP)
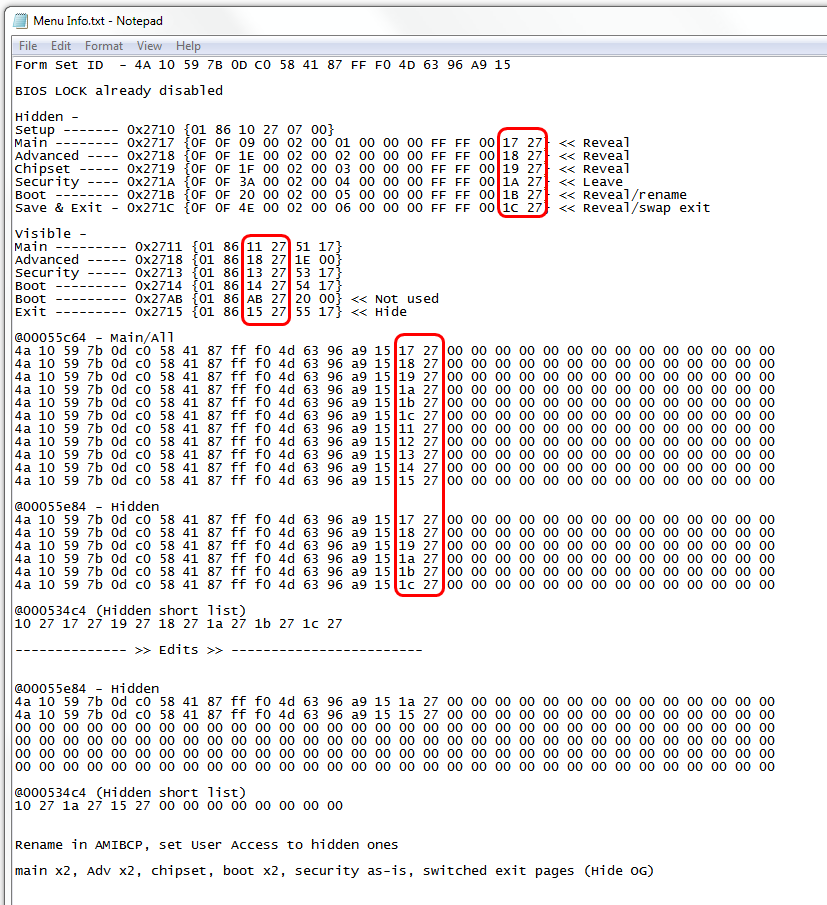
Each actual menu ID is circled in red, this is it’s Form ID in hex (backwards). This will be used later to quickly ID the lines you want to edit/remove/swap/add etc.
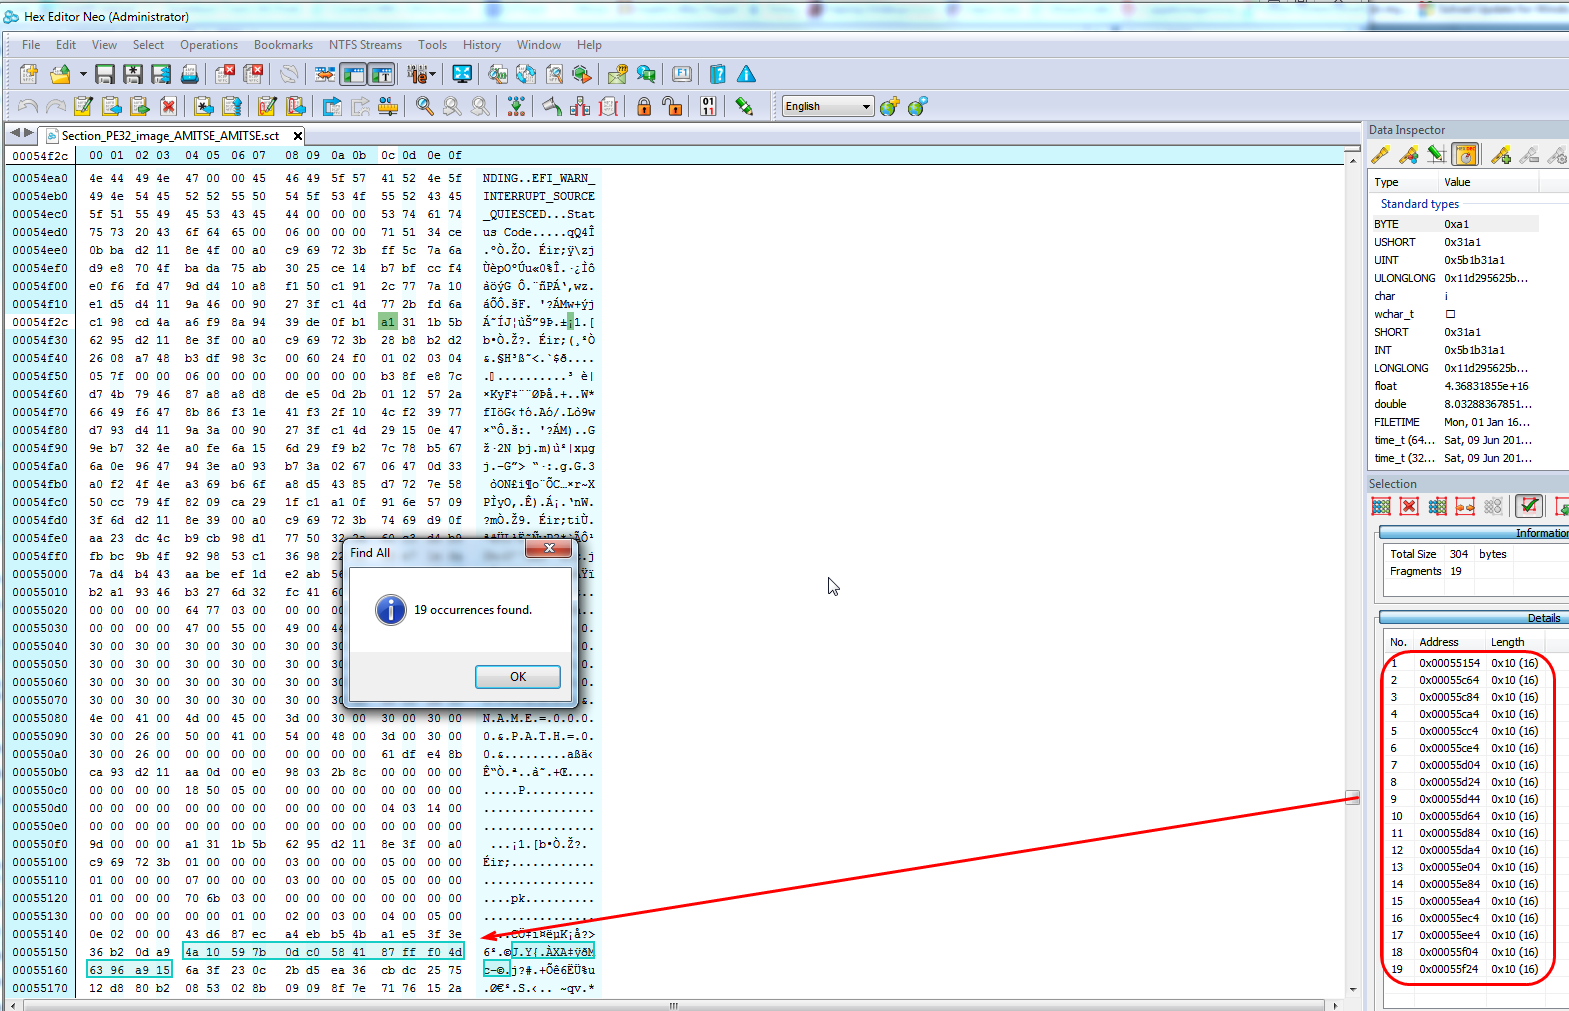
6. Once you have all your menu ID’s and info saved into your notepad file, open AMITSE PE32 module in your favorite hex editor, using search for hex terms input your main form set ID and "Find All" Depending on BIOS, you should find 15-30 or so results (Some less, most in the middle of that range, this BIOS has 19)
* Please note * If extracting body resulting file extension = .EFI and to be sure to replace body / If extracting as-is resulting file extension = SCT and be sure to replace as-is
This applies to all the mod-BIOS-files as well, some I included AMITSE As-Is=SCT and some have AMITSE Body=EFI
7. First result usually not anything we need to look at, but go ahead and click through to each result for a quick glace. You noticed the chunks/blocks of several in a row/right after each other correct, and did you catch the menu form ID’s too in each one? If not, I’ve circled them in the below example, so you can now notice where to easily locate them. Once you see this often enough you will recognize immediately. I’ve also outlined two of the chunks/blocks of ID’s I mentioned, these are sets of either available, visible, or hidden menus
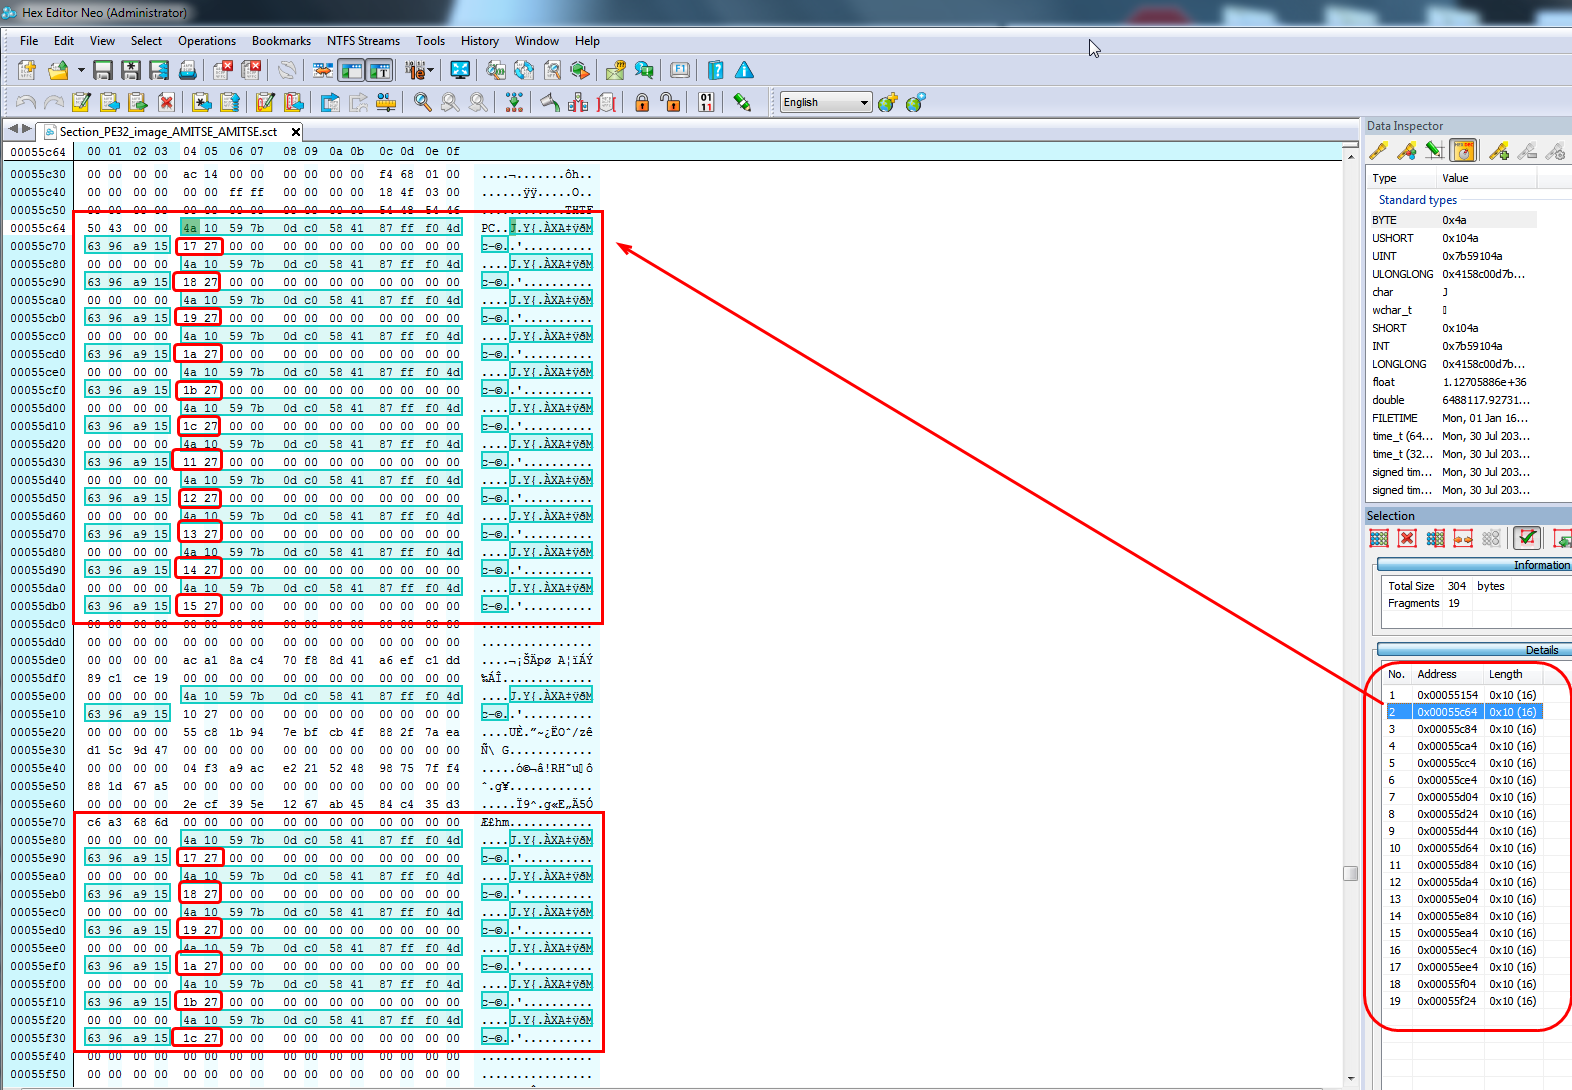
8. Make a notation in your menu text where each of these sets of ID chunks is located (Hex address), you should have two, some BIOS three. After that, go back to hex and copy each set of ID’s in their entirety to your menu text file. Be sure to select and copy/paste the correct amount of bytes, so each begins with the form Set ID and ends evenly, example image below. Paste each set to their corresponding hex address location in your menu text, then then arrange the hex into neat format like you see in my image example at #5 This makes for easier editing later.
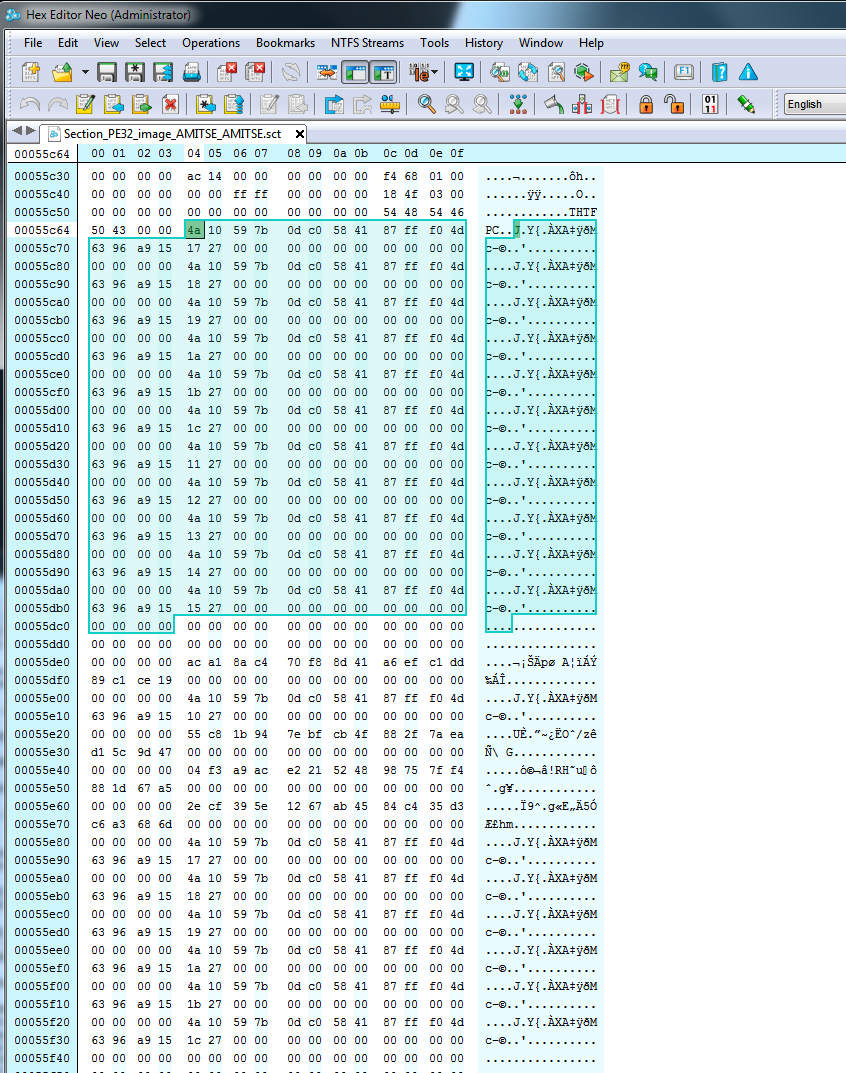
9. Now, lets find the short block list and it’s location. Search AMITSE PE32 module for 19 27 (chipset) via hex, we know this one is blocked so it will help us quickly locate the short block list. You should find 2-3 results, if more that’s OK (Be sure to uncheck "Ignore Case" in your search box if you can, this will provide less incorrect results). Once you’ve located the correct one, you’ll see several other menu ID’s with the 19 27, all in a short row of 3-6 or so ID’s. In the image example below, I’ve circled the short block list entirely in red and each individual blocked menu ID in blue. Copy this blocks starting address (First ID) into your menu text, and then also copy all the contents (just all menu ID’s) via hex to the menu text as well like you see in my example at #5
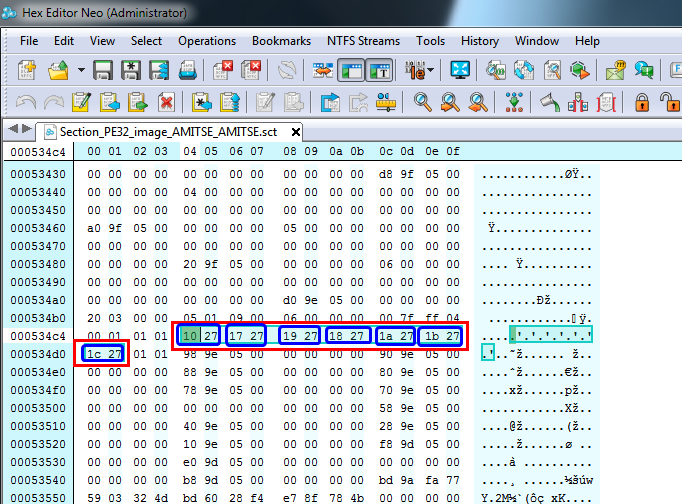
10. Now, your menu txt file should look nearly identical to my example at #5 image, except for the edits at the bottom. Now, edit yours marking which menus at the top area you want to reveal, or hide, or swap and then make an edits section like I’ve done at the bottom of my #5 example image. Then make your edits there, looking back to the top as needed, whatever you remove fill in exact same amount with 00. Once done, save file with a modified moniker, and you’re now done with hex edits.
11. Open BIOS region in UEFITool regular version, replace AMITSE PE32 As-Is module with your modified file.
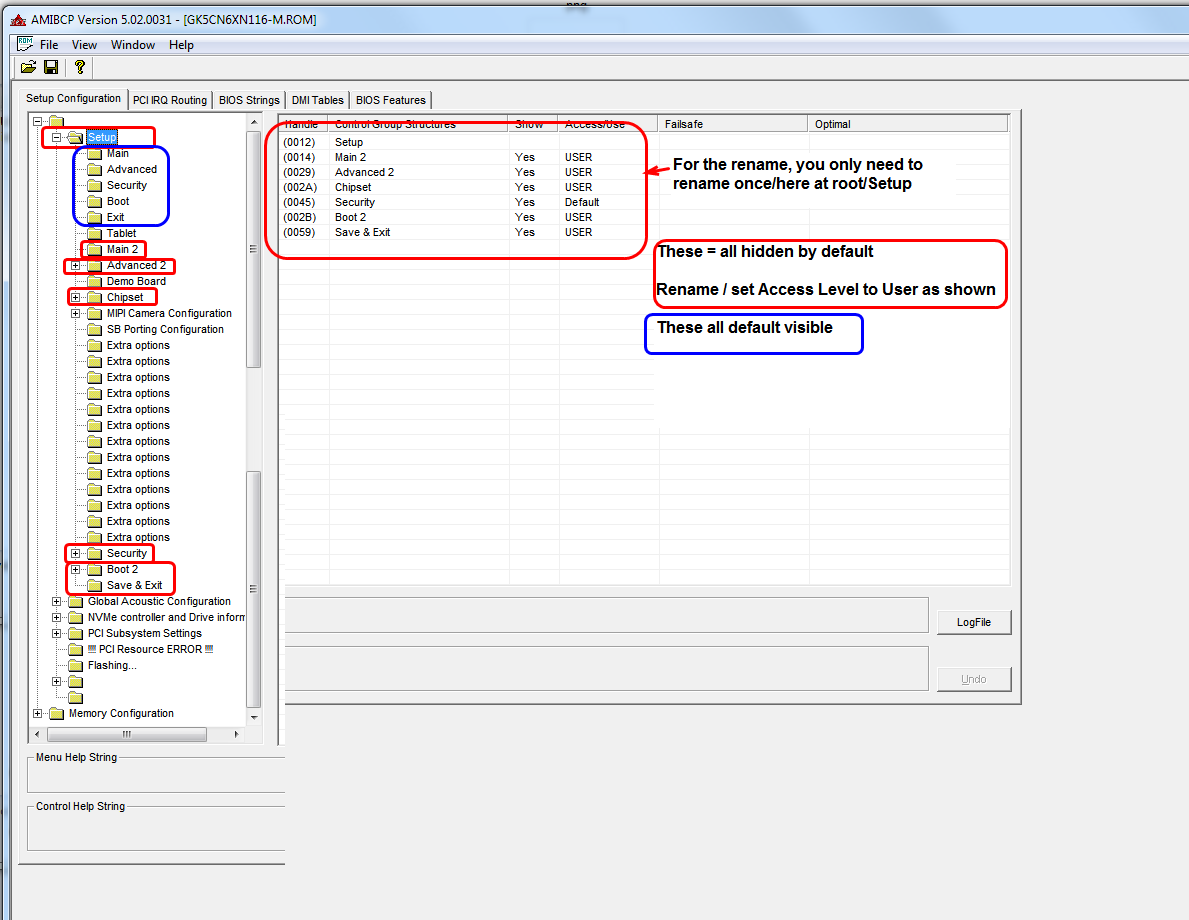
12. Open modified BIOS region in AMIBCP, go to "Root" of Setup, here you will rename any menus you want to rename, and set Access Level to User. Save BIOS with final modified moniker once you are done, this will be your finished mod BIOS
13. If you are doing this mod for someone else, as long as it’s the same exact model and BIOS version, you can extract (As-Is) AMITSE PE32, Setup PE32, and AMITSE/SetupData >> SetupData Submodule from your final mod BIOS and insert into others BIOS regions to do the mod for them. This would be exact same as the mod files linked on this guide. But you must always make sure it’s same model and same BIOS version, due to these modules change sizes/contents between BIOS version and definitely do not match between the models.
AMITSE PE32 = your main menu lock/unlocks
AMITSE/SetupData/SetupData = your AMIBCP Access Level changes
Setup PE32 = your AMIBCP textual menu name changes
Mod BIOS Files Download (User is RETIRED, his personal files and the service server “tinyupload.com” is no more available, Win-Raid does not have the files stored, dont bother to ask for them, unless a forum user still has them)
Universal IFR Extractor-0.7.rar (229 KB)
Edit by Fernando:
Since our former Moderator and BIOS Guru Lost_N_BIOS cannot do it himself (he has not been online since several years), I have tried to shorten the thread title and to expand its coverage simultaneously.
If anyone should have a better idea, please send me a PM.