[GUIDE] Coffee Lake CPUs on Skylake and Kaby Lake motherboards

Premise: the guide below is NOT a transaction without risk and success can not be guaranteed.
Therefore, I do not assume any responsibility for problems or damages resulting from the use of this guide.
Those who do not have a propensity to risk and a some computer skills should abstain (at least for now).
Almost all the information is coming from this forum, my modest task is just to put various things together.
So thank you to all forum members that made this possible, From Fernando to SoniX to all the others.
This guide is intended for AsRock Skylake motherboards as they have proven to work well with this mod. for other brands look Here, bear in mind I have not personally tested this mod.
A socketed BIOS chip is desirable as it could reduce the risk of bricking the board.
Because of higher power limits I would not suggest this mod with i5 and i7 K series CPUs. 6 cores CPUs require some physical modifications to the CPU pins.
IMPORTANT: recent Intel ME firmware may inhibit correct CPU recognition. If the motherboard has an updated ME firmware (as applied to mitigate the well known 2018 security issues) the Coffee lake CPU won’t be recognized. ME firmware should be v11.7.x.1xxx or lower.
There are some unofficial methods to roll back to a previous ME version, like this one.

Four software “packages” are required for the software:

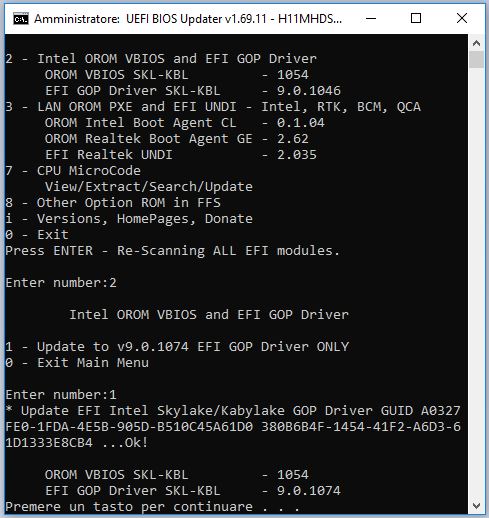
1. UEFI BIOS Updater (UBU) in version 1.69.11.fix
2. Intel Binary Modification Program (BMP) v2.6.7
3. VBios and BSF Package
4. AMI Aptio V UEFI MMTool v5.0.0.7 or more recent

Links and directions to get those are all in the first post of the following page:
[Tool Guide+News] “UEFI BIOS Updater” (UBU)
in addition to the four packages you need a copy (instant flash) of the motherboard BIOS downloaded from the manufacturer’s website. The version must be recent but not too much (not after October 2017: the issue is the Intel ME firmware version). Finally you need the two files that are in the attached zip file.

Before starting, the following preparatory work is needed:

1. Unpack the UBU folder (v1.69.11.fix): this will be the main working folder
2. Install Intel BMP on the PC: it will be used to prepare the updated vBIOS
3. Copy the VBIOS_and_BSF / SKLKBL folder into the UBU folder
4. Check that the MMTool.exe program has exactly this name (without spaces or numbers, possibly rename it) and insert it in the UBU folder
5. Leave a copy of the BIOS to be changed in the UBU folder
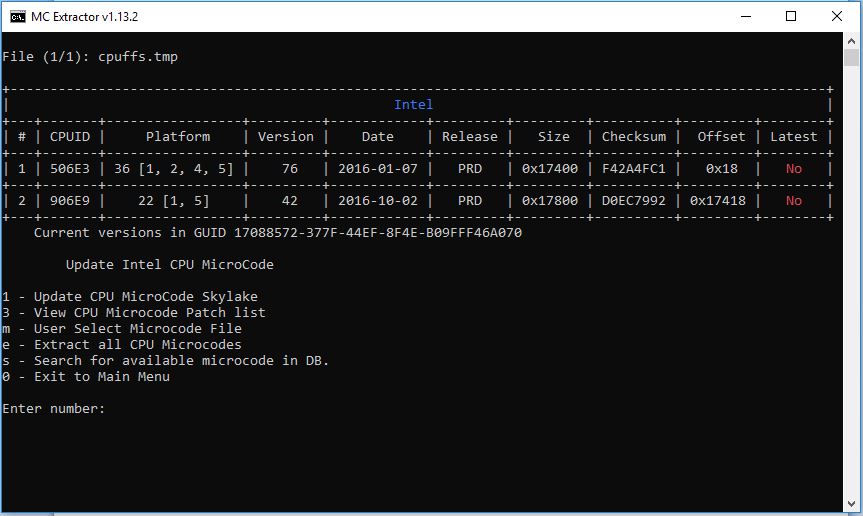
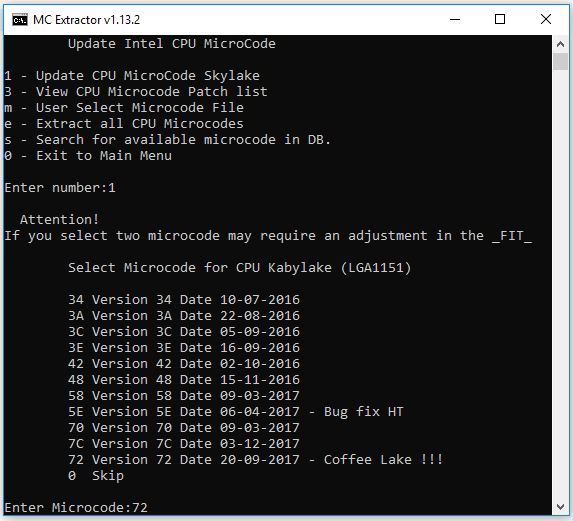
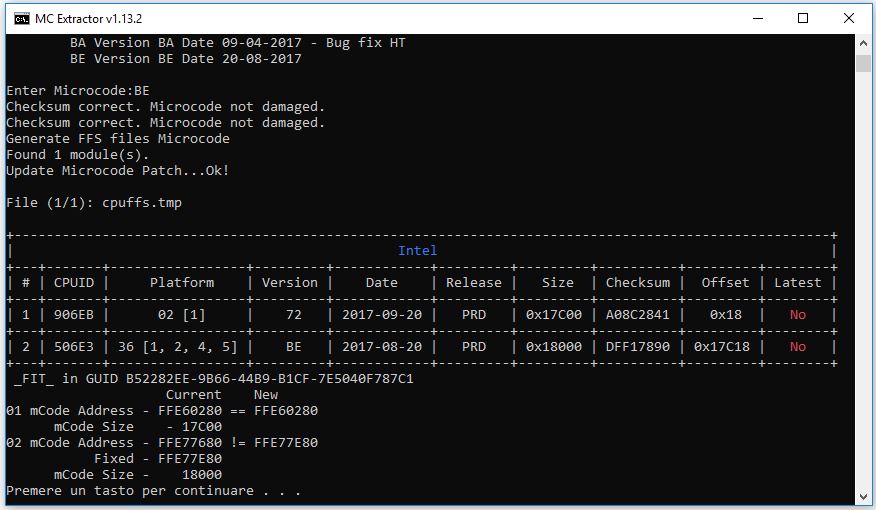
6. In the folder UBU / modules / mCode replace the file “sel1151.bat” with the one with the same name attached to this post and in the subfolder 1151 insert the attached file: “cpu906EB_plat02_ver00000072_2017-09-20_PRD_A08C2841.bin”. these two files will allow the Coffee Lake microcode to be inserted semi-automatically.

Sel1151.zip (96.5 KB)

The operation to be performed to the BIOS basically consists in updating to the latest versions of vBIOS and GOP driver besides the insertion of a microcode compatible with the Coffee Lake CPUID.
The first operation is the most complex because it must be done manually (in the volume there are too many manufacturer’s customizations to use an automated process) while the other two can be done more easily through UBU Tool.

VBIOS UPDATE:

1. Open the BIOS to be modified with the MMTool program, select the “Option ROM” tab, in the table click on device 406, note the relative value of the “GUID section”, extract the OROM naming it “vbios.dat” and click on “apply”. Close MMTool.

IMG01.JPG


2. Open "vbios.dat" with notepad and look for the first string "Intel(R)": just before it, there must be a number between 1034 and 1054. This number represents the version of the original vBIOS. Take note and close without saving.

3. Open the previously saved "vbios.dat" file with the Intel BMP program, using as a script file (.bsf) that of the corresponding version taken from the SKLKBL folder (in this example it is 1039).

IMG02.JPG


Once opened, save the settings from: "BIOS Settings" -> "Save All" by naming the "transfer" file with the extension .ssf. We have thus saved the settings of the original vBIOS that will be transferred to the new one. Close the program.

IMG03.JPG


Open "transfer.ssf" with notepad and remove ALL the line that starts with "STRING $ Signon Intel (R) …". Save the file and close it (Doing this you have removed the old vBIOS description).

IMG04.JPG


4. Open the "skl_1054.dat" file and the corresponding .bsf file in the SKLKBL folder with the Intel BMP program.

IMG05.JPG


Apply the original settings to the new vBIOS with: "BIOS Settings" → "Apply All" by selecting "transfer.ssf". After a few moments of processing the file is ready. Save the file as new_vbios.dat and close the program.

5. Now you need to replace the OROM in the original BIOS. Open the BIOS with the UEFITool program (it is also located in the UBU folder). Using the "Search …" function (File menu) in the GUID tab, enter the first part of the values ​​noted in step 1. (Section GUID), select "Header only" and confirm.

IMG06.JPG


The result of the search with the address should appear below (Messages). Double-clicking on the line in the "Messages" window highlights a line in the "structure" window. Double-click on this line.

IMG07.JPG


6. (OPTIONAL) to verify that the correct OROM portion will be replaced, from "Action" -> "Section" -> select "extract body", choose the name vbios1.dat and save. Check with an editor (for example HxD) that vbios1.dat and vbios.dat are identical.

7.with the line selected in step 5, from "Action" -> "Section" -> "replace body" and select the file new_vbios.dat. Confirm, then save the file (Save image file) with a new name and exit UEFITool. Now the BIOS has a vBIOS updated to version 1054.

Make a copy of the file to be kept for security in another folder.

GOP driver and Microcode UPDATE:

1. remove all BIOSes in the UBU folder, leaving only a copy of the one with the updated vBIOS. Launch UBU.bat as an administrator: the program should automatically select the BIOS by performing some operations such as removing the manufacturer’s protections and renaming the file. After a few seconds, you are asked to press any key to continue.

IMG08.JPG


The main menu of UBU appears, where some BIOS attributes are shown. If the vBIOS update has been carried out, the VBIOS version -1054 will appear.

IMG09.JPG


By choosing option 2, the GOP Driver update is updated (updated version 9.0.1074), confirm by pressing 1. The GOP Driver is updated automatically. Pressing a button returns to the main menu, with the updated driver.

IMG10.JPG


Choose option 7 (CPU Microcode) to proceed to the last step. A new window opens with the available Microcodes and the available options. Depending on the type and size of the BIOS there will be two microcodes (BIOS of 8 MB) or three or more (BIOS of 16 MB).

IMG11.JPG


IMPORTANT NOTE: UBU can save a maximum of two microcodes even if originally there are more. This means that if you want compatibility with Coffee Lake, you need to "sacrifice" the present Kaby Lake microcode.

To proceed select option 1. The update has two successive phases: first the microcode is requested for Kaby Lake.
To enable a Coffee Lake processor select the last value (72): that will insert the relevant microcode.

IMG12.JPG


UBU also asks to upgrade the Skylake microcode. I recommend that you select the BE value. The program automatically proceeds and updates the two microcodes: in the table that will appear there should be both.

IMG13.JPG


Press any key and then exit with 0. Choose the name that will be given to the BIOS (it will probably be renamed as the original to have it accepted by the update module).

The BIOS is ready.

Hi ,GuysDoes i7 8700K works on Z270 Chipset?

So @elisw

Have you successfully booted up coffelake on your older non-coffee flavored motherboard??

yes!
works fine.
integrated GPU
http://www.userbenchmark.com/UserRun/7001381
https://www.passmark.com/baselines/V9/di…?id=96580232199
PCI express GPU
https://www.passmark.com/baselines/V9/di…?id=96695419244
http://www.userbenchmark.com/UserRun/7031702

@ elisw
The question about the processors CoffeeLake they work on your motherboards with the chipset x100 / 200?

Well only two things are known for now:
1) Only Quad Core Coffee Lakes are confirmed to work for sure (they are Kaby Lake Cores after all)
2) Only Asrock Boards were modded successfully. Nobody knows how to do this on non-Asrock boards as the PCIe goes missing there.

I want to know if non-ASRock mb use this guide but can not boot up.what should I do?


@SoniX Yes, the benchmark do show both the CPU (i3 8100) and the motherboard/chipset (H110 → AsRock H110M HDS).
iGPU and PCI Express do work fine (benchmarks are with both). RAM frequency is limited to 2400 (XMP is 3000) but on a non-Z platform it could be expected as this is the i3 max frequency.

the issue I want to address is the compatibility with Skylake and Kaby Lake, once the BIOS is modded and does support Coffee.
Until now the iGPU (HD 510) stops working.
I have to dig a bit deeper, also the fact HWInfo does display a different CPU microcode from the one inside the BIOS. Once I have received the chip programmer I will also try the mod on adifferent, ASUS motherboard (again of the H110 sort).

nice job, I am waiting for an asus z170 and 8700k

TDP of K models might be a problem.


What about motherboards with more phase lines like Rog or Strix?

Tried an i7 8700 on a Z170 motherboard and it turned on for 1 second and off, and tried an i7 6700K on my Z370 motherboard and did the same symptoms as the Z170 motherboard.

Sorry, I can’t find the Vbios and BSF package files, could you possibly send me the link?


https://cloud.mail.ru/public/5iRi/eMU5hdv3w/VBIOS_and_BSF.7z

xx00K/xx00 can also be started, but you need to do physical shielding and some other modifications.But it is not recommended for the 6 core CPU. After all, the larger current makes the pin of the base unsafe

Hello

The guide came in handy. The CPU has already been updated. Thanks

I still have a question

How can I update the RAM memory?

There is a newer bios edition with memory update but I have a dump bios and I would like to do it with the UEFITool program


Which module is responsible for supporting ddr memory?

PCB ASrock H110M-HDV bios 7.20 Improve DRAM compatibility.


Bios dump 1.7


For now, I have the pcb itself. I’m just gathering to buy the whole thing

@elisw

Thank you for such a wonderful guide. I have finished my BIOS today and already ordered my 8100 to test tomorrow. I only have 1 question before i flash: I used "UBU_v1_69_15" instead of the version .11 fix you mentioned. Can this cause any problems? I was not able to find the older version. All other files I searched and found properly, bios is good to go, just want to make sure using a newer version is not going to cause any issues.

**EDIT: Yeap, it works with 1.69.15, see screenshot of my Z170 PRO4S with the i3 8100 coffee lake.

Thanks again for the guide. Very easy to follow! Cheers.

cpuz.jpg