Preliminary Notes:
- Before you start with the BIOS modding procedure, you should have read carefully the “General Preparations for BIOS Modding” (>Link<)
- If you are searching for an easier method to get some Option ROM or EFI modules of an AMI UEFI BIOS updated, you may look into >this< thread.
How to manually extract/replace/insert
AMI UEFI BIOS Modules
(last updated: 01/15/2019)
A. Manual Modding of an AMI Aptio IV BIOS
Unfortunately the currently available UEFi BIOS Updater (UBU) has some limitations:
1. Like the tool name already indicates, the UEFI BIOS Updater can only update an already present LEGACY or EFI BIOS module, but neither extract any BIOS module norinsert an absolute new one into the BIOS.
2. Not all BIOS modules can be updated by the UBU tool.
3. Although the UBU tool offers different well-approved versions of the most popular LEGACY and EFI BIOS modules, it cannot satisfy all the wishes user may have regarding an exotic or brandnew BIOS module version.
That is why I have written this guide.
1. Preparation
This is what you need:
- An appropriate BIOS modding tool named AMI Aptio UEFI MMTool.
Since there are 2 different AMI Aptio platforms (IV for all "old" UEFI BIOS mainboards with an Intel 6/7/8/9-Series or X79 chipset and V for mainboards with a newer Intel chipset from 100-Series up), there are different AMI Aptio UEFI MMTool versions available:- "AMI Aptio IV UEFI MMTool v4.50.0.23" (dated 03/02/2010)
The link to this tool has been removed here upon demand of American Megatrends Inc. (AMI), but you may find it, if you do a Google search for "MMTool Aptio 4.50.0023".
This UEFI MMTool version is recommended for the manual BIOS modding of AMI Aptio IV BIOSes (all AMI UEFI BIOSes up to except from Intel X99 mainboards). - "AMI Aptio V UEFI MMTool v5.0.0.7" (dated 03/14/2014)
The link to this tool has been removed here upon demand of American Megatrends Inc (AMI), but you may find it, if you do a Google search for "MMTool Aptio 5.00.0007".
The MMTool v5.0.0.7 has been primarily been designed for Aptio V platform BIOSes (from X99 and 100-Series Chipset mainboards up). It works with not capsuled Aptio IV BIOSes as well (exception: CPU Microcode updates), but the MMTool v4.50 seems to be the better option for them. - "AMI Aptio V UEFI MMTool v5.2.0.24" (dated 01/18/2018)
The link to this tool has been removed here upon demand of American Megatrends Inc. (AMI), but you may find it, if you do a Google search for "MMTool Aptio 5.02.0024".
This is the currently latest AMI UEFI MMTool version. The original tool is only usable with AMI Aptio V BIOSes, but it exists a "patched" variant of it, which works with nearly all AMI Aptio IV BIOSes as well. Usrs, who want to use this modded variant, should do a Google search for "MMTool Aptio 5.02.0024 Mod".
- "AMI Aptio IV UEFI MMTool v4.50.0.23" (dated 03/02/2010)
- The "clean" (uncompressed) BIOS file you want to modify. If the BIOS has been offered inclusive installer and Flash Utility (as EXE file, it has to be extracted by using an appropriate tool.
Tip: To make the BIOS processing clearly arranged for you, I recommend to create a sepate folder (e.g. D:\BIOS-MOD) and to copy both files (the MMTool and the BIOS) into it. Additionally you may create
- a sub-folder named "desired", where you can store the BIOS modules, which you want to get into the BIOS and
- a currently empty sub-folder named "extracted", where you can put the extracted BIOS modules later on during/after your BIOS processing work.
2. Opening of an AMI Aptio IV UEFI BIOS file
The UEFI type AMI BIOS files can easily be identified by their big size (minimum: 4 MB, usually ca. 8 MB).
This is the way to open an UEFI BIOS file:
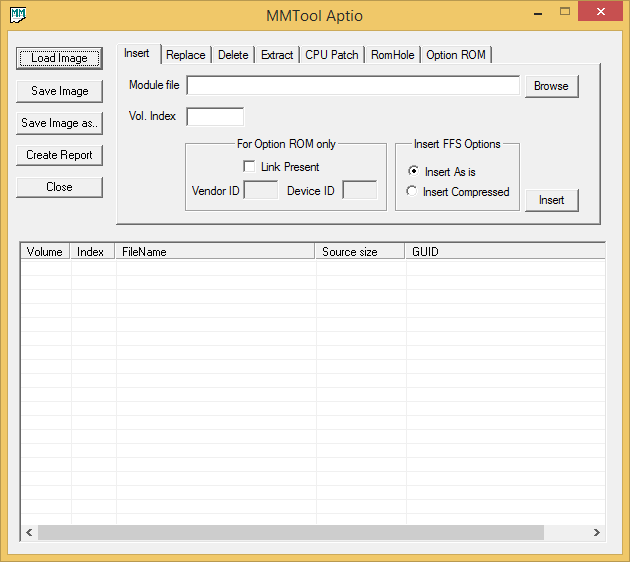
- Run the AMI Aptio UEFI MMTool v4.50.0.23 named MMTool.exe as Administrator.
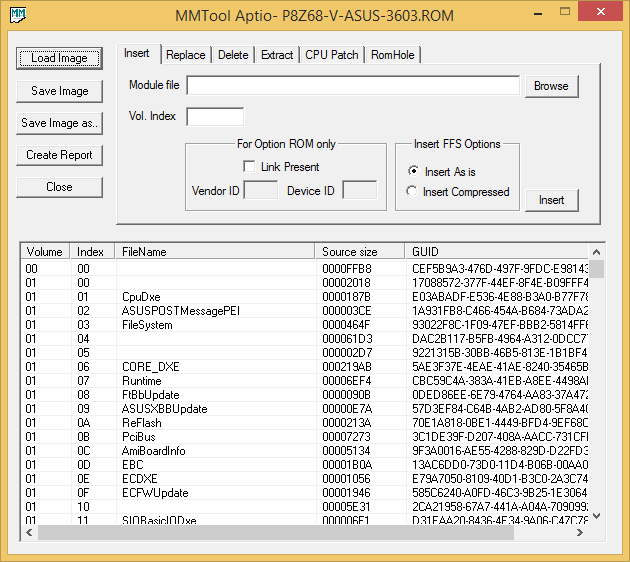
This is the GUI you will see:
- Hit the "Load Image" button, browse to the folder with the AMI UEFI BIOS file you want to open and choose the correct "Files of Type". If your BIOS has neither the extension .ROM nor .CAP, choose the "all files" option. Now you should see the prepared "clean" BIOS file.
- Doubleclick onto the BIOS file.
Now the Aptio MMTool GUI will look like this:
If the Aptio UEFI MMTool should not able to open the AMI BIOS file, it is not an AMI UEFI BIOS. In this case you have to use the AMI MMTool v3.26 and to follow the instructions you will find >here<.
3. Extraction of a BIOS module
Generally notes:
- Very important:
- The extration procedure depends on the sort of the BIOS module you want to get extracted. So-called “Option ROM” modules, which are managing certain on-board Controllers (e.g. Intel RAID or LAN ones) while running in LEGACY mode, need to be extracted, replaced and inserted another way than EFI modules and other (non-Option ROM) BIOS modules. Below you will find the specific guides for both sorts of BIOS modules.
- Contrary to the non-UEFI AMI BIOS the important “Option ROM” modules of the AMI UEFI BIOS files are hidden and cannot be seen by opening the BIOS file. Usually all OROM files are stored within the BIOS file named “CSMCORE” and identified by the listed Vendor- and Device-ID.
- The extraction of a BIOS module doesn’t effect the mainboard BIOS. It will stay untouched by the extraction.
- It is impossible to verify the version of any BIOS module as long as it is part of the BIOS file. So you have to extract it, if you want to know the details about it (vendor, sort, version and supported DeviceID).
This is the procedure how to extract an Option ROM module:
- Run the Aptio MMTool and open the mainboard BIOS file (see above).
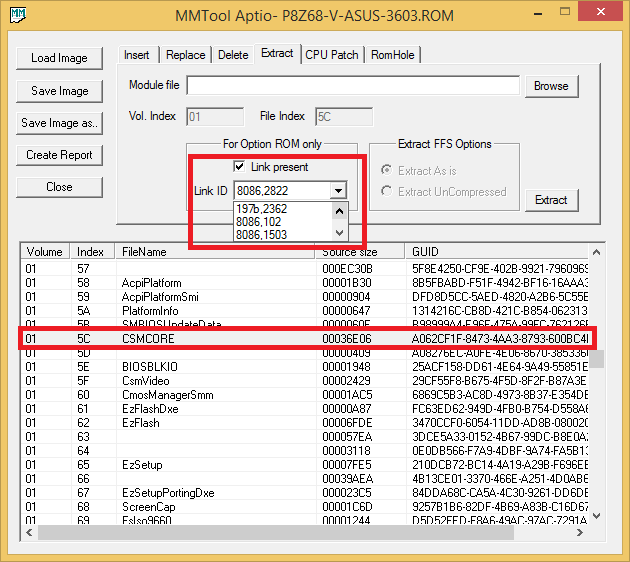
- Hit the “Extract” tab.
- Scroll down within the Aptio MMTool GUI window and search for the FileName “CSMCORE” with the GUID beginning with “A062CF1F-8473-” and highlight the related line. (Note: This step is not really required, but makes clear, where the Option ROM modules are stored.)
- Check the “Link present” option within the “For Option ROM only” section of the MMTool GUI.
Now you should see on the right-hand side of the “Link ID” a drop-down menu with the VendorIDs and DeviceIDs of all Option ROM modules, which are currently within the BIOS:
The first 4 characters (numbers or letters) belong to the VendorID (VEN_XXXX), whereas the second 4 characters (numbers or letters) identifies the DeviceID (DEV_XXXX) of the related on-board Controller (Note: If you see just 3 characters, the first one is “0” and will not be shown by the MMTool).
These are the VendorIDs of the most important Chipset Controller manufacturers:- VEN_8086 = Intel
- VEN_1002 = AMD
- VEN_1B21 resp. 1b21 = ASMedia
- VEN_197B resp. 197b = JMicron
- VEN_1B4B resp. 1b4b = Marvell
- VEN_10DE resp. 10de = NVIDIA
- VEN_10EC resp. 10ec = Realtek
Example (see the last picture):
The ASUS P8Z68-V BIOS contains at least 4 Option ROM modules:- 8086, 2822 = Intel RAID ROM for the device “Intel(R) Desktop/Workstation/Server Express Chipset SATA RAID Controller” (DEV_2822)
- 197b, 2362 = JMicron RAID ROM for the device “JMicron JMB36X Controller” (DEV_2362)
- 8086, 102 = Intel VGA ROM for the device “Intel HD Graphics Family” (DEV_0102)
- 8086, 1503 = Intel LAN ROM for the device “Intel(R) 82579V Gigabit Network Connection” (DEV_1503)
Examples:- The Intel RAID ROM of many Z77 mainboards is shown by the MMTool as “8086, 282a”, although the correct DeviceID of the on-board Intel SATA RAID Controller is DEV_2822.
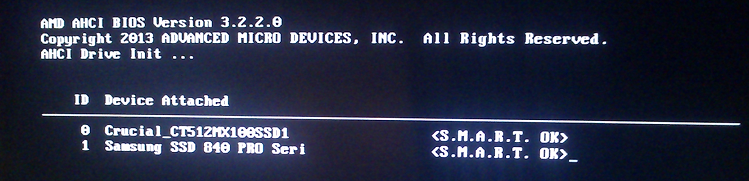
- Some Option ROM modules are listed by the MMTool with the Link ID “1002, 55aa”, although a DeviceID DEV_55aa doesnt exist. It may be an AMD AHCI ROM for DEV_4391. The digits “55aa” don’t mean any DeviceID, but are just the hex codes of the first 2 bytes of the related OROM module.
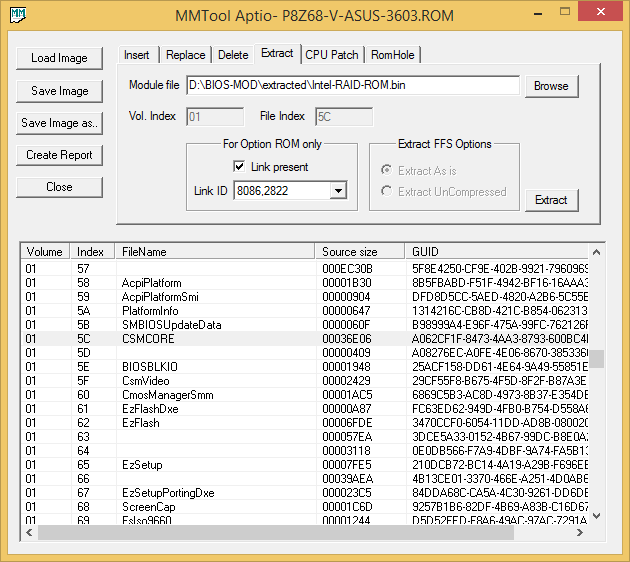
- Hit the “Browse” button and search for the folder, where you want to store the extracted Option ROM BIOS module (e.g. D:\BIOS-MOD\extracted), choose any file name with the suffix .BIN (example: RAID_ROM.BIN) and hit “Store”.
Here is the related screenshot:
- Hit the "Extract" button of the Aptio MMTool.
- Now you will find the extracted Intel RAID ROM module as .BIN file within your test folder (D:\BIOS-MOD\extracted).
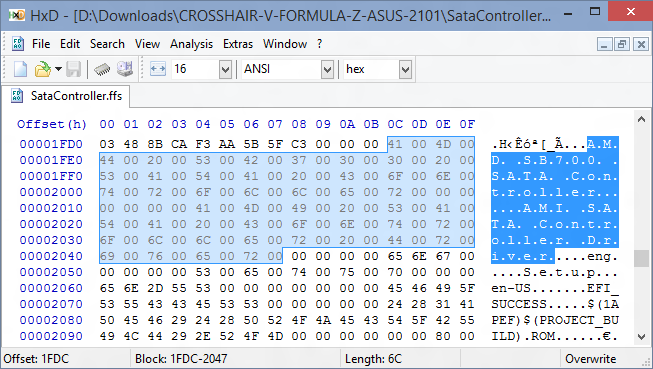
- If you want to know the version of the extracted Option ROM module, you should open it with a Hex Editor. Usually the ROM version is visible within the text code (right-hand side of the Hex Editor GUI).
- Since the "Extraction" procedure doesn't change the BIOS file at all, you can close the MMTool without hitting the "Save Image" button.
Here is a short guide about how to extract an EFI module resp. any other BIOS module (except Option ROM ones):
- Run the Aptio MMTool and open the mainboard BIOS file.
- Hit the "Extract" tab.
- Scroll down within the Aptio MMTool GUI window and search for the module you want to get extracted. Important is the listed "FileName" and maybe additionally the first characters of the listed "GUID".
- Highlight the related line.
- Make sure, that the "Link present" box within the "For Option ROM only" area is unchecked.
- Within the "Extract FFS Options" area choose the option "Extract UnCompressed" (this option will give you later the opportunity to open the extracted file with an Hex Editor and to verify the version and other module details).
- Hit the "Browse" button and search for the folder, where you want to store the extracted module (e.g. D:\BIOS-MOD\extracted), choose any file name with the suffix .FFS (example: RaidDriver.ffs) and hit "Store".
- Hit the "Extract" button of the Aptio MMTool.
- Now you will find the extracted BIOS module as .FFS file within your test folder (e.g. D:\BIOS-MOD\extracted).
- If you want to know the version or other details of the extracted module, you should open it with a Hex Editor. Usually a lot of such informations are visible within the text code (right-hand side of the Hex Editor GUI).
- Since the "Extraction" procedure doesn't change the BIOS file at all, you can close the MMTool without hitting the "Save Image" button.
4. Replacement of a BIOS module
Caution: The manual replacement of an Option ROM module is usually very safe (provided, that the DeviceID is matching), but may be dangerous regarding the Intel VGA ROM (VBIOS) modules. Users, who want to replace any VGA ROM (VBIOS) module, should read >this< guide written by SoniX, before they start their work.
This is the procedure regarding the replacement of an Option ROM module:
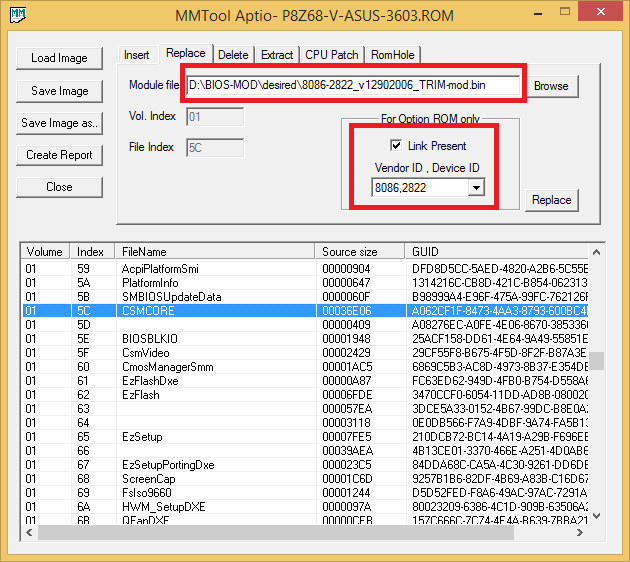
- Open the BIOS file and hit the "Replace" tab of the Aptio MMTool.
- Highlight the line containing the Option ROM module you want to replace (it is usually the line with the CSMCORE file).
- Go to the "For Option ROM only" section, check the "Link Present" option and scroll down to the correct VendorID (8086 = Intel) and DeviceID (Example: 2822 = "Intel(R) Desktop/Workstation/Server Express Chipset SATA RAID Controller") of your on-board RAID Controller.
- Hit the "Browse" button and navigate to the Option ROM module (named xxxx.BIN) you want to get inserted and double-click onto it.
This is what you should see, if your system has an Intel ICH8R, ICH9R, ICH10R, 5-Series or 6-Series chipset and you want to update the related Intel RAID ROM version:
Note:
The “For Option ROM only” section only shows the VendorID and DeviceID of the RAID ROM Modul, which has been inserted by the manufacturer of the original AMI UEFI mainboard BIOS file. So you will get no information regarding the VendorID and DeviceID of the RAID ROM file you are going to insert now by doing the replacement. - Hit the “Replace” button.
- Hit “Save Image” or - if you want to rename the BIOS file - the “Save Image as …” button.
- Wait some seconds, before you close the MMTool.
- After having done all that correctly, you will find the modified BIOS within the folder where the original BIOS file was (e.g. D:\BIOS-MOD) or within the folder you had chosen while saving the modified one. The “modded” BIOS file should have exactly the same size as the original one, but a different date.
- If you should get an “Error in Replacing File” message while trying to replace a RAID ROM module, the mainboard manufacturer may have inserted the related special RAID ROM module twice (by mistake), but with different DeviceID’s.
Solution: Remove one of the identical PCI ROM modules (example: 8086,2822) by using the MMTool “Delete” tab and then retry the replacement of the other one (example: 8086,282a).
Here is a short guide about how to replace an EFI module resp. any other BIOS module (except Option ROM ones):
- Open the BIOS file and hit the “Replace” tab of the Aptio MMTool.
- Make sure, that the “Link present” box within the “For Option ROM only” area is unchecked.
- Scroll down within the Aptio MMTool GUI window and search for the module you want to get replaced. Important is the listed “FileName” and maybe additionally the first characters of the listed “GUID”.
- Highlight the related line.
- Hit the “Browse” button and navigate to the folder, where you have stored the desired unzipped BIOS module file (usually named xyz.FFS).
- Double-click onto the desired file, which shall replace the actually present one.
- Hit the “Replace” button of the Aptio MMTool.
- Hit “Save Image” or - if you want to rename the BIOS file - the “Save Image as …” button.
- Wait some seconds, before you close the MMTool.
- After having done all that correctly, you will find the modified BIOS within the folder where the original BIOS file was (e.g. D:\BIOS-MOD) or within the folder you had chosen while saving the modified one. The “modded” BIOS file should have exactly the same size as the original one, but a different date.
5. Insertion of an originally not present BIOS module
Some mainboards have an on-board AHCI or LAN Controller, but the original BIOS doesn’t contain any suitable OROM module for this device (example: ASMedia 106x AHCI Controller).
Here is the way how to get such missing PCI ROM module inserted into the BIOS:
- Check the VendorID and DeviceID of the Controller, whose OROM you want to insert. You can do it from withn the Device Manager by doing a right click onto the related Controller > “Properties” > “Details” > “Property” > “HardwareIDs”.
- Open the original or already modified BIOS with the AMI Aptio MMTool.
- Hit the “Insert” tab.
- Highlight the line with the CSMCORE file.
- Check the “Link Present” within the “For Option ROM only” section.
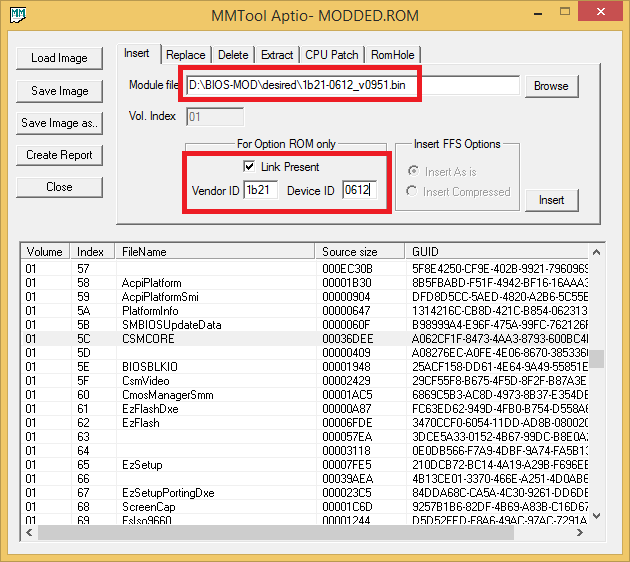
- Enter the VendorID and the DeviceID into the related fields.
- Hit the “Browse” button and navigate to the OROM file you want to insert (e.g. D:\BIOS-MOD\desired\1b21-0612_v951.bin).
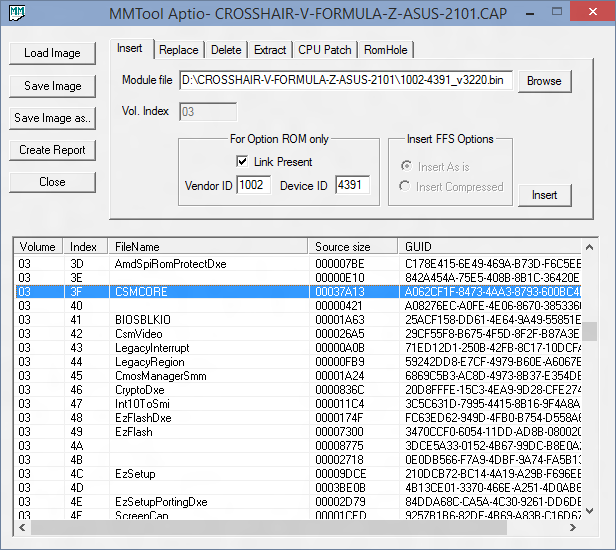
In my example the AMI Aptio MMTool GUI looked like this:
- Hit the "Insert" button.
- Save the modified BIOS file.
And here is a short guide about how to get a missing EFI module inserted into the BIOS:
- Open the BIOS with the AMI Aptio MMTool and hit the "Insert" tab.
- Make sure, that the "Link present" box within the "For Option ROM only" area is unchecked.
- Scroll down within the AMI Aptio GUI window to the line, where the module named "CSMCORE" is listed, and keep in mind the related "Volume" number of it (leftmost column). Usually it is "01".
- Enter the just found "Volume" number of the CSMCORE file (mostly "01") into the "Vol. Index" box (don't enter any "Index" number, just the "Volume" one).
- Hit the "Browse" button and navigate into the folder, where you have stored the desired unzipped BIOS module (usually named xyz.FFS).
- Double-click onto the desired file, which shall replace the actually present one.
- Within the "Insert FFS Options" choose the appropriate option (usually it is "Insert compressed").
- Hit the "Insert" button of the Aptio MMTool.
- Now the freshly inserted module should be listed by the AMI MMTool GUI as last module with the same Volume number as the CSMCORE file.
- Save the modified BIOS file.
- Wait some seconds, before you close the MMTool.
6. Verification of the BIOS modding result
Although it may not really be necessary, it is a good idea especially for BIOS modding beginners to verify the successful modification before they are going to flash the modded BIOS into the mainboard BIOS chip.
The procedure is very simple:
- Run the AMI Aptio UEFI MMTool and open the freshly modded BIOS.
- Extract all BIOS modules, which have been recently put into the BIOS (no matter if done by a replacement or just by an insertion).
- Compare the size and - if similar - the content of the extracted modules with the modules, which are within the "desired" folder.
- If you are still unsure, open the extracted Option ROM files with an Hex Editor like HxD and look for the version number or GUID header. If it is identical to the one you had inserted, everything should be fine.
For users, who want to modify an AMI Aptio V UEFI BIOS, I recommend to use the AMI Aptio MMTool v5.2.0.24 (original or modded variant).
A very good alternative is CodeRush’s UEFI Tool (>LINK<).
By the way: The UEFITool can be used the same way with AMI Aptio IV UEFI BIOSes.
Here is a short guide about how to update/replace a certain EFI BIOS module by using CodeRush’s UEFITool:
(That means, that this guide is not usable for the update/replacement of an Option ROM module. If you want to do that, you should read >this< guide written by sinders.)
- Download the latest version of CodeRush’s UEFITool from >here< and unzip the .zip archive.
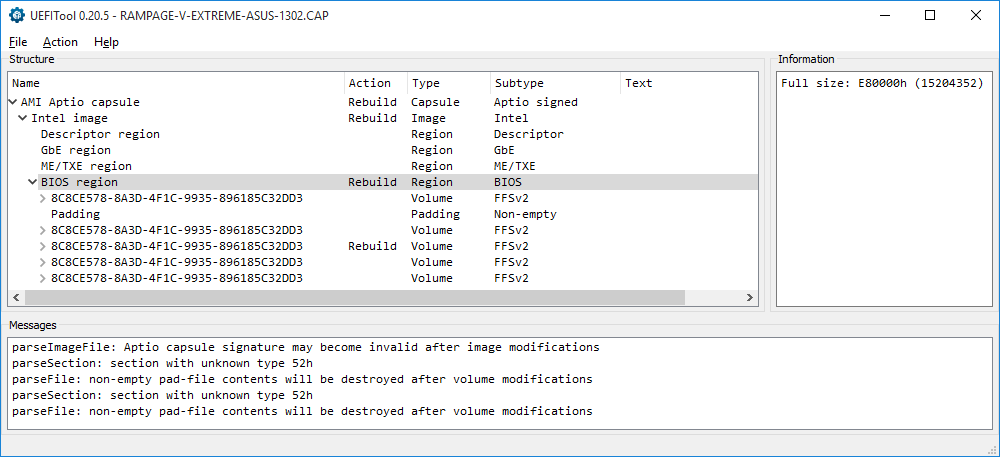
- Run the UEFITool.exe file and open the previously extracted BIOS file you want to modify.
Details: Click onto “File” > “Open Image file…” and navigate to the extracted BIOS file, depending on the extension of the BIOS file you may have to choose the file option "All files ()". - If you do not yet see the folder “BIOS Region”, expand the shown folders until you get it.
Look here:
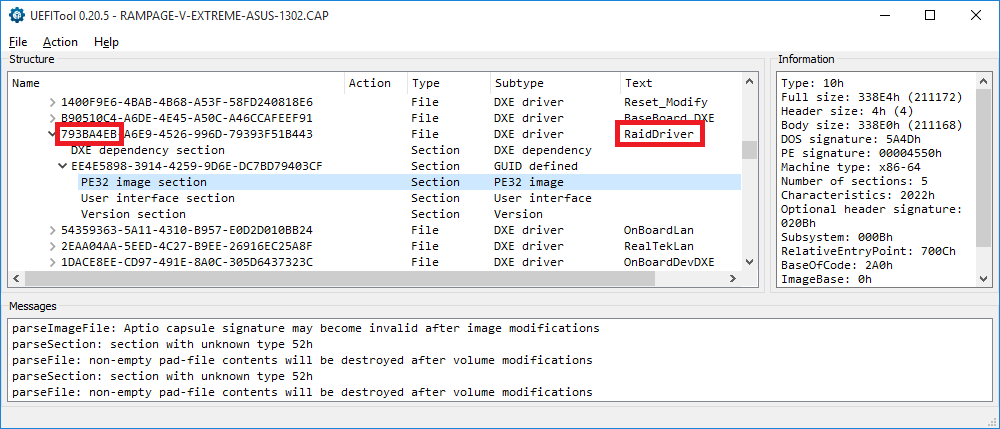
- Expand the folder "BIOS Region" and search for the name resp. the first GUID characters of the module you want to replace (the UEFITool has a very good search feature). Maybe you have to expand the shown GUID mode files incl. their subfolders to see all of them).
- After having found the module with the correct GUID, expand all its subfolders until you see the "PE32 image section" of the related file.
In the case of the Intel RaidDriver module, it may look like this:
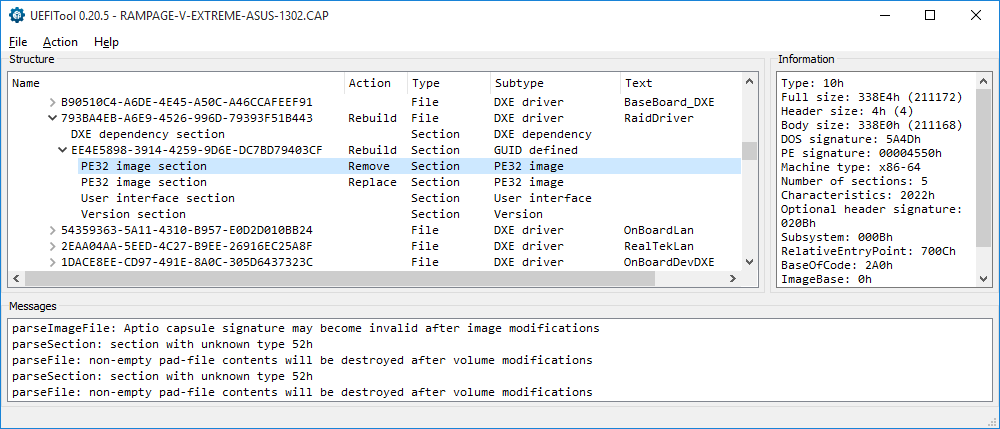
- Right click onto the "PE32 image section".
- Choose the "Replace body..." option of the UEFITool.
- Navigate to the "pure" EFI module (with the extension .efi) you want to get inserted (maybe you have to customize the file model option to "All files...").
- Now the UEFITool will do the replacement.
Here is a picture about what you may see:
- Save the modded BIOS image (clck onto "File" > "Save image file..." and give the modded BIOS a meaningful name).
- Verify the success of your work by opening the BIOS with the appropriate AMI Aptio UEFI MMTool, extracting the just inserted module as "uncompressed" and opening it with an Hex Editor.
It is strongly recommended to follow these advices:
- Before you are going to flash the new BIOS, you should make a complete backup of your entire system and boot partitions or at least of all important data. After having done that, enter the BIOS and list all your special settings. Before you leave the BIOS, choose and save the DEFAULT settings.
- Since the BIOS file name usually is layed down by the mainboard manufacturer within the BIOS itself, the “modded” BIOS file should not be renamed unless the new name is “in the line” with BIOS files, which were previously released by the manufacturer.
- Users with an ASUS or ASRock mainboard should look into the start post of >this< thread before they try to get a modded BIOS flashed. Otherwise they may get a failure message.
- After having flashed the new BIOS, you have to redo your previous BIOS settings.
Safest way (found >here<):
After flash is complete, shut down fully and switch off PSU, wait one minute and clear CMOS. Then turn on, boot to BIOS, load optimized, set the SATA Controller to the appropriate mode (AHCI/RAID) and save/apply/reboot back to the BIOS. Once in the BIOS again recover the previous boot settings (boot device and HDD boot order). If you have updated the Marvell 91xx AHCI/RAID ROM module, set the Marvell Firmware mode to “Force”, then save/apply/reboot and let it load through to windows, before that happens Marvell Firmware will update and board will reboot. - Before you restart with your usual PC work, you should verify the full function of the updated PCI ROM module. If you have inserted a new RAID ROM version into the BIOS, you have to make sure, that the “RAID” mode of the on-board SATA Controller is enabled, and then you should run the RAID Configuration Utility by hitting CTRL+I, F10 or similar (look into your mainboard manual). Everything will be fine, if you can enter and use the RAID Configuration Utility without any problem (Don’t modify anything, if you don’t want it to be changed!).
Advice for users with a non-RAID system:
Users, who are running their SATA Controllers in AHCI or IDE mode, should check the function of the freshly updated RAID ROM module the same way. After having temporarily enabled the “RAID” mode of the on-board SATA Controller they should run the RAID Configuration Utility and look, if everything seems to be fine (but don’t create a RAID array!). Then they can close the Utility and reset the SATA Controller to the usual setting (AHCI/IDE mode). The data of their AHCI/IDE system will not be altered or destroyed by this procedure.
Any feedback is much appreciated. Most important is a short report about the success or failure of flashing the “modded” BIOS into the BIOS chip of your mainboard. Don’t forget to mention the vendor and the name of your mainboard and the sort and version of the flashed PCI ROM module.
Good luck!
Fernando