Edit by Fernando on 08/30/2024:
This Guide is outdated and needs to be completely re-written!
Since I am no longer eligible to handle such tasks, we need someone else who is willing and able to start a new thread about this topic. Please get in touch with one of the Forum Admins!
Where to get the latest UBU tool and its components?
>Here< is the Link to SoniX’s MEGA folder.
Old Guide (not valid anymore!): (open/hide by a click)
@ all users, who are searching for an easy way to get any OROM or EFI module of their AMI UEFI BIOS updated:
It was our member eierfrucht, who gave me in September 2013 the link to >this< very interesting thread at forum.overclockers.ru and to a BIOS modding toolkit named "OROM_Replace", which has been developed by the Russian BIOS modding expert named LS_29. Later on I found out, that LS_29 is just another nick name for our Forum member SoniX. This is very good news for all visitors of this Forum, because they may get answers to their questions by the developer himself.
Since this toolkit is very simple to use and seems to be able to update all interesting LEGACY and UEFI modules of an AMI UEFI BIOS without the need of an advanced BIOS modding knowledge, I decided to present it within this Forum.
Easy AMI UEFI BIOS Modding:
Usage of the “UEFI BIOS Updater” (UBU)
(last updated: 06/30/2020)
Thank-you to the “makers” and the supporters of this toolkit:
The "UEFI BIOS Updater" is a composite work of the following BIOS Gurus and Win-RAID Forum members:
- SoniX, who is doing the main UBU work (he had the idea, writes the script named UBU.bat and bundles the various included tools and modules to an up-to-date BIOS modding toolkit -
if you want to give him a personal donation, you can do it by clicking onto >SoniX’s PayPal link<, - CodeRush, the developer of several BIOS tools (UEFITool, UEFIFind, UEFIExtract etc.), which are components of the UBU toolkit and used by SoniX’s script and
- plutomaniac, the developer of the CPU Microcode Extractor Tool (MCE)
Currently latest UBU Tool platform: UBU v1.79.x
Note:
The exact version/build number of the newest UBU tool and the related changelog has been/will be announced by the UBU maker SoniX himself and can be found within the last page of this thread.
Please post all your UBU related questions, reports and comments at >this< thread!
This thread is reserved just for the guide and the announcements of UBU tool updates.
Important:
- The UBU tool from v1.71 up performs nearly all BIOS modding tasks by itself, that means without the manual addition of any AMI Aptio UEFI MMTool into the UBU folder.
- These are the only tasks, where the addition of an AMI MMTool may be required (UBU will give you a related message):
- replacement of Option ROM modules on Aptio IV BIOSes
- replacement of CPU microcodes on some Aptio IV and Aptio V BIOSes
- The UBU tool has been designed and optimized for the modification of Desktop mainboard BIOSes. According to the feedback we got until now the usage of the tool with Desktop mainboard UEFI BIOSes is very safe.
Nevertheless it is possible, but only recommended for advanced users, to update some modules of a Mobile system BIOS (except the VGA ROM!) by using the UBU tool. For further details please read >this< post written by plutomaniac.
Short description of the UBU toolkit:
This tool is very easy to use and able
- to detect the versions of the OROM/EFI modules, which are inside an AMI UEFI BIOS file and
- to replace
a) the most important OROM/EFI modules (incl. various "Universal TRIM in RAID0 modified" ones) and
b) the CPU MicroCode
of any AMI Aptio UEFI BIOS.
Notes:
- This tool cannot be used, if you want to
- modify any other BIOS type (Award/Phoenix, non-UEFI AMI or Intel mainboard BIOSes) or
- insert a BIOS module, which is not present within the source BIOS file or
- remove a BIOS module.
- Special problem with Intel’s iGPU VGA ROM modules (=VBIOS):
Contrary to the other Option ROM modules there is no "universally" usable Intel VGA ROM module available for systems with an Intel CPU from Sandy/Ivy Bridge up. That is why the mainboard specific VBIOS settings have to be transfered by using a special tool named BMP to the desired Intel VGA ROM module version, before the UBU tool is able to update the VBIOS version (for details see below).
Guide: How to use the "UEFI BIOS Updater" (UBU Tool)
(valid for the UBU tools from v1.79.3 up)
- MMTool v5.0.0.7 as mmtool_a4.exe
- MMTool v5.2.0.2x as mmtool_a5.exe
Info:On demand of the Company AMI the downloadable UBU tool packages do not contain the AMI Aptio UEFI MMTool named MMTool.exe
Tip how to get it: Depending on what you want/need, do a Google search for "MMTool Aptio 5.00.0007" (original older version), "MMTool Aptio 5.02.0024" (original newer version) or "MMTool Aptio 5.02.0024 Mod" (patched new version).
SHA-1 values: The Secure Hash Algorithm 1 (SHA-1) values of the mentioned MMTool variants can be found >here<.
This is just an interim solution until SoniX will present an UBU tool platform, which doesn’t require at all any AMI MMTool. We are sorry about this inconvenience.
(Note: If the UBU tool shouldn’t find a BIOS file within the UBU processing folder, it will give you the opportunity to navigate to it.)
- Info: Since the "best" version of the Intel RAID BIOS modules
a) depends on the related Intel chipset of the mainboard (look >here<) and
b) should match the version of the in-use/desired Intel RAID driver (should belong to the same RST/RSTe development branch, examples: v5.4.x.xxx, v11.2.x.xxxx or v14.8.x.xxxx),
the UBU tool does not automaticly offer any specific Intel RST/RSTe RAID BIOS module. Nevertheless it gives the user the ability to replace the Intel RAID BIOS modules by any desired and available original or modded version, but this needs some preparations done by the user. - This is the easiest way to do it:
- Download the latest version of the 7z-archive beginning with "Intel_RST(e)" from >here< (developer’s MEGA hoster) and unzip it somewhere outside the UBU tool folder.
- Copy the desired Intel RAID ROM/EFI BIOS module(s) into the UBU subfolder Files\Intel<big>RST (for "normal" Intel RAID Controllers) resp. Files\Intel<big>RSTe_VROC (for "Enterprise Edition" RAID Controllers). Don’t put more than 1 RaidOrom.bin and 1 RaidDriver.efi file into the subfolder
- If you want to integrate any Intel RAID module you got from another source, don’t forget to rename the related Intel RAID ROM module (.bin) to "RaidOrom.bin" and the Intel RAID EFI file (.efi) to "RaidDriver.efi".
- The latest Intel GopDriver version may not be the best choice for certain Intel CPUs. That is why the UBU tool (from v1.75.xx up) offers the option to replace the Intel GopDriver by any desired version.
Procedure: Copy the desired uncompressed "pure" Intel GopDriver (as *.efi file) into the UBU subfolder Files\Intel\GOP\Usr_GOP and rename it to "IntelGopDriver.efi".
- Download and install Intel’s utility named "Binary Modification Program" (BMP). You can get the latest version of this tool >here<.
- For this task UBU requires >Python (from v3.7 up)< to be installed first. Download "Windows installer (32-bit)" or "Windows installer (64bit)" depending on your OS x86 or x64 architecture. During setup, make sure to select the "add to PATH" and the "Install Launcher" options. Open a command prompt and run "pip install colorama pltable". You are now ready to update the CPU microcodes via UBU.
- Open the UBU processing folder and execute the file named UBU.bat.
Double-click onto the *.bat file or do a right-click onto it and choose the option "Run as Admin".
Provided, that no BIOS file is present within the UBU folder, the UBU tool will give you the option to navigate to the BIOS file you want to modify.
After having clicked onto it, the UBU tool will copy it into the UBU processing folder, rename it to "bios.bin", open it and analyze the EFI/Option ROM modules, which are currently within it.
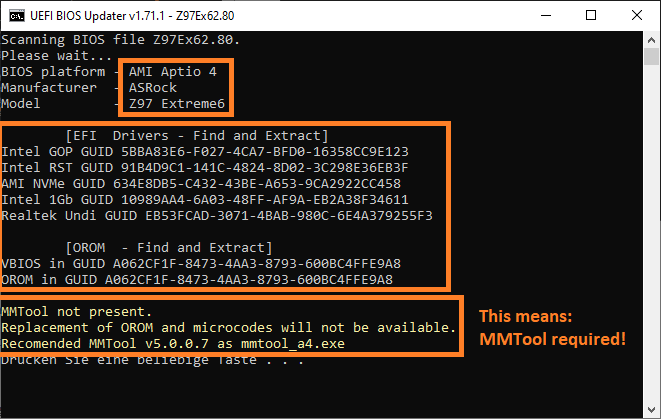
New: The UBU tool will now give you a message, whether you should add a specific AMI MMTool (or maybe even 2 different ones) into the UBU folder or not.
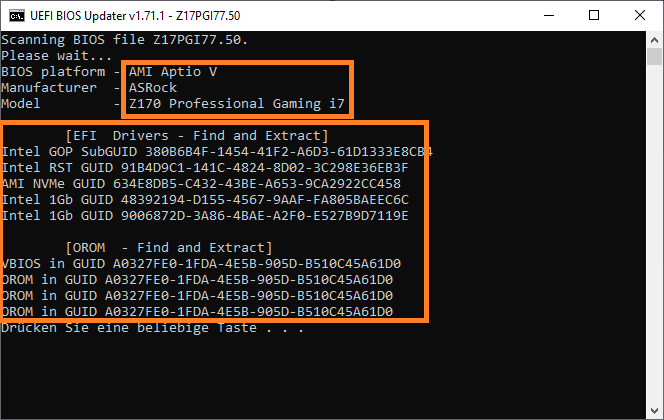
Here are 2 examples (left Pic: Aptio V BIOS 7.50 for my current ASRock Z170 board, right Pic: Aptio IV BIOS 2.80 for my former ASRock Z97 board):
All following pictures were taken while processing the Aptio IV BIOS 2.80 of the Z97 board after having added the mmtool_4a.exe file (to show all possible UBU tasks, incl. those, which require the MMTool).
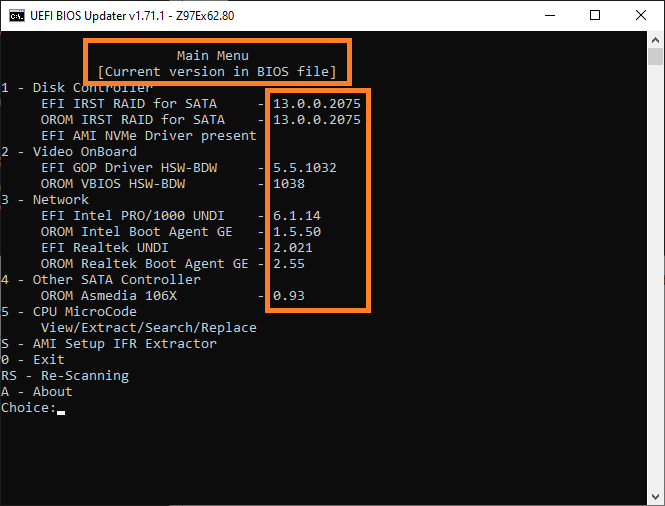
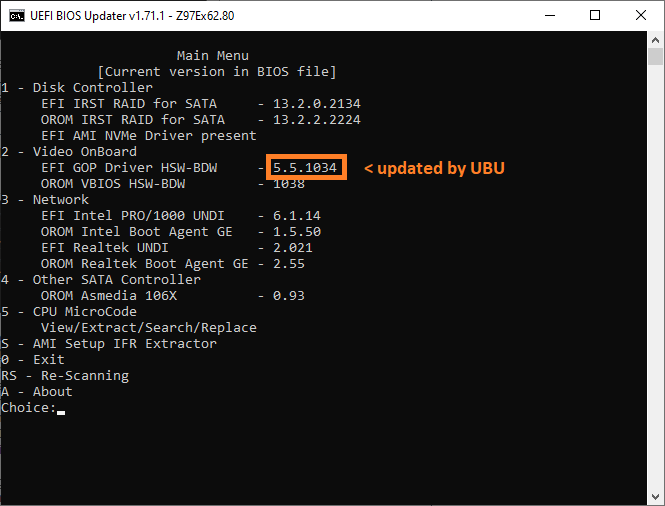
After having pressed any key, you will see the UBU "Main Menu". It shows, which specific modules (incl. its version) are currently detected within the BIOS by the UBU tool.
In my example it looked like this:
According to the Main Menu the UBU Tool gave me the information, that the original BIOS contained- the Intel RAID ROM v13.0.0.2075 and the Intel EFI RaidDriver v13.0.0.2075,
- the Intel Sandy/Ivy Bridge VGA EFI GopDriver module v5.5.1032,
- the Intel LAN ROM v6.1.14 and the Intel LAN EFI UNDI module v1.5.50 and
- the Reatek LAN ROM v2.55 and the Realtek LAN EFI UNDI v2.021
As next step you will get the option to update different OROM, EFI and CPU Microcode modules and to replace them by other versions.
Here are some examples: - a) Update of the "Storage Controller" BIOS modules (here: Intel RAID ROM/EFI RaidDriver:Preliminary Notes:
1. The RAID BIOS modules are only used, when the on-board SATA Controller is running in "RAID" mode.
2. The update will only work, if there are matching RAID modules within the UBU subfolder Files\Intel\RST resp. Files\Intel\RSTe (see Chapter A).
Procedure:
If you want to update the Intel RAID ROM or EFI RaidDriver module, you should type "1" from within the Main Menu and then hit the "Enter" key.
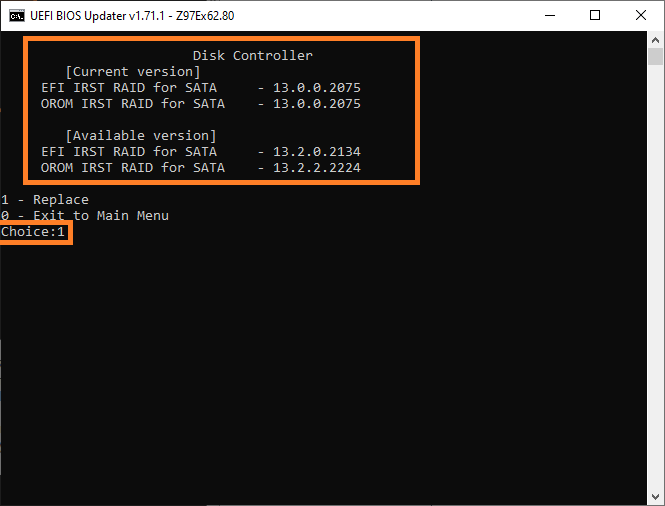
Now you will see a picture like this (example here: ASRock Z97 Extreme6 BIOS):
On top the tool shows the Intel EFI RaidDriver and RAID Option ROM module versions, which are currently within the BIOS.
Below you can see the related Intel RAID EFI/ROM module versions, which are offered by the UBU tool for a replacement (they were previously put by me into the UBU subfolder Files\Intel\RST).
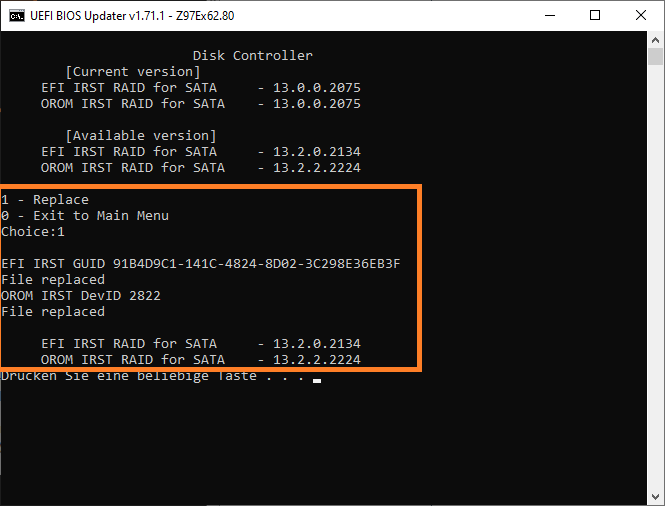
After having entered "1" (= Replace), I got this picture, which shows, that the replacement of the originally present Intel RAID BIOS modules (OROM and EFI "RaidDriver") by the desired ones has been successfully completed:
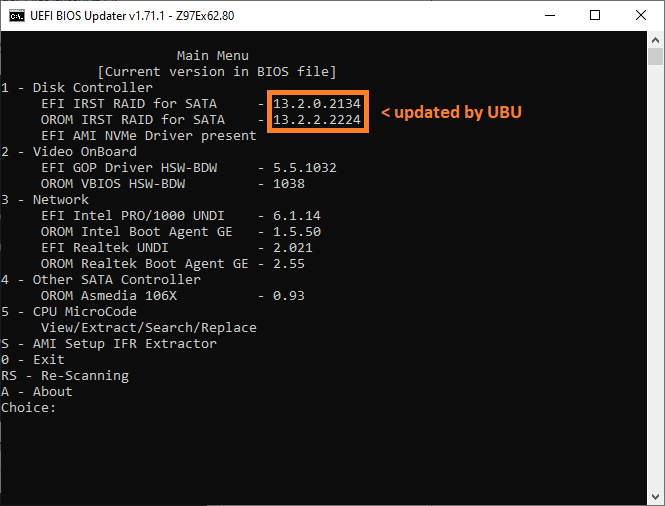
After having pressed any key, you will get the Main Menu picture again, but now showing other Intel RAID module versions.
This is what I got:
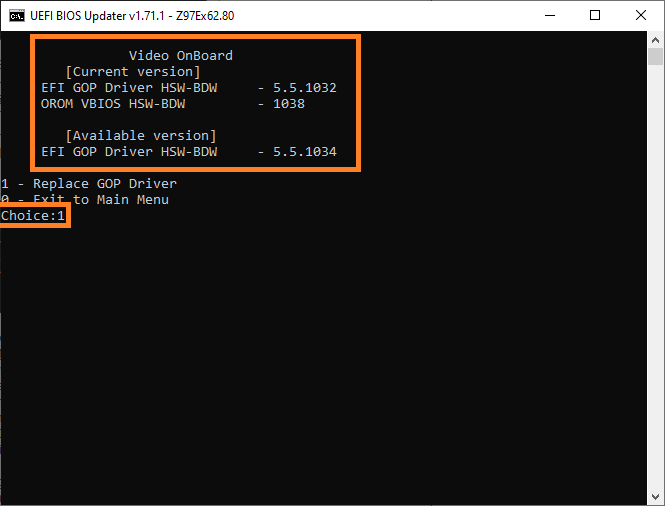
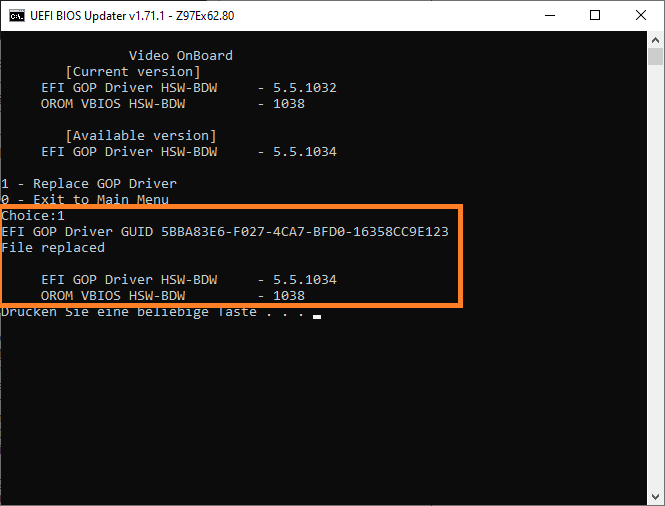
Now you have the option to update another sort of BIOS modules (inclusive the CPU Microcodes). - b) Update of the "Video on-board" BIOS modules (here: Intel Haswell/Broadwell EFI GopDriver): If you want to do that, you should type "2" from within the Main Menu and then hit the "Enter" key.
These are the pictures I got before and after having updated the Intel EFI GopDriver module (you can enlarge each picture by clicking onto it):
In my example the Intel Haswell/Broadwell CPU GopDriver module has been successfully updated to the latest versions.
Remarks regarding the update of the Intel VGA ROM (VBIOS) modules:
Unfortunately there are no Intel VGA ROM (VBIOS) modules available, which are compatible with all existing DeviceID specific iGPU Graphics Controllers. For unknown reasons the mainboard manufacturers insert slightly different VGA ROM modules into their BIOSes with an Intel Chipset from 6-Series up. That is why the UBU tool is not able to update the Intel VGA ROM module the easy way as with other Option ROMs.
Nevertheless the UBU tool can help you to get your Intel VGA ROM updated, but you will additionally need
1.) the newest Intel VGA ROM module for your special Intel CPU architecture (as *.dat files) with associated binary script files (as *.bsf files) and
2.) the tool named "Intel(R) Binary Modification Program" (BMP).
You can download both packages from >here< (SoniX’s hoster).
SoniX has written a detailed guide about how to get the Intel VGA ROM (VBIOS) module safely updated. You can find his instructions >here<. - c) Update of the "Network Adapter" BIOS modules (here: Intel and Realtek LAN ROM/EFI UNDI):Preliminary Note:
The LAN Option ROM resp. EFI UNDI BIOS modules are only used by the PC/Mobile system, if the "Wake-on-LAN" option has been ENABLED within the BIOS. That means, that an update of these BIOS modules has no effect for users, who don’t use the Wake-on-LAN option.
Procedure:
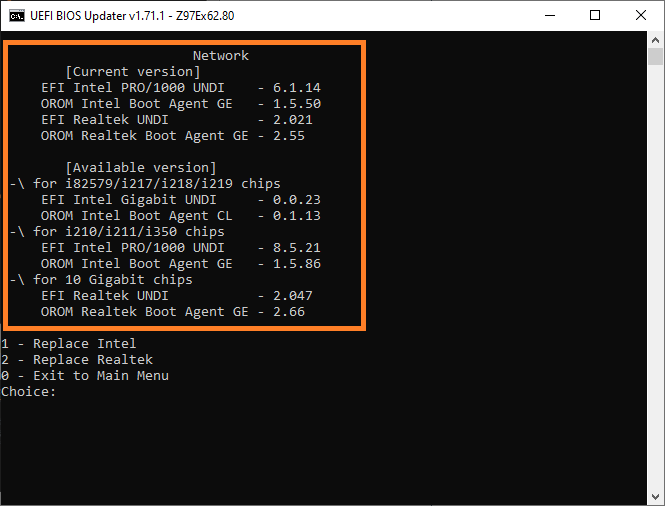
If you want to update the LAN modules of any AMI UEFI BIOS, you should type "3" from within UBU’s Main Menu and then hit the "Enter" key.
This is the picture I got after having chosen this option with my ASRock Z97 Extreme6 BIOS:
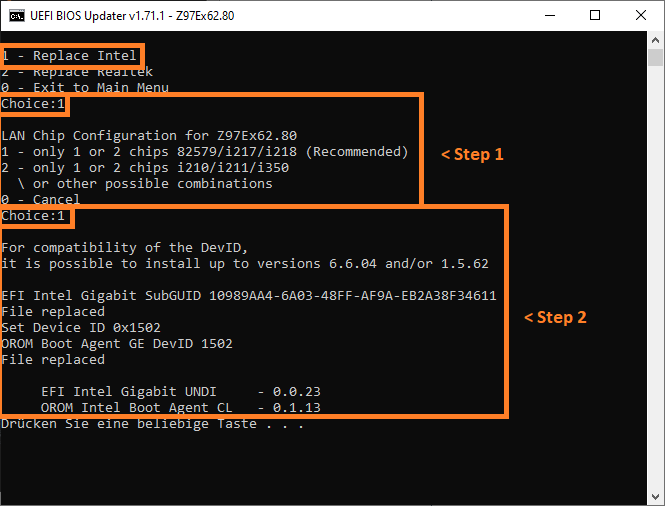
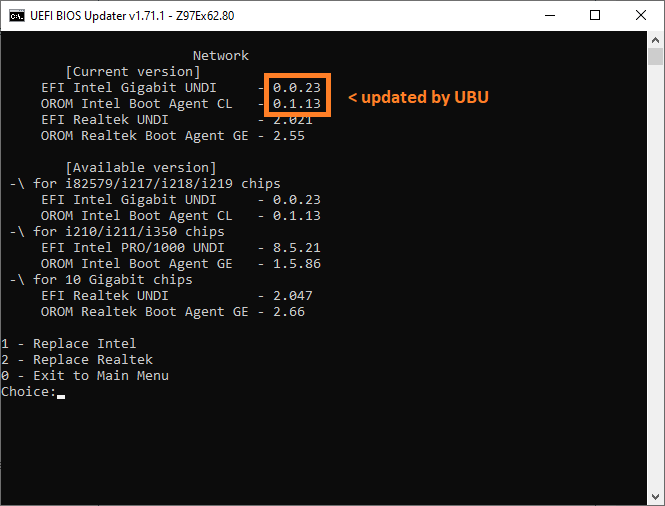
Here are the pictures about how I updated the Intel LAN Option ROM and EFI UNDI modules (left Pic: Update procedue, right Pic: Result):
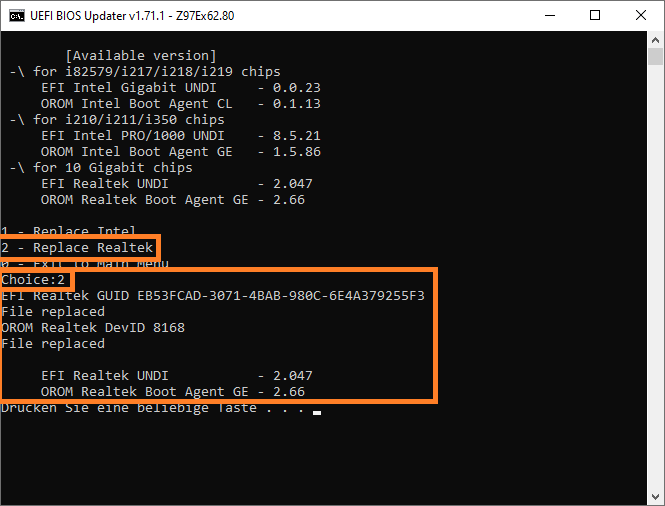
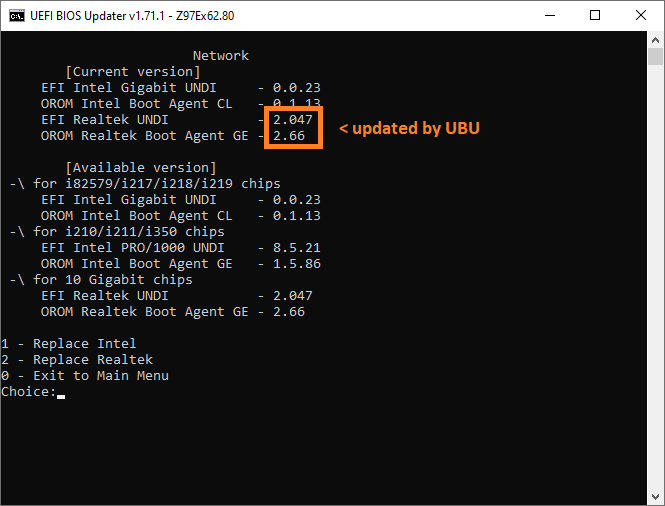
And here you can see how to update the Realtek LAN modules (left Pic: Update procedure, right Pic: Result):
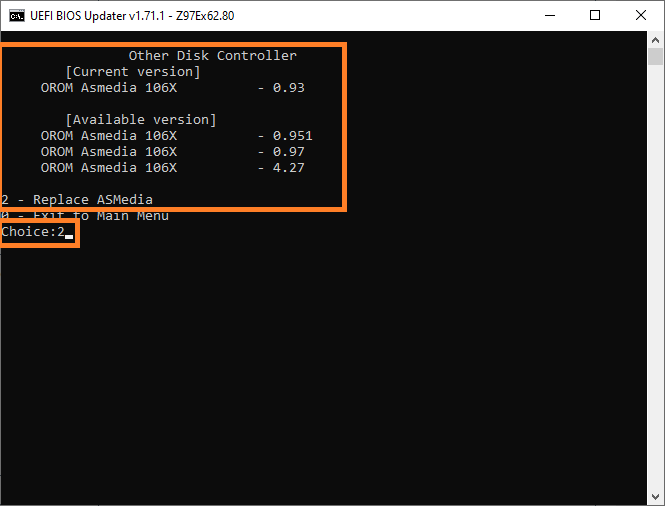
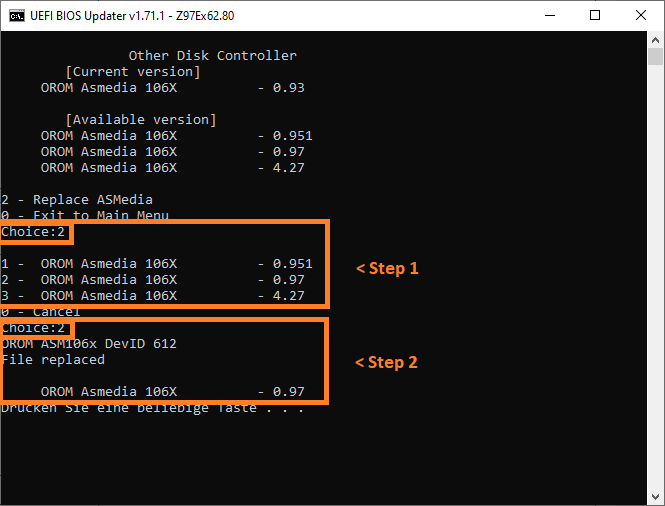
As you can see within the right Pic, all Intel and Realtek LAN modules have been successfully updated by the UBU tool. - d) Update of "Other SATA Controller" BIOS modules (here: ASMedia 106x Option ROM): If there is any BIOS module listed within this section of the UBU Main Menu and you want to update it, you should type "4" and then hit the "Enter" key.
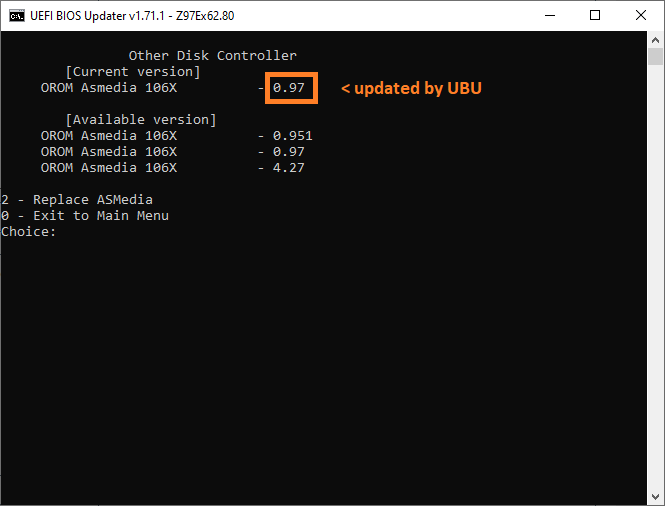
These are the pictures I got before and after having updated the ASMedia 106x Option ROM module:
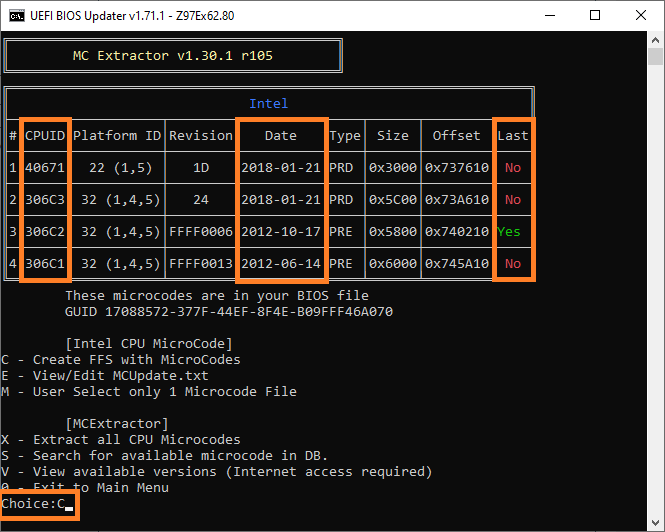
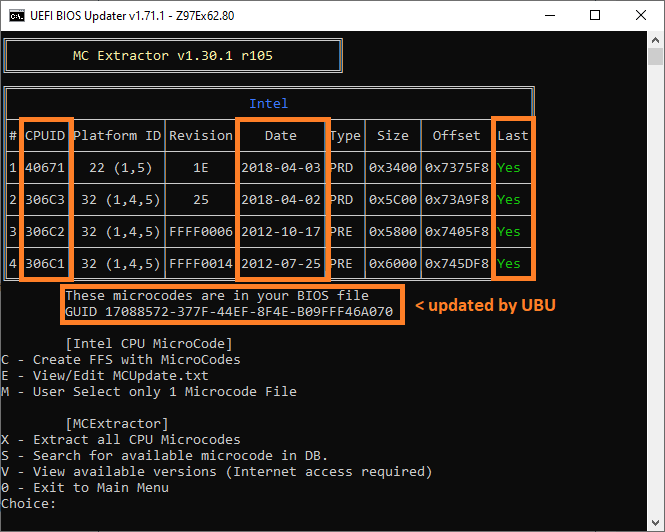
In my example the ASMedia 106x Option ROM module v0.93 has been successfully updated to v0.97. - e) Update of the "CPU MicroCode" modules (here: for Intel CPUs):After having entered the number "5" (CPU MicroCode), you will get a popup window showing the actual CPU Microcode details of the BIOS:
After having entered "C" (creating FFS file with Microcodes), you will get a new window showing a preview of the new CPU MicroCode details (not yet updated).
In my case it looked like this:
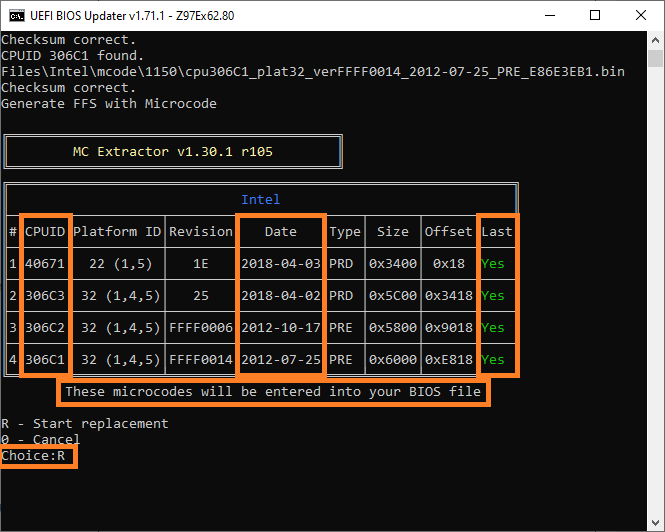
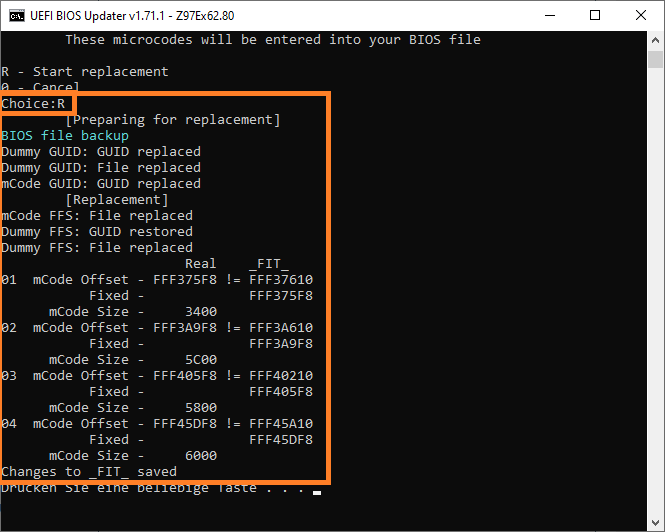
After having chosen the option "R", the CPU Microcode update will be done by the UBU tool.
These are the pictures I got (left Pic: Update procedure, right pic: Result):
By entering "0", you can finally return to the UBU Main Menu. - f) Only for experts: Running the "AMI Setup IFR Extractor" tool: This is what I got after choosing the option "S" from the UBU main menu:
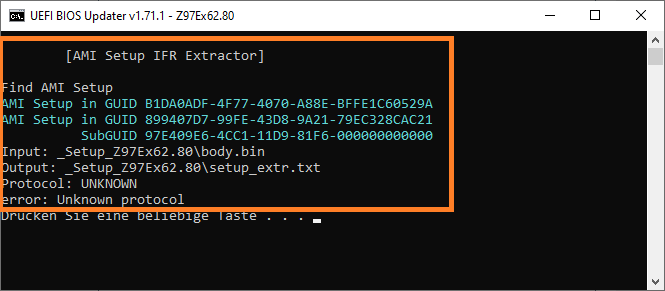
If you want to know more about the IFR Ectractor tool, you may look >here<.
- After having completed all desired (resp. currently available) UBU tasks, you will get the final results of the UBU work.
In my example I got this picture:
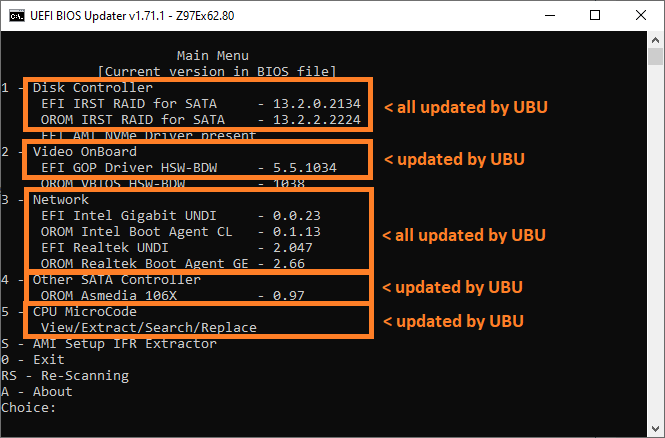
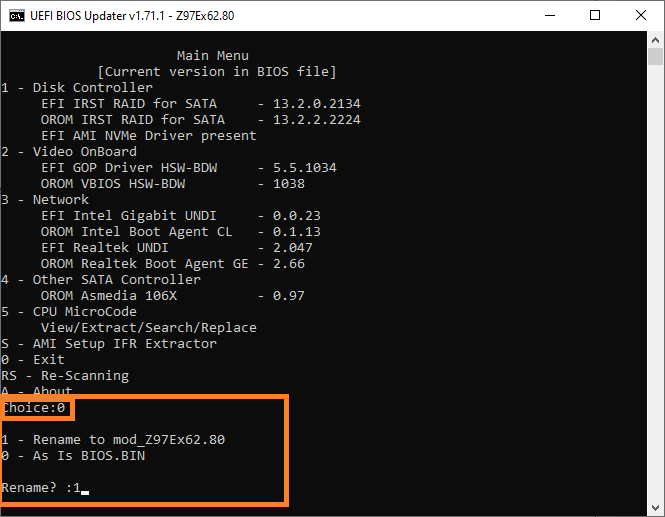
If you want to finish UBU’s work, you should enter the number "0".
After having done that, the tool may offer the option to rename the BIOS file. This additional feature is very useful especially for capsuled ASUS BIOSes with the extension ".CAP". Modified .CAP BIOSes can only be flashed into the mainboard BIOS chip by using the "USB Flashback" feature.
The next picture shows the renaming options I got for my modded ASRock Z97 Extreme6 BIOS:
The last UBU screen shows the credits to people, who helped SoniX to develop his tool. It will disappear after having hit the "Enter" key.
That’s all you have to do! The BIOS file (usual name given by UBU: bios.bin), which is still within the UBU processing folder, has been updated and finally renamed by the UBU Tool according to your demands.
Notes:- The BIOS file may have to be renamed before you are going to flash it into the mainboard BIOS chip.
- You should remove the recently processed BIOS file from the UBU processing folder, before you start a new BIOS module update procedure.
General remarks regarding the usage of the UBU toolkit
- It is not a good idea to use this tool without any knowledge about what your are doing.
That is why I recommend to get some informations, before you are going to modify any BIOS and to flash it into the BIOS chip of any mainboard.
You can get them here:- a) >BIOS Modding: Introduction and Preparations< (the start post should be read completely),
- b) >Guide: AMI UEFI BIOS Modding< (the start post contains a lot of informations) and
- c) >Section "BIOS Modules" of this Forum< (here you can find detailed informations about the modules you want to get updated).
- If you are using this toolkit the first time, you should only update 1 single module (that one, which is the most important for you). This way you can minimize the risk of a BIOS update failure.
- A critical toolkit option is the "Update of the Intel CPU Microcode". According to the developer LS_29 resp. SoniX the special procedure to update the Intel CPU microcode depends on the manufacturer of the mainboard and may be quite different from the procedure, which will be used by the toolkit.
Consequence: This toolkit option should only be used by persons, who know, that it will work for their special mainboard. - Usually the toolkit renames the BIOS file to bios.bin. This way the BIOS shall be prepared for being flashed with the "Flash Toolkit" (=FTK, look >here< and >here<). If the user wants or have to to use another BIOS flash method, it is no problem to rename the BIOS file.
- It is possible to use this toolkit even for the replacement of an original by a modded module (example: "Universally TRIM modified" Intel RAID ROMs).
The modded module should be replaced within the related OROM subfolder of the toolkit before running the UBU.bat. If you want to know the exact procedure, please look into >this< post.
Note: The modded OROM should have the same version as the one, which is within the UBU tool OROM subfolder, and has to be renamed according to the UBU rules (should have exactly the same name as the replaced original OROM module). - An incomplete repository of old UBU versions can be found >here<. You need to use programs which support RAR5 compression. Feel free to contribute other old versions, which are not yet included, by posting at [Discussion] UBU Tool related Questions, Reports and Suggestions.
Attention:
- After having finished the previous work, but before you are going to flash the BIOS, you should verify the BIOS modding success. You can do it either by re-running the UBU tool or by opening the modded BIOS file with the Aptio MMTool, extracting the related modules, checking the version with a Hex Editor and the usability of the updated modules (by checking the DeviceID).
- Users of an ASUS or ASRock mainboard may get an "Integrity Error" message, when they try to flash any modded BIOS. >Here< is a guide about how to circumvent the built-in integrity check.
- Before you are going to flash the BIOS you should carefully read the chapter "Flashing the modded BIOS into the mainboard BIOS chip", which you can find within the start post of >this< thread.
- No warranty
Although I have tested the tool successfully with the actual BIOS 2003 of my ASUS Z77-V, I cannot give you any guarantee, that it will work with other AMI UEFI BIOSes as well. If you should run into problems, I recommend to post them into this thread.
Good luck with this interesting BIOS modding toolkit!
Fernando
