Since SoniX has presented his wonderful UBU tool (look >here<) it has become very easy to modify any UEFI mode mainboard BIOS regarding their included Option ROM and EFI modules. Unfortunately the real risky part of the BIOS modding operation begins, when the user is going to flash the modded BIOS into the BIOS chip of the mainboard.
Although I only have own experience with ASUS and ASRock mainboards, I decided to write this guide about how to get the modded BIOS properly flashed and working without getting an error message. It would be great, if a user of a Gigabyte or MSI mainboard would write a similar guide.
General warnings/advices:
- Warning:
Before you are going to flash any modded BIOS into any mainboard BIOS chip, you have to make sure, that the source BIOS version definitively has been designed exactly for this mainboard type (incl. Revision number)!
Flashing a wrong (not matching) BIOS may cause a bricked BIOS chip and an unusable mainboard. - General advices:
- How to name the BIOS file?
Usually it is a good idea to give the modded BIOS file the exactly same name (incl. extension) as the original BIOS file (there are some exceptions, see below). This can easily be done by the Windows Explorer (right-click onto the modded BIOS file > “Show advanced options” > “Rename”). - Which flash procedure resp. which tool should be used?
The most risky flashing procedure is the one from within a running OS. That is why I recommend to use either a BIOS flash tool from within the UEFI BIOS or a flash tool, which has been put onto a bootable USB Flash Drive with a DOS environment.
A very safe method to get a modded BIOS properly flashed is to use the "normal" BIOS flashing tool the mainboard manufacturer is offering within the BIOS. The problem is, that the tool may detect the alteration of the BIOS and refuses to flash it.
The Company AMI itself offers >here< for their different BIOS platforms (AMIBIOS, Aptio IV and Aptio V) specific BIOS Update Utilities. They are as well available within my OneDrive account (look >here<).
Another tool, which is able to flash a modded BIOS into the BIOS chip of Intel Chipset mainboards is the "Flash Programming Tool (FPT)", which is part of the related Intel (CS)ME System Tools version. You can find the specific Intel CSME System Tools for your mainboard within the chapter C2 of >this< start post. - What can be done, when the "Flash Programming Tool (FPT)" gives an error message due to the BIOS’s WRITE protection?
Our BIOS Gurus SoniX and Lost_N_BIOS have written guides about how to solve this problem by using different methods. These guides can be found >here< (SoniX’s Guide) and >here< (Lost_N_BIOS’s Guide).
- How to name the BIOS file?
with an AMI UEFI BIOS
Flashing an ASUS BIOS file with the extension “.ROM”:
- This BIOS file type is not capsuled and usually not write protected. It is most common for ASUS P67 and Z68 mainboards.
That is why it should be no problem to get an accurately modded BIOS flashed into the BIOS chip by using the ASUS standard tool named “EZ Flash”.
Flashing an ASUS BIOS file with the extension “.CAP”:
- These types of ASUS BIOS files are capsuled and write protected, which makes it impossible to flash a modded .CAP BIOS the usual way.
- Rename the modded BIOS file according to ASUS "USB BIOS Flashback Rules". The ASUS support is offering a tool named "BIOS Renamer for USB BIOS Flashback" for all mainboards, which support the USB Flashback feature. Furthermore the UBU tool offfers the renaming procedure as well.
- Copy the modded and renamed BIOS file onto a small sized, freshly FAT32 formatted USB 2.0 Flash drive and insert it into the special "USB Flashback port" (Note: The USB Flashback mechanism is very picky regarding the used USB Flash Drive. So if the procedure should fail, try another USB stick!).
- Shut down the computer, but don’t power it off.
- Hit the USB BIOS Flashback button. A LED light will start blinking. Press the button for some seconds (LED light should have blinked 3-4 times).
- Wait until the LED light doesn’t blink anymore. This means, that the BIOS has been successfully flashed into the BIOS chip of the mainboard.
- Then all is done. You can power off the computer and remove the USB Flash drive.
- Download the following AMI Aptio IV BIOS Tool:
>AMI AFUWin64 v3.05.04< (can be used while running any 64bit Windows OS)
Note: This AFUWin tool version is dated 11/07/2015 and not offered by AMI anymore, but the latest, which supports the tricky " /GAN" command suffix (see below). This tool does not work with modern mainboards, whose BIOS is an AMI Aptio V one. - Copy the original (untouched) capsuled BIOS file into the same directory as the file AFUWINx64.exe.
- Flash the original BIOS by running the following Command Prompt (as Admin):
afuwinx64.exe <NAME OF THE ORIGINAL BIOS>.CAP
- Remove the capsule header from the modded *.CAP BIOS file and save the modded BIOS as *.ROM file.
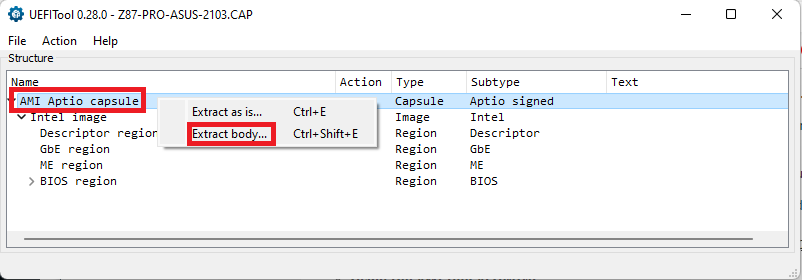
The removal of the capsule header can be done by several BIOS tools. Here is the way how to do it by using the latest UEFITool version (you can get it >here<):- Open the *.CAP file, do a right-click onto the listed "AMI Aptio capsule", choose the option "Extract body…" and save it as *.ROM file. Here is the related screenshot:
Note: Due to the removed capsule header the *.ROM file is a little bit smaller sized than the original *.CAP file. This is normal and nothing to worry about.
- Open the *.CAP file, do a right-click onto the listed "AMI Aptio capsule", choose the option "Extract body…" and save it as *.ROM file. Here is the related screenshot:
- Replace the original *.CAP BIOS file within the AFUWIN64 folder by the modded *.ROM BIOS file.
- Flash the modded BIOS by running the following Command Prompt as Admin:
afuwinx64.exe <NAME OF THE MODDED BIOS>.ROM /GAN - The UEFI BIOS should now be fully re-flashed and updated! Reboot and give it a try!
- Download AI-Suite (when not for Win10 available use Version for 8.1)
- Start Easy Update for BIOS Update in Windows, select ORIGINAL file (then some timeconsuming checking seems to happen)
- Before start flashing delete selected original file and replace with modded one (same name, same location).
- Proceed with bios flash.
There are at least 4 options how to solve this problem:
1. Usage of the ASUS “USB Flashback” feature (easiest option):
- Many ASUS mainboards with an Intel 7- 8- or 9-Series chipset do support this very easy to use feature to get a modded BIOS flashed. These boards have a special "Flashback USB port" and a special "USB Flashback button". For details please look into your mainboard manual or at >this< ASUS site (maybe the Smart Redirect Addon has to be disabled).
Procedure:
2. Usage of an AMI AFUDOS or AFUWIN Tool:
- The first users, who reported about this option, were the Forum users ValkyrieStar (look >here<) and OldGuy (look >here<).
Here is a short guide for users, who are running a 64bit Windows OS:
3. Usage of the ASUS AI Suite:
- Our Forum member Wishbringer reported, that he was able to successfully flash modded *.CAP BIOSes into the BIOS chip of several Intel 7-, 8- and 9-Series Chipset ASUS mainboards by doing the following:
4. Usage of a tool named "Flashrom" or its successor "Flashprog":
- You can find a guide about the usage of the "Flashrom" tool within the Annex part of this post.
Although I have only own experience with the BIOS of my ASRock X570 Pro4 mainboard (having used the Flashrom tool), the method may work with modern ASUS mainboards as well. A list of definitively supported AMD Chipset mainboards can be found >here< at overclock.net Forums.
Guide for ASRock mainboards
with an AMI UEFI BIOS
General information about flashing an ASRock BIOS file:
- The normal procedure to flash an AMI UEFI BIOS into the BIOS chip of an ASRock mainboard is to copy the BIOS onto a FAT32 formatted USB Flash drive, to enter the BIOS, to navigate to the "Tools" section and to choose the "Instant Flash" option. Some BIOSes of older ASRock mainboards can be flashed this way even after having modded it, but all modern ASRock UEFI BIOSes have an internal "Security Flash Check", which may prevent a successful flashing of any modded BIOS (unless the user is able to circumvent the protection).
Note: Unfortunately the “Instant Flash” tool cannot be used at all with modded 32MB sized ASRock BIOSes (see below).
Flashing a modded ASRock UEFI BIOS by using the ASRock BIOS tool “Instant Flash”:
(valid for all 8 or16MB sized ASRock AMI UEFI BIOSes)
- The “Security Flash Check” of ASRock mainboard UEFI BIOSes is located either within the BIOS capsule header (valid for AMI Aptio IV BIOSes) or at a specific place outside of it (valid for all AMI Aptio V BIOSes).
- Download the latest UBU tool (you can get it >here<) and unzip it by using WinRAR v5.xx or 7-zip v20.00.
- Run the UBU.bat, navigate to your modded ASRock BIOS file (should be named as the original one) and double-click onto it.
- After having completed the BIOS scanning by the UBU tool, hit any key and then enter "0" (for Exit) to get access to the UBU Main Menu.
- Provided, that you don't want to get any BIOS module updated, enter "0" (for Exit) again.
- As last step you will be asked by the UBU tool how the BIOS file should be stored.
If you want the ASRock "Security Flash Check" code being removed from the BIOS, you should choose the option "1". - After having hit any key, you will find the modded BIOS, but now without the "Security Flash Check", within the UBU folder.
You can easily verify, whether the UBU tool has removed the "Security Flash Check" or not, by comparing the size of the modded and the original BIOS. If the modded BIOS is a few KB smaller sized than the original one, you can be sure,
a) that the original BIOS contained ASRock's "Security Flash Check" and
b) that the UBU tool found it and was able to removed it (not possible with BIOSes of the newest ASRock mainboards).
Don't worry about the BIOS file size difference. Since the size of the modded BIOS Region is still identical with the original one, the modded BIOS will be successfully flashed despite the size difference of the complete BIOS file. - Flash it from within the BIOS by using the ASRock "Instant Flash" tool.
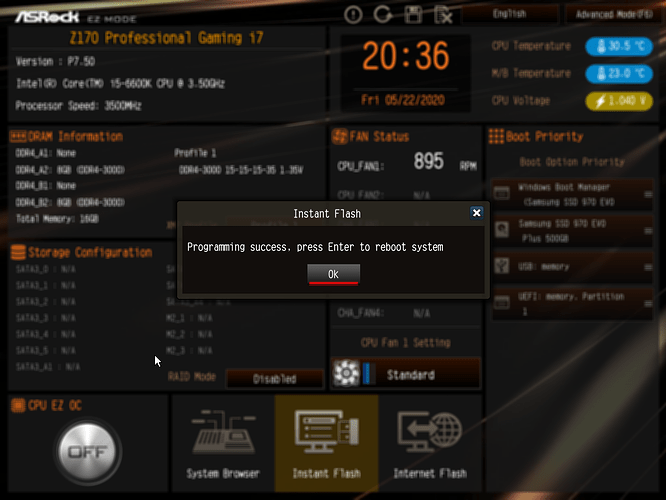
- At the end of the flashing procedure you should get this success message:
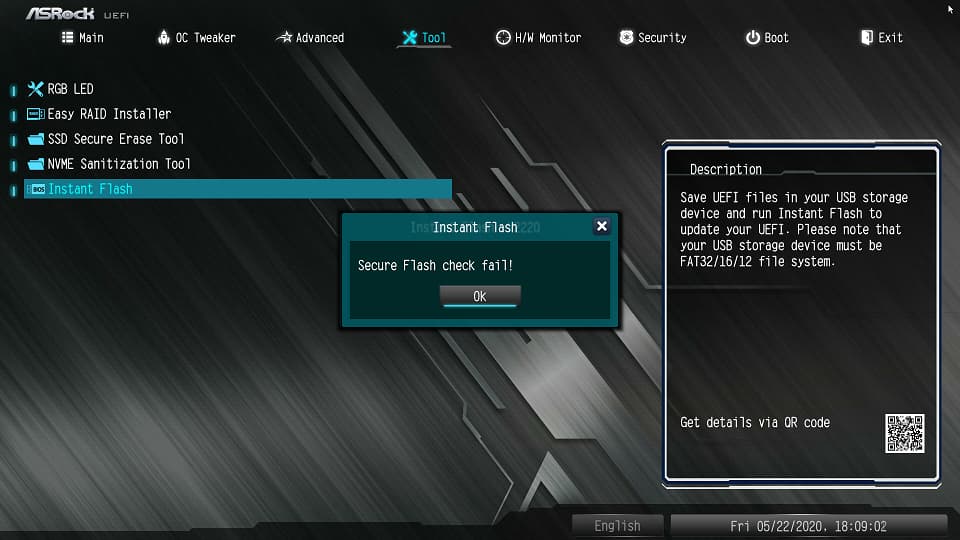
Users of an ASRock mainboard, who are trying to flash a modded, but still protected UEFI BIOS may get an error message like this:
Thanks to
a) our BIOS Guru lordkag, who detected the exact position of the related code of ASRock AMI Aptio V BIOSes, and
b) our UBU maker SoniX, who included the automatic removal of the ASRock security flash check as an additional UBU tool feature,
it is very easy to circumvent ASRock’s BIOS protection and to get a modded ASRock AMI Aptio UEFI BIOS properly flashed.
Solution:
The “Security Flash Check” hex code can be deleted from the ASRock UEFI BIOS without any impact on the integrity or functionality of the BIOS. This can be done either by the user as a separate BIOS modification process or automaticly by the UBU tool (new feature even for a lot of Aptio V BIOSes since UBU v1.50).
Here is a short guide for UBU newbies:
Details: (open/hide by a click)
Flashing a modded ASRock UEFI BIOS by using the BIOS tool named “Flashprog”:
(maybe useful for ASRock mainboards with a 32MB sized AMI AptioV UEFI BIOS)
Once it will be written you can find a guide about the usage of the Flashprog tool within the Annex part of this post.
Guide for Gigabyte mainboards
with an AMI UEFI BIOS
Usually it is no problem to get a modded AMI Aptio BIOS properly flashed into the BIOS chip of a Gigabyte mainboard by using the Q-Flash utility.
Tip: You should give the modded BIOS the exactly same name as the original BIOS (incl. its extension).
If you should get an "Invalid BIOS Image", please have a look into >this< thread. Within the start post you will find lordkag’s brilliant instructions and >here< a step-by-step guide written by rootuser123 about how to circumvent the "Invalid BIOS Image" message and to get a modded Gigabyte Z170 mainboard BIOS properly flashed.
Tip from our Forum member rootuser 123: Users of a newer Gigabyte motherboard with an EFIFlash.exe file in the BIOS zip file can use the modded efiflash, which has been attached >here< by our Forum member Mov AX, 0xDEAD. The related report from rootuser123 can be found >here<.
In case of any problems while trying to flash a modded Gigabyte BIOS please post your help request >here<.
Another option to get a modded Gigabyte BIOS properly flashed is the usage of the EFIFlash v0.80 tool. For details please look into >this< thread.
Guide for MSI mainboards
with an AMI UEFI BIOS
Users of an MSI desktop mainboard can try to flash the modded BIOS by using the MSI standard M-Flash tool (don’t forget to rename it similar to the related original BIOS version!). If you should get an integrity error message, I recommend to follow this short guide kindly written by our experienced Forum member Gregory_Tumanyan:
Alternatively affected users may try either the “Flashrom” tool (see the Annex of this Guide) or to join >here< the MSI Global English Forum for a solution. Thanks to Dogf for the hint.
Guide for Supermicro mainboards
with an AMI UEFI BIOS
You can find a guide written by our Forum member Wishbringer within >this< post. Big thanks to him!
Annex:
How to dump the BIOS Region
and to flash a modded AMI UEFI BIOS
by using a tool like “Flashprog” or “Flashrom”
(valid for mainboards from all manufacturers)
Flashprog (successor of the tool named “Flashrom”) is a utility for identifying, reading, writing, verifying and erasing flash chips. It has been designed to flash BIOS/EFI/coreboot/Firmware/OptionROM images on mainboards, network/graphics/storage controller cards, and various other programmer devices. >Here< is the related Wiki link.
After having successfully tested its predecessor named “Flashtool” with my ASRock X570 Pro4 mainboard, it seems possible for me, that the new Flashprog tool may work with other AMI UEFI mainboards as well.
A big advantage of this tool is the any-time option to reflash the previously working backuped BIOS Region, if anything should not work properly after having flashed an updated or modified BIOS.
Here is a short guide about how to use its predecessor named “Flashtool”:
- Download and unzip the attached package named “Flashrom v1.2 Utilities”, which contains all required tools and files.
- Run any Windows OS, insert a 2-8 GB sized USB Flash Drive, do a quick FAT32 formatting and give the drive a meaningful name like “FLASHROM”.
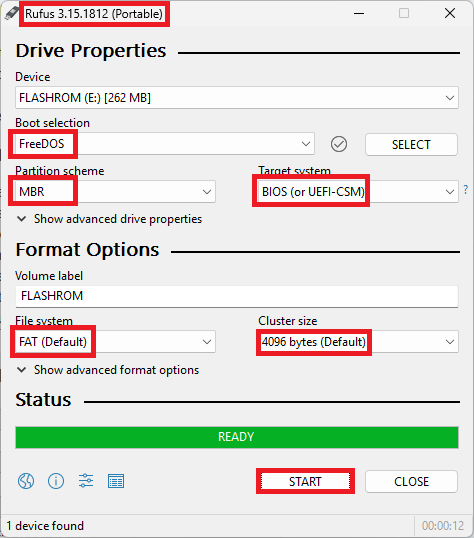
- Create a bootable USB Flash Drive with a FREEDOS image by using the tool Rufus, which is within the “Flashrom Utilities” package.
Here is a screenshot about the most important Rufus settings:
- Copy the Flashrom files named flashrom.exe and CWSDPMI.EXE into the root of the just created bootable USB Flash Drive.
- Boot off the USB Flash Drive in LEGACY mode (CSM should be set within the mainboard BIOS to "ENABLED").
- Once you have access to the DOS image, type
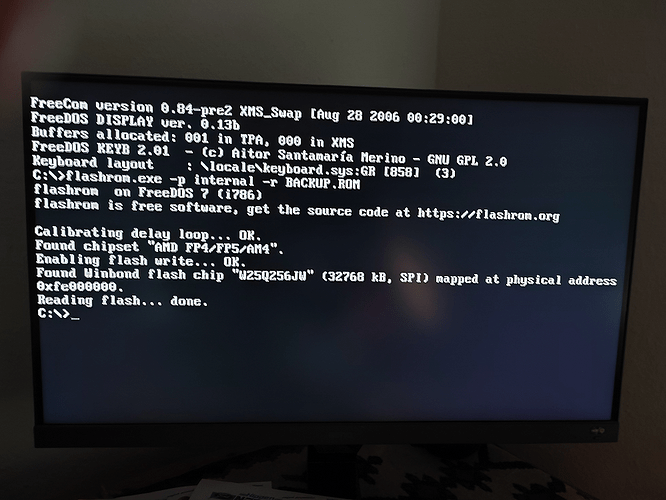
flashrom -p internal -r BACKUP.ROM
and hit the "Enter" key. Wait until the process has been finished.
You hopefully will see something like this on your desktop screen:
- Now you can shut down your PC and remove the USB Flash Drive. Don’t forget to enter the BIOS during the next start of the PC and to restore your desired BOOT order and options.
- The just created file named BACKUP.ROM is a clean complete BIOS Region dump of your mainboard and should be stored outside of your PC to be able to recover the original BIOS Region later on, if something should go wrong at any time.
- Now you should use a copy of the backup.rom file as source for the UBU work updating the desired BIOS modules.
- Once you have finished the desired UBU processing and saved the product as “BACKUP.ROM”, rename it to “MOD.ROM” and copy it onto the already previously used USB Flash Drive.
- Boot off the USB Flash Drive in LEGACY mode again, type
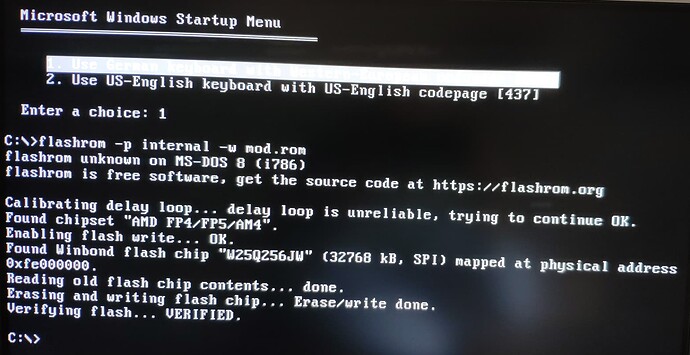
flashrom -p internal -w MOD.ROM
and hit the “Enter” key.
Now wait until the erasing, flashing and verification process has been finished.
Users, who want to get a logfile about what exactly has been checked, detected and done by the tool, should execute the command with the suffix “ -o writelog.txt” (thanks to hancor for the info).
Here is the picture you hopefully will get: - Then you can shut down your PC and remove the USB Flash Drive.
- Start the PC, enter the BIOS, set everything to "DEFAULT" and restore your specific non-DEFAULT BIOS settings.
- After the reboot your mainboard is using the updated BIOS.
Details: (open/hide by a click)
All credits regarding the usage of the Flashrom tool go to its makers, to "The Stilt" at overclock.net and to our Forum member aGeoM for his admirable work to make the related videos and to pursuade me to do the required tests.
Disclaimer:
The BIOS modification itself is not risky at all, but flashing a modded BIOS may end with an unbootable system or even with a bricked mainboard/PC.
Neither the maker of the used BIOS Flashing tool nor the author of this guide will overtake any responsability, if anything should go wrong.
Everything needs to be done by people, who
a) understand, what they are doing, and
b) know, that they alone are responsable for their action.
Good luck!
Dieter (alias Fernando)
Flashrom v1.2 Utilities.rar (1.34 MB)
